Tag: Sony

  • Elinchrom EL-Skyport Plus HS for Sony MFA

    SONY DSC

    This is expanded from the feature which appears in the July/August issue of f2 Cameracraft magazine. We’ve been using the Elinchrom EL-Skyport Plus HS for Sony Multi-Function Accessory shoe since its arrival on May 28th as the first test unit released by Elinchrom. If you wonder why I don’t immediately do a clickbait blog post, it’s because Elinchrom were already concerned by synchronisation/shutter release timing delay issues – being unfamiliar with the very slow AF-AE-shutter cycle of the Sony mirrorless full frame models. My feedback was needed along with others. I can safely say that any practical difficulties encountered with hi-sync (hypersync) using the new Sony Skyport are entirely down to Sony.

    aligraham-djiphantom

    It’s not advisable to work too close to a DJI Phantom drone as the rotor tips whizz by at a touch less than 100 miles an hour. With a 16-35mm CZ zoom used at 16mm to get the low viewpoint it did feel a bit like being buzzed at times but Ali Graham kept it well within the target zone. Click this image to open a full sized 42 megapixel original where you can see the exact extent of 1/8000s blur…

    The idea here was to test, and show off, the 1/8,000s synchronisation with the focal plane shutter of the Sony A7R II which the Elinchrom dedicated high speed sync trigger EL-Skport HS Plus Sony makes possible. It actually makes it effortless, as this studio flash trigger is properly set up to provide the camera with the right signals. It’s the first studio flash wireless trigger ever designed to do this for any Sony or previous Minolta camera across three different generations of flash shoe, and that is important as electronic viewfinders really need a trigger which emulates a native dedicated flash.

    hi-sync-diagram-fb

    The variable pre-sync timing (ODS) of the Skyport HS Plus uses HSS, originally intended for burst mode camera top strobe flash, to fire the studio or location professional flash milliseconds before the usually ‘hey, the shutter is fully open – fire!’ moment we call X-sync. The shutter then opens during the flash illumination, instead of the flash firing during the shutter opening. The white  gap in the diagram above represents the shutter opening. The grey bar to the left against the vertical axis shows the ODS, which can move the start of the shutter opening to a different point on the flash output curve. This is done by changing the shutter release timing not the flash! Think about it – you press the shutter button, and that is the earliest moment anything can happen, either shutter firing or flash firing. Since the flash must be triggered before the shutter opens when using HSS, it is the shutter action which is delayed (it’s very easy to think of this as the flash being fired early!).

    The big selling point for Elinchrom is Hi-Sync. They have even made special slow-burn flash heads for their Quadra ELB battery location kit, which have a T=0.5 flash duration longer than 1/550s compared to as short as 1/5700s with a Type A head. In practice you can fine tune shutter speeds between 1/1000s and 1/8000s to catch a fairly level plateau of high level output (the flash is used on full power for this). But at £199 this trigger, with its full visual display and adjustment of multiple head flash control, is actually worth getting even if you never used Hi-Sync at all.

    The EVF issue

    With a plain hot-shoe trigger, using an adaptor or not,  no Flash Powered On signal is sent to the camera. It will remain in whatever P/A/S/M mode is already set, and if this results in a virtually blacked out EVF or screen because the modelling or ambient light is low it becomes necessary to turn off exposure or effect previewing (Setting Effect On, the normal setting which links the finder brightness to the exposure set). When you fit a dedicated flash, non-HSS modes set the camera to a standard flash sync speed typically between 1/60s and 1/160s and switch the finder to an auto gain mode (Setting Effect Off) without any menu diving required. HSS modes retain the same finder setting but allow any shutter speed down to the shortest 1/8000s time.

    Normally,  any remote trigger or commander fitting the Sony body will do this if it’s part of a wireless remote flash set up using the camera maker’s own battery flash protocols (and a camera-mounted flash like the Nissin i40 can do the same). You can make a crude studio flash trigger using a small dedicated flashgun and masking it with an infra-red filter but it’s not simple as automatic pre-flash sequences or operating delays need to be disabled, though Elinchrom’s current heads can be programmed to allow for pre-flash bursts.

    Pro flash triggers which are not part of the dedicated system won’t turn Setting Effect to OFF, and did not for the earlier locking flash Minolta-Sony shoe of the A77, A55 and other electronic viewfinder SLR-style models. It was apparently just a matter of applying a simple signal voltage across a pair of the contacts when the trigger was switched on – but not a single manufacturer could be bothered to find a solution. Not PocketWizard, not Skyport, nor anything else until the arrival of Phottix, Pixel King and a few other Chinese-made innovative brands which added a PC-X-sync socket to modules mainly intended for camera-top strobe guns.

    SONY DSC

    Now, with the rise in popularity of the Sony A7 series, Elinchrom has invested in a fully dedicated version of their EL-Skyport Plus HS which behaves just as if you had a Sony native flashgun mounted. To do so, they worked with Phottix and Sekonic. There’s no TTL, as the Elinchrom studio and location flash units are all high powered with manually controlled output. For normal use, the Plus HS offers a greater operating range to 290m (instead of 100m), LCD menus, and remote control of the power and modelling settings of all RX heads with the setting displayed on the trigger for the latest generation. Because it switches the EVF camera instantly into a studio-friendly mode and can act as a complete wireless remote control it’s worth the £199 cost for anyone using Elinchrom RX wireless triggered flash with Canon, Nikon and now Sony.

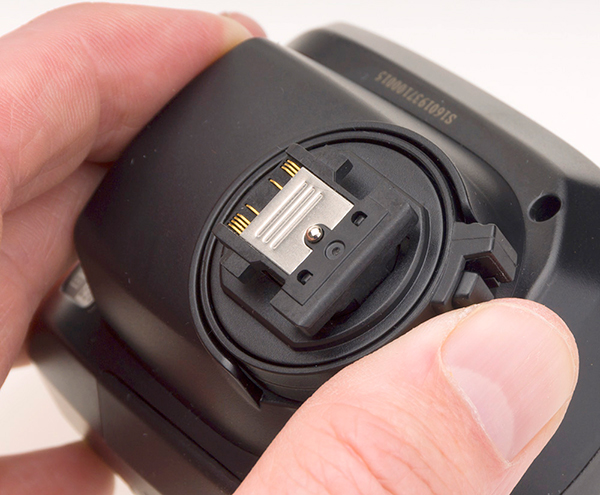
    It is a very well made unit with a near locking shoe function (above). However, it’s also a bit of a monster (below) compared to the tiny original Skyport. That lens, by the way, is a Canon 40mm STM on a Commlite, with a 49mm filter thread adaptor and a Minolta 45mm f/2 lens hood. It’s actually one of the fastest-actuating lenses as its aperture mechanism makes up in speed of operation anything you might lose on AF speed.

    SONY DSC

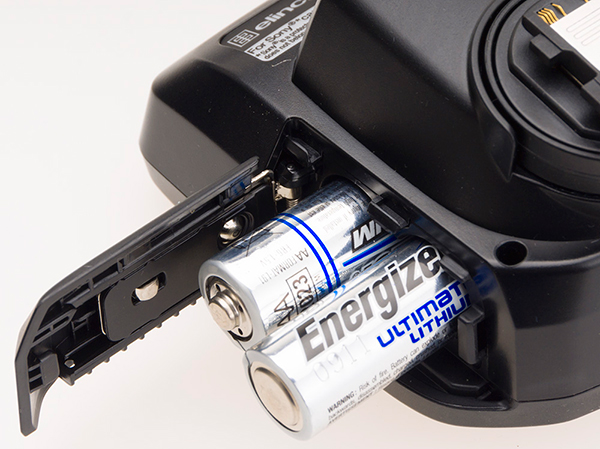
    The size of this trigger is not only used for the informative top LCD display, it also houses two AA cells, which gives it the extra power for the 290m wireless reach and its advanced electronic functions.

    SONY DSC

    So for my money, this new trigger becomes my regular trigger. With any other trigger, I have to remember to change the Setting Effect and White Balance when working in the studio, and of course change it back. Sony, in their wisdom, have excluded Setting Effect on or off from the parameters you can remember in a user setting memory. With my A900 (optical finder) Sony all I had to do in the studio was turn the mode dial to 1 (Memory 1) and my camera was instantly set to ISO 100, Daylight, 1/200s, and f/13 as my startpoints for studio work. With my A99, the missing Setting Effect meant the 1, 2, 3 memory positions did not enable instant set-up or instant return to regular operation and it’s been the same with every SLT or mirrorless yet made by Sony.

    Hi-Sync

    The Hi-Sync feature – ability to emulate Nikon FP, Canon and Sony HSS – is compatible with all Canon DSLRs but not all Nikon, so check before ordering (example – no Hi-Sync with D5500 or D610, but fine with D750 or D300S). It’s also not compatible with all Elinchrom heads. My Ranger Quadra RX AS kit was bought with Type A (short flash duration heads) and my studio BRX500i heads are similar. They gave me high speed flash at normal flash sync speeds (up to 1/250s with most of my cameras) but the short, sharply peaking flash output can’t be used for Hi-Sync. I would need to buy Type S heads for the Quadra kit, or trade in and get the latest ELB 400 with Type HS heads – which is what I tested the unit with successfully before trying all my other flash. The lowest cost Hi-Sync studio head is the budget D-Lite 4 in IT (no remote setting) or RX (full remote) versions. In fact, the 400Ws D-Lite 4RX at under £250 per head, with its 5-stop output range down to 25Ws and constant 1/800s duration, is actually the most compatible of all current Elinchrom heads even though not really intended for intensive professional use.

    Like PocketWizard and other triggers with hypersync, the EL-Skyport Plus HS offers a programmable delay in microsecond intervals from 0 to 5 milliseconds. This can be used with the Elinchrom RX Universal Receiver connected to almost any make of flash head. You then need to experiment with the power setting, as some have long durations at lower power with more even output level and for others a peak is followed by a relatively flat long tail decay at full power. There are some IBGT controlled flash units which cut off the peak and tail leaving a plateau of output. The ODS (delay) and camera shutter speed in HSS mode can be experimented with and you may get lucky.

    However, the two certain ways to get maximum relative power and ease of Hi-Sync use are the ELB 400 with HS heads and the D-Lite 4RX. Mounting the very firm locking hot shoe on my Sony A7RII and switching the trigger on automatically set the camera to Wireless Flash and EVF Setting Effect Off, Auto WB to Flash. In Standard mode on the Plus HS, the shutter speed was set to 1/250s; just turning the Plus HS dial to set HS mode, my faster shutter speed set via the M mode on the camera was instantly restored and access to the full range from 30s to 1/8000s enabled. In fact it was impossible to create a mismatch, other than by entering an extreme ODS delay.

    At all speeds faster than 1/250s, using Hi-Sync, the A7RII should be used with mechanical first shutter curtain. Silent electronic-only shutter mode simply doesn’t fire flash of any kind, and first curtain electronic mode may produce unevenly exposed or partial frames (I’ve since found that such problems really don’t happen often and you can risk using first curtain electronic to help overcome the really laggy shutter timing). Even used correctly, there’s some shading with the ELB 400 at full power, about a stop of fall-off smoothly grading to the bottom of the frame at 1/8000s. Moderating the shutter speed and adjusting the flash power and ODS can fine tune this but I wanted maximum output and my landscape format test shot benefited from the shading. Vertical shots are not as forgiving and the lighting may need feathering to suit. Be careful with some very fast lenses used wide open as these can also produce a shutter/scan related grad filter effect at the fastest shutter speeds.

    To do the drone shot, we wanted to work fast so I did a simple manual adjustment of ISO and aperture in the studio first at the right distance. The main flash (2/3rd power, Outlet A on the Elinchrom ELB pack) had a red gel fitted, and the second head (1/3rd power, Outlet B) had no gel. I placed in the same relative positions I planned to use outside, and used my paper ceiling lantern to check settings.

    exposure-test-indoors-fb

    I then repeated the test on the sky outside without changing the settings, and got pretty much what was expected.

    sky-grey-fb

    So when Ali arrive with the drone at 4.30pm we just brought the portable flash pack and two heads on stands outside, already adjusted, and flew the drone in the right area of the shot working with the 16-35mm f/4 CZ zoom fitted to A7RII. The actual exposure was 1/8000s at f/5.6 and ISO 400, manually set. One small problem is that you can not judge ambient exposure unless you turn the Skyport off… because when it’s switched on, Setting Effect OFF immediately takes over and makes the sky look correctly exposed even when it will not be. I didn’t get this into the magazine report because I knew what was happening and only noticed, a few days later, someone complaining about this problem when using HSS fill-in flash on the Sony A7.

    Such is the latitude of the A7RII raw file that lots of overshooting was not needed. I’m not a machine gun shooter. Even on top corporate assignments I’d often travel thousands of miles and then takes just a dozen frames of a CEO-in-office shot. I used to do whole newspaper features on a single roll of film. Digital has never changed my approach, but being able to check the shots as you take them is a great boon. It meant that with each shot, I could see how the rotor blades were aligned (the drone position was chance – slight buffeting wind kept it dodging around all over my designated shooting space). I could also check the light on Ali’s face and the drone controller. I took just nine frames before getting exactly what I wanted, and Ali was able to leave at 4.45pm.

    drone-shots

    Troubleshooting

    The HSS mode of the Sony A7 series involves a considerable delay between pressing the shutter and getting the shot. There’s no solution to this and as a result I found timing some action shots almost impossible. I had to manage to fire about 1/2-1/4s before the subject reached the required position. Bridal portraits? Fine. Synchro-sun action? Not so!

    It’s not all down the HSS either. In my review of the A99, I found the 1/50s hair-trigger response of the electronic first curtain shutter was negated by a complete AE-AF-stopdown cycle giving the camera a reaction time about the same as any regular DSLR, and a rather long overall 300ms ‘cycle’ in AF-S/continuos sequence mode, extended to 400ms in 14-bit capture AF-S single frame. The A7R was found to have an actual capture delay of up to a third of a second, and in fact the A7RII despite its option for electronic first curtain is not that much better.

    If you want to get the 0.20-22s response time, with the shutter firing a mere 1/50s after you press the button, you will have to disable AF With Shutter and use manual focus or centre back AF on demand. With native Sony lenses, you must also work wide open as the aperture can take 1/15s to close down; with adapted lenses, for example on the Sigma MC-11, this can be 1/8s or more. If you use Auto exposure (A for example with a manual lens) the camera will briefly reset the sensor in a short interruption of live view and if you use A-mount or Canon EF lenses which have an instant aperture closing action, it can allow about 1/15s following this happening to recalibrate.

    I don’t have the time in the world to check all the delays and complexities of A7RII timing, but when HSS flash control is added, it’s as bad as it gets (remember, HSS delays shutter release). So you can press when the subject is approaching the centre of the picture, and the flash will fire when the subject has left… so you pan a bit, and anticipate the way you might have had to do with a focal plane VN Press Camera 70 years ago.

    runner-kelsomay16-delay-fb

    And, if you are lucky, your Hi-Sync daylight and flash will work and your subject will still be in shot!

    Fun day, 'mini olympic' fund raising sports in Scottish town of Kelso. Tractor tyre lift.

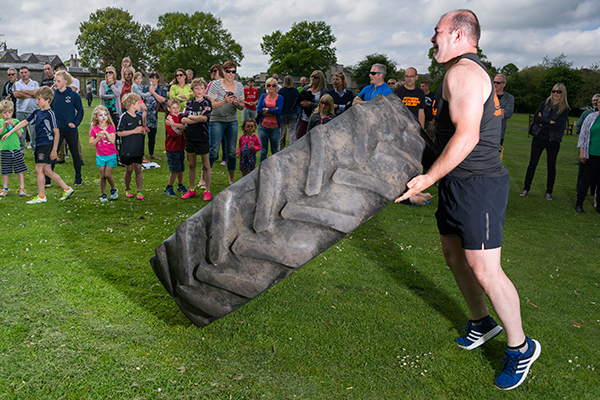
    Even a relatively slow-moving sport like turning the tractor tyre was not easy to frame up and time (no, you don’t wheel it along, this is Scotland – you lift it and turn it over repeatedly to complete the course).

    I continued with experiments with the trigger and my A7 as well as my A7RII, and also using the RX10 (on Speed mode but not HSS). Actually, the RX10 offers about the fastest response and easiest daylight sync up to 1/3200s shutter speed and no need for this or any other hypersync trigger.

    During tests, I found that the A7RII completely locks out HSS mode when you fit a dumb manual lens, with or without the Lens App in use to tell the camera what plain-mount, uncoupled manual lens is fitted. Put a manual lens on, with no electronic aperture control, and it won’t let you select a speed faster than 1/250s even if both flash and camera confirm HSS operation. Perhaps it may do so with some other brand or type of flash. To check, exactly the same set-ups were repeated on the A7 – this body has no such problems. You can use HSS with manual lenses.

    willow-may26-1-1000thf8-fb

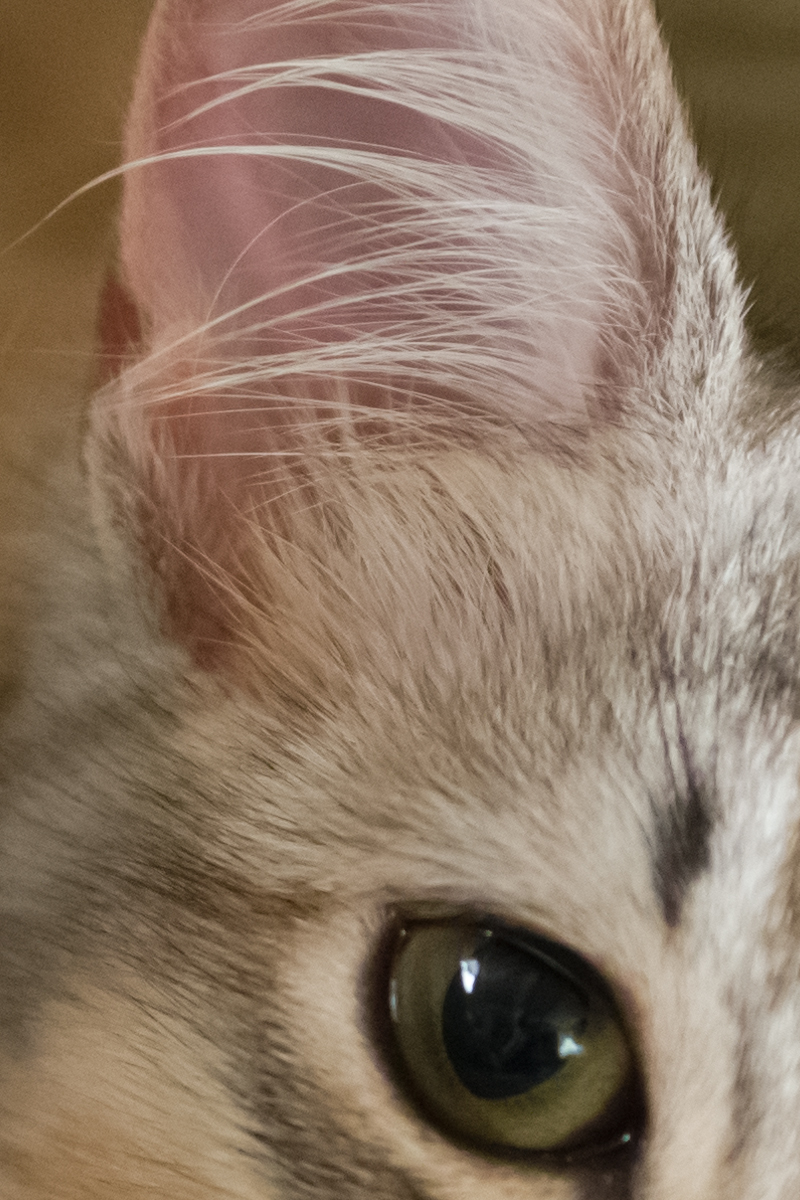
    The 28mm f/2 OSS lens on A7RII proved a good choice above, taken at 1/1000s and f/8, but during my attempts to actually get our kitten in the frame at all this was a rare semi-success. The camera was rarely as fast as the cat.

    The worst scenario proved to be that a shot could actually be captured about two-thirds of a second after your shutter press with the A7RII. This delay must be a concern to Elinchrom and should be a concern to Sony (their own firmware updates to handle the new GM lenses have slowed down the operational cycle, and their HSS defaults to allowing for a pre-flash sequence even when there is no pre-flash involved). Just a point, ADI flash is not an option on mirrorless bodies and does not apply to bounce, wireless or HSS anyway so suggestions that setting his may improve timing are not relevant. The Skyport Plus HS tells the camera it is indirect or off-camera flash, and these always use Pre-Flash TTL. Perhaps Elinchrom can cut some of the lag time out but it’s really down to Sony to provide firmware (or even hardware) which permits much faster real-time shutter actuation. Without this, all the claims for fast AF are pretty meaningless; the best AF in the world can’t allow for the distance travelled by your subject in a third of a second or more.

    Despite this…

    Though this EL-Skyport Plus HS is not like the tiny original Skyport, I want one now just for its proper control of the camera in routine studio work despite not one of my existing Elinchrom units (Quadra Hybrid AS, BX500ri) providing the Hi-Sync function.

    Please also note that Hi-Sync does not work with the new ELC heads (gated fast durations), with Type A or S pack heads, and with pretty much anything except the ELB 400 with HS head/s, and in a surprisingly welcome drop to the lower end of the cost scale, the higher powered entry level D-Lite4RX.

    It’s been a long time coming but this unit is, I think, the sign that Sony has arrived as a professional camera system. – David Kilpatrick

    www.elinchrom.com/skyport.html

  • New firmware for A7RII, A7SII

    Sony has released new firmware 3.20 for the A7RII and 2.10 for A7SII to enable XAVCS video recording on SDHC (rather than the larger XC) cards. The European updater is, as usual, not on line when the US/Americas Sony site has got it all ready to go. They are the same software so it’s safe to use either.

    Though nothing else is mentioned as improved, we note that lens compatibility is an active link in the list of inherited changes.

    The link for A7RII is: https://esupport.sony.com/US/p/model-home.pl?mdl=ILCE7RM2&template_id=1&region_id=1&tab=download#/downloadTab

    and for A7SII:

    https://esupport.sony.com/US/p/model-home.pl?mdl=ILCE7SM2&template_id=1&region_id=1&tab=download#/downloadTab

    European support for A7RII is here: http://www.sony.co.uk/support/en/product/ILCE-7RM2

    and for the A7SII: http://www.sony.co.uk/support/en/product/ILCE-7SM2

  • Sony 28-75mm f/2.8 SAM on mirrorless FF

    SONY DSC

    With the 24-70mm f/2.8 new Sony GM FE lens selling for £1799 (UK) and the A-mount version two 24-70mm f/2.8 for a full £100 more, the cost of a basic mid-range zoom to use with a camera like the A7RII remains very high. There are good arguments to be happy with the 24-70mm f/4 FE zoom, or even the 28-70mm f/3.5-5.6 though that is best limited to use on the A7 (24 megapixel) and A7S (12 megapixel) bodies rather than the A7R (36 megapixel) or A7RII (42 megapixel).

    Of course there are good lens adaptors out there and 24-70mm f/2.8 lenses from Canon, Tamron or Sigma with ultrasonic focus drive in Canon EF mount offer one solution. The original 24-70mm f/2.8 for A-mount with its SSM motor of this type can also be found for a fair price. But there’s one lens which I sold after my A7R arrived, mostly because I was parting company with my full-frame A-mount body survivors. It’s the Tamron-based but Sony revised SAL 28-75mm f/2.8 SAM.

    Although I did have an LA-EA3 adaptor to use SSM and SAM drive A-mount lenses on the E-mount bodies, the 28-75mm didn’t really work very well on the A7R so it remained on my A99 or A900. I made a few tests and saw that it was certainly OK on 36 megapixels, though even on the 24 megapixel A99 where it played nicely with the AF system it had slightly soft corners when used wide open. They were not any softer than the 24-70mm f/2.8 Carl Zeiss of that time and in some ways the lens was better behaved.

    SONY DSC

    The first thing to do was to fix this lens to the LA-EA3 creating an FE lens unit. Imagine the adaptor is just part of the lens (that’s pretty much how Sony makes many lenses for E-mount anyway). The total unit measures up at 115mm long including the adaptor, and 75mm diameter taking 67mm filters. The lens itself weighs only 565g, the combo weighs 683g with adaptor and lens hood. That compares with the new GM lens at 136mm long and 88mm diameter using 82mm filters and weighing 886g. As I already have a 16-35mm f/4 CZ which covers the 24mm requirement well, the 28-75mm range is just as useful to me as 24-70mm.

    While the 28-75mm SAM activates PDAF and multiple AF points, it’s not the full works with tracking and Eye-AF. But it’s also not as noisy as some reviews imply. It’s much quieter than the 85mm f/2.8 SAM, and silent compared to the grinding focus of the 30mm DT SAM macro. Startup is fast, with the lens initialising quicker than FE mount stabilised zooms. The aperture actuation is slicker than with body-drive SAL lenses on the LA-EA4, and quieter. Focus is fast and the only downside is the rotating focus ring which does not support DMF or over-ride on the fly, or auto manual focus magnification. Manual focus requires you to set it on the lens and the body, and whatever you are doing, you need to avoid either turning the focus ring when there is any resistance, or blocking it from turning during AF. It’s a bit vulnerable and the direction of focus is the opposite to normal Sony/Minolta design. The zoom ring which locks at 28mm only operates in the normal direction.

    SONY DSC

    So, what you get with the LA-EA3+28-75mm SAM is basic but fully controlled and communicating, EXIF accurate with profile correctly invoked. It will track with continuous focus and during movies, though slightly noisy for in-camera sound recording; it seems to do so when some SSM lenses, like the 24mm f/2 CZ, don’t play.

    As for optical quality, it’s still a 14-year-old Tamron in disguise, but it can match up to 42 megapixels centrally across its full range. The performance over the APS-C image area is superb, even wide open at all focal lengths, with just a hint of misty aberrations slightly masking a super-sharp result on axis. On full frame, a marked ‘cap shape’ deviation from flat field towards the extremes causes strong softening on flat subjects and landscapes at 28mm and is not entirely removed at longer lengths. You would not want to use this at 50mm and f/2.8 if you had a faster 50mm you could fit and stop down to f/2.8. On real three-dimensional subjects at typical working apertures between f/4 and f/11 it can be extremely sharp. The respectable 38cm close focus and 0.22X subject scale (not as good as the new Sony GM 24-70mm) reveal microscopic detail on the A7RII at f/5.6. The shot below is at the closest AF on the large water drop in the centre, at 75mm and f/5.6 – you can see the bokeh is very acceptable, not complex or ‘nervous’ which it tends to be when used wide open for more distant subjects with a slightly defocused background.

    28-75mm@f5p6-75minfoc

    A 100% crop from th A7RII file (converted from raw ISO 500 14-bit, without any sharpening for web and with minimal NR) gives an idea how good this lens is and also just how little depth of field you’re ever going to see from a 42 megapixel full frame image used this way!

    28-75mm@75-f5p6minfoc

    It would hardly be worth buying an LA-EA3 and a new 28-75mm just to save about £1000 over the GM 24-70mm. If you already own an LA-EA3 and you can find a cut price or good used 28-75mm go for it. The way its aperture works means you’ll get very fast low light focus and minimal shutter lag (but you do need a mark II A7 series body to get the best functioning).

    The zoom action is a real pleasure to use, very light but positive, and the overall build and feel of the lens will not disappoint. It also seems to get just the right response from the in-body stabilisation of the A7RII. Sure, 67mm filters may be smaller than many midrange zooms require, but I will either have to use a stepping ring or get a couple of new filters – not cheap, for the quality needed to maintain the lens performance. Also, it’s not weatherproofed.

    Here’s a quick set of three hand held (with SSI) comparisons at 28mm – f/2.8, f/5.6 and f/9. I’ve loaded these up at full size so they should open the original Level 10 sRGB JPEG when clicked. The focus in on the foreground railing spike and the fine spider web gives the best idea of how the resolution and contrast of the lens improve from wide open. It’s clearly resolved at f/2.8 but with a gentle ‘glow’ at pixel level. First image – f/2.8.

    28-75mm28wideopen

    Second image – f/5.6. If you download all three images and load them into Photoshop, it’s interesting to switch between tabs and see the depth of field change.

    28-75mm28at5p6

    The third image is at f/9 and here the ISO is high at 2000. The A7RII can produce great results up to 3200 but I might not choose to have this at 2000. Even so, the sharpness can be judged without problems as the noise doesn’t have much effect on fine detail with current Sony sensors and processing. It always shows more in defocused, smooth areas.

    28-75mm28atf9

    Because I use other lenses – such as the 24-105mm f/3.5-4.5 Sony and 50mm f/2.8 Macro Sony on LA-EA4, 40mm f/2.8 Canon STM, Sony FE 28mm f/2, 16-35mm CZ f/4 and also the unrivalled 24-240mm FE zoom I have many choices overlapping the range of this lens. I remember that for landscape work on the A900 it was hard to beat. Here’s one of my images from that combination, using a 6 second exposure at 40mm focal length, f/8 and ISO 100 with a variable ND filter. With the restrictions on tripod position given by the location, the zoom range of 28-75mm proved just right for a range of studies.

    Roughting Linn, Northumberland - the waterfall.

    With this lens arriving during a period (for my corner of the UK) of sustained white skies and drizzling rain, it’s not been out and about much. One thing it has done is to focus very well in dim room lighting on my sofa companions –

    55mm-2p8-iso3200

    And, for those who don’t think f/4 is wide enough and desperately want 55mm f/1.8 or f/0.95 lenses, this is at 55mm f/2.8 and of course when the iris of the eye is sharp the fur around it is not and Willow’s nose is blurred. Once again, despite correction for tungsten light at the extreme limit of Adobe Camera Raw, and using ISO 3200, it’s pretty amazing what the A7RII can do seen at 100% (below).

    3200-iso-f2p8-55mm-100pc

    But this super-shallow depth of field is what happens at 42 megapixels. Depth of field used to be worked out based on a 10 x 8″ print held in your hand, not a 6 x 4ft image viewed through the ‘window’ of a screen. Of course for social media you do indeed need very wide apertures because when your pictures are mostly viewed on smartphones, it’s like looking at a contact print from a Vest Pocket Kodak…

    To support Photoclubalpha, subscribe to f2 Cameracraft (it’s probably the only photo mag edited by two long-standing Sony system users, myself and Gary Friedman).

    – David Kilpatrick

    You can find deals for the Sony SAL 28-75mm f/2.8 SAM A-mount lens at B&H Photographic, Wex Photographic for the UK, or Amazon Sony SAL2875 Alpha 28-75mm F2.8 Standard Zoom Lens

  • Bad science and dissing the Sony A7 FE concept

    No doubt everyone’s seen the article on Petapixel which can best be described as successful clickbait – by Sator, essentially claiming that the whole idea of mirrorless full frame is flawed. Well, the good news is that this article is more flawed than the flaws it’s claiming to point out.

    First of, let’s simply dismiss the groundless myth that a shorter mount to focal plane register (body thickness) cause any problems with lens design. It simply doesn’t. Nor does an empty space without any body at all. The only aspect of register which can ever cause problems is additional body thickness, as found on single-lens reflex (SLR and DSLR) designs. In the early days of SLRs, it caused so much trouble for the design of very wide-angle lenses that SLR mirrors had to be locked ‘up’ and a lens fitted with a rear assembly almost touching the shutter, sticking right back into the darkchamber.

    The quote from Zeiss in the article about the ‘short flange distance’ being an engineering challenge for wide-angle lenses may well be a result of mistranslation as it’s hard to imagine any Zeiss engineer actually saying that and meaning it. This is the company which effectively built the Hasselblad SWC, not to mention the aerial and stereoscopic models based on the 38mm f/4.5 Biogon. And they made the Hologon camera. Flange distance? What flange distance?

    Take a look at the optical design of one of the best Zeiss/Sony collaborations, the RX1 series with its 35mm fixed f/2 lens, and you’ll see that Tatsuo Kureishi, Sony product planner, was probably right to say this: “We eventually realised that only a camera with a non-interchangeable lens could significantly increase image quality, since it would allow us to optimise performance between the lens and image sensor.” And what did he mean? That by not even having a focal plane shutter, by having an even slimmer body than the E-mount, a lens which almost touched the sensor, they could engineer something better. And they could align it to perfection. The ghosted product view below says it all. As far as I have been able to work out, the actual body register of the RX1 would be around 12mm, or like the FE mount’s 18mm but with the lens sticking into the body even more than the 5mm depth of the E-mount bayonet.

    Now if there’s any reason the A7 series can’t have the same 35mm f/2 as the RX1, it’s down to the shutter assembly and the filter/coverglass pack of the sensors used in A7 bodies. But it’s not to do with the mount, and as this lens proves perfectly, claims that you ‘can not get lens performance without size and weight’ are also made on a weak foundation.

    Now the throat diameter can indeed cause problems. Sator quotes a set of throat diameters:

    Minolta/Sony A: 49.7mm
    Sony E: 46.1mm
    Fuji X: 44mm
    Canon EF: 54mm
    Pentax K: 44mm
    Nikon F: 44mm

    However, all these are meaningless without reference to the register. Back on 2012, in Issue No 1 of Cameracraft (the quarterly I produced with the co-editing help of Gary Friedman for three years) I printed the register distances then applicable to a range of new and legacy systems:

    Pentax Q: 9.2mm    Nikon 1: 12.29mm     C-mount: 17.52mm     Fujifilm X-Pro: 17.7mm
    Canon EF-M: 18mm     Sony NEX: 18mm      MicroFourThirds: 19.25mm      Samsung NX: 25.50mm
    Pentax 110: 27mm     Leica M: 27.8mm     Robot: 28.1mm     M39 Leica Screw: 28.8mm
    Contax G: 29mm     Olympus Pen F: 28.95mm     Contax/Kiev: 34.85mm     FourThirds: 38.67mm
    Konica AutoReflex: 40.7mm     Miranda: 41.5mm     Canon FL/FD: 42mm     Minolta SR/MD: 43.5mm
    Canon EF: 44mm     Praktica B: 44.4mm     Minolta/Alpha: 44.5mm     Rollei SL35: 44.6mm
    Pentax K: 45.46mm     M39 Zenith Screw: 45.46mm     M42 Pentax Screw: 45.46mm
    Contax/Yashica: 45.5mm     Olympus OM: 46mm     Nikon F: 46.5mm     Leica R: 47mm

    A 46.1mm throat placed 18mm from a 43mm diagonal image sensor clearly isn’t ideal, but it’s for ever better than Fuji’s 44mm throat at the same 18mm. Or is it? Measure the actual mount, and the 46.1mm turns out to be a generous figure including the bayonet recesses. The real circular size is only 43mm and the internal diameter once any mount is fitted is only 42mm. The electronic contact array removes a further 4mm but fortunately not in a bad place. On the Fuji X mount, the contacts are placed to prevent any real chance of a full frame body (the same applies to Canon’s EF-M mount).

    sonyjune1526

    Sony got in by the skin of their teeth, and it is this mount diameter which actually starts to impose design contraints on lenses and makes some of them larger. A good example is the 85mm f/1.4 GM. That, in its purest form, would be a lens normally positioned >85mm from the sensor with an aperture diameter 0f 60mm. However, many of image-forming rays from this would be obstructed by the E-mount. A complex telephoto construction is therefore needed which reduces the virtual size of the lens aperture as seen from the focal plane and simultaneously moves its apparent location closer (placing the rear nodal point of the lens somewhere between 18mm and 85mm). Most lenses longer and/or faster than 50mm f/1.2 will need some increased complexity of design to condense the exit pupil.

    Telecentric design

    But against this, there’s a fortuitous benefit. Digital sensors, with their optically active filter/low-cut/IR glass packs, don’t respond well to very oblique angles of ray incidence. If you can make a telecentric lens – one which produces an almost parallel bundle of image-forming rays from a greater register distance – you’ve overcome this issue. That is what Olympus did with the original FourThirds format, which if scaled up to full frame size would have had a 77mm register – and they made their lenses telecentric, which means they produce a relatively parallel ray bundle, with a long back focus. Although FourThirds is now almost obsolete, it did have this odd advantage (also a real challenge which Olympus overcame in the creation of a fully retrofocus 7-14mm zoom with a 38mm register).

    The point I’m making is that large size, complexity and weight are not as so many state ‘laws of physics’ relating to making good lenses. They may simply be the most expedient solution. Remove all constraints – as Sony did with the RX1, Minolta did with the TC-1, and Ricoh did with the original film GR – and exceptional lenses can be made to be very compact, almost as compact as the theoretical physics will allow. Indeed it surprised many users to find large glass elements almost touching the film plane in some cameras.

    Sorry to be so wordy but it needs explaining. Does it matter? Yes, if you still believe in a Sony A7/FE system which can be as compact as a Leica kit used to be. In fact the E-mount makes it possible to design slightly smaller medium to long zooms and very much smaller wide-angles, and normal sized standard lenses. To adjust your perception, it’s important to take Sator’s camera size comparison images and align the focal plane index marks, not the front or back of the camera body. It’s surprising how much of an A7RII is behind the sensor plane.

    sony-wrongcomparison

    The screen grab above is from Sator’s article. It purports to compare two 85mms. There’s just one small problem – it doesn’t. The lens shown fitted to the A99 on the right is the 24mm f/2 CZ SSM A-mount, not the 85mm CZ. The 85mm is 1mm shorter but 3mm fatter with a generally chunkier look, and if you align the focal plane index marks, its front would come almost exactly level with the GM lens. It’s still smaller than the GM but if comparisons are to be made this way, they really should be correct, not wrong.

    Why other big lenses?

    Blame Canon and Nikon. Both have had SLR mirror paths which are very generous, and there are some lenses you can adapt to Canon which will give you a damaged mirror and lens in return (those lenses can’t be adapted to Nikon at all). Makers like Sigma and Tamron have to design all their lenses to clear the Canon full-frame (EF) mirror swing, and if that means adding 5mm to the back focus and then adding even more in glass to the overall assembly to make this work, so be it.

    sigma-20mmf1p4

    Therefore, when a nice fast 20mm f/1.4 Sigma appears designed for a retrofocus with a 42mm physical clearance, it’s going to be the same size when remounted (if they ever do) for a skinny 18mm register. Actually, the same size plus 24mm of deadspace extension.

    If you think that a fast superwide is bound to be huge, try a Voigtlander 21mm f/1.8 Ultron in Leica M fit. It’s not f/1.4, but it’s also the size of your palm not your forearm – and no doubt an autofocus lens could be made much the same. In fact you can buy an E-mount to Leica M autofocus adaptor and turn it into one. My point is that where Sony’s own lenses may sometimes be fairly large in order to deliver the best results from the existing sensors and the mount constraints, DSLR system lenses can be even larger. Where there is potential for Sony native lenses to be small, there’s very limited potential for this with DSLRs. I use a couple of rare examples, the 20mm f/3.5 Voigtlander Nikon fit wide and the Canon 40mm f/2.8 STM pancake. They are exceptions. Within the range from 28mm to 90mm, there have always been excellent and fairly compact lenses for all types of system – Contax G, Canon, Nikon, Pentax, Leica, Minolta CLE. Sony should look to these for inspiration for a core set of lenses, and seem to have done so with the 28mm, 35mm, 50mm, and 55mm. A neat 85mm f/2.8 next in line then?

    Adaptors and focus calibration

    The general comment that adaptors introduce error is very true, but Sator doesn’t explain why the E-mount is so prone to such errors. Let me do so. It was designed, from the ground up, to be self calibrating and not to require much precision. When the original 16mm f/2.8 pancake was launched with the NEX-3 and NEX-5, that lens had so much focus travel it could go well beyond infinity. Just 0.1mm makes a huge difference with a 16mm lens at f/2.8 – and the actual flange to sensor register of those first bodies was not even accurate to 0.1mm. Sony just made the lenses able to cover the manufacturing tolerance, because the on-sensor contrast detect focusing always got it right. You would never know if a body had 0.1mm or 0.2mm variation from spec, as the lens had more than this leeway.

    SONY DSC
    Why the A7 system still wins – though now old, a Voigtlander Leica screw original 12mm f/5.6 ultrawide works well using a $10 simple adaptor. A very much more expensive adaptor – $300 – turned out to have incorrect infinity focus.

    Then along came awkward early buyers of adaptors and lenses like the Voigtlander 12mm, or for example the 40mm f/1.4 which was the lens that really alerted me to the problem. These lenses are calibrated to Leica focus register with the aim of a hard infinity stop. They are supposed to hit infinity just as the stars in your night sky snap into perfect focus. We found that whether this happened depended on the individual Sony body and also on any adaptors. Manual focus lenses were not self-calibrating! That’s why the Fotodiox Tough-E mount arrived, why Sony tightened up generally on tolerances after the A7 and A7R, and also why makers like Samyang wisely allow a generous over-run past infinity for manual focus lenses (their 12mm f/2 for E-mount is an example, with plenty of tolerance to handle different bodies).

    Now all of Sony’s E and FE mount autofocus lenses have continued to be self-calibrating. They do not have hard infinity stops and many don’t form an image properly at all unless powered up (the power moves groups and elements into position, centres any stabilisation group, and finally performs AF). The start-up routines can also involve opening the lens aperture and closing it, often every time the shutter release is touched for first pressure. This is why expert users often prefer to AF using an assigned custom button, not the shutter release. It can save a wasted quarter-second and greatly speed your response time for action and grab shots. It’s also why manual lenses are popular, as these always shave the response time of the camera body down to an absolute minimum.

    The mistake some make is to assume the Sony E-mount needs to be as precise and accurate as a 35mm SLR or DSLR. It does not. It may feel like a precision instrument but in fact it’s not. Where an SLR design requires micron precision in alignment of the lens mount and the focus plane, the principal mirror and the secondary AF mirror, the AF module, and the focusing screen – all at once – the E-mount mirrorless requires only two conditions to be met. The axis of the lens should be centred on the sensor, and should be perpendicular to the sensor (and any focus mechanism used should retain this). If this is achieved, all other degrees of precision can be covered by tolerance. Obviously the IBIS, 5-axis moving sensor, does require considerable engineering excellence to do what it does and keep everything right. But unlike the old DSLRs, it will never need you to adjust hidden screws just to get the focus working properly.

    The IBIS question

    Sator suggests that with such a small throat aperture, the 24 x 36mm stabilised sensor really can’t do its job. We all saw the first demonstrations of AS, or SSS, or SSI or whatever we call it – the sensor apparently gyrating over many millimetres. Those who bought the original Sony A100 and 16-80mm CZ lens also found that sometimes the sensor would be a little more off-centre for the shot and one corner would be sharply vignetted. Well, you might expect that from the A7RII with certain lenses but in fact I’ve never observed it.

    The IBIS never allows the sensor to sit off-axis. It will constantly correct for your wavering hold, but always return to a centred position. It’s not trying to dive 5mm past the shadow of the lens throat or outside your lens image circle, even if it can do so in theory. The real stabilisation corrections made are within a millimetre or two, and even that is a considerable blur when there are over 200 pixels in one millimetre of travel! Consider what a 200 to 400 pixel blur looks like. What IBIS is doing often corrects shake producing blur in the region of 2 to 20 pixels.

    So, the reply to the apparently valid point that the whole sensor size, stabilisation movement, lens throat size, and lens image circle combine to make Steady Shot Inside a guaranteed failure can only be this: it works. It’s like a bicycle – look at it, think about it, and it’s not promising… but in practice it works very well. It also works, however its firmware interfaces with lenses, to use OSS optically stabilised Sony lenses very successfully.

    Conclusion

    The Leica screw system was probably designed with its 39mm lens thread much smaller than the diagonal of the film gate because it was originally made for an 18 x 24mm ‘single frame’ (later called half-frame) format. When a fixed lens was replaced with the screw mount, the inherent problem of having this smaller than the film diagonal was missed. That gave later generations the vignetting Leica Visoflex and the limited range and performance of all lenses over 135mm focal length!

    To some extent Sony has done the same thing and simple large aperture long lenses might in theory vignette. In practice they don’t. The limitations are nothing like the Leica or Contax rangefinder mounts were in the past. The argument against full frame mirrorless, or the specific design of the Sony FE/A7 series, ignores many things including simple points like volumetric heft (looks very different from overhead views of the camera footprint) and multi-body kits. I use A7RII, A7 and A6000 and all three bodies together barely take up the baggage space of a single pro DSLR.

    So, just relax. The Petapixel article was not a very carefully constructed one or a balanced argument. You’re going to find many different form factors of digital camera in future. The Sony full frame mirrorless system is just one. Because Fujifilm, Olympus, Panasonic, Nikon, Pentax, Samsung and Canon have all made design decisions for their mirrorless offerings which rule out full frame it’s not going to have ‘competition’ right now, and all users of other systems will find reasons why it doesn’t work for them – or take the plunge.

    David Kilpatrick

    Subscribe to f2 Cameracraft our bi-monthly magazine – worldwide subscriptions by fast airmail, premium ultra-heavy print quality and the best of British printing technology (it even smells good).

  • The best 50mm for A7RII

    After testing the Sony Carl Zeiss 55mm f/1.8 FE in 2014, I was less than impressed. I may have had a decentred example (it happened to dPreview and at least one photographer I trust to know his lens performance expectations). It was, certainly, pin-sharp on a test chart or a brick wall but the moment three-dimensional subjects were involved at wide aperture the defocused detail could be very untidy. The clip below from trees behind a building which was sharply focused is at f/1.8 and 1/2500th (a suggestion that it could be caused by camera shake is easily ruled out). See my additional notes at the end!

    cz55mm1p8distance

    It’s worth saying that when I had this lens I made some tests of the bokeh using very strong defocus which looked good. Many examples I’ve seen, which true believers put forward, show a figure (from full length to portrait) centre of a horizontal frame at f/1.8 with a pleasant enough looking distant background. My gripe has been with what happens when your subject is further away, or the background is not all very distant. This is an expensive lens but it seems to me to have fussy bokeh with too much CA fringe and also more focus-related colour shift than desirable.

    Here is a full size example with EXIF. Honestly, the best standard lens around? //www.pbase.com/davidkilpatrick/image/162847304

    Now I’ve got a fair collection of 50, 55 and 58mm lenses and also the little Canon 40mm f/2.8 STM which is my alternative to having a 35mm and a 55mm. No matter what the lens – Pentax, Minolta, Sony 50mm f/1.4, Helios, Zenitar, Nikon, CZ Jena – the full aperture between f/2 and f/1.4 always proves to be a touch soft. They all have residual aberrations that the CZ 55mm f/1.8 design has eliminated. While they can have a smoother bokeh, they also have marked colour shifts and uncorrected CA. Generally, they also all perform extremely well once stopped down to f/8 and most designs are great by f/4.

    Despite the advantage of full AF functions, the CZ 55mm does not have a particularly good close focus or maximum image scale. In use I often found myself framing up closer than 50cm. That’s half a metre – it’s even further than the old 55 and 58mm lenses of the 1960s, which generally manage 45cm. I find this limitation hard to understand. 50 years ago CZ Jena started to put helicoids on their standard 50mm lenses which enabled focus down to 35cm. We have gone backwards since then.

    And then I realised I’ve already got a lens which is free from all vices, gives me AF and manual focus options using adaptors I already own, which cost me about a third of the price of a CZ 55mm – and I was not being used on my A7RII. We bought a good used example of the Sony SAL 50mm f/2.8 Macro to use with our Alpha DSLR.

    First of all, I compared this with the idea of buying a Zeiss Loxia 50mm f/2, by fitting it to the LA-EA3. Although the focusing ring does not communicate to the camera to invoke magnified manual focus, the lens has a Focus Hold button which can be set to this. The focusing throw is steep but in practice very accurate focus is easily set. At f/2.8, the lens is already perfectly sharp with some contrast improvement at f/4. The lack of vignetting and distortion, the flatness of field and generally very attractive smooth defocusing without CA issues make the lens better than typical fast standard designs.

    On the LA-EA4 with autofocus, a limited set of AF functions ends up activated and there’s always the issue of the slight delay and sound caused by mechanical aperture operation. AF-C is of limited use, along with this video functions. However, I don’t generally use this type of lens for action or for video.

    I made plenty of non-image tests by defocusing bright edges, both ways, and could find no hint of colour problems. I then set up a small food shot using the close focus – exactly the reason I find a lack of close focus restricting – and made tests at f/2.8, f/5.6, f/11 and f/22 to look at the bokeh. My conclusion is that I will be hard pressed to find anything technically better, or with a more pleasant character to the background defocus, in the c.50mm focal length. The series covers all four apertures.

    I am aware that one comment will be that f/2.8 simply isn’t wide enough. There’s no significant differential focus and you’d need 50mm f/1.0 to get what many photographers want. However, this is all to do with viewing size. We all tend to see pictures on smartphone screens, on Facebook, or even on our own camera three-inch screens. In fact, at f/2.8 there isn’t enough depth of field for a typical real-world use of a full page reproduction and f/5.6 is just about right. For a poster, f/11 would be good. At f/22 the whole image is slightly softened as expected and it’s just there to complete the set.

    For the moment – at least until a Batis version of the 50mm f/2 Makro Planar appears and answers all my demands perfectly – I think this Minolta-derived 50mm macro will do fine as my ‘standard’ lens.

    David Kilpatrick, aka ‘some random blogger’ (©SAR comments March 2016)

    Added August 30th 2016: Sony has announced an E-mount 50mm f/2.8 Macro focusing to 1:1 with a stated RRP of $500 – really, they must have read this article in March. In the meantime, during the Brexit fiasco I caved in and bought a 55mm f/1.8 CZ, suspecting the price would be 20% higher soon enough (and sure, it was). My new example is no better than those I originally tested but it has its uses and in a flat plane – no defocused image to screw the results up with an ugly mess – it’s the sharpest 50-55mm I have used. I’m still using the 50mm macro and recently spend a month using the Samyang 50mm f/1.4, which is not as sharp as the CZ but handles blur and bokeh more elegantly. Both lenses don’t really excel at suppressing Longitudinal CA, one of the strengths of the A-mount macro. Hopefully the new SEL FE 50mm macro will also give clean, colour-shift free foreground and background bokeh.

    Added July 29th 2017: I have now bought the 50mm f/2.8 Sony FE Macro, and put my A-mount macro lenses up for sale. The E-mount focuses to 1:1 rather closer than I would like, at 16cm which indicates its internal focusing changes the focal length to something more like 37mm to 1:1 (16cm is a pure 40mm at 1:1 assuming no optical thickness to the lens). It’s an extremely sharp lens with bokeh as good as the A-mount 50mm and no trace of CA.

  • Voigtländer FE 10mm f/5.6 and 15mm f/4.5 III

    cameraswithVSMVFEwides-web
    I got to try out the first new Voigtländer Sony FE mount lenses with electronic aperture setting and manual focus control with a quick overnight test during the UK Photography Show at the Birmingham National Exhibition Centre, on March 19th 2016. The pre-production 10mm f/5.6 Hyper-Wide-Heliar and 15mm f/4.5 Super-Wide-Heliar are two of a trio reaching the market in Spring 2016 – the third is a new version of the 12mm f/5.6 Ultra Wide-Heliar. We also tried the 10mm in Leica M mount; the test cameras were the Sony A7R II and Leica M 240.

    First of all, no other Voigtländer lenses yet have the Sony E-mount with electronic connections, similar to the Zeiss Loxia models. Cosina, the manufacturer of Voigtländer lenses, also makes some Zeiss lenses and the operation of these designs is probably identical to Loxia 21mm, 35mm and 50mm models. The electronics could allow in-body control of the lens aperture but for these lenses, the aperture is mechanically set on the lens itself with a 1/3rd stop clicked ring that can be de-clicked by pushing back, turning through 180° and putting an alternative index mark in place. The focus distance set is transmitted to the camera, along with the focal length. This allows a digitalogue display in the finder, a marker moving on a bar from close to infinity.

    15mm-Emountrear-web

    For the E-mount, the close focus of the 10mm and 15mm is impressive and identical at 30cm. This contrasts with the M-mount minimum focus of just 50cm. The mechanical focus is very smooth indeed and the whole metal-bodied barrel and mount feels solid and precise. Depth of field markings are conventional (that is, based on pre-digital circles of confusion, or a typical A4 print rather than a 100% view on a 27 inch monitor screen). The optical design for the Leica M mount is clearly identical but the mount is very different with no electronics, and indeed no way of telling the Leica body the focal length or aperture in use. The EXIF data from Sony E-mount files is precise, with Leica it depends on the user manually entering the focal length, and a clever algorithm that uses the camera metering to work out the f-stop being used.

    15mmvoigt-twomounts-web

    Here are 10mm Hyper-Wide-Heliars in E-mount and M-mount.

    10and10-web

    The lenses have fixed petal type lens hoods and come with well-fitting front caps. The use of filter systems will depend on adaptors like those already found for the 15mm MkIII Leica M, but probably custom designed for the 10mm.

    Here, as a final product shot, is the original 1990s 12mm f/5.6 Ultra-Wide-Heliar Leica screw mount, with its detachable hood removed, next to the new 10mm. The new 12mm is similar in size to the 10mm, reflecting an optical design intended to be more compatible with digital sensors with improved vignetting control and freedom from colour shifts. It’s fair to say, though, that with the Sony A7R II I have been using the old 12mm with very good results. I can also tell you the new lenses are much sharper especially towards the corners.

    old12and10web

    It’s this sharpness which comes as a really welcome surprise with the 15mm f/4.5 design. It can be used wide open with confidence. Because the lenses have mechanical apertures, they don’t open up for focusing like purely electronic E-mount types – you focus at the working aperture, or for extra accuracy open the lens up, focus, then close down. When you touch the focus ring and move it, the magnified focusing of the Sony body is automatically activated, returning to a full view when you take first pressure on the shutter release. In practice this is a very fast and accurate manual focus method needing no button presses on the camera body.

    The geometric distortion of the lenses is minimal – they are almost perfectly orthographic but far from isometric! Objects near the ends and corners of the image can appear extremely distorted simply because they are projected with such rigorously rectilinear drawing. This is not really distortion, but it certainly looks like it when a face or figure ends up placed at an extreme. The 15mm must be used with care, and the 10mm needs an advanced understanding of weirdness.

    These lenses convey a built-in profile to the Sony bodies, and also to Adobe Lightroom or Camera Raw for processing (or so the dialog reports). What you see through the electronic viewfinder, and on opening a raw file, may not represent the optical truth. Studying the 10mm I found it hard to understand how any light reaches the corner of the sensor at all. I can’t measure the true fall off but I would guess it’s in the order of five or six stops. With the profile applied in-camera or by the raw converter, it’s moderated especially when stopped down a bit. This looks natural. Correct the vignetting fully, and some of the natural appeal of the image is lost.

    We must wait to review what may be primary choice for many users, the 12mm.

    The 10mm Hyper-Wide-Heliar f/5.6

    This lens displays an exceptionally straight geometry, even when used on the Leica M 240 body which has no added firmware correction function. Whatever profile is being passed to the Sony bodies probably only concerns vignetting (our Leica test indicated it may not really need a lens profile). It has 13 elements in 10 groups and covers the widest angle ever achieved with a true wide-angle on the 35mm format, 130°.

    Of course, I took a few tests inside the NEC but the first subject which really lent itself to the extreme angle was the giant illuminated sign. I was about a metre away from this, but a standing adult is about half the height of the letters. All the pictures used in this article can be clicked-through and will take you to the pBase Gallery which allows access to the ‘Original’ A7RII (level 10 JPEGs, full size) along with all the essential metadata. Please note these pictures are all copyright and if you wish to share them, please link to the pBase Gallery. You may download and examine them for your own research but they may not be reproduced.

    Outside the exhibition centre there’s an open land drain (Pendigo Lake) which stops the entire place from flooding. It’s about seven feet deep and fed by drains from below all the exhibition halls. With the 10mm fitted, I found a suitable supporting post. You’ll see that the beach gravel shows some softening and elongation towards the corners, almost inevitable regardless of the sensor cover glass specifications sometimes blamed for this. The lens geometry forces the elongation. This shot at f/8 has no added correction at all for vignetting.

    But with a lens like this, simple extreme wide views can be disappointing or pointless. You need to exploit its potential to do what other lenses can not do. The Sony A7R II can also go where other cameras might not – such as nested into the gravel, using the rear screen folded out for viewing the composition.

    This is stopped down to f/22, and in fairness the diffraction softening means nothing is really as sharp as it can be. The diaphragm stars from the lights are neat. Depth of field doesn’t get much deeper than this.

    This picture is from the next morning, walking back past the lake. ‘Not often you get to photograph Father Christmas fishing’, my friend here joked. He told me the history of the ‘lake’. Seven friends had gathered, for a fishing competition – pick their spot, set up, three hours to fish, winner with the biggest catch by weight. I’d been using a tripod so Steady Shot was turned off, and this hand-held shot at 1/6th was just OK. I found that because of the magnified scale of detail towards the outer field, if you do get shake it can be almost invisible in the centre but really blur the corners. I’m still trying to work out exactly why sensor based stabilisation manages to handle this change of scale caused by lens projection, but it does. Shots with SS on were generally perfect, those without could be surprisingly poor considering the very short focal length. I’ve processed this picture a little to suit the subject, but it shows the potential of the 10mm for environmental portraiture and editorial work. Because a shift of just inches in the lens position changes the shot so much with the 10mm, a tripod would have been impossibe here (I was leaning forward almost vertically above his foot for this).

    Here’s a funky use of the 10mm extreme angle and scalar distortion. It’s a quick grabbed shot on leaving the exhibition hall, and it’s not even vaguely sharp, except rather oddly in the view through the coach windows. The LED lighting has strobed some detail at the left hand side.

    I liked the effect with the bus so much I tried a few trucks through the car window in the morning. However, they lacked shape and form. This passing car and trailer was about the best. The progressive shutter captures a very strange effect from the wheels.

    Here’s a more conventional use of the 10mm. The weather was pretty dull and actually, night scenes were better. Stopping right down, again, takes the edge off sharpness. The 10mm seems about at its best around f/8 or f/11 (which is exactly where I use the old 12mm at the moment).

    Before moving on to the 15mm, a change of location. Next to the ‘lake’ there’s a new Resorts World hotel, casino and outlet mall complex with restaurants. Brightly lit at night, it was a far better subject for these wide lenses than anything else! Even in the daylight, it was interesting.

    You’ll also find a vertical version of this in the pBase gallery. It’s hand held, and the detail throughout really says everything you need to know about the 10mm and its practical uses. Although I believe the 15mm is substantially better optically – simply not as ‘stretched’ – I placed my order for a 10mm after doing this test. It is, after all, about the same price as Sony’s supremely boring but widely praised CZ 55mm f/1.8 – and you’re getting something with a unique commercial and creative edge instead of exactly the same old standard lens we’ve had around for ninety years, slightly improved…

    The 15mm Super-Wide-Heliar f/4.5

    With only 11 elements in 9 groups, this 110° lens is version III of a popular favourite. Optically identical to the M mount version, the big attraction is not just the lens, but the E-mount functionality. However, having used various 15mms before version III, I have to say this lens is just outstanding optically. It resolved such fine detail that on the interior view at night of the Resorts World mall, moiré patterns are thrown up by the pattern of pegboard type holes in the architectural ceiling surface. Please note that’s not vignetting at the top, below, it’s the lighting in the mall.

    Even if you don’t bother to click through and examine the full sized images for the other shots, please do take a look at this. It’s also handheld with SS, and not at the very slowest ISO. The resolution at f/8 is extreme and other shots taken, including those at f/4.5 maximum aperture, show the same quality. I’ve been testing lenses for over 40 years now and this is simply one of the best lenses I have used. This particular interior is almost like a 3D test target for lenses, too!

    The 15mm causes me a problem. I already own a Sony CZ 16-35mm f/4 and it simply isn’t this sharp.  It can’t do the same thing on a 42 megapixel sensor, it is acceptable and all very good, but not on this level. The 15mm is better than the 10mm and in many ways a more generally useful focal length. But… I’ve got my 16mm covered. 10mm is a better partner. If I dd not have my 16-35mm, I’d team up the Voigtländer 15mm with a 24-70mm. Only even the new 24-70mm Sony f/2.8 probably won’t match this (I have taken a few shots on a pre-production sample, but remember, this Voigtländer is also pre-production).

    The 15mm is a great angle for shots like this and it resists flare well. This is not a tripod shot, it used the fishing platform at some risk of an expensive camera and lens taking a dive.

    Here’s a hand-held, stabilised, very high ISO shot stopped down enough to keep the topiary fairly sharp. It’s much easier to get the horizon level with the display function available in the Sony A7R II and the brightness of the EVF for night shots. Otherwise, this would be much harder. I found it almost easy to take pictures like this casually using the 15mm (it’s harder with the 10mm which needs that little bit more care in levelling up).

    The 10mm on Leica

    Just to prove that the straight-line geometry and reasonable vignetting are not entirely down to any kind of electronic profile, a couple of Leica 240 shots start here with one using no adjustments in raw conversion to correct illumination or geometry.

    Here’s a slightly more creative use of the lens. Getting the camera in position was not easy and the A7R II would have been quicker to set up, but we wanted to check out the Leica version too.

    Conclusion

    If you have not purchased any wide-angles shorter than 20mm, it’s worth buying both the 15mm and the 10mm – or maybe just the 12mm on its own. The prices in the UK should be around £839 including VAT for the E-mount 10mm and £724 inc VAT for the 15mm – or less. At The Photography Show, these lenses were being ordered in some quantity especially on the professional days. A surprising number of mainstream professionals now use Sony A7R II and it seemed that almost all my pro magazine readers who came for a chat at the Master Photographers Association stand either had Sony or Fujifilm X. Those handling commercial assignments generally had the A7R II and most were using their Sony kit alongside Nikon or Canon. You can get pretty good (if huge) 15mm lenses for these DSLRs but you simply can’t get a 10mm. The closest is Canon’s 11-24mm EF zoom; at 11mm this does not even begin to approach the image quality of the Hyper-Wide-Heliar. You could also buy an A7R II with this lens for less than this zoom alone (definitely so at the show prices where £700 was slashed off the A7R II body).

    For those who own 16-35mm or similar lenses, the 10mm is a logical buy. It’s especially useful with the A7R II rather than the A7 II or A7S models, because the 42 megapixel sensor allows sensible cropping away of geometric extremes. One photographer I talked placed an order just to dispense with his bulky Canon 17mm tilt shift and DSLR – a crop from the 10mm angle of view is all he reckons he’ll need in future.

    Our thanks for Hardy Haase of UK distributors Flaghead for the overnight loan of the lenses, and thanks to the NEC and Resorts World environmental landscaping completed this year for creating some half-decent subject matter. Flaghead is also the owner of Robert White, the famous UK professional dealership in Poole, Dorset, whose founder is no longer with us. They took over the premises and shop before Robert’s death, and continue his name and reputation. This is their own direct outlet for the Voigtländer lenses

    – report and all example photographs by David Kilpatrick, publisher and editor of f2 Cameracraft and Master Photography magazines. Product photographs by Richard Kilpatrick. To subscribe to our premium quality bi-monthly magazines, visit www.iconpublications.com

    See: Flaghead – www.flaghead.co.uk; Robert White – www.robertwhite.co.uk; US distributor, CameraQuest – Cameraquest.com; B&H for US orders, 10mm lens E-mount link, B&H product listing.


  • My new Sony 85mm…

    With extremely expensive Sony-fit 85mm lenses in abundance and beyond my (economically sensible) reach, I’ve done good commercial work last year on the Canon 85mm f/1.8 USM and later the Sony 85mm f/2.8 SAM on A7RII. Some of my work relies on showing close-up details with strong differential focus, and hardly any lenses are free from ‘colour bokeh’ issues, so it’s needed some care to process the files and avoid that typical magenta tinge to the background and greenish hue to foreground blur.

    detailshot6

    This is a typical example. It’s on the Canon 85mm f/1.8, and although this is a fairly clean lens, the background at f/4 needed some post-process work to avoid a magenta colour shift.

    longwhitecloud-glass

    In contrast, absolutely no work is ever needed on my Sigma 70mm f/2.8 macro. It shows no chromatic effects in defocused areas. But this is a studio shot at f/10 – and, like many commercial shots, the extreme f/1.4 or f/2 apertures which are so highly valued by the bloggerati simply don’t enter the equation. Differential focus here is precisely balanced against the legibility of the bottle wording at web size (these shots are for a 1440 pixel wide template).

    I like to have a choice of wider aperture and macro lenses for this kind of work as they all produce different effects. My 70-210mm f/4 Minolta AF classic, for example, has about the cleanest foreground blur wide open on 0.25X scale 210mm close ups. My 85mm SAM is ‘dirty’ by comparison (but its 60cm 0.20X minimum focus distance still makes it the best 85mm for close work unless you use a macro or a zoom with good close range). Then, we get the Zeiss Batis 85mm f/1.8 popping up followed now by the costly Sony G-Master 85mm f/1.4 FE. In both cases you get 80cm minimum focus and around 0.12X image scale (rather like the 70-200mm f/4 Sony G FE lens used at 190mm and 1m focus).

    I really like, on a full-frame camera, to reach one quarter life size on the sensor. One-eighth, the 0.12-0.125X type of scale, means a full A4 magazine page fills the frame. One-quarter, 0.25X, means a quarter of that page or a postcard size fills the frame. There are so many things in the world, from a kitten’s face to a lily in bloom or a perfect cup cake, which are about this size. When I photograph food I often want to avoid including the edges of the plate completely. Those lenses which push me back too far prevent that. I know many users will be puzzled by my preference and see no reason to want to get any closer. Well, that’s just me. I have always done well creatively and commercially from surprisingly tightly cropped, close-up work.

    And, being more critical of these new hyper-expensive lenses, we’ve had 80cm focus 85mm lenses for SLR focusing for 70 years now. Really, any new lens in this focal length should focus to 60cm or ideally 50cm without calling itself a macro. That suits the way we live, in our cars, at desks, at home, at tables, in small spaces, giving other people space. I really like to be able to place an item in front of me, or even hold it in my hand, and focus on it. I can’t do that at all with 1m minimum focus (the old rangefinder Leica standard!) and only just with 60cm.

    Then I started seeing some work taken on an interesting old lens. It’s small, taking 49mm filters. It is fast, at f/2. It was originally designed by Carl Zeiss and if you were really lucky you might find an 85mm f/2 Sonnar. But for around £100/$150 or a little more for guaranteed condition you can buy the Russian Jupiter 9 85mm f/2 manual preset lens in M42 screw (Pentax/Praktica). And since it’s a screw mount SLR lens, you can add an extra layer of focus extension for very low cost between the E-mount body and the lens.

    SONY DSC
    Above: my Jupiter-9 with Camdiox helical Pentax screw E-mount adaptor fully extended and with a vital lens hood fitted; top, the mount and lens set for infinity focus, lens hood removed.

    So last week I assembled a relatively low-cost eBay rig to enable even closer focus than the 60cm of the SAM . This is partly just experimental, our of curiosity to see how well a 1930s Sonnar type design made in 1980s Russia with 1950s technology and coatings can peform. The 85mm f/2 Jupiter-9 is often used to get an attractive f/2 soft-focus with core sharpness, gradually cleaning up until around f/3.5 the softness is gone. It is also used to get neat circular bubbles from strongly out of focus light sources beyond the subject, or a generally very attractive focus transition at any aperture since the 19-blade mechanical iris forms an almost perfect circle at all settings. It focuses slightly closer than 80cm.

    With the well-made Camdiox helical adaptor costing under £28 delivered, this is extended in a continuous range to 35cm from the film plane and 0.51X. Obvously, it takes up no more space than my plain M42 adaptor as it is exactly the same thickness at infinity setting – and it does allow true infinity focus. Being solid metal, the combination is not all that light, a dense 490g in its 88mm long by 63mm maximum diameter, 20g more than the Batis. But it feels good. The aperture mechanism is crude and difficult to see and use, but would normally be set first to a chosen aperture such as f/2.8 for the best sharpness with a shallow depth of field, or f/8 for landscapes. It would not be much fun for anyone who likes taking a range of shots from f/2 to f/16, or for anyone wanting accurate half or third stops.

    First of all, is this lens even remotely sharp, and can the Sony A7? bodies use it well? Both answers must be yes. Just set the focal length for normal distances to 85mm and the in-body SSS of the A7SII, A7II and A7RII will give amazingly effective stabilisation. Work between f/4 and f/11 and this simple old lens design outresolves the A7R. I was just checking the focus on some calendar text in very dim room light, using ISO 1600 on my A7RII, when I pressed the shutter with 1/40th hand-held –

    85mmJ9-f4-1600-40thA7RII

    This was never intended to be seen, just a casual target. These pictures open out to Facebook size, by the way, when clicked – 2048 pixels. Here’s a 100% pixel friendly section from this. I was surprised. The lens was at f/4 and focus was done at max magnification, at the taking aperture.

    85mmJ9-f4-1600-40thA7RII-100%

    You need to check this JPEG out by clicking to open/view at 100%. It’s like this right across the frame, corner to corner. There’s a pleasant dimensional quality to the rendering this old lens gives, but it has one massive failing – it flares up dramatically if any light at all reaches the front glass. The only solution is a very deep lens hood indeed.

    Making more considered tests, I headed for a target I had set up to explore colour bokeh, that unpleasant magenta to green shift in defocused areas. With this set-up, my 85mm SAM is not bad at all and does benefit from a proper lens profile. As you can see, the music doesn’t seem to change much in colour from front to back though in the full size 42 megapixel file, especially without lens CA corrections, some funky colours do appear.

    85mmSAMf2p8-corrected

    Here’s how the Jupiter-9 worked out – first of all, it’s one of a number of shots at different distances and angles, not identical to the SAM shots, and this one takes advantage of the closer focus combination of adaptor and lens:

    fiddlemusicJ9f2p8close-facebook

    The colour shifts are different, with a bit of a rainbow including red and cyan fringes as well as magenta and green, and the contrast is lower. However, the detail in the very limited f/2.8 focus zone is very fine and over a range of tests the blurring (from the circular aperture) just looks better. No doubt I need to take many more shots with this lens (once the deep 200mm lens hood I’ve found arrives…) but it seems like a worthwhile creative option alongside a number of older manual lenses.

    What really interests me is that this same design, with a few refinements of modern manufacture, would surely be worth having. Tamron’s forthcoming 85mm f/1.8 will focus close – it is the special feature of this new lens series – and maybe along with the 35mm and 45mm f/1.8 designs will one day appear in native E-mount. I’d love to see a half-price Batis, a Sonnar f/2 variant instead of f/1.8, with a decent close focus limit around 50cm. Until then I’ll use the SAM on LA-EA3 or LA-EA4 (works well with either) and my assortment of manual set-ups including this Jupiter-9.

    Here’s a revision to the post, got some sunshine this morning (day after writing the original post) and with focus peaking and f/5.6 even a little moving target comes out whisker-sharp!

    theexplorer-fb

    – David Kilpatrick

  • Sony’s precision aspherics

    In interviews about the new micron-accurate aspheric lens element moulding process used to increase the resolution of the latest Sony G Master lenses, a visual has appeared which shows the ‘onion ring’ effect that coarser mould machining causes in lens elements.

    Working independently, I’ve been aware of this for years – and I have used a point-source photography technique to study lenses. I’m not an optical engineer or scientist, indeed I don’t even have a degree in anything. I came into photography through Victorian books and teenage years experimenting with lenses, developer formulae, building my own equipment and using observation, corollary and deduction to understand how things work. It’s helped me explain difficult technical stuff to many thousands of readers through books and magazines, without using maths or formulae, and very few diagrams.

    In the Cameracraft back in 2013 I published a home-brewed rendering of aspheric moulding visual analysis.

    Here’s Sony’s visual showing the difference between traditional aspheric moulding (pressed glass aspheric, as pioneered by Leica and Sigma) and their new refined pressing with better engineering.

    onion

    And here is my home-brewed visual from Cameracraft when I explained the bokeh and resolution issues created by pressed elements (and also, some other aspects of bokeh, which I’ll refer to below the image):

    onion-ours

    This is the clip from a 2013 article in Cameracraft dealing with broader aspects of bokeh, depth of field, aberrations and how images are rendered. You can download the two-page article here. Nine years after we launched Cameracraft the magazine is going strong, it’s a bit thicker and does have the occasional advert unlike our original, but it is still one of the best ‘never knew that before’ reads a photographer can have drop through the letterbox. You can arrange that easily enough here!

    Here is the full article as a downloadable PDF.

    Sony’s new superlens was not any better than the Sigma 70mm f/2.8 macro which I still use. My reasons for choosing this macro are simple – it is optically excellent and traditionally made without any aspheric or other special elements, and it uses simple focal extension for focusing, not rear or internal group movement. This means it’s a true 70mm lens even when used at 1:1 and gives the maximum lens to subject distance, for its focal length.

    However, it’s MUCH better than the Voigtländer 50mm f/1.4 used for the colour bokeh shift example at the top. Sony’s information makes it clear that the new more precise aspheric moulding allows new surface profiles and the elimination of chromatic aberrations which cause this magenta-green foreground to background shift in so many otherwise excellent lenses. I’ve said that to do so, the new lenses must be what would once have been called Apochromatic, though that term has only ever meant that all wavelengths focused to the same plane and at the same scale. Even past Apo lenses can show poor colour bokeh. It’s interesting that Sigma, after years of plugging the APO (capitals not actually needed, folks!) label chose not to label some new lenses this way even through their performance matched or exceeded earlier APO models. Sony seems to be taking the same view – G Master will be sufficient label to imply very high resolution, elimination of bad colour bokeh shifts, and by implication an apochromatic performance on RGB sensors.

    So will I be buying these amazingly expensive, large, E-mount dedicated lenses? Probably not. My unscientific observations tell me there are smaller, lighter, far less expensive lenses which will serve me better. Mirrorless digital camera bodies with high quality EVF and high magnification focusing allow me to  do things I could never have done over 40 years ago when I took my first position as a Technical Editor (of the UK monthly Photography published by Fountain Press and edited by John Sanders). Geoffrey Crawley, editor of the British Journal of Photography, showed me how to evaluate any lens quickly with the help of a light bulb, a darkened studio, a roll of background paper and a sharp pencil. Back then you had to expose film, now you can just look through the finder. In a photo store, any LED spotlight will do for a quick check. Focus centre, magnified to max, at full aperture. Move to all corners in turn without refocusing, magnify each time. Refocus each corner in turn when magnified, examine change in rendering of point source. Buy the lens which shows symmetrical, balanced results and the best sharpness of the corners when the centre is correctly focused. Do this with a light source at least 3m/10ft away and if you can, even further. Repeat one stop down, two stops down, with zooms repeat at three or four focal lengths across the range. Never do it at close distance (hint: lens test chart results are only good for the distance you photograph the chart from, which is why Imatest, DxO and other labs have test targets the size of a wall and industrial sized space to work in).

    And, if you have a single LED bulb or miniature LED torch, you can examine any of your lenses in a darkened room and produce a ‘bump map’ which will reveal its moulding defects, scratches or fungus, blemishes, and population of dust and microfauna.

    – David Kilpatrick

    dk-cameracraft-bokeh

    For our PDF and App editions, go to Pocketmags where you’ll find Apple iOS, Android and all the usual choices to subscribe or buy individual editions.

    And if you really want a trip back in time – there were huge changes between 2012 and 2015. Cameracraft documents the rise of mirrorless, the growth of hipster retro, and the discovery of older manual lenses as it happened. You can read a full set of the 12 issues via this one-off YUDU subscription:

    Click to view the full digital publication online
    Read Cameracraft 2012-15
    Self Publishing with YUDU

  • Sony’s Master plan – new 85, 24-70, 70-200 and more

    15H_GM_lens_image_04

    On Tuesday, February 2nd 2016, Sony UK held a press event to which I was invited. Well, I’m in a different country and about 400 miles from their Weybridge offices, so as usual my trusted English office editor at large (and son) Richard made the still substantial journey from Leicester. The result was a completely wasted day, his time and our company’s money, looking at a mixed bag of TVs, camcorders, headphones and all the Alpha and RX gear we already had seen long before.

    Then on February 3rd, mid-afternoon, the same PR agency which had extended this generous invitation to come and gather ZERO editorial content for our magazines announced the new G-Master series 24-70mm f/2.8 FE, 70-200mm f/2.8 FE and 85mm f/1.4 FE, 1.4X and2X extenders, and upgraded A6000 successor A6300.

    I was attending an excellent event with Graphistudio on the road in Edinburgh (they do try to cover the whole of our surprisingly large and still united kingdom) and returned to see the news. Talk about mixed emotions! I was furious that they should cost me a very real £300 or so (that’s what it costs, whether I do it, or Richard, or a hired freelance) to cover yet another of their red herring events just 24 hours before a major announcement like this. We get nothing free from Sony, they don’t advertise in our magazines, and unlike Minolta they don’t offer pre-launch access to pre-production samples.

    And that’s why I should not even be writing this. In the past, I would never – as a responsible journalist and technical editor – have made any comment on equipment I had not been allowed to handle and preferably use if only for an hour or two. But these days a thousand bloggers try to drive traffic to their sites by doing exactly that.

    Here are my thoughts, anyway.

    a6300_N_wSEL1670Z_right

    a6300_N_wSELP1650_topa6300_N_wSELP1650_tilt_downa6300_N_wSELP1650_front_topa6300_N_front

    a6300_N_wSEL1670Z_fronta6300_N_reara6300_N_lefttside   Click to open full size official images!

    The A6300

    It’s 24 megapixels like the A6000 and does claim a slightly faster and wider zone AF. But the A6000 is already close to perfect and I normally shoot with centre point focus, not any of the wide zone modes. I really don’t want the collar on a dog sharp and its face out of focus just because the collar is the more contrasty target which the wide area focus finds first. It’s also twice as much as I paid for my A6000, which happens to have been selling for a market-beating price. I have a great set of lenses – 10-18mm, 16-50mm, 35mm f/1.8, 50mm f/1.8 and 55-210mm. All except the 10-18mm cost about half the official retail because Sony did some great deals. Basically anyone like me who has invested in a decent A6000 (or NEX-6, even) kit and already own an A7S, SII, or RII can take the A6300 or leave it. In fact my now-outdated RX10 and RX100 MkIII do pretty neat silent shooting, one of the main upgrades over the A6000.

    If you need the very fast (120fps) refresh of the new EVF, 4K video and the improved audio functions (whether using jack plug mic or the MFAccessory shoe mic choices) then it’s easy – it will cost you less to get these than any other comparable route. Even the RX10 MkII no longer looks so attractive. As others have commented, it’s partly a matter of waiting for the body price to fall by the end of the year. In the meantime my A7RII actually does all the movie stuff I need (its APS-C 4K is superior to its full frame, and makes full use of line-up of lenses above).

    However, if they manage to lend me a test sample and the new sensor turns out to kill the already wonderful noise/ISO ratio of the 6000 I could be won over early at a high price. Had this been a 36 megapixel body I would be thinking very differently, and perhaps even considering a switch from full frame to APS-C.

    The 24-70mm f/2.8  and 70-200mm f/2.8 G-Master FE

    SEL2470GM_A

    With a 77mm thread and an overall size not far removed from the A-mount equivalents, the weatherproofing and generally improved design of the AF system will win buyers. The longer lens has the 0.96m close focus I’ve been campaigning for now for several years, and it’s disarmingly simple. If you study lenses, you’ll have realised that SSM, stepper or linear motor type AF (silent, no gears) has caused the increased and restrictive focus distances I’ve covered in Cameracraft and elsewhere. It has just been unable to provide enough movement. As an example, compare the old screw-drive 28-75mm Konica Minolta with the ‘identical’ Sony 28-75mm SAM. The 24-70mm f/2.8 A-mount models are actually amongst the better in this respect, managing the magic quarter life-size to important for many subjects. The 24-70mm f/4 FE is not as good though you would have though it easier to make close focusing with a simpler, slower lens – only 0.20X. At least the 24-70mm f/2.8 FE matches up to its A-mount equivalent.

    SEL2470GM_B

    In these new fast FE zooms Sony has improved performance by using more accurate asphericals, designated as XA (extra aspherical, presumably meaning a curve which was out of reach before). Combined with expensive glass types (low and extra-low dispersion) and complex design (23 elements in 18 groups for the 70-200mm) this enables apochromatic correction although they do not use the term. This removes ugly colour bokeh effects. A ‘floating’ internal focus action for the rear unit gives a wider fully corrected focus range, affecting both the focused distance and the flatness of field. An SSM (ring) motor drives the heavy, larger forward group focusing and a linear (rail) movement shifts the rear assembly but the whole focus action is internal.

    SEL70200GM_A

    I welcome the 96cm close focus (I trust it applies across the whole zoom range and with AF all the way). This lens achieves 0.25X scale at 96cm. Compare that to the Tamron Di VC USD 70-200mm which can only manage 0.125X, half the subject size, at 1.3m and that’s by switching to manual focus – it forces you back to 1.4m from the subject if you use AF.

    It’s also worth comparing size; most new 70-200mm DSLR lenses are around 185mm long, the Sony is 200mm long. But it’s really ‘smaller’ than the original Sony A-mount 70-200mm’s 197mm. That 15mm extra length is almost entirely dead space, a kind of extension to the barrel in order to handle the 18mm register of the E-mount, and also enable the use of the 1.4X and 2X extenders. This extension falls behind a fixed, not removable, rotating tripod mount collar which has a removable foot instead.

    SEL70200GM_C

    I’m sure that the dual focusing will be fast, with two simultaneous actions combined, and ideal for contrast detection  as well as on-sensor PDAF. My reservations are simple enough though – these are lenses for one-system users, dedicated to mirrorless. There really is no saving over the latest A-mount versions in weight and size, and many photographers (like me) may want to use both A and E mount bodies. I’ve been considering investing in another A99 even though I sold mine. That’s because it is so much more comfortable and complete with my longer lenses than the A7RII with LA-EA4 or 3, both of which I have. If I did so the 24-70mm and 70-200mm A mount would be on the shopping list, and what reason would I have for buying even more expensive new FE versions which could never, ever be used on a A-mount body?

    The 85mm f/1.4 G-Master FE

    SEL85F14GM_A

    One guide to acceptable minimum focus distance is the simplest formula imaginable. A lens should be able to focus – at the least – to the same centimetre distance as its millimetre focal length. So, a 50mm lens should manage 50cm, a 100mm lens 1m, a 200mm lens 2m or closer. But that’s the least you need. The ideal is HALF the mm in cm. A 50mm focusing to 25cm is brilliant, a 200mm focusing to 1m is amazing (Vivitar once made one, with a bright f/3 maximum aperture too).

    So, for me the 85mm f/1.4 with its substantial 82mm filter thread, 850g weight and focusing down to 80cm (some data tables say 85cm) with 0.12X image scale is just acceptable. A Samyang 85mm won’t go so close and most 85mms don’t break the 1m barrier. But an ideal new, modern 85mm would focus to 50cm. It’s just pretty hard to enable this using SSM or linear AF drive. Even the Carl Zeiss Batis 85mm f/1.8 is the familiar 80cm, 0.126X scale.

    SEL85F14GM_B

    What I actually use right now is an 85mm f/2.8 SAM lens on LA-EA3. It’s not 100% free from CA and colour bokeh issues, but it is exceptionally sharp and it focuses right down to 60cm with 0.20X scale. Above all it is very small and light, and for me that is most of the point of the A7RII and all the A7 series bodies. It focuses perfectly on my LA-EA3. I can use it with A-mount extension tubes or my Meike metal full frame FE extension tubes, but that’s a bit of a crude solution.

    Results from the MG 85mm so far seen, disregarding some fairly cheesy portraits, show that its 11-blade iris and apochromatic XA correction do deliver more than you will ever get from an 85mm f/1.2 Canon or a Samyang or a Sony 85mm f/1.4 ZA. The manual 1/3rd stop clicked or click-free aperture ring combined with the absence of magenta-green bokeh shift mean this lens will be massive for vids, whether creative porno or music promo. It should be on the same level as Zeiss/Arri ciné lenses if the claims stand up, and I would not be surprised to see a dedicated cinema version.

    It’s a long way from the 85mm SLR lenses of Minolta’s past – six iris blades!

    The extenders

    Sorry, but most FE and E lenses can never (ever) use a a tele extender. That’s why you have not seen any. It’s also why I use that 85mm SAM… it makes a neat 170mm f/5.6 wth my Teleplus 2X MC-7. Way back, one of my favourite travel outfits including the Minolta XD-7 with 85mm f/2 and a 2X converter, 170mm f/4 was a sweet spot in every respect.

    SEL20TC_BSEL14TC_B

    These two converters can only be used with the new 70-200mm f/2.8 G-Master FE. When you look at how far the converter unit extends into the lens barrel,  you’ll see that this is a combination designed from the start. The rear element of the FE lens is deeply recessed, midway between a typical E-mount design (18mm register) and an A-mount (rear element no closer than 42mm to the sensor).

    SEL70200GM_SEL20TCSEL70200GM_SEL14TC

    The extenders add less length than an A-mount variant would, and the back focus of the FE lens is shorter. But it’s a mid-way compromise. Extenders are easy to make for DSLR back focus register, they are difficult or impossible to design for 18mm register mirrorless like Sony or Fuji unless the host lens is matched exactly to the extender. And the 70-200mm f/4, for example, is not…

    The compromise

    And, having mentioned compromise, I should explain the great compromise which has made the entire Sony E/FE system much larger than it needs to be.

    It’s all down to the A7R 36 megapixel sensor. This sensor, more so than the 24 megapixel full frame, requires a very telecentric lens design. That is, more like a DSLR lens, despite the slim A7 series body. In order to perform acceptably with this sensor, the FE lens range could not be designed to be as small as a rangefinder system equivalent, or to take full advantage of the 18mm mount to sensor distance. Brian Smith, whose images are great (not cheesy portraits) but whose technical info clearly comes via Sony PR, says this: “Mirrorless camera design has allowed Sony’s lens designers to place larger than normal lens element close to the body”. Actually, they don’t, as the design of the extenders will tell you. They’ve used a stronger degree of telephoto construction in the long zoom, allowing a smaller than normal rear element and they have taken measures to move it further away from the body – and this is a general trend. If you want to see what a properly small 85mm f/1.4 looks like try a Carl Zeiss Planar 85mm f/1.4 ZE in Canon mount – 72mm filters not 82mm, 570g versus 850g and really solid all-metal manual focus. The mirrorless bodies do provide a zone from around 16mm to 42mm from the sensor surface which can accommodate the rear of the lens, and can’t ever be used on a DSLR. But Sony does not make full use of that and can not do so because of the microlens, filter layer and structural characteristics of the A7R sensor.

    15H_GM_lens_image_06

    All Sony FE lenses and all CZ independent FE lenses have been designed to work well with the A7R. The 28-70mm kit lens was not, but most owners find it acceptable. They could have made some of the lenses a fair amount smaller and lighter if the A7R had never existed. The A7RII is so tolerant towards short back focus, oblique ray angle imaging, that a whole different range of lenses could be designed for it… but never will be.

    The system has to remain compatible with its earlier components, especially the first ‘flagship’ body A7R. And that is going to constrain design and increase costs for ever into the future. In contrast, see the Fujfilm X system. We have yet to find whether the new 24 megapixel Fujifilm sensor disagrees with any older lenses, but all new lenses no matter how fast, small or clever have full compatibility with all the earlier bodies and don’t seem to have any compromises in design.

    15H_GM_lens_image_03

    Here’s my view, after doing a lot of digging around over the last two days (Sony PR does not supply any of the technical data for the released lenses – all that had to be found, and cross-checked, from Sony corporate and various dealer sites). I have found some interesting historic lenses like the 50mm f/1.5 and 85mm f/1.5 Zeiss Biotar. They are simple and perform poorly by today’s standards but they are very small. I am familiar with many excellent lenses I’ve used in the past like the Minolta MC/D 45mm f/2, the MD 85mm f/2 and of course the ‘beercan’ 70-210mm f/4 AF. I loved my first serious freelancing kit, Pentax Spotmatics with 20mm f/4.5, 35mm f/3.5, 50mm f/1.4 and 105mm f/2.8. I’ve used some good lenses which have been perfect with all A7 series bodies, such as the Voigtlander 21mm f/1.8, the Canon 40mm f/2.8 STM, and several rangefinder 35mm f/2 or f/1.4 lenses. All of these have been small and perfectly in keeping with the A7 series mirrorless bodies. I think Sony’s inspiration for new lenses should have come from classic rangefinder and compact pre-digital SLR glass, rather than from the bloated f/2.8 zooms of professional digital SLRs.

    In 1999, with a multi-state road trip in the USA to enjoy, I left the SLR kit at home because I was using two Minolta CLE bodies, a 20mm Russar, 28/40/90mm Minolta set and a Leitz Elmar 135mm f/4.5. SLRs in the AF era had started to became big, plastic and clumsy with fairly poor zoom lenses. I opted for the NEX/A/A7 system because I thought we were heading back to light, elegant, unobtrusive little jewels of lenses. Ah well, not so. We’re going to be sold lenses built like a Kardashian ass and learn to live with it!

    – David Kilpatrick

    ????

    A zoom specification comparison

    • Sony Carl Zeiss 24-70mm f/2.8 ZA SSM II – focuses to 34cm, 0.25X, 77mm filters, 975g
    • Sony Carl Zeiss 24-70mm f/2.8 ZA SSM – 34cm, 0.25X, 77mm filters, 955g
    • Sony Carl Zeiss 24-70mm f/4 ZA FE SSM OSS – 40cm, 0.20X, 67mm filters, 430g
    • Sony GM 24-70mm f/2.8 FE SSM OSS – 38cm, 0.24X, 82mm filters, 885g
    • Sony G 70-200mm f/2.8 SSM II – focuses to 1.2m, 0.21X, 77mm filters, 188mm long, 1300g
    • Sony G 70-200mm f/2.8 SSM – 1.2m, 0.21X, 77mm filters, 197mm long, 1500g
    • Sony G 70-200mm f/4 FE SSM OSS – 1-1.3m*, 0.13X, 72mm filters, 175mm long, 840g
    • Sony GM 70-200mm f/2.8 FE SSM OSS – 0.96m, 0.25X, 77mm filters, 1480g, 200mm long, 11-blade aperture

    *Focus to 1.3m at 200mm, 1m when set to 190mm or shorter focal length. 0.13X at 1m and 190mm.

    All the pictures used here have, linked to them, the full sized unwatermarked official Sony PR images except the first image which we have cropped a load of useless white space from – Sony likes useless white space, as the others show. Web and magazine editors hate it and constantly have to crop product shots…


  • A7RII shoots in Iceland’s glacier caves

    Sony camera sensor technology enables a closer look at some of Mother Nature’s rarest sights that could not previously have been photographed in this way

     Story: Sony Corporation UK PR release with high resolution images and full metadata – click to view. All images are copyright and may not be copied or reproduced.

    Wednesday 25th November 2015, Vatnajökull national park, Iceland: Photographer Mikael Buck with assistance from renowned local Icelandic guide Einar Runar Sigurdsson, explored the frozen world of Vatnajökull glacier in Iceland using Sony’s world first back-illuminated full-frame sensor – which features in the ?7R II camera. His images were taken without use of a tripod or any image stitching techniques in photoshop. This was made possible through Sony’s new sensor technology, allowing incredibly detailed low-light hand held photography. Previously images this detailed would have required carrying bulky equipment to the caves, some of which can require hiking and climbing over a glacier for up to two hours to to access. This picture: Inside the 'ABC cave' - which stands for Amazing Blue Cave. Guide Einar Runar Sigurdsson is seen taking a photo at the entrance to the cave PR Handout - editorial usage only. Photographer's details not to be removed from metadata or byline. For further information please contact Rochelle Collison at Hope & Glory PR on 020 7014 5306 or rochelle.collison@hopeandglorypr.com Copyright: © Mikael Buck / Sony 07828 201 042 / mikaelbuck@gmail.com
    Inside the ‘ABC cave’ – which stands for Amazing Blue Cave. Guide Einar Runar Sigurdsson is seen taking a photo at the entrance to the cave. Copyright: © Mikael Buck / Sony

    The enigmatic beauty of the caves of Vatnajokull, one of the largest glaciers in Europe, is revealed in all its frozen, icy splendour through astoundingly sharp and detailed photography.

    The sensor sits at the heart of every camera and defines its capability to capture the amount of light and detail that goes into photographs. Advancements in Sony’s sensor technology are enabling photographers to take pin-sharp photographs in the most challenging low light conditions with the latest cameras from Sony, which formerly would not have been possible.

    Wednesday 25th November 2015, Vatnajökull national park, Iceland: Photographer Mikael Buck with assistance from renowned local Icelandic guide Einar Runar Sigurdsson, explored the frozen world of Vatnajökull glacier in Iceland using Sony’s world first back-illuminated full-frame sensor – which features in the ?7R II camera. His images were taken without use of a tripod or any image stitching techniques in photoshop. This was made possible through Sony’s new sensor technology, allowing incredibly detailed low-light hand held photography. Previously images this detailed would have required carrying bulky equipment to the caves, some of which can require hiking and climbing over a glacier for up to two hours to to access. This picture: Inside the 'ABC cave' - which stands for Amazing Blue Cave. This view shows a snow storm outside the entrance to the cave. PR Handout - editorial usage only. Photographer's details not to be removed from metadata or byline. For further information please contact Rochelle Collison at Hope & Glory PR on 020 7014 5306 or rochelle.collison@hopeandglorypr.com Copyright: © Mikael Buck / Sony 07828 201 042 / mikaelbuck@gmail.com
    A snow storm outside the entrance to the cave. Copyright: © Mikael Buck / Sony

    Stunning photo series heroes Iceland’s otherworldly ice caverns, with the cave’s bright blue and bubble-like walls resembling an almost underwater scene. Images also capture flowing waterfalls, and crystal clear crevasses and icy tunnels within the frosty fortress.

    Wednesday 25th November 2015, Vatnajökull national park, Iceland: Photographer Mikael Buck with assistance from renowned local Icelandic guide Einar Runar Sigurdsson, explored the frozen world of Vatnajökull glacier in Iceland using Sony’s world first back-illuminated full-frame sensor – which features in the ?7R II camera. His images were taken without use of a tripod or any image stitching techniques in photoshop. This was made possible through Sony’s new sensor technology, allowing incredibly detailed low-light hand held photography. Previously images this detailed would have required carrying bulky equipment to the caves, some of which can require hiking and climbing over a glacier for up to two hours to to access. This picture: Looking up from inside the 'ABC cave' - which stands for Amazing Blue Cave. Guide Einar Runar Sigurdsson can be seen ice climbing on the glacier outside. PR Handout - editorial usage only. Photographer's details not to be removed from metadata or byline. For further information please contact Rochelle Collison at Hope & Glory PR on 020 7014 5306 or rochelle.collison@hopeandglorypr.com Copyright: © Mikael Buck / Sony 07828 201 042 / mikaelbuck@gmail.com
    Looking up from inside the ‘ABC cave’. Guide Einar Runar Sigurdsson can be seen ice climbing on the glacier outside. Copyright: © Mikael Buck / Sony

    This incredible photo series displays the immense intricacies of never-before-seen ice caverns in Vatnajokull, Iceland – only made possible through Sony’s new sensor technology, allowing incredibly detailed low-light photography.

    Wednesday 25th November 2015, Vatnajökull national park, Iceland: Photographer Mikael Buck with assistance from renowned local Icelandic guide Einar Runar Sigurdsson, explored the frozen world of Vatnajökull glacier in Iceland using Sony’s world first back-illuminated full-frame sensor – which features in the ?7R II camera. His images were taken without use of a tripod or any image stitching techniques in photoshop. This was made possible through Sony’s new sensor technology, allowing incredibly detailed low-light hand held photography. Previously images this detailed would have required carrying bulky equipment to the caves, some of which can require hiking and climbing over a glacier for up to two hours to to access. This picture: Inside the 'ABC cave' - which stands for Amazing Blue Cave. PR Handout - editorial usage only. Photographer's details not to be removed from metadata or byline. For further information please contact Rochelle Collison at Hope & Glory PR on 020 7014 5306 or rochelle.collison@hopeandglorypr.com Copyright: © Mikael Buck / Sony 07828 201 042 / mikaelbuck@gmail.com
    Inside the ‘ABC cave’. Copyright: © Mikael Buck / Sony

    Each year, the Vatnajokull glacier shifts and changes, revealing complex cave systems that are there for only a matter of weeks before metamorphosing again.

    Wednesday 25th November 2015, Vatnajökull national park, Iceland: Photographer Mikael Buck with assistance from renowned local Icelandic guide Einar Runar Sigurdsson, explored the frozen world of Vatnajökull glacier in Iceland using Sony’s world first back-illuminated full-frame sensor – which features in the ?7R II camera. His images were taken without use of a tripod or any image stitching techniques in photoshop. This was made possible through Sony’s new sensor technology, allowing incredibly detailed low-light hand held photography. Previously images this detailed would have required carrying bulky equipment to the caves, some of which can require hiking and climbing over a glacier for up to two hours to to access. This picture: Inside the 'ABC cave' - which stands for Amazing Blue Cave PR Handout - editorial usage only. Photographer's details not to be removed from metadata or byline. For further information please contact Rochelle Collison at Hope & Glory PR on 020 7014 5306 or rochelle.collison@hopeandglorypr.com Copyright: © Mikael Buck / Sony 07828 201 042 / mikaelbuck@gmail.com
    Inside the ‘ABC cave’. Copyright: © Mikael Buck / Sony

    Photographer Mikael Buck and renowned local guides Einar Runar Sigurdsson and Helen Maria explored the frozen world using Sony’s latest digital cameras including the α7R II featuring the world first back-illuminated full-frame sensor which brings together ultra-high resolution and ultra-high sensitivity, the  RX10 II and RX100 IV which feature the world’s first 1.0 type stacked Exmor RS CMOS sensor that truly shine in low-light and high contrast conditions. The images were taken without the use of any external sources – just the natural light that filters through the ice caves.

    Wednesday 25th November 2015, Vatnajökull national park, Iceland: Photographer Mikael Buck with assistance from renowned local Icelandic guide Einar Runar Sigurdsson, explored the frozen world of Vatnajökull glacier in Iceland using Sony’s world first back-illuminated full-frame sensor – which features in the ?7R II camera. His images were taken without use of a tripod or any image stitching techniques in photoshop. This was made possible through Sony’s new sensor technology, allowing incredibly detailed low-light hand held photography. Previously images this detailed would have required carrying bulky equipment to the caves, some of which can require hiking and climbing over a glacier for up to two hours to to access. This picture: Guide Einar Runar Sigurdsson is seen ice climbing inside the 'Waterfall Cave' PR Handout - editorial usage only. Photographer's details not to be removed from metadata or byline. For further information please contact Rochelle Collison at Hope & Glory PR on 020 7014 5306 or rochelle.collison@hopeandglorypr.com Copyright: © Mikael Buck / Sony 07828 201 042 / mikaelbuck@gmail.com
    Guide Einar Runar Sigurdsson is seen ice climbing inside the ‘Waterfall Cave’. Copyright: © Mikael Buck / Sony

    Within the photo series, barren caves have been brought to life, making visible the intricate curves of the natural sculptures, the delicate structure of its icicles, and the smooth and the marble-like texture of the cavern walls, which are formed through constant movement. Images capture the misty waterways that flow within the frosty fortress, as well as the ice-cold waterfalls that cascade down and transform the cavern’s bright blue walls. Buck has also captured images of a skilled local climber ascending the icy walls to showcase the scale of the majestic blue cave.

    Wednesday 25th November 2015, Vatnajökull national park, Iceland: Photographer Mikael Buck with assistance from renowned local Icelandic guide Einar Runar Sigurdsson, explored the frozen world of Vatnajökull glacier in Iceland using Sony’s world first back-illuminated full-frame sensor – which features in the ?7R II camera. His images were taken without use of a tripod or any image stitching techniques in photoshop. This was made possible through Sony’s new sensor technology, allowing incredibly detailed low-light hand held photography. Previously images this detailed would have required carrying bulky equipment to the caves, some of which can require hiking and climbing over a glacier for up to two hours to to access. This picture: Guide Einar Runar Sigurdsson is seen ice climbing inside the 'Waterfall Cave' PR Handout - editorial usage only. Photographer's details not to be removed from metadata or byline. For further information please contact Rochelle Collison at Hope & Glory PR on 020 7014 5306 or rochelle.collison@hopeandglorypr.com Copyright: © Mikael Buck / Sony 07828 201 042 / mikaelbuck@gmail.com
    Sigurdsson ice climbing inside the ‘Waterfall Cave’. Copyright: © Mikael Buck / Sony

    Helen Maria of Local Guide – Iceland’s oldest mountain guiding company – comments: “I have been exploring these ice caves for years with Local Guide. Being here in them is a truly wonderful opportunity. Knowing you’re experiencing such a fleeting phenomenon makes it even more special – the opportunity to help capture this nature in all its intricate glory and now in more detail than ever thanks to Sony’s sensor technology is a truly magical experience. This series of photographs has done it justice like never before, and I hope many more people will be spurred on to visit as a result.”

    Wednesday 25th November 2015, Vatnajökull national park, Iceland: Photographer Mikael Buck with assistance from renowned local Icelandic guide Einar Runar Sigurdsson, explored the frozen world of Vatnajökull glacier in Iceland using Sony’s world first back-illuminated full-frame sensor – which features in the ?7R II camera. His images were taken without use of a tripod or any image stitching techniques in photoshop. This was made possible through Sony’s new sensor technology, allowing incredibly detailed low-light hand held photography. Previously images this detailed would have required carrying bulky equipment to the caves, some of which can require hiking and climbing over a glacier for up to two hours to to access. This picture: Guide Helen Maria is pictured inside the waterfall cave PR Handout - editorial usage only. Photographer's details not to be removed from metadata or byline. For further information please contact Rochelle Collison at Hope & Glory PR on 020 7014 5306 or rochelle.collison@hopeandglorypr.com Copyright: © Mikael Buck / Sony 07828 201 042 / mikaelbuck@gmail.com
    Guide Helen Maria is pictured inside the waterfall cave. Copyright: © Mikael Buck / Sony

    Yann Salmon Legagneur, Head of Product Marketing, Digital Imaging for Sony Europe, commented, “These images wouldn’t have been possible a few years ago without having to take bulky kit, lighting and other accessories to the glacier – all of which would have weighed down a photographer. The sensors inside Sony’s α7 and RX cameras ensure that all a photographer needs is a small form factor camera and with its low light photography capabilities and they can then capture incredible images like these.”

    Wednesday 25th November 2015, Vatnajökull national park, Iceland: Photographer Mikael Buck with assistance from renowned local Icelandic guide Einar Runar Sigurdsson, explored the frozen world of Vatnajökull glacier in Iceland using Sony’s world first back-illuminated full-frame sensor – which features in the ?7R II camera. His images were taken without use of a tripod or any image stitching techniques in photoshop. This was made possible through Sony’s new sensor technology, allowing incredibly detailed low-light hand held photography. Previously images this detailed would have required carrying bulky equipment to the caves, some of which can require hiking and climbing over a glacier for up to two hours to to access. This picture: Inside the 'ABC cave' - which stands for Amazing Blue Cave. Guide Einar Runar Sigurdsson is seen taking a photo at the entrance to the cave PR Handout - editorial usage only. Photographer's details not to be removed from metadata or byline. For further information please contact Rochelle Collison at Hope & Glory PR on 020 7014 5306 or rochelle.collison@hopeandglorypr.com Copyright: © Mikael Buck / Sony 07828 201 042 / mikaelbuck@gmail.com
    Sigurdsson is seen taking a photo at the entrance to the ABC cave. Copyright: © Mikael Buck / Sony

    As the global number one in Sensor technology and production with approximately 50% global market share, Sony is proud to continue to push through the perceived boundaries of sensor development and thanks to advancements in this field, images like this are now possible. Sensors are such a vital part of camera performance and being able to release two new advanced sensors this year is enabling Sony to continue its growth in the digital imaging industry.

    Wednesday 25th November 2015, Vatnajökull national park, Iceland: Photographer Mikael Buck with assistance from renowned local Icelandic guide Einar Runar Sigurdsson, explored the frozen world of Vatnajökull glacier in Iceland using Sony’s world first back-illuminated full-frame sensor – which features in the ?7R II camera. His images were taken without use of a tripod or any image stitching techniques in photoshop. This was made possible through Sony’s new sensor technology, allowing incredibly detailed low-light hand held photography. Previously images this detailed would have required carrying bulky equipment to the caves, some of which can require hiking and climbing over a glacier for up to two hours to to access. This picture: The view on top of the Vatnajökull glacier whilst hiking to access the caves PR Handout - editorial usage only. Photographer's details not to be removed from metadata or byline. For further information please contact Rochelle Collison at Hope & Glory PR on 020 7014 5306 or rochelle.collison@hopeandglorypr.com Copyright: © Mikael Buck / Sony 07828 201 042 / mikaelbuck@gmail.com
    The view on top of the Vatnajökull glacier whilst hiking to access the caves. Copyright: © Mikael Buck / Sony

    In addition to being able to capture incredibly detailed low-light photography, sensor technology featured in the RX10 II and RX100 IV cameras also allows photographers, hobbyist and professionals alike, to capture moments not always visible to the human eye, with 40X super slow motion video capture at up to 1000fps.

    Wednesday 25th November 2015, Vatnajökull national park, Iceland: Photographer Mikael Buck with assistance from renowned local Icelandic guide Einar Runar Sigurdsson, explored the frozen world of Vatnajökull glacier in Iceland using Sony’s world first back-illuminated full-frame sensor – which features in the ?7R II camera. His images were taken without use of a tripod or any image stitching techniques in photoshop. This was made possible through Sony’s new sensor technology, allowing incredibly detailed low-light hand held photography. Previously images this detailed would have required carrying bulky equipment to the caves, some of which can require hiking and climbing over a glacier for up to two hours to to access. This picture: On top of the Vatnajökull glacier PR Handout - editorial usage only. Photographer's details not to be removed from metadata or byline. For further information please contact Rochelle Collison at Hope & Glory PR on 020 7014 5306 or rochelle.collison@hopeandglorypr.com Copyright: © Mikael Buck / Sony 07828 201 042 / mikaelbuck@gmail.com
    On top of the Vatnajökull glacier. Copyright: © Mikael Buck / Sony

    Wednesday 25th November 2015, Vatnajökull national park, Iceland: Photographer Mikael Buck with assistance from renowned local Icelandic guide Einar Runar Sigurdsson, explored the frozen world of Vatnajökull glacier in Iceland using Sony’s world first back-illuminated full-frame sensor – which features in the ?7R II camera. His images were taken without use of a tripod or any image stitching techniques in photoshop. This was made possible through Sony’s new sensor technology, allowing incredibly detailed low-light hand held photography. Previously images this detailed would have required carrying bulky equipment to the caves, some of which can require hiking and climbing over a glacier for up to two hours to to access. This picture: Inside the 'ABC cave' - which stands for Amazing Blue Cave. For further information please contact Rochelle Collison at Hope & Glory PR on 020 7014 5306 or rochelle.collison@hopeandglorypr.com Copyright: © Mikael Buck / Sony 07828 201 042 / mikaelbuck@gmail.com
    Amazing Blue Cave. Copyright: © Mikael Buck / Sony
    To enquire about other uses, reproduction rights or prints email [email protected]