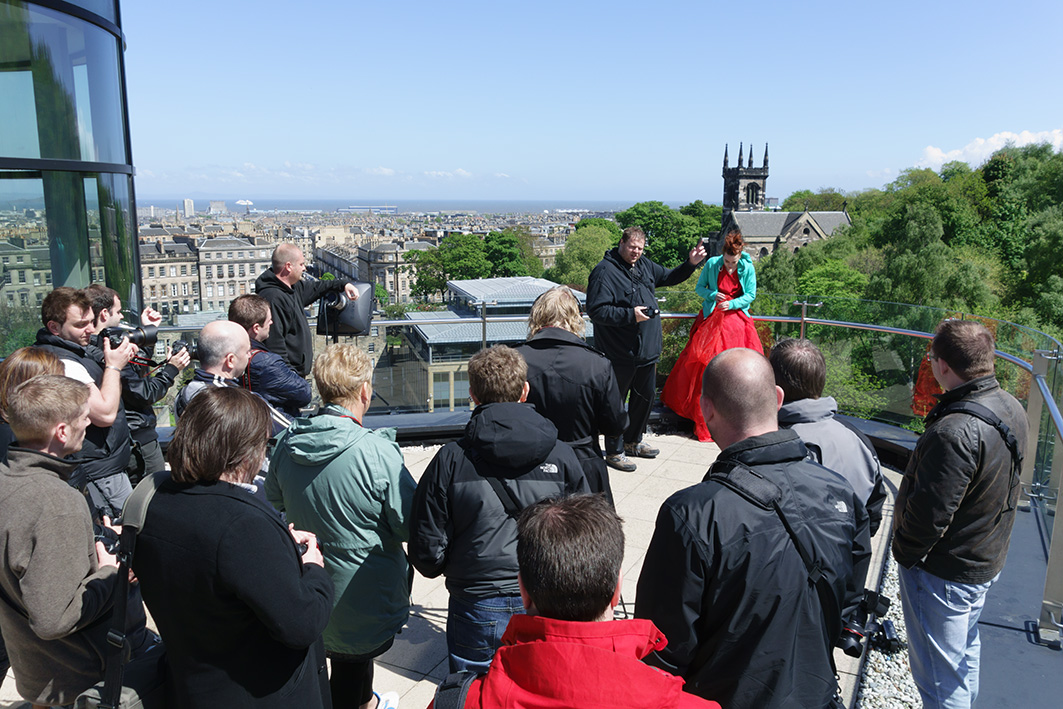
The launch of and initial reaction to Sony’s Alpha 99 has been spoiled, for many, by the overpricing of the camera generally and to a greater degree in some key markets. The promise of the SLT design, and Sony’s move away from flapping mirrors and optical prisms with their associated collimation and alignment, was one of reduced manufacturing cost and more competitive product.
Along with this, we should remember Sony’s 2006 statement that external mechanical controls, switches and buttons would be reduced on future models for the same reason. The Alpha 99 has as many external physical controls as any predecessor and will make traditional users happy.

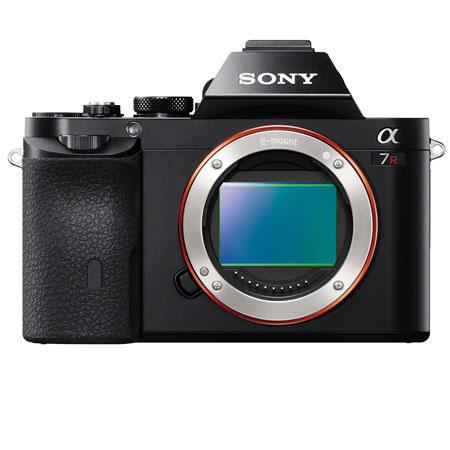
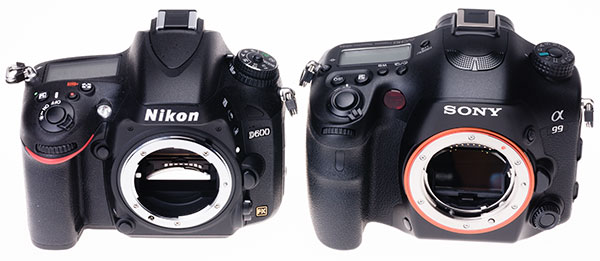
Compare the Alpha 900 and the Alpha 99 – despite apparently very different designs, they share many points and clearly come from the same gene pool. There is no longer any need for the largest glass prism of any modern DSLR, the power switch has moved to Nikon position round the shutter release, lines are rounded off. The construction is similar as the strap lugs fitted through the outer skin into the solid magnesium chassis indicate.

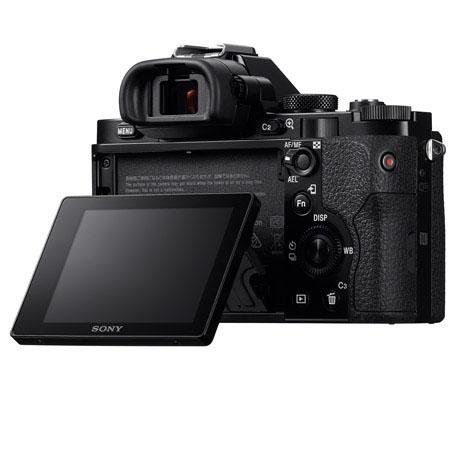
From the rear, the 900 looks somehow more complex because of the left-hand button array. In fact the A99 has just as many buttons (it is only missing a SteadyShot switch and the selector round the AE lock button for metering method – this is no longer as important with the 99 doing its metering directly from the imaging sensor).
Out there we find Canon’s lightweight travel-friendly full frame 6D appearing at £900 lower launch street price (UK) with both that essential built-in GPS and the marketable function of WiFi, and Nikon’s almost comparable D600 officially at a £500 lower RRP, and a street price match for the Canon. In practice the UK Sony price of the A99 fell from £2499 to £2299 in the first two months on sale; the D600 fell from £1955 to £1495 in the same period (WEX dealer figures) and on that basis we can expect the see the Canon fall to £1395 in early 2013. By then the A99 may have fallen to £2195.
Sony lenses are not cheaper, nor wider in range of choice or sources of supply, than Nikon or Canon. There is no collateral benefit when you hand over as much as 50% extra to Sony for their innovative cost-saving technology. In my British Journal review, I concluded that the Alpha 99 was between 30 and 50% over-priced and combined with the cost and limited range of Sony lenses there would be little good reason for any new full-frame entrant to prefer Sony over Nikon or Canon.
At the same time, the Alpha 77 – so close a sister to the 99 that it shares exactly the same EVF and the same file size, with identifiable advantages in some respects – has been selling for £819 body only in the UK when the 99 in the same store was priced at £2299. That’s 64% less, 36% of the price or just over a third. You could almost buy three A77s for one A99. And it even has that very useful built-in flash.

You may pause to work out which of these, photographed to exactly the same scale (one shot) and then moved so that their focal plane markings coincide horizontally, is the 99 and which the 77. The 99 is actually bigger but looks smaller.

This will give you a better idea of the height of the A99, and also the improved eyepiece which puts your eye further away from the camera screen or back than the A77.
Assault and battery
In fact, there’s a hidden penalty in addition to the high price of the A99. The Nikon D600 with its single 1900mAh battery as supplied will keep on shooting into four figures where the A99 with GPS enabled manages a couple of hundred on a good day with the wind behind it from 1650mAh. Officially it does over 400 without GPS. That was not my experience, any more than it has been with the Alpha 77.
Perhaps this is because of the odd conditions Sony uses to measure battery life – only using a MemoryStick PRO Duo card not SD, no card in slot 2, ambient temperature 25°C, shooting Fine quality JPEG only, shooting one frame every 30 seconds and turning the camera on and off every ten shots, and not having GPS active. Needless to say I shoot raw, back up to a second card with JPEG, and have GPS active. That’s why I bought the camera…
The economical Nikon D600 is a direct competitor, despite rabid claims on internet that the 99 is ‘professional’ and the 600 is ‘consumer’. They are both semi-pro models but the 99 probably has a better shutter mechanism and a higher precision body. The Nikon has better image quality and battery life. Both have similar dual card slots, manual adjustment of audio input for video recording, wireless flash options, grip and so on.
GPS eats batteries. We’ve got a GPS module for the D600 which runs off the camera’s power, but so far have not had it switched on permanently for a week. Maybe it will reduce the D600 to the same ‘battery every day or two’ as the A99. The Canon 6D is the only other DSLR made with built-in GPS. Unlike the A99, the 6D does not turn off its GPS when you turn the camera off. Result? The 6D drains a battery in four days, flat – dead flat 0% – if you just switch the camera off and leave it in your bag with the GPS symbol showing. You have to go into a menu and turn off Enable. At least the A99 does not draw on its battery at all when switched off, regardless of settings.
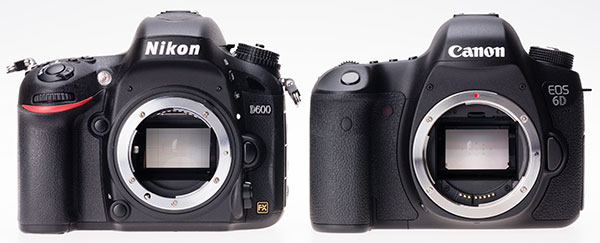
The EOS 6D compared with the D600 – it’s smaller, lighter, and built to a far more consumer-level standard with minimal controls. But like the 99, the 6D has GPS on board, and as a ‘first’ in this field it includes WiFi, which is not just file transfer. We used a free iPhone app to view, focus, adjust settings and shoot remotely and wirelessly with the 6D (EOS Remote). This is bound to win substantial sales.
You need deep pockets in two senses for two extra Sony batteries (£136) or the add-on vertical grip at £299 plus two batteries (not included). The first option will keep you going without GPS about as long as the Nikon on one charge. If you are travelling and using GPS, be prepared to change and charge one battery daily.
Another reason for this short battery life is the electronic viewfinder. Unlike any optical prism finder, it uses as much power as shooting video. Even if you turn the camera off every time it leaves your eye, the typical length of time needed to compose and follow subjects will add up. I do not have review enabled, and I rarely ‘chimp’ because one big plus side of the Alpha 99 – as you will learn – is the near 100 per cent success rate achieved by its metering and focus. If you use the rear screen for composition instead of the eye-level finder, you can extend battery life by 16%.
Sony must be commended for sticking to the same battery format used by all larger body models from the Alpha 700 onwards. I do have half a dozen spares but of course, many are now getting old and barely manage 150 shots in the 99. What Sony must do is to take the advances made in lith-ion production and create a higher capacity NP-FM500H. Third party makers have been able to boost their clone batteries to 2000mAh (I’ve bought two and they are non-compliant with the chargers and clearly don’t deliver what they claim…). Sony’s battery should match Nikon’s similar size at 1900mAh, even if the EVFs now standard across the Sony range will always eat twice as much power as a regular DSLR.
The EVF dividend
Would-be Alpha system professionals and advanced amateur users face a future of electronic viewfinders. The good news is that at photokina 2012 Epson showed a prototype with twice the resolution of the current 2.3 million pixel ceiling, and in five years most current complainers will accept that an EVF can be as accurate as any true groundglass screen ever was.
We tend to forget that after autofocus arrived focusing screens lost their visible granular or laser-cut structures unless you deliberately specified a type intended for manual focusing. Plain old groundglass has a ‘dot’ all of its own because it does break the image up. Minolta’s Acute Matte screen was like a superfine microprism field. The new Epson developments come so close to being as fine as this kind of screen, visually, that you might be able to fool someone into believing it was not an electronic finder.
While the A99 finder is excellent, it falls a touch short of this. It is absolutely identical to the Alpha 77 in every parameter including virtual window size (the magnification figure given by Sony of 0.71X compared to the A77 1.09X is all down to using a 50mm lens on both for measurement). Eyepoint is identical despite the slightly different overall design of the eyepieces and the size of the rubber surround. If there’s any improvement, it lies in the illumination range and contrast control of the OLED unit which has been given one additional user control, colour temperature. You can make the finder warmer or cooler in colour independent of any picture style or WB adjustment.

This is a good example of where the EVF’s great clarity in low light pays off – an ISO 3200 image taken hand-held where a tripod was not appropriate, using the Sigma 12-24mm which has fairly strong vignetting. To see and align the geometry of the shot (bottom cropped off) was much easier on the A99 than it would have been on an OVF camera. Click the image for a full size file.
In full sun, the finder appears very dim compared to any good optical finder. In overcast light, it’s a good match. As the light fails or you move indoors, the EVF shows substantial benefits over optical systems. After dark, it can make accurate composition easy instead of almost impossible.
Here, the A99 has the edge over the A77, NEX-7 and all predecessors even including the NEX-5n and presumably the 6 which I haven’t tried. The larger sensor’s better high ISO performance together with its pixel count keep the coloured noise at bay for another stop or two lower light levels. This coincides with an important transition. The kind of indoor artificial light level where the A99 remains very clean using an f/2.8 lens is typical domestic light – brighter than restaurants, not as bright as stores and malls.
Anyone using the A77 will confirm that the 16-50mm f/2.8 lens brought a real benefit in this sort of lighting despite its other failings, by improving the finder experience. Combine the A99 with a good fast lens like the 50mm f/1.4 and you get a relatively natural view of the world after dark.
The A99 returns the auto eye start sensor, which switches between rear screen and EVF if you have that function enabled, to below the ocular instead of above it as on the A77. This makes viewfinder attachments work without blackout glitches, including Sony’s 1.15X eyepiece magnifier, which for me enables a full view of the screen and a truly impressive finder size.
Ergonomics and control
One of the benefits of the EVF is that you don’t need to use the rear screen at all. The Quick Navi interface developed more or less from A700/900 Quick Navi has to cope with a bewildering number of pictograms and readouts, ranging from a full histogram to digital spirit level, and a complex AF setup. With the help of carefully repositioned buttons, it succeeds. I’d say that the A99 has the best user interface I’ve seen on an Alpha since the 900. The top LCD display panel is much richer than the basic one of the 900, and does not deserve some of the criticism levelled at it for duplicating stuff you can see on the rear screen. I work with the rear screen permanently turned to face the body, unless I am actually employing it for composition or image review. The top LCD provides vital at a glance info about manual or metered exposure settings, ISO, state of ± override, battery power, drive mode, WB, file type and image remaining count.
It is, however, blank when the camera is asleep. Later in this review I’ll be comparing the A99 with the Nikon D600, which we now also own and use alongside it. Nikon’s top LCD shows some basic info (shots remaining) all the time. But it’s interesting to note that Sony gives you the correct information when Nikon does not! Both cameras have two card slots. You can set both of them to work in overflow mode, fill one card, then the next. Nikon shows you only the shots remaining on the card in use. Sony shows you the total. The Canon 6D LCD also goes blank when the camera is turned off, except for showing a GPS symbol to warn you about leaving this battery-eating function Enabled.
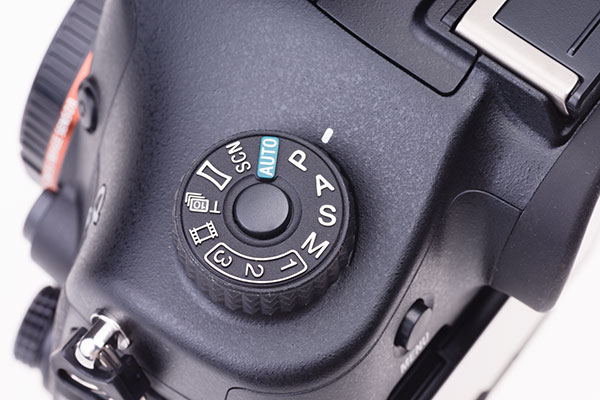
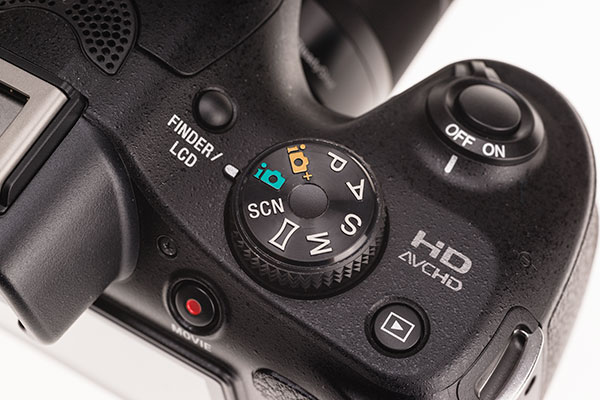
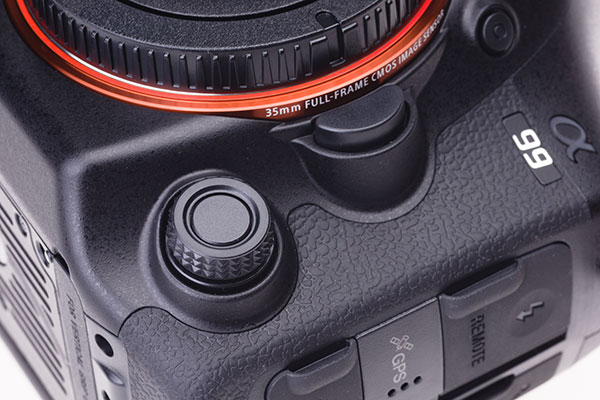
The Mode dial has three memory positions, a Tele 10fps (1.5X crop) position, panoramic, Scene selection, Intelligent Auto, PASM and a separate Movie position. You can opt to lock the Movie button out except when the dial is set to this.
Another similarity is the mode dial, locking on all three cameras. Here, Sony goes for a more purposeful central locking action making it a little harder to adjust the dial. They also cram more on to the dial, including the invaluable feature of Memory 1 2 3 positions (as on the 900). There’s a special movie mode which not only prevents accidental movie shooting, but when used allows shutter, aperture and ISO to be set. The range for this is exceptional, you can film at 1/8,000th shutter speed if you really want to break rules.
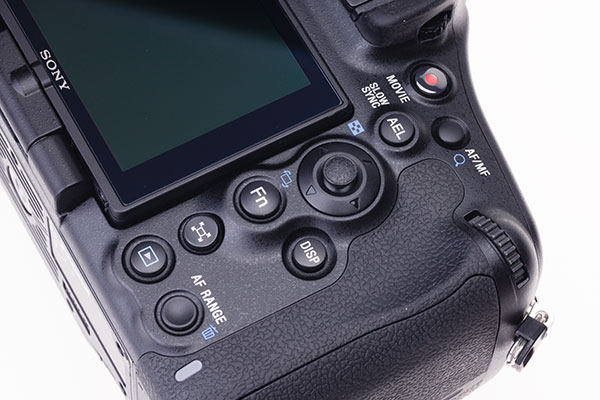
The right hand buttons include Fn, your access to Quick Navi on the screen or in the EVF. There is a new AF Range button which I simply don’t seem to need – I wish this could be customised to become a SteadyShot On/Off button, something I need to do far more often when working with a tripod.
The A99 has a total of 19 operating buttons, some of which have only a single use such as LCD illumination or Playback. The manual identifies 18 primary default functions plus the Silent Controller, of which more later. One button, Fn or Function, accesses Quick Navi and its 23 adjustable settings many of which have multiple choices. Fn can direct access 18 functions outside Quick Navi.
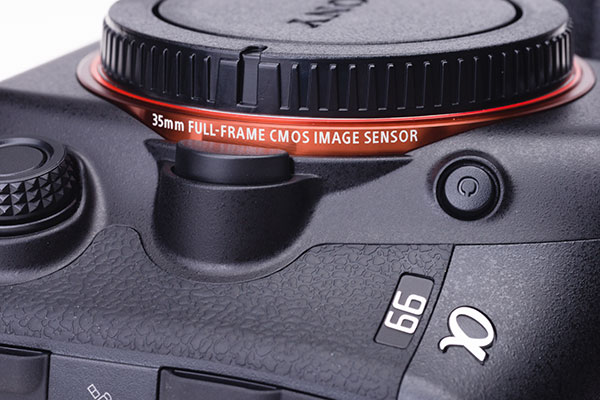
Here is where the Custom function button has been moved to – under your left index finger, where the flash pop-up button used to be. Slightly pointless wording on the bright orange anodised lens mount bezel lets you know this camera is not actually aimed at working professionals.
The Menu button accesses six main menu tabs. Still Shooting has four menus covering a total of 20 parameters. Movie Setting has two menus and eleven adjustments. The Custom menu has a huge depth, with six menus covering 33 functions some of which in themselves cover other buttons – five of the dedicated buttons on the body can be assigned any one of 35 functions or behaviours, including their native marked use. The Playback menu has two tabs, with ten parameters. The Memory Card Tool menu also has two tabs and nine functions, needed because you can choose where and how to save raw and JPEG images and movies.
Only the Clock Setup menu remains its usual two-entry basic form. The main Setup menu has four tabs covering 24 settings or actions. If you want to try adding all this lot up, before even investigating the complexity of settings within some aspects like Picture Style, you’ll realise there are thousands of different exact ways in which an Alpha 99 can be configured.
Canon has always had a secret weapon whenever anyone failed to get the expected good results from their camera – ‘ah, you didn’t set it up correctly…’. Now Sony has the same rather weak excuse. Not setting the camera up at all should result in successful images. No buyer should experience Default Setting shortcomings out the box. Setting it up expertly should lead to wonderful, perfectly tuned, almost-impossible-to-get-easily images.
And, I am glad to say, if you get an Alpha 99 out of the box and never touch a single one of these adjustments it is more than likely you will get perfect images. That is because unlike most DSLRs, the Alpha 99 actually works like your eye. It focuses and exposes as effortlessly as you do and you can see far more clearly, through the EVF, what is happening to exposure and focus as you prepare to shoot.

The EVF looks great in dark conditions – no coloured noise like the A55 and A77 generations, as the sensor is so noise-free. This is an in-camera ISO 1600 JPEG, click to go to the original full size file. It’s not bad at all.
Real-world performance
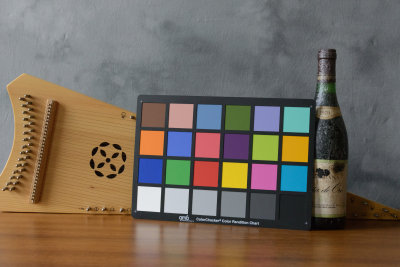
As I’ve said, we have been using the Alpha 99, Nikon D600 and Canon 6D side by side before I started writing this review. I did not have the 6D present when making colour-checker tests on the A99, A900 and D600.
Shirley has used Minolta/Sony since 1980, when we first took over the Minolta Club. Before that she used Praktica (as many students did), Pentax and then Olympus. The OM system was her preferred camera for its size and weight, and the exceptional viewfinder.
Well, after over 30 years using Minolta then Alpha, she’s finally departed from the system because of the change to EVF. Unlike me, she finds EVF view uncomfortable. The Alpha 700 was a great camera but sensor technology moves on, and she happens to be a regular abuser of long focal lengths and low light. The A580 has proved good but the very small optical finder has been an issue from the start. The Nikon D600 with 28-300mm VR lens may not be her ultimate ideal camera – we’re planning to try the Pentax K5IIs with 18-250mm, as that has a very good large optical prism finder. But Sony is now out of the picture and we suspect that she’s not alone. However good EVF technology becomes, some users will never feel comfortable with it.
One reason is the need for perfect accuracy in adjusting the dioptre. Optical finder cameras have a certain latitude, always best with exact adjustment, but remaining sharp over a small range of error. The A99 EVF does not have any latitude. The dioptre is set in clicks, and one click either way puts the OLED display visibly out of focus. If your eyesight changes a lot or you move between spectacles and the naked eye frequently, you will need to make constant adjustments to the dioptre.
The first thing we noticed when reviewing a few hundred raw files taken in similar conditions with the two cameras is that Nikon’s auto-ISO implementation on the D600 behaves very differently from that on the A99. The Sony metering, especially in Program mode with Auto ISO and wide potential range set, prefers the lowest ISO acceptable for the focal length in use and the available light. Nikon’s system will select higher ISO settings, and smaller lens apertures, very readily.
The Nikon meter is also calibrated out of the box to be generous in exposure, possible because the separate metering system is more influenced by light sources or high contrast and prone to big shifts in auto exposure with minor adustments to composition. At any given ISO, the D600 was often giving double the actual exposure – half of this doubling due to overexposing a bit, half of it due to Nikon’s different calibration of ISO.

Not only does the A99 have strikingly accurate auto exposure when confronted with very difficult conditions (Sigma 12-24mm shot above covering from deep shade to a white waterfall in sun), it also has 14-bit raw files with generous shadow detail and highlight recovery headroom. Click image to open a larger (not 100%) view.

Here is the histogram and totally neutral adjustment set shown in Adobe Camera Raw before fine tuning the shot above to improve the brightness and clarity of the shaded areas. Note the excellent shape of the histo without top or tail clipping.
The A99 meters exposure off the actual shooting sensor, using a 1200-zone colour sensitive matrix and intelligent bias towards single or multiple active AF points. In practice, it proved almost bullet-proof. Anyone who can remember the consistent off-sensor exposure of the old Konica Minolta A2 will appreciate the new Sony EVF and NEX models alike. They simply meter with far better consistency than any camera which uses a separate metering sensor. Of course this can also be said of Olympus, Panasonic and all mirrorless cameras. But they don’t all have the amazing 14-bit raw files and 12 EV normal ISO step dynamic range of the Alpha 99.
When we processed the raw files, Nikon’s ISO 6400 was less noisy than Sony’s despite the very similar (not identical) Sony manuactured 24 megapixel FF sensors. The difference is a little more than we would expect from the 2/3rds EV light loss caused by the trans-flective SLT mirror. The remaining difference seems to be down to Nikon treating a gain which Sony would call ISO 4000 as one labelled 6400, but giving exactly the same exposure Sony would give at 4000. This is not very accurate, as depending on the actual ISO setting the discrepancy ranged from less than 1/3rd of a stop to around 2/3rds, but seems to increase at higher ISO settings. Thus Sony has an apparently clear disadvantage at 6400 or 12,800, but the camera is actually giving half the exposure.
Here are some small samples which, when clicked on, will lead you to our full size set of JPEGs which can be pretty large. These files compare the A99, A77, A900 and D600 at two ISO settings only – 100 and 6400. All are auto exposed under identical conditions using matrix metering, so the cameras have been allowed to give whatever exposure and apparent ISO they would do in comparison. All have been processed using identical settings with Adobe Camera Raw 7.3 – Camera Standard profile (Sony Alpha 900 profile for A900), Linear, default sharpening 25/1/25/0 and no noise reduction at all.
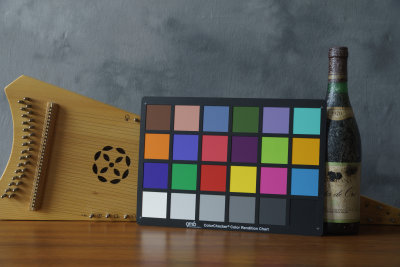
A99 at 100

A99 at 6400
A900 at 100
A900 at 6400

D600 at 100
D600 at 6400

A77 at 100

A77 at 6400

The Minolta 24-85mm at 85mm and f/6.3, 1/100th at ISO 640. A perfectly clean file, critically sharp though only one third of a stop down from wide open. Click image to view a larger (not 100%) version. The quiet shutter and articulating live view screen enabled this natural study.
Although the Nikon lens used was a consumer grade optic the £800 28-300mm VR, when it managed not to misfocus or produce a strange reverse-VR blurring due to Shirley’s initial failure to delay shooting by a tiny amount to allow the lens to settle, often produced slightly sharper results than the 1999 Minolta 24-85mm I chose to use on the A99. Subsequent tests show that the Nikon sensor seems to have a slight fine detail advantage over the Sony at ISO settings around 200-800 with Adobe Camera Raw 7.3. While Canon’s 20 megapixel 6D sensor has a similar high ISO performance, detail sharpness was generally similar to the A99 rather than the D600. Cumulative issues with AF performance, lens field flatness and sensor planarity also led to some Canon images having zones of unexpected defocusing. The A99 has no such problems and I believe it has the same very high standards of sensor flatness and body precision as the A900.
Comparing the A99 with the A900, there is a clear one stop gain in ISO related performance above 1600. But at 100 to 400, the A900 from raw has a kind of fluid quality – the pixels seem to merge and give a luminous yet crisp image. The A99 never really produces this special quality at low ISO, though at the expanded 50 setting it’s impressive. Perhaps there’s an element of illusion in this, that the exceptional optical image through the A900 finder conditions me to see the final picture differently.
The A99 has the same generous 30-lens AF Micro Adjustment calibration as the A77, though I found no need to calibrate except a very small adjustment of -2 for my 28-75mm f/2.8 SAM. I’ve not yet used every lens I own. It also corrects geometry and CA in-camera unlike the A900, for JPEGs. One benefit over the Nikon D600 which does the same is that the EVF shows the true geometry and composition after the corrections are applied. Optical finders can’t do that. This does impose a small extra load on processing and if you are after the fastest overall response should be turned off.
The A99 has one of the best 1080/50(60)p HD video functions on the market. For the bitrate involved, it captures detail three times as good as you would expect. It tends towards a soft compression like the Canon 5D MkII, not a highly detailed frame level image like Nikon’s video. You can stream pure HD video to external recorders without compression, monitor live sound with headphones including provision for lip-sync or echoless real time latency, control the stereo mic/line input with manual gain, and use the Silent Controller during filming for various functions.
The Silent Controller is a free rotating dial with a push button in the centre allowing you to set its function before each use if you want. The default use is AF-C, AF-S, AF-A, MF, AF-D and there are no clicks. It is silent, for use during movie shooting to change exposure or audio volume (etc).
This controller is placed where the former C/A/S/M focus mode switch was on the 900. It has a central button you can press to reassign a function to it before use. The external knurled collar is turned with one finger, without click stops. By default it changes focus mode. A typical assignment for this during video would be audio volume.
The 99 can auto-crop to APS-C 10 megapixel files when DT lenses are fitted, or if this is set by menu (needed for non-Sony lenses like Sigma DC or Tamron DiII). It can do this for raw files, resulting in a smaller raw, for raw+JPEG, JPEG only and for video. The Smart Teleconverter works in JPEG-only or video modes, giving 1.4X or 2X (4.6 megapixel) stills. In conjunction with the rear controller you get a further continuous zoom range to 4X for movies (native resolution to 3X, interpolated between 3X and 4X, with a very smooth electronic zoom effect). The EVF remains pixel-sharp at 1.4 or 1.5X, but anything more and you can see that the sensor image is being enlarged and is softer.
The 1.5X crop is also enabled if you select the 8fps or 10fps higher speed continuous mode, using the mode dial, rather than the 6fps full resolution mode using Drive settings. The actual sequence burst rates are effectively identical to the A77 and not any better in practical terms than the 4-year-old A900, which unlike the 99 can shoot 5fps Fine JPEGs without a break until the card is full or the sensor overheats. The 99 can only manage 18 frames before slowing. The use of a single Bionz processor with SD storage in the A77 and 99 seems to have been a backwards step, the dual processor of the A900 was better able to sustain a data flow to the fast UDMA CF cards accepted by that camera.
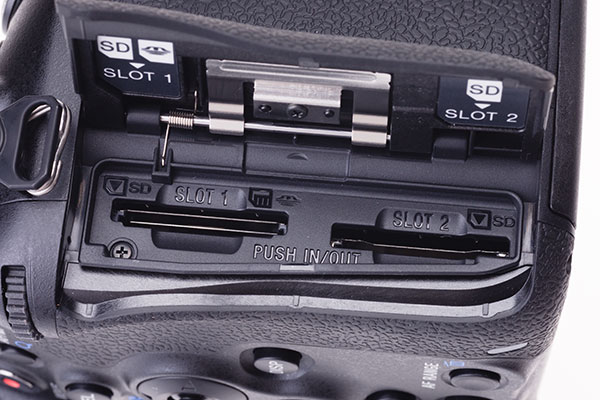
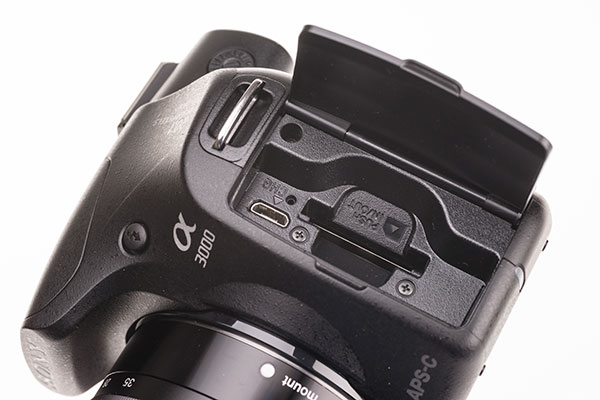
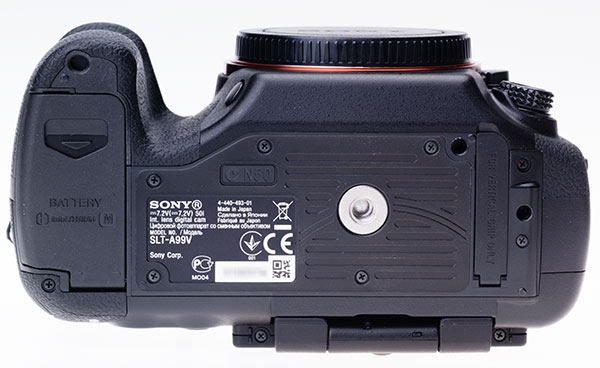
The dual card slots – SD and MS Pro Duo upper, SD only lower. The lip surrounding the card slot area is an effective waterproofing channel and the metal spring plate gives the card door a firm, unstressed action.
The 99 does away with CF despite its 900-like body size. Instead, a dual SD drive very similar to that in the Nikon D600 is fitted. Even the spacing of the two slots, and the way the upper card sticks out a little more than the lower, is the same. But the Sony has the ability to accept Memory Stick PRO Duo cards in Slot 1 as well as SD. I find this convenient, as I use a classic Dynax camera strap with a card wallet fixed to it. This can hold spare MS Pro Duo cards, and by chance, the slots for these cards also fit the plastic cover for the new hot shoe exactly – there’s nowhere else to put it, and it matters. The latest MS Pro Duo HX cards offer maximum performance, better than SD UHS-1.
But in the end, despite all its problems, the Alpha 99 simply turns in a better success rate on my sort of subjects – landscapes, street scenes, people, events – than its rivals. The metering is more accurate, the AF is either as good or better, the image quality at high ISOs is a touch lower, the GPS works well, and of course the sensor-based stabilisation is a total winner. Sigma sent a 35mm f/1.4 in Canon fit to test. This lens is quite incredible, and transforms the Sigma offering. It’s so sharp even wide open that the smallest degree of camera shake makes a shot look inferior. I forgot that with the A99, there’s hardly any situation I can not tackle hand held and get pixel-sharp results. I used speeds like the 1/30th or 1/60th on the Canon 6D and lost the exquisite jewel-like edge sharpness of the Sigma. I’m just so used to getting every single shot usable and not thinking about whether a lens is stabilised or not.

This scene didn’t work well with the un-stabilised Canon 6D – I was too cold, and hanging on to a support with one hand while standing half way up a steep muddy slope, with two cameras. SteadyShot worked well on the A99. Click the image for a full size link. ISO 1600.
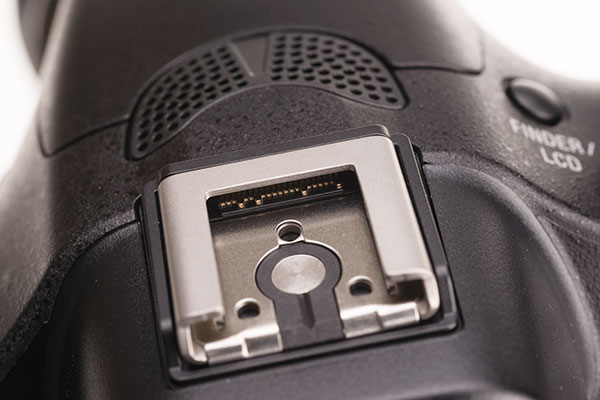
The new shoe
The new Sony Multi Function Accessory Shoe looks a bit like a rather crude old single contact hot shoe, and its central contact does indeed work to sync with any plain ISO unit. It can be used with Skyport and PocketWizard or generic flash wireless triggers, and I’ve also checked it with Wein infra-red. The three holes round the main contact are locking-pin holes, so beware third party generic adaptor makers. This is a good candidate for getting adaptors stuck.
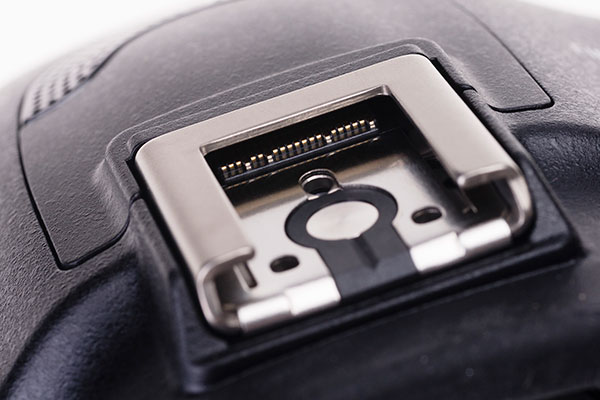
Under the leading edge of the ‘old’ shoe there is a recess, a horizontal slot not unlike the accessory slot fitted to the first generation NEX cameras. Its gold plated contact strips are very fine, and if this slot was left exposed by failing to replace the cover, it’s easy to see that dirt of moisture could get in. Unlike the NEX slot, there is no built-in spring loaded cover to shield it.
This interface provides the flash connection – duplicating the entire contact set for the iISO or Minolta i-shoe known as the Auto Lock Accessory Shoe by Sony, which is now gone. A small adaptor ADP-MAA is provided with the camera to convert from the new ‘old’ shoe to the Minolta standard. It is as slim and firmly fitting as they can make it, but still felt a little vulnerable with an HVL-F58AM mounted on top, especially when the camera was held vertically. A new flash unit, the HVL-F60AM, has been released for the A99 and in line with current trends it incorporates an LED video/modeling light. This aims forward to double as an AF illuminator, and can not be bounced.

The adaptor ADP-MAA shown with its connectors and the small spring loaded pins and ‘ball bearing’ centre contact to fit the new Multi Function Accessory Shoe.
Audio input is also handled by the shoe for microphone units compatible with the Cyber-Shot/HandyCam/NEX models using the new shoe. Since this shoe also appears on the NEX-6 and the DSC RX1 where it is the only way to input audio, there is some hope for a line/mic module. It is not needed by the A99 as this has a 3.5mm phantom powered stereo jack input, under one cover with a similar headphone output. Both input and output volume levels can be controlled on screen.
This change means that there are now three generations of hot shoe in the Alpha system, and five different shoe or accessory mounts in the Sony still camera systems of the last few years – there’s the Sony CyberShot shoe in two generations used by DSC F series and the R1, the inherited Minolta Auto Lock shoe, the NEX Smart Accessory Terminal and this new Multi Interface Shoe. To say this is unwelcome would be an understatement, but the shoe provides a long-term solution for future development and if you want to create a Christmas tree, it’s still backwardly compatible.
Its 24 contacts cover two different levels of power supply to accessories, audio in and out, flash or wireless flash control and connection, add-on GPS unit (the 99V includes an internal GPS, the plain 99 does not), add-on WiFi module, and EVF or HD monitor feed. We should expect to see a WiFi module and a monitor screen option, while the regular HDMI output can simultaneously send uncompressed video to a recorder. What we don’t know yet is whether the future WiFi module will be as clever as Canon’s built-in WiFi and do more than just send files from the camera. If it has an Android/iOS app for remote viewing and shooting it will be a winner.
The flash system remains with the original Minolta digital wireless TTL protocol as found from the HS(D) guns onwards. There is no built-in flash on the A99 and thus no built-in wireless control. The HVL-F20AM fold-down mini flash made for the A900 as a wireless trigger works perfectly on the 99 with the ADP-MAA but it’s no way as neat. The one benefit is that for direct use, it’s raised a little higher and casts less lens hood shadow while causing less risk of red-eye. We would guess that a new version will appear soon enough. I’ve tested it both directly and bounced, and as a wireless controller.
Flash exposure with the A99 has been exactly as expected – not a wildcard – but short of testing every flash in every configuration, I can’t guarantee against the kind of overexposure found in the A77. All I can say is that my tests, made within the expected range of units using appropriate ISO settings and apertures, have worked well. I do not use flash often outside the studio, and given the performance of the A99 at high ISO settings I doubt I will ever want to.
Any reverse adaptor for the shoe – to allow the HVL-F60AM to be used on Auto Lock shoe cameras – will not of course provide functions other than flash. The Auto Lock shoe doesn’t have any of the other contacts.
My reservations about the Multi Interface Shoe are only that its connector strip looks delicate and each contact has a very small physical contact area. Even the Auto Lock shoe has had its problems with occasional contact failure due to wear and tear or foreign matter.

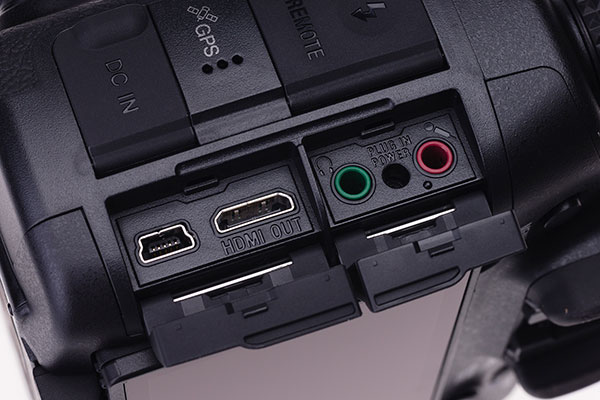
There is, of course, also a studio flash PC sync cord connector, threaded, under the same cover as the DC Power Supply connector. Below these is the Remote Cord connector, and between them, a GPS symbol marked next to the loudspeaker. Sony does not give advice which way up to hold the the camera for the best GPS reception. With the Canon 6D, lying on its back face up is the recommended position.
The focus system
Because of the Smart Teleconverter, APS-C auto crop and video crop/zoom functions the A99 needs an AF module perfectly suited to the APS-C or smaller areas. It gets exactly that – the same module as the A77 uses, and that one starts off with leeway to work in Smart Teleconverter mode.
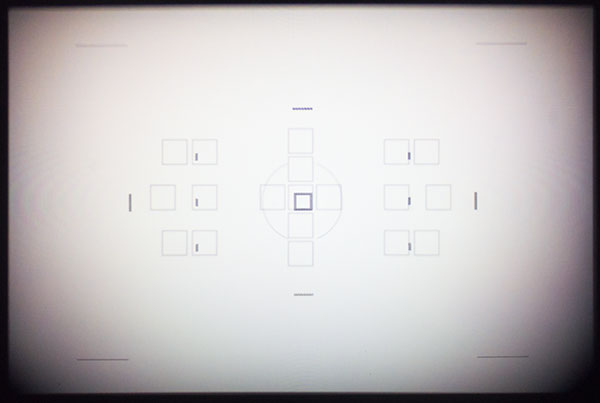
It’s a rather staggeringly tiny 6 x 12mm AF array, one-ninth of the frame area. Imagine the frame divided into thirds both ways and the entire 19-point, 11-cross point phase detect array fits within that modest central rectangle, but forms more of a horizontal ellipse shape within it. No AF points reach into the corners of that central patch.
The manual is deceptive because it frequently shows the AF area and points out of true scale to the overall frame.
This is why you come to photoclubalpha – we do the stuff the others don’t notice! Above, though rather crudely taken due to needing to hold an A55 with 30mm macro up to the eyepiece of an A700 aimed at the rear screen of the A77, is the actual AF module of the 77 (faint squares) overlaid on the AF markings of the A700 finder. This may be out by enough to make the overall AF zones similar , but it looks to me as if the A77 doesn’t quite cover the same extent as the A700, even after allowing for the 96% A700 finder view.
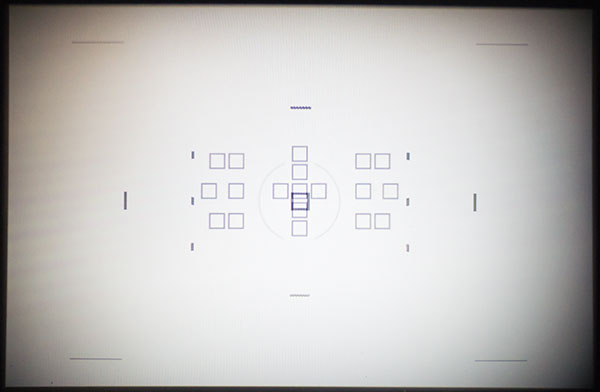
This is the same technique applied to showing the AF zone of the A99. As you can see, it’s the same module as the A77, floating in the middle of full frame. It doesn’t come anywhere near to the extent of the old A700 module, or the A77 in its cropped format frame. It does not even reach the ‘rule of thirds’ favoured points for composition. Coindidentally, the Phase Detect AF-D zone with its 102 tiny sensor spots occupies almost exactly the same area as the square formed by the A700’s top and bottom horizontal line sensors and triple vertical groups.

Here is how Sony generally represents the AF zone within manuals. This is not a graphic dealing with AF, and there is no need to show the AF zone larger than it actually is relative to the rest of the display. From the A99 manual.
Sony may have saved some money by using exactly the same module as the A77 but it’s just not adequate. You can compose shots where not a single part of the subject you want to have in focus touches an AF point, and moving subjects can move beyond the active zone all too easily. What was needed was twice the AF area – 1.4X the linear dimensions at least – even if that meant adding further non-cross points.
This module works with all Alpha lenses, from the earliest Minolta screw drive to the latest SSM and SAM. It works down the EV-1 (minus one), the same as Nikon’s 39-point D600 module and four times less sensitive than Pentax’s latest SAFOX design or Canon’s equally tiny central AF cluster in the 6D. It’s still better than AF used to be considering its ability to work optimally with relatively small apertures.
The marked AF-D area is a larger 12 x 12mm square, and when one of the compatible lenses is used and the appropriate AF-D mode invoked with subject tracking, a square array of 102 on-sensor PDAF focus assist points becomes active. I’ve described the result as a fireworks display, though that depends on the lens and subject. Groups of these points can light up, alongside the main focus points, in brief recognition of the subject.
As to whether it works, I can’t say. It turns on and become visible. Does it make any difference? I use both incompatible and compatible lenses. I can’t say that I have been able to spot any real difference in performance, certainly nothing I can observe or measure. All I see is the points light up after the focus has been acquired; they seem often enough just to confirm what area surrounding the chosen focus point is also within depth of field at focusing aperture.

To get this shot, the surfer had to be kept within the AF area of the A99. I was using a Sigma 70-300mm f/4-5.6 Apo Macro DG lens (which has replaced my Sony 70-300mm f/4.5-5.6 SSM G – reasons of superior sharpness, light weight, size and close focusing prevailed over the superior colour rendering and bokeh of the big G lens). Click picture for a larger, but not 100%, size.
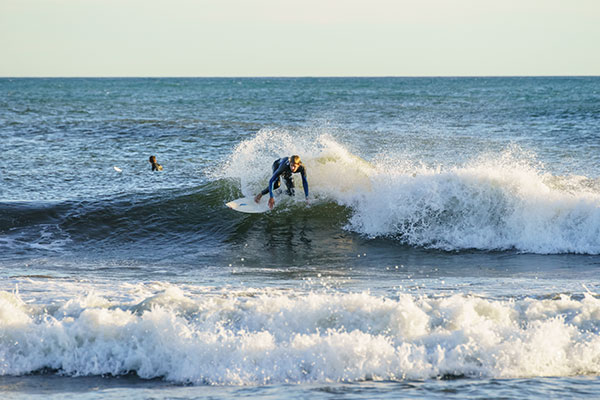
Here’s the full frame, 300mm, 1/500th at f/9, ISO 800. You can see I was keeping the central AF point on target because in this case, there was going to be plenty of spare megapixel estate to crop away. I took 115 shots of surfers, mostly single frames but some short maximum speed bursts between 2 and 5 frames, in nine minutes. Not one is out of focus even when the surfers came in closer to the camera at speed. But… they are all within that small one-ninth area of the frame which features the AF grid.
This 102-point zone is also too small, and the wrong shape. It’s a cut-cornered square. I am shooting 2:3 or 16:9 ratio stills or movies. I am not shooting square images. There is a reason, and it is also the reason more lenses do not work with this on-sensor phase detect focus assist. The pixel pairs on the sensor with their differentially angled microlenses use the image forming ray cone in a specific way to detect front or back focused phase shift. To do so, they demand a specific exit pupil geometry and need to be placed relatively close to the lens axis. This on-sensor array can not be extended to cover the entire sensor, or even to extend to a echo the image format more accurately.
In theory, on-sensor PDAF should be extremely accurate, and should be able to work with contrast detection (as it does on other sensors using this technology). But on the A99, they don’t have that function. You can not opt for hybrid contrast detection with on-sensor PDAF; the system is designed to augment the SLT-fed main PDAF module only.
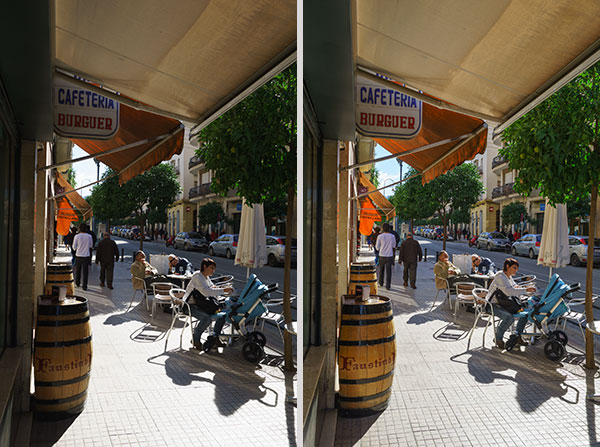
I’ve already observed that the perceived maximum resolution (microcontrast and detail sharpness) of the A99 does seem to be lower than the D600, despite Sony’s zonally graded low-pass filter which I can confirm does improve the performance to the edges and corners for wider angle lenses. The on-sensor PDAF zone is sufficiently populated and large to have some effect.
In case you think I’m talking up Nikon’s AF module over Sony, don’t… the D600 certainly did not focus any more accurately, quickly or reliably than the A99. Both AF modules are small in coverage, and both cameras do have an APS-C crop function including raw file saving and faster burst capture. The thinking has been alike. Ditto for the Canon 6D. That’s got a pitiful APS-C area module with only 11 AF points, ten of them plain old linear f/5.6 the centre one a mere f/5.6 cross with vertical linear f/2.8 (slightly inferior to the Alpha 700 of 2007 in all respects except low-light sensitivity). Canon doesn’t even have the excuse of APS-C or 2X capture modes, you can’t fit any Canon APS-C (EF-S) lens to the body let alone get the optional crop functions enjoyed by the D600 and A99.
So, here’s a new bunch of full-frame choices, and all three turn out to have small-area AF modules. It is Hobson’s Choice.
The A99 can never be rescued from its tiny principal AF zone by firmware updates and owners will just have to live with it. Things could have been designed differently; they were not. The same module is just about right in the A77. It’s lost in the big image of the A99.
Shutter response
One of the more surprising things about comparing the humble Nikon D600/Canon 6D with the advanced Sony A99 is the sound and feel of the shutter action. Both rivals have a low 1/4,000th maximum speed shutter, but are still capable of flash sync similar to the A99 (1/200th for Canon, 1/250th for Nikon, 1/250th for A99) which means curtain travel speed is similar and they simply chose not to permit a narrow enough slot to achieve 1/8,000th.
The D600 with its complete mirror up and down, twin shutter blind and recock action feels and sounds sweeter than the A99 which has no mirror to move and no first shutter blind. In fact, it’s louder and the dB peak for a very brief spike is about twice the volume of the A99 or the A77. But some recording with sound analysis reveals that the A99 sounds ‘louder’ because the actual duration of the sound is almost twice as long, and divided into two distinct clunks.
d600-a77-a99-200th
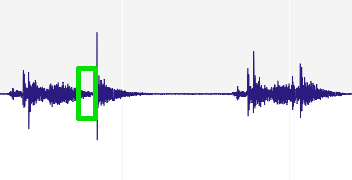
The D600, like the A77, has a normal single-shot shutter sound of around one sixth of a second, as you would expect from cameras which can achieve 6fps or something close. The Alpha 99 has double that. I timed it at over 300ms, and if first curtain mechanical mode was used, well over 400ms.
It took me a few days and some digging to find out that the 14-bit readout on the A99 only applies one shooting mode – single shot. Any other mode you select, including Lo 2.5fps continuous and all multishot or JPEG only modes, uses 12-bit readout from the sensor. This was already documented in the literature about the A99, but what Sony omit to say is that the 14-bit mode causes a noticeable pause between the shot being captured and the restoration of EVF viewing. This pause is around 1/10th of a second longer in single shot mode than the blackout which happens during 2.5fps or the first frame of any faster sequence, and totals 200ms or 1/5th of a second.
single versus lo
Above is an .mp3 link of single frame 14-bit capture compared to 12-bit capture in a Lo sequence setting. The green rectangle on the graphic indicates the extra time used for 14-bit processing; the overall time of the longest sound is over 400 milliseconds – nearly half a second is a fairly long duration for the audible cycle of any modern camera’s shutter actuation.
Thanks to the detailed analysis of audio recording using Amadeus Pro, followed by frame by frame time analysis of an iMac movie clip showing the actual LCD screen blackout period, I have been able to see this ‘dead period’ of blackout and image processing is longer than the entire shutter action of the A77 or D600; indeed, the shutter actions of the A99 surround this hiatus. The card writing light comes on a millisecond or two after the live view blacks out. The action of the shutter curtain being recocked, which accounts for a substantial part of the overall shutter noise, only happens at the end of the 1/5th second pause.
Short of a firmware upgrade, there’s nothing you can do about the extremely slow single-shot shutter cycle or the interrupted finder view if you want the extra quality which comes from 14-bit raw capture. Nikon offer you a choice of 12 or 14 bit, compressed or uncompressed raws. Sony does not offer a choice and makes the bit depth specific to the way you shoot. There is no doubt at all that both raws in single-shot mode, and Extra Fine Quality JPEGs created in this mode, show less noise when adjusted to an extreme. 12-bit capture is fine for lower ISOs, in good light, with correct exposure.
The 14-bit raw file has great flexibility for shadow and highlight adjustment from raw without losing colour values or subtle tones. I’d rate it as one of the best raw file formats I have worked with, at normal (100-800) ISO settings. No local dodging has been used above to enhance the backlit scene – just what amount to curve adjustments.
The 3fps Lo motordrive setting was easy to use for single frames, with a light touch. This caused half the finder blackout duration and no more than a 290ms total sound envelope (including all reverberation – the main sound is not unlike the 180ms of the D600 or A77). It didn’t matter what file size and type I recorded or what card was used. This setting always produced the shutter cycle, and sound, I would have expected the A99 to have.
Having observed the way the camera works, I’m afraid I am now rather too aware of it. It makes me appreciate the Alpha 77’s much faster, sweeter action and even consider the A900’s noisy clack with affection. One effect of the longer shutter cycle is to make the relatively quiet sound – 4dB quieter at peak than the Nikon D600 which also has a higher and more intrusive pitch – seem ‘louder’ than it actually is.
What is interesting to me is just how few users, when I asked for information or tests of their own cameras, were really able to hear the differences or see the blackout period. I can thank Gary Friedman for being able to confirm my findings – he could understand exactly what I was looking for. And thanks to several posters on Dyxum forums, whose concerns were with the image quality of 14-bit versus 12-bit, for providing the information I need to put the facts together and realise that no amount of adjusting settings was ever going to make the A99 share the brief blackout and sweet shutter sound of the 12-bit A77.
Gary uses wireless flash a lot. I don’t generally use flash at all except in the studio. Gary has observed delay in wireless flash triggering which is just as long as the entire shutter cycle, and made a great short video which explains this problem:
http://youtu.be/eHrBcT51oE8
I’m not sure if this is a definitive test – there are other trigger flashes which can be used and I’d like to see the times from the HVL-F60AM, F58AM, F42AM and so on. But it indicates that it’s not just me who does not use wireless flash. Nor do Sony’s systems designers and technical team!
The LV dilemma
Sony’s camera line is now totally committed to using the sensor as the viewfinder. This means that whatever performance they can pull from that sensor, it will always be a quantum drop lower than the same sensor used in an optical viewfinder camera. The level of read noise is heavily influenced by the sensor temperature, and continuous live view makes the sensor heat up.
Sorry, I can’t measure it. No doubt someone equipped with the right tools could measure the temperature of the silicon after 15 seconds, a minute, ten minutes or any other period and also allow for ambient conditions. Sony’s handbook reveals that most performance figures and presumably most pre-production tests assume an ambient temperature of 25°C. By my standards, that’s extremely warm, even as an indoor temperature.
There are warnings that the camera may shut down if video or continuous shooting result in an internal overheat. I’m just not going to be testing the A99 to that degree. The best I could do was to set it to ISO 6400 and the highest video bitrate, and leave the camera running in low light, to ensure the highest gain levels.
I’m fairly sure all of the Nikon D600 noise level advantage can be put down to not using full-time live view, and the effect of the SLT mirror. The Sony sensor is almost certainly just as good overall, give or take whatever effect the phase detection pixels may have.
Battery – left hand as seen (right hand grip). To the other end, a narrow covered port allows connection of a vertical grip without cannibalising the battery already fitted. The resulting three-battery configuration is the only way to get real stamina for a busy day’s uninterrupted shoot, especially if you use GPS.
LV and EVF lead to very short battery life, and this may be exaggerated if you want to do very long exposures.
So there is the ultimate dilemma – the Alpha 99 is a master of all the functions and features you could want just so long as you want EVF with it. If you don’t, then the Nikon and Canon alternatives will not only be better choices for you, they will save you into the higher hundreds of pounds or into four figures in dollars.
My choice
The Alpha 99 is currently the full-frame camera I’m working with and will stick with until the next generation arrives.
I sold my Alpha 900 shortly after the Alpha 99 arrived. I regretted it straight away, but that is just down to an attachment after four years of familiarity, and a false reassurance that this is such a solid and simple camera it would have lasted me for life. I do not make videos often, but when I do in future I want full control over direct audio input as audio overdubbing from a separate recorder is something I have found very tricky to handle (at least in iMovie, which is what I use).
I didn’t sell my Alpha 77 despite the poor performance in low light, and the lack of the audio level control. It’s far too useful, having 24 megapixels in an APS-C crop, rather than the 11 produced by the A99 crop format. Also, the general colour and grading of video matches the A99 well enough for the 77 to be a second camera. After we bought the Nikon D600, I found the colour and contrast sufficiently different to mean mixing video from Alpha and Nikon was not an option. It also has manual audio input gain – but we can’t team them up. For much the same reasons I have kept my NEX-5n and my Alpha 55.
Could I work professionally with the Alpha 99? Yes. I’m confident it would not let me down in any situation I’m likely to encounter or set up – I do not shoot sports or hard news, events or conferences. Future professional use would be likely to be public relations, corporate brochure, annual report, advertising, industrial and environmental, executive portraiture, products, architectural, building works, stock travel and landscape. Frankly, anything I could once have shot on a Hasselblad can easily be tackled with an Alpha 99.
Despite this, I would be very happy if Sony revived the highest end optical prism DSLR in future. An Alpha 900 quality version of the D600 would have been perfect. And I do not think I am alone in showing some regret for the apparent end of the single-lens reflex Alpha.
– David Kilpatrick
Footnote: elsewhere, the usual comment has been made that I’m wrong to compare this with the 6D and D600 because the A99 is competing with the 5D MkIII and D800. We have a D800E and may acquire a second one. It’s not competing with that; the D800, and especially the 800E, appeal to a different market where using 36 megapixels counts more than several other factors. It is also not competing with the 5D MkIII, which is locked into a huge Canon professional userbase as the one undisputed mainstream body. Nikon has a fragmented position; the D600 isn’t on the right level, the D800 offers benefits many users do not need and loses advantages they want to keep, the D700 is low resolution, the D3s the same and the D3X is priced beyond its specification. Nikon professionals I know all say what they want is a D700 body (and shutter, etc) with a D600 sensor – they would then have a camera at precisely the same level as the 5D MkIII. They would have the one easy no-doubts choice to make the same way Canon users have.
Like it or not, the Alpha 99 is actually competing with the 6D and D600, and it does not matter to the market that some aspects of its construction and specification are closer to 5D MkIII ‘build’. Sony is doing something in enthusiast-level photography right now that it has done well in the past in television and audio, positioning its pricing as a premium consumer brand. The DSC-RX1 specification and pricing tells you everything you need to know about how Sony sees the market.
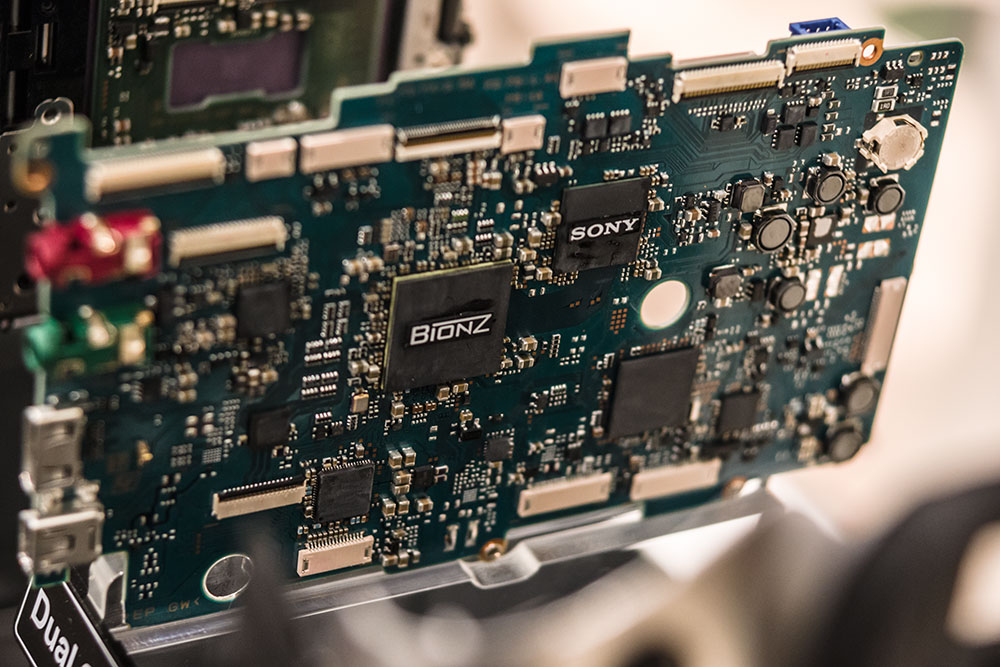
This is why the A99 doesn’t even really compete with the older A900. Single Bionz processor (that word saying ‘Dual’ refers to the memory card slot) where the 900 had two – and 14-bit data to process. The SD cards, even Class 10 UHS-1, also represent a bottleneck in data transfer. Using the highest end MemoryStick PRO Duo overcomes this. Photographed on the Sony stand at photokina.