Sony A7RIII pixel shift with a vintage lens

We’ve got one from the first Sony ILCE-A7R3 delivery in the UK, and with a first review of two pages appearing in Cameracraft January/February 2018 from tests in early December, I will be following up with a fuller printed review and more on-line articles here as the camera’s potential unfolds.

Continue reading »

Sony is ready to launch a GPS module

Sony can make GPS work. They pioneered it in the A55, refined it in the A77, A65 and A99 – and abandoned it without a word in all later A-mount cameras and the entire E-mount series. But they prepped the Multi Function Accessory Shoe to be used with a GPS module – and I believe it will be on the market soon.

They have put the rest of the architecture into the new cameras to make a GPS hardware module for the accessory shoe possible, practical, easy to implement and maybe even affordable (especially if third party makers come to the party).

This is a simulation using a retouched Elinchrom Skyport trigger – about the smallest size a GPS could be expected to be. For accuracy, something twice this scale mounted on the hotshoe would be a powerful four-aerial 2xAA cell or lith-ion powered GPS receiver.

Sony have added the I/O part of the data flow which puts geo data into the metadata fields of image files to the processor of the A9, A6500, RX10 MkIV (I think) and now the A7RIII – and in all three, they’ve put a 2.4GHz Bluetooth I/O process which can communicate with smartphones running their own GPS tracking app and grab the data every time you press the shutter. It needs no additional app on the camera.

This is significantly different from the Olympus solution (above), which I have also been testing alongside Sony’s. I have not found the A6500 pairing with iPhone all that reliable or persistent between sessions out of range or turned off. I have not enjoyed the Olympus method either – you synchronise the phone GPS app timecode and the camera time setting once using WiFi and after this you can turn WiFi off on the camera, leave the tracking app running on the phone, and shoot. At the end of the shoot, you connect again to the camera and initiate a transfer of the GPS track to the camera, which then parses it and embeds the co-ordinates closest to the timing of each exposure into the image files.

Sorry if this sounds a bit complex but it’s not. Essentially, Sony maintains a live link to the phone while you are shooting and acquires the GPS data to embed every time you make an exposure. Olympus relies on time synchronisation and an ‘end of day’ in-camera, wireless addition of the GPS data not unlike the process you might use with a separate tracker and a program like HoudahGeo or Photolinker.

That shoe has a GPS data channel – so far, unused. Now the processor has everything needed to make it work.

What’s really, really important is that these new Sony models have the firmware, interface connections and data handling to acquire a real-time or most recent position data packet from a stream, and inject this into your .ARW and .JPG files without needing any time synchronisation. Other models, which can not use the phone/Bluetooth solution, presumably do not have this firmware and the built-in protocols for acquiring, writing and validating. They don’t have the ready-made menu options either.

So, in place of your Bluetooth phone GPS, you will hopefully be able to fit a camera-top GPS module similar to those used by Canon and Nikon (who built the GPS data writing ability into their firmware years ago). The connections have been in the MFA shoe since 2010. Now the new camera models complete the jigsaw. All we are waiting for is for Sony to release a GPS module and a minor firmware update (the menu entries are already there). If the GPS module has its own battery, all the better – my tests with iPhone and A6500 ran the batteries on both down so fast the method would be impractical for anything more than day-trips.

I use GPS – at the moment, synchronising a track from an iGotU GT120 tracker carried in my camera kit or in a pocket. The device is not very reliable, has dodgy Windows-legacy management software and basic Mac function via third party programs. But for the travel photography I sell, captions have to be accurate and detailed, so the effort has to be taken. It was all SO much easier with the A55, A77 and A99… not to mention the Nikon D5300, Pentax K-1, or Sony’s non-raw-enabled Cybershot HX400V, HX60V and so on. For a very short time indeed I used the Jobo PhotoGPS, which required connection to a server database to turn its satellite position values into geocoordinates. Someone forgot to renew the licence, the server owners turned off the service, and every single PhotoGPS unit sold became a paperweight.

Nothing really beats having in in-camera or on-camera – and Sony has a good record of providing GPS assistance data files, auto-loaded on to your memory card when needed, which make the few cameras provided with GPS work well.

I had almost decided not to consider the A7RIII, but if my prediction proves right and the GPS module arrives in 2018 I will buy one. I’ve actually sold my A6500 after just three months of use to spend a bit of time using an Olympus E-M1 MkII outfit, including its slightly less battery-intensive GPS kludge. I’ve kept my A7RII as no camera made on the market at present, which is comparable in format, attains an image quality to match it when all other factors are equal.

Disclaimer: this is speculation. But it’s not empty speculation!

  • David Kilpatrick


LandscapePro – changing your world

If they want to fake a Mars colony story, a video version of British software developer Anthropics’ LandscapePro could be useful. It’s from the same team who created PortraitPro, and it allows you to change almost any landscape beyond recognition. It also allows subtle and careful modifications, or essential commercial fixes like a better sky in place of blank white.

One September weekend, a visit to a local restored mansion and park (The Haining, Selkirk, in the Scottish Borders) was rewarding because the Moving Image Makers’ Collective had video art installations running in the house.

Above is a film with dual projectors using the corner of a room (by Jason Moyes, with power making its way from hydro-electric dams to lonely wires and pylons).

Outside things were not as inspiring.

Of course the components of a closer shot, using the ‘quay’ as a foreground, perhaps in black and white, are there. But from this view as I walked past, not really photogenic.

Here’s where LandscapePro can perform any number of tricks, some familiar from sets of actions or presets like a sepia vignetted contrast-boosted vintage look. But it’s the tools which let you mask off different areas, named in the control menus, that give the program (whether plug-in or stand alone studio edition) its power.

This is a screen shot during progress of auto-painting the masks by dragging the named tags on to various parts of the image. You can then refine them by expanding any part. It’s pretty difficult to mask complex tree horizons as on the right, and some post-process work in Photoshop may be needed. My not-serious rework here is a quick job. You could spend an hour or two setting up the masks for an important image. Even so, the program handles a Sony A7RII 42 megapixel JPEG well enough and most actions are as fast as you can shift the cursor

My idea here was make the scene look like a frosty morning sunrise. The sky is one of my other shots, not a LandscapePro stock sky (the program comes with a good selection but I prefer to keep all parts of an image my own work). The post-pro includes a method for getting rid of a white outline on the woods – you use the Healing Brush tool in Photoshop, set it to Darken, choose a source point in the sky above the horizon, and paint. A similar technique using the Brush tool set to darken with a sampled colour from the lake fixes original tones showing between the reeds. I find the Clone, Brush and Healing Brush tools very useful when combined with Darken or Lighten and controlled flow; I don’t retouch using Layers but have always worked ‘fast and clever’ on the background (single layer), after doing most of the image control and adjustments in Adobe Camera Raw which gives me an .XML sidecar saved non-destructive edit as complex as I need. Mostly, I don’t have to retouch at all in Photoshop. Both PortraitPro and LandscapePro suit me well as they are very fast to use and non-destructive; generally, you can’t see they have been used, especially PortraitPro, because I only use it when needed and then pick specific controls. It is easy to go over the top with these programs as this example shows, but this does not detract from their serious value for careful work.

For this image I also copied the sunset/rise area, flipped it vertically, and used the Clone tool to overpaint from the flipped version down into the lake to give a reflected sun glow. Colour changes have also been made to the trees.

Above you can see, close up, a detailed section with the original top and the processed version bottom. This should demonstrate that the program is not just a gimmick. I used to work with UltiMatte, Mask Pro and other programs which allow painted masking but the multiple different mask zones of LandscapePro take this a step further. Needless to say it’s a godsend for architectural photographers as the clean edges in most architectural shots allow rapid perfect masking and then each face of a building, ground area, sky and landscaping can be adjusted separately. You can work from raw files or from open images in Photoshop (as I did here – it’s not really a JPEG until saved).

You can try LandscapePro at www.landscapepro.pics, and get a 10% discount by using the coupon code F278. If you want to try Anthropics’ PortraitPro visit www.portraitprofessional.com, again we have a discount code – F2910.

UPDATE: August 2020 – until August 17th, use code CC8B on current 50% off deals to get a further 20% off any edition or upgrade of both programs. Visit this link.

– David Kilpatrick


Never say ‘zoom with your feet’…

There’s a dismissive and rather superior position some camera club buffs take – ‘why not zoom with your feet?’. It is well worth ignoring. The focal length of your lens, whether your use a zoom or a range of fixed focal length lenses, decides the exact relationship of elements in the picture including one component you just can’t ‘zoom with your feet’, the sky. The depth of blue above the horizon, the scale of clouds, can only be changed by using a different focal length.

Here is the cover of the May/June 2017 Cameracraft magazine, and in a very rare lapse of judgment I used one of my own photographs. I had never photographed this church before despite driving past it on the A7 Scotland to England road through the ‘debateable lands’ for the last 28 years. A quick left turn down a farm estate road led to St Andrews church of Kirkandrews, an 18th-century gem with the unusual feature of being built on a north-south alignment instead of east-west. This put the late March afternoon sun on to the south door and sundial.

Now this is a typical deliberately uncorrected 24mm steep angle shot, and I also have very straight versions taken from further away on the 24-70mm CZ f/4 lens and A7RII. but they are all at between 24 and 32mm with the church smaller and composition using the churchyard and walls. That’s because the sky simply looks best with a wide angle.

Despite some bad press, I’ve found the 24-70mm to be an excellent lens. You can get good deals and Amazon UK is showing discounts up to 19% – check our affiliate link which helps photoclubalpha cover its costs if you buy.

When we pulled up here, there was a car on the other side of the church spoiling the view I had seen from the road, spotting a dramatic old dead tree. We chatted to a lady who was looking after the churchyard and gardens, a lifelong commitment. She said it was a pity the church was locked as the interior was worth seeing – and left taking her car which had been prominently in my planned shot. So, we parked the car in the field further away, and I returned to the area of the tree.

I knew what I was looking for, and at first walked to a spot and composed this at 30mm. But by moving round and just looking at the possible camera positions (and heights above ground) I could see the relative scale of the church and tree could be changed by finding the best angle of view and perspective. This is what using your feet AND a zoom helps you do, and ‘zooming with your feet’ most certainly does not if all you have is a fixed lens. A 35mm or 28mm would have been fine here, but I knew how much clearance I wanted between the church bell tower and the branch, how large or not I wanted the fallen branches to be (and I do not ‘garden’ subjects like this which are someone else’s property).

This shot at 26mm was able to give me more sky. It’s also one which I could straighten for converging verticals (it has space to do that) using Photoshop/Camera Raw‘s excellent tools for this. To the right, there was an ugly wooden barrier to keep livestock off a sapling. Below, you can see why this was not a good addition to any composition. Earlier on there was that white car between it and the church, which had departed.

From this position, I was generally happy with the scale of the tree and church and their relative weights in a vertical composition, but felt it needed to be a little tighter.

This framing at 35mm kept all parts of the tree clear of the church, placed them neatly and avoided any strong foreground of fallen wood.

This example moved me closer to the tree, at 24mm again, giving the most attractive sky and clouds. But I felt the broken main trunk of the tree was slightly too strong and the ratio between the tree and church just missed the mark. Such small differences do count. Normally I don’t show anyone the ‘ringaround’ compositions, only the final shot. In what is essentially a landscape scene, it’s not always that important. In commercial work, including portraits, wedding or fashion you need to realise that a centimetre or two difference in where you place your lens can distinguish good photography from ordinary. This, and the timing of your shot, also marks out the best press photography.

Precision viewpoint is where both your feet and zooming come in. By moving much closer to the tree, and using it as a solid closure to the left hand side of the image, the small forked branch could be positioned to frame the church and no slightly more ugly broken branch ends would be shown. The closer viewpoint was controlled to within an inch or two side to side and vertically, by crouching slightly to get the lens in exactly the position I wanted.

This also kept the church centred and therefore without converging verticals. I was already seeing this as a black and white conversion, and possibly a cover image, with the space necessary for typical cover lines and logo. This was the picture I did use for the cover.

However, from the same viewpoint zooming to 41mm allowed a different crop with a larger scale to the church.

You can see how I have moved to my left just a small amount, and also stepped back a couple of paces to change the relationship between the forked branch and the church. This is the control you gain from a lens like the 24-70mm – and why you should zoom PLUS your feet, not zoom WITH your feet. Above all, you should walk round and look, even without the camera, studying the interplay between foreground, background, middle distance and the sky.

For my first three years of using the Sony full-frame mirrorless system I have been without a 24-70mm, using a range of primes and the 28-70mm instead. Although I had used excellent work from the 24-70mm f/4 in our magazines, from other photographers, there were so many bad reports about it. But 24mm has always been a critical focal length for me, so I had to buy it when a good deal came up (a refurb from Sony, which allows me to recover the 20% VAT which I can’t claim on regular secondhand items). Well, it’s not perfect because at 24mm the focus field is very curved (cap-shaped) to the extent that detail at the edge of the frame is focused on around 45cm when the centre is set to 45m. This can lead to the idea it’s soft. In fact, this curvature improves the sharpness of the tree trunk and the distant church at f/11 – 42 megapixels can be demanding. But if this was a portrait, with a distant scene beyond, it would have the reverse effect and make the outer field seem less sharp.

  • David Kilpatrick

Affiliate links to help photoclubalpha if you order the 24-70mm Carl Zeiss Vario-Tessar f/4 FE – B&H Photographic, Amazon, and WEX.

Sony launches A99II at photokina

a99-ii_wsal2470z2_right-web

Sony has today released the details of the updated A99II, using a 42MP sensor and 5-axis stabilisation to match the A7RII. It does not appear to have retained GPS and the paragraph highlighted in red later on indicates a weasel-worded possible get out for this – it may not embed GPS in the image files, but instead store a mobile phone location data track on the camera’s memory card. We may guess that this choice could be partly down to cutting out fees payable to incorporate a GPS module. Not the same, guys, not the same:

From Sony’s site, the ambiguous word is highlighted here:

Use Location Information Link to make the most of your camera anywhere you go together. After the camera has been paired to the PlayMemories Mobile app installed on a compatible mobile phone or tablet device, it can acquire location data from the mobile device and record that data with still images. The acquired location data can also be used to correct the camera’s date/time and location settings. The PlayMemories Home application can then be utilised on a personal computer to organise still images imported into the computer on a map.

Edit: note that Sony’s later announcement for A6500 uses specific wording which says that its GPS Blueooth app embeds location data in the images as they are shot. This wording has not been used for A99II. We have not, though the A9II has now been released and bought by some users, been able to confirm how it works yet.

In the Sony release (used almost complete, slightly edited, to form this post) they appear to imply that dual SD card slots are new, which of course they are not, the original A99 has this already. No UHS-II, no USB 3 Not only that, the dual slots are apparently exactly the same spec as the original unless someone at Sony Towers has forgotten to edit their website:

Memory Stick PRO Duo, Memory Stick PRO-HG Duo, Memory Stick Micro (M2), SD memory card, SDHC memory card (UHS-I compliant), SDXC memory card (UHS-I compliant), Micro SD memory card, Micro SDHC memory card, Micro SDXC memory card

Some of the hidden, clever features of the A99 remain like the buttons which are coded to touch with concave or convex tops or a small raised dot, making it easy once you have learned their feel to find them by fingertip. In fact the entire interface remains constant (in the way that Canon did throughout the EOS 1D series) meaning you can pick this up and shoot immediately, coming fom the A99. Only the Silent Controller is significantly improved, and the badly placed Movie button remains exactly where it was.

  • Full-frame 4D Focus: Innovative Hybrid Phase Detection AF system with accurate 79 hybrid cross AF points[i] enabled by 79-point dedicated and 399-point focal-plane AF sensors and continuous shooting at up to 12fps[ii]
    There is no AF Illuminator, but please note that -4 EV is quoted with an f/2.8 lens at ISO 100. In the past, AF low limits were always quoted with an f/1.4 lens (although the sensor only works at f/2.8). This is very good.
  • 42.4 effective MP 35mm Full-frame Exmor R™ CMOS sensor so it’s essentially an A7RII
  • Newly developed optical 5-axis in-body image stabilisation system
  • Outstanding operability and reliability in newly designed downsized body
  • Internal 4K movie recording in XAVC-S format[iii] with host of pro-orientated movie features
    IMPORTANT: this appears to be a Super-35 4K mode if you want no pixel binning and the highest overall quality but near-full-frame is offered with the usual partial readout.We would add a few extras – this camera has the much-needed (almost essential) Copyright Info function, minimum shutter speed when using Auto ISO, 10/5/2 sec self-timer, Hi+ in addition to Hi, Med and Lo motordrive shooting (not just shifting three settings over a faster range but giving 12, 8, 6 or 4 fps); built-in WiFi wireless including WiFi remote control and NFC (but not, apparently, apps); there are new Highlight and Average metering modes, and for each metering mode, you can calibrate the standard exposure if you prefer your shots slightly lighter or darker than the camera’s default.The A99II can capture 54 uncompressed RAW+JPEG images at 12fps (Hi+) before the buffer is full. There’s no great advantage in capturing RAW only, or JPEG only, and even with Fine JPEG at Hi speed (8fps) the limit is still 71, not ‘until card full’.

    Omissions include no Multi Shot Noise reduction, no GPS, and the external DC power supply is no longer via a dedicated socket, instead it uses the dummy battery approach. The camera is still not officially recommended for use in temperatures below freezing or over 40°C/104°F, both of which can easily be achieved in Scotland in a single sunny winter day (even without the benefit of your car parcel shelf oven).

a99-ii_rear-web

The upgraded autofocus

The newly developed Phase Detection AF System is capable of ‘full-time AF’ and is the first implementation of 4D FOCUS in the full-frame ɑ series, bringing a supreme new level of AF performance to ɑ99 II users. The Hybrid Phase Detection AF System is enabled by combining a precision 79-point[iv] dedicated phase detection AF sensor with 399 focal plane phase detection AF points to produce a 79 hybrid cross AF point[v] array. These cross points deliver incredibly precise autofocus performance and advanced subject tracking of any moving objects right across the image, at high speed. In addition, as there is no moving mirror, TMT enables continuous AF operation and the finder image remains unaffected during any type of shooting, including live view and movie recording.

Low light conditions present no problem to the ɑ99 II. The precision AF system will function properly down to EV-4[vi] brightness levels where most other cameras struggle. Editor’s note: the A99 is poor in this respect and often can’t focus modest aperture lenses at all in low light.

Data flow through the ɑ99 II has been redesigned to allow for high resolution and continuous shooting at high frame rates. A new front-end LSI works with the image sensor and BIONZ X image processing engine, as well as a newly designed shutter unit, to enable continuous shooting at up to 12fps with AF/AE tracking[vii], all whilst harnessing the sensor’s 42.4MP capabilities. The result is an ultra-fast camera that will deliver incredibly detailed shots, even with fast moving objects in challenging light conditions. Thanks to a large buffer and sophisticated data processing, these shots can be viewed immediately after shooting even when in high speed continuous shooting mode and if shots are being taken indoors under artificial lighting, flicker is automatically detected and the shutter is timed to minimise its effect on the end image[viii].

Improvements to the EVF display algorithm now deliver continuous live-view shooting at up to 8 fps[ix] with AF/AE tracking with minimal display lag so that the viewing experience is essentially no different from that of an optical viewfinder. Exposure, white balance and other camera settings are displayed in real time in the viewfinder and continuous live view shooting can be set in 3 stages to match a variety of subjects: 8 fps, 6 fps and 4 fps.

Pixel Power

The back-illuminated full-frame 42.4MP[x] Exmor R CMOS sensor benefits from a gapless-on-chip design and allows for fast readout of large volumes of data as well as being extremely efficient in its light gathering ability. The net result is very high sensitivity with low noise, wide dynamic range and 42.4MP resolution across an ISO range of 100-25600, expandable to ISO 50 – 102,400[xi]. The ɑ99 II has been designed without an optical low-pass filter to allow the finest natural details and textures to be captured with unprecedented depth and realism and the photographer can select compressed or uncompressed RAW files, as required.

5-axis SteadyShot™ INSIDE Image Stabilisation

Having proved to be incredibly popular in the ɑ7 II series of cameras, Sony has designed a new in-body 5 axis image stabilisation system for A-mount cameras which debuts for the first time in the ɑ99 II. In addition to movement in the pitch and yaw axes that tend to occur at longer focal lengths, this system effectively detects and compensates for shift blur that can occur on the X and Y axes when shooting close-up, and roll blur that is often apparent in still images and movies that are shot at night. Newly implemented precision gyro sensors are capable of precisely detecting even tiny camera movements that can cause blurring, providing a 4.5 step[xii] shutter speed advantage that can help realise the full potential of the 42.4MP sensor, in both stills and movies. The effect of image stabilisation can be monitored in the viewfinder or on the LCD screen during live view when the shutter button is half pressed or the Focus Magnifier functions are used. This allows framing and focus to be accurately checked via live view when shooting at telephoto focal lengths or macro distances.

Improved design and operability

The design of the new ɑ99 II has noticeably evolved compared to its predecessor, based upon feedback from professional users. The new model is 8% smaller than the original ɑ99 and has a newly designed grip, magnesium alloy body, dual SD[xiii] card slot and other upgrades that improve both hold and operation. All major buttons and dials are provided with seals and the media jack cover and enclosure edges feature tongue and groove – the result is a body that is both dust and moisture resistant[xiv] and can be used in the toughest and most challenging shooting conditions.

In addition to being designed for faster response, the new shutter unit is also more durable and has passed endurance tests in excess of 300,000 shutter operations[xv].

a99-ii_top-web

The XGA OLED Tru-finder has a ZEISS® T* Coating and has a 4 element lens group that includes a double sided aspherical element whilst offering a powerful 0.78x magnification, delivering outstanding clarity from corner to corner. It also has a fluorine coating on the outer lens to prevent fingerprints, dust, water, oil and dirt from sticking, thus ensuring a clear view. Editor’s note: the ocular of the original A99 is a weak point, and in the A7RII Sony finally produced a really good non-squiffy eyepiece optical train which shows a clear view with some leeway to move your eye. So this is a major upgrade as much of the experience of using the SLT models comes down to finder quality.

The silent Multi Controller introduced in the original ɑ99 has been improved so that in addition to allowing control of aperture, shutter speed, ISO, exposure compensation, AF area, AF mode and other settings, it now features a click-stop ON/OFF switch. When ON, the preferred setting for still image shooting, the control clicks, providing a tactile indication of the length of rotation. When OFF, the control turns smoothly and quietly, ideal for movie shooting. Location data acquisition has also been made possible via Bluetooth[xvi] connection to a compatible mobile device and it is now possible to select whether the storage location should just be on a tethered computer or also on camera for easy review without leaving the shooting position. Based upon feedback from a number of ɑ users, the menu structure of the ɑ99 II has also been updated to deliver a smoother navigational experience.

Internal 4K movie at 100 Mpbs

The ɑ99 II enables internal 4K movie recording[xvii] featuring full pixel readout, without pixel binning[xviii], for ultimate high resolution video in the pro friendly XAVC S format. It is capable of recording high quality footage at 100Mbps for 4K recording. A new ‘Slow and Quick’ mode[xix] (S&Q) supports both slow motion and quick motion. Frame rates from 1 fps to 120 fps (100 fps) can be selected in 8 steps for up to 60x (50x) quick motion and 5x (4x) slow motion recording.[xx] A number of features designed for a professional movie production workflow are included such as picture profiles, time code and HDMI clear output and the new ɑ99 II now also offers gamma assist for real time S-Log monitoring and a zebra mode for easier exposure adjustment. S-Log3 and S-Log2 gamma are now included, making wide dynamic range shooting possible with(out) – our edit, the press release says with! blown highlights or blocked shadows making the ɑ99 II easily integratable into a fully professional movie production workflow.

Editor’s note: there’s a problem with the A99II for movies, which also applies to the LA-EA4 and SSM/SAM or other A-mount lenses on the E-mount bodies – the lenses really don’t work well at all. Sony had pictures of this camera with the 24mm f/2 SSM, still a current lens. I sold mine because it could not handle the same AF and exposure control functions as the 25mm f/2 Batis or the 28mm f/2 Sony (which I use) during video shooting. The A-mount was never built for movies, the E-mount has been from the start. However, both are fine using purely manual focus, manual aperture ciné lenses which many professionals prefer.

a99-ii_sal2470z2_wvg-c77am_front-web

The new ɑ99 II will start shipping in November, priced at approximately €3600 and full technical details can be seen here.

Editing: David Kilpatrick

Further information can be found on the Sony Camera Channel: www.youtube.com/c/ImagingbySony/ and the

Sony Photo Gallery: www.sony.net/Product/di_photo_gallery/

Our Affiliate links, supporting photoclubalpha:

Check Amazon.co.uk for availability and price

Check B&H stock (pre-order live)

Check WEX (UK)

[i]The number of usable AF points may depend on the lens and shooting mode. Up to 323 focus points are selectable. Not available for movie recording

[ii]Continuous shooting mode set to ‘Hi+’

[iii] Class 10 or higher SDHC/SDXC memory card required for XAVC S format movie recording. UHS-I (U3) SDHC/SDXC card required for 100Mbps recording

[iv]The number of usable AF points may depend on the lens and shooting mode

[v]Hybrid Phase Detection AF active. The dedicated phase detection AF sensor or focal-plane phase detection AF sensor may be used independently in certain photographic situations.

[vi]Central focus point

[vii]The supported focus area will depend on the shooting mode and lens used. Furthermore, when“Continuous Shooting: Hi+” is selected, focus will be fixed at the first frame shot when Hybrid Phase Detection AF is active at aperture settings of F9 or higher, or when Hybrid Phase Detection AF is not active at aperture settings of F4 or higher

[viii]When Anti-flicker Shoot. is ON. Flicker detection at 100 Hz or 120 Hz only. Continuous shooting speed may decrease. Does not function during bulb exposure or movie recording

[ix]Continuous shooting mode set to ‘Hi’

[x] Approximate effective megapixels

[xi]Still images only

[xii]CIPA standards. Pitch/yaw shake only. SAL135F18Z lens. Long exposure NR off.

[xiii]One slot can hold an SD card or a Memory Stick.

[xiv]Not guaranteed to be 100% dust and moisture proof

[xv]Electronic front curtain shutter activated

[xvi]Requires pairing with compatible mobile devices running the PlayMemories Mobile app. Supported devices are Android smartphones running Android 5.0 or later and compatible with Bluetooth 4.0 or later. iPhone/iPad: iPhone 4S or later/iPad 3rd generation or later

[xvii]SDHC/SDXC memory card of Class 10 or higher is required for movie recording in XAVC S format. UHS-I (U3) SDHC/SDXC card is required for 100Mbps recording

[xviii] In Super 35mm recording mode

[xix]Sound cannot be recorded. SDHC/SDXC memory card of Class 10 or higher is required

[xx]In NTSC (PAL) system

Is retouching acceptable?

There’s been a controversy surrounding Steve McCurry, a photographer I have listened to on the edge of a conversation a couple of times courtesy of Kodak who were always great sponsors and put his ‘Afghan Girl’ on display at photokina 2012 where McCurry’s work was celebrated.

Here’s the story – he’s been changing, or allowing his retouchers and agents to change, the material content of some shots. This has included the removal of people, changes to their clothing, tidying up messy objects and distractions. First, this is not something new and great photojournalists never saw harm in burning in or dodging back areas of a print to make something disappear into a shadow or burn out to white. It was OK to use bleach on prints if needed to remove blemishes, including things which damaged the shot. It was even OK to use tints or pencil to enhance outlines so that newspaper reproduction didn’t lose the subject in a grey mush.

http://petapixel.com/2016/06/07/eyes-afghan-girl-critical-take-steve-mccurry-scandal/

That’s the current controversy.

Well, here are some examples from my archives. One dates from 1969 and back when the first prints were made from this, with publication in The Guardian and various magazines, I used pencil and bleach to try to ensure the faces at the centre of the group were properly defined from the wall behind them. This was a very mild treatment and not very successful.

Here’s a not-totally straight print. Some detailed dodging and burning was done in the darkroom to try to get the definition needed between the blonde girl’s face and the wall. It was this lack of definition which meant it was never a real winner, though it did well enough in competitions. It was also taken on outdated Perutz film using a very cheap manual Hanimex lens – I was only 17 and could not afford anything more!

Vintage 1969 black and white print scan secondary school pupils crowd round a little black girl who has fallen and is crying at Maltby Grammar School sports day. Note the black child was one of twins from the only coloured family in this Yorkshire mining town and at this time there was no discrimination just a lot of attention.

Once scanned, the print could be retouched digitally, Photoshop giving much more accurate control of burning-in the tone of the wall behind the girls. This is the result – it’s not a huge change. and I do not think anyone would suggest it falsifies the image.

Vintage 1969 black and white print scan secondary school pupils crowd round a little black girl who has fallen and is crying at Maltby Grammar School sports day. Note the black child was one of twins from the only coloured family in this Yorkshire mining town and at this time there was no discrimination just a lot of attention.

Moving on, here’s another group of children – three kids in the timed-burst water play fountain at Alnwick Castle Garden. It’s a picture I was very pleased to catch, the best of three frames with the children at the best critical moment for action and composition. But in the darkroom I would certainly have burned in the people in the background to reduce their distracting highlights.

Children run into a fountain released by build up of a head of water visible in a tube popular water feature in Alnwick Garden Northumberland UK

One of the principles of making a picture which works is to reduce it to a simple form. Extra faces always distract (we are drawn to look at faces regardless of composition). So, for this image, I retouched our the entire background scene. This would not be allowed by many competition, awards and some news or general media.

Children run into a fountain released by build up of a head of water visible in a tube popular water feature in Alnwick Garden Northumberland UK

Since I offer both images as licensable stock, with the retouched version clearly identified as retouched, I don’t feel there is any wrongdoing here.

The next example is less controversial because it has no people at all. Wires interfere with the view of Hollows Tower, the old stronghold of the reiver Johnny Armstrong in the debateable lands as you pass from Scotland into England.

Hollows, the tower house of the Armstrong clan lairds of Gilnockie on the border between England and Scotland. Unretouched see also version with power lines removed from shot.

It’s not a massive task to remove the pole and wire mess. It falsifies the state of the scene, but only from a viewpoint which is not typical – most tourists see the tower as they drive past, from many angles.

Hollows, the tower house of the Armstrong clan lairds of Gilnockie on the border between England and Scotland. Retouched image with power lines removed.

I have not removed all the poles!

Finally, another example of where the infrastructure spoils the scene. In Holetown, Barbados, local ladies tend to dress up well to do the shopping and tend to stop to chat in the street. Even so, it’s a matter of framing and shooting quickly to catch a neat moment before they move on or something else gets in the way. And the wiring on the wall really does spoil the shot.

Barbados Holetown St Thomas parish west coast two Bajan ladies typically dressed chat on a street corner

The retouching here was more complex. Is it a crime, or a routine part of modern photography?

Barbados Holetown St Thomas parish west coast two Bajan ladies typically dressed chat on a street corner retouched version

My work is generally used by travel guides, or in articles and books relating to people and places, travel and everyday life. The meter on the wall clearly documents the real place. The retouched image is an imaginary place. However it’s not been removed because it was an ugly meter. It’s removed because it spoiled a shot which I liked.

You can make your own judgments on Steve McCurry or his retouchers. Did they alter the pictures because they were really spoiled by the way they were? I feel I would have been happy with the unretouched image in most cases or used less obvious major changes.

– David Kilpatrick


Sony 28-75mm f/2.8 SAM on mirrorless FF

SONY DSC

With the 24-70mm f/2.8 new Sony GM FE lens selling for £1799 (UK) and the A-mount version two 24-70mm f/2.8 for a full £100 more, the cost of a basic mid-range zoom to use with a camera like the A7RII remains very high. There are good arguments to be happy with the 24-70mm f/4 FE zoom, or even the 28-70mm f/3.5-5.6 though that is best limited to use on the A7 (24 megapixel) and A7S (12 megapixel) bodies rather than the A7R (36 megapixel) or A7RII (42 megapixel).

Of course there are good lens adaptors out there and 24-70mm f/2.8 lenses from Canon, Tamron or Sigma with ultrasonic focus drive in Canon EF mount offer one solution. The original 24-70mm f/2.8 for A-mount with its SSM motor of this type can also be found for a fair price. But there’s one lens which I sold after my A7R arrived, mostly because I was parting company with my full-frame A-mount body survivors. It’s the Tamron-based but Sony revised SAL 28-75mm f/2.8 SAM.

Although I did have an LA-EA3 adaptor to use SSM and SAM drive A-mount lenses on the E-mount bodies, the 28-75mm didn’t really work very well on the A7R so it remained on my A99 or A900. I made a few tests and saw that it was certainly OK on 36 megapixels, though even on the 24 megapixel A99 where it played nicely with the AF system it had slightly soft corners when used wide open. They were not any softer than the 24-70mm f/2.8 Carl Zeiss of that time and in some ways the lens was better behaved.

SONY DSC

The first thing to do was to fix this lens to the LA-EA3 creating an FE lens unit. Imagine the adaptor is just part of the lens (that’s pretty much how Sony makes many lenses for E-mount anyway). The total unit measures up at 115mm long including the adaptor, and 75mm diameter taking 67mm filters. The lens itself weighs only 565g, the combo weighs 683g with adaptor and lens hood. That compares with the new GM lens at 136mm long and 88mm diameter using 82mm filters and weighing 886g. As I already have a 16-35mm f/4 CZ which covers the 24mm requirement well, the 28-75mm range is just as useful to me as 24-70mm.

While the 28-75mm SAM activates PDAF and multiple AF points, it’s not the full works with tracking and Eye-AF. But it’s also not as noisy as some reviews imply. It’s much quieter than the 85mm f/2.8 SAM, and silent compared to the grinding focus of the 30mm DT SAM macro. Startup is fast, with the lens initialising quicker than FE mount stabilised zooms. The aperture actuation is slicker than with body-drive SAL lenses on the LA-EA4, and quieter. Focus is fast and the only downside is the rotating focus ring which does not support DMF or over-ride on the fly, or auto manual focus magnification. Manual focus requires you to set it on the lens and the body, and whatever you are doing, you need to avoid either turning the focus ring when there is any resistance, or blocking it from turning during AF. It’s a bit vulnerable and the direction of focus is the opposite to normal Sony/Minolta design. The zoom ring which locks at 28mm only operates in the normal direction.

SONY DSC

So, what you get with the LA-EA3+28-75mm SAM is basic but fully controlled and communicating, EXIF accurate with profile correctly invoked. It will track with continuous focus and during movies, though slightly noisy for in-camera sound recording; it seems to do so when some SSM lenses, like the 24mm f/2 CZ, don’t play.

As for optical quality, it’s still a 14-year-old Tamron in disguise, but it can match up to 42 megapixels centrally across its full range. The performance over the APS-C image area is superb, even wide open at all focal lengths, with just a hint of misty aberrations slightly masking a super-sharp result on axis. On full frame, a marked ‘cap shape’ deviation from flat field towards the extremes causes strong softening on flat subjects and landscapes at 28mm and is not entirely removed at longer lengths. You would not want to use this at 50mm and f/2.8 if you had a faster 50mm you could fit and stop down to f/2.8. On real three-dimensional subjects at typical working apertures between f/4 and f/11 it can be extremely sharp. The respectable 38cm close focus and 0.22X subject scale (not as good as the new Sony GM 24-70mm) reveal microscopic detail on the A7RII at f/5.6. The shot below is at the closest AF on the large water drop in the centre, at 75mm and f/5.6 – you can see the bokeh is very acceptable, not complex or ‘nervous’ which it tends to be when used wide open for more distant subjects with a slightly defocused background.

28-75mm@f5p6-75minfoc

A 100% crop from th A7RII file (converted from raw ISO 500 14-bit, without any sharpening for web and with minimal NR) gives an idea how good this lens is and also just how little depth of field you’re ever going to see from a 42 megapixel full frame image used this way!

28-75mm@75-f5p6minfoc

It would hardly be worth buying an LA-EA3 and a new 28-75mm just to save about £1000 over the GM 24-70mm. If you already own an LA-EA3 and you can find a cut price or good used 28-75mm go for it. The way its aperture works means you’ll get very fast low light focus and minimal shutter lag (but you do need a mark II A7 series body to get the best functioning).

The zoom action is a real pleasure to use, very light but positive, and the overall build and feel of the lens will not disappoint. It also seems to get just the right response from the in-body stabilisation of the A7RII. Sure, 67mm filters may be smaller than many midrange zooms require, but I will either have to use a stepping ring or get a couple of new filters – not cheap, for the quality needed to maintain the lens performance. Also, it’s not weatherproofed.

Here’s a quick set of three hand held (with SSI) comparisons at 28mm – f/2.8, f/5.6 and f/9. I’ve loaded these up at full size so they should open the original Level 10 sRGB JPEG when clicked. The focus in on the foreground railing spike and the fine spider web gives the best idea of how the resolution and contrast of the lens improve from wide open. It’s clearly resolved at f/2.8 but with a gentle ‘glow’ at pixel level. First image – f/2.8.

28-75mm28wideopen

Second image – f/5.6. If you download all three images and load them into Photoshop, it’s interesting to switch between tabs and see the depth of field change.

28-75mm28at5p6

The third image is at f/9 and here the ISO is high at 2000. The A7RII can produce great results up to 3200 but I might not choose to have this at 2000. Even so, the sharpness can be judged without problems as the noise doesn’t have much effect on fine detail with current Sony sensors and processing. It always shows more in defocused, smooth areas.

28-75mm28atf9

Because I use other lenses – such as the 24-105mm f/3.5-4.5 Sony and 50mm f/2.8 Macro Sony on LA-EA4, 40mm f/2.8 Canon STM, Sony FE 28mm f/2, 16-35mm CZ f/4 and also the unrivalled 24-240mm FE zoom I have many choices overlapping the range of this lens. I remember that for landscape work on the A900 it was hard to beat. Here’s one of my images from that combination, using a 6 second exposure at 40mm focal length, f/8 and ISO 100 with a variable ND filter. With the restrictions on tripod position given by the location, the zoom range of 28-75mm proved just right for a range of studies.

Roughting Linn, Northumberland - the waterfall.

With this lens arriving during a period (for my corner of the UK) of sustained white skies and drizzling rain, it’s not been out and about much. One thing it has done is to focus very well in dim room lighting on my sofa companions –

55mm-2p8-iso3200

And, for those who don’t think f/4 is wide enough and desperately want 55mm f/1.8 or f/0.95 lenses, this is at 55mm f/2.8 and of course when the iris of the eye is sharp the fur around it is not and Willow’s nose is blurred. Once again, despite correction for tungsten light at the extreme limit of Adobe Camera Raw, and using ISO 3200, it’s pretty amazing what the A7RII can do seen at 100% (below).

3200-iso-f2p8-55mm-100pc

But this super-shallow depth of field is what happens at 42 megapixels. Depth of field used to be worked out based on a 10 x 8″ print held in your hand, not a 6 x 4ft image viewed through the ‘window’ of a screen. Of course for social media you do indeed need very wide apertures because when your pictures are mostly viewed on smartphones, it’s like looking at a contact print from a Vest Pocket Kodak…

To support Photoclubalpha, subscribe to f2 Cameracraft (it’s probably the only photo mag edited by two long-standing Sony system users, myself and Gary Friedman).

– David Kilpatrick

You can find deals for the Sony SAL 28-75mm f/2.8 SAM A-mount lens at B&H Photographic, Wex Photographic for the UK, or Amazon Sony SAL2875 Alpha 28-75mm F2.8 Standard Zoom Lens

Bad science and dissing the Sony A7 FE concept

No doubt everyone’s seen the article on Petapixel which can best be described as successful clickbait – by Sator, essentially claiming that the whole idea of mirrorless full frame is flawed. Well, the good news is that this article is more flawed than the flaws it’s claiming to point out.

First of, let’s simply dismiss the groundless myth that a shorter mount to focal plane register (body thickness) cause any problems with lens design. It simply doesn’t. Nor does an empty space without any body at all. The only aspect of register which can ever cause problems is additional body thickness, as found on single-lens reflex (SLR and DSLR) designs. In the early days of SLRs, it caused so much trouble for the design of very wide-angle lenses that SLR mirrors had to be locked ‘up’ and a lens fitted with a rear assembly almost touching the shutter, sticking right back into the darkchamber.

The quote from Zeiss in the article about the ‘short flange distance’ being an engineering challenge for wide-angle lenses may well be a result of mistranslation as it’s hard to imagine any Zeiss engineer actually saying that and meaning it. This is the company which effectively built the Hasselblad SWC, not to mention the aerial and stereoscopic models based on the 38mm f/4.5 Biogon. And they made the Hologon camera. Flange distance? What flange distance?

Take a look at the optical design of one of the best Zeiss/Sony collaborations, the RX1 series with its 35mm fixed f/2 lens, and you’ll see that Tatsuo Kureishi, Sony product planner, was probably right to say this: “We eventually realised that only a camera with a non-interchangeable lens could significantly increase image quality, since it would allow us to optimise performance between the lens and image sensor.” And what did he mean? That by not even having a focal plane shutter, by having an even slimmer body than the E-mount, a lens which almost touched the sensor, they could engineer something better. And they could align it to perfection. The ghosted product view below says it all. As far as I have been able to work out, the actual body register of the RX1 would be around 12mm, or like the FE mount’s 18mm but with the lens sticking into the body even more than the 5mm depth of the E-mount bayonet.

Now if there’s any reason the A7 series can’t have the same 35mm f/2 as the RX1, it’s down to the shutter assembly and the filter/coverglass pack of the sensors used in A7 bodies. But it’s not to do with the mount, and as this lens proves perfectly, claims that you ‘can not get lens performance without size and weight’ are also made on a weak foundation.

Now the throat diameter can indeed cause problems. Sator quotes a set of throat diameters:

Minolta/Sony A: 49.7mm
Sony E: 46.1mm
Fuji X: 44mm
Canon EF: 54mm
Pentax K: 44mm
Nikon F: 44mm

However, all these are meaningless without reference to the register. Back on 2012, in Issue No 1 of Cameracraft (the quarterly I produced with the co-editing help of Gary Friedman for three years) I printed the register distances then applicable to a range of new and legacy systems:

Pentax Q: 9.2mm    Nikon 1: 12.29mm     C-mount: 17.52mm     Fujifilm X-Pro: 17.7mm
Canon EF-M: 18mm     Sony NEX: 18mm      MicroFourThirds: 19.25mm      Samsung NX: 25.50mm
Pentax 110: 27mm     Leica M: 27.8mm     Robot: 28.1mm     M39 Leica Screw: 28.8mm
Contax G: 29mm     Olympus Pen F: 28.95mm     Contax/Kiev: 34.85mm     FourThirds: 38.67mm
Konica AutoReflex: 40.7mm     Miranda: 41.5mm     Canon FL/FD: 42mm     Minolta SR/MD: 43.5mm
Canon EF: 44mm     Praktica B: 44.4mm     Minolta/Alpha: 44.5mm     Rollei SL35: 44.6mm
Pentax K: 45.46mm     M39 Zenith Screw: 45.46mm     M42 Pentax Screw: 45.46mm
Contax/Yashica: 45.5mm     Olympus OM: 46mm     Nikon F: 46.5mm     Leica R: 47mm

A 46.1mm throat placed 18mm from a 43mm diagonal image sensor clearly isn’t ideal, but it’s for ever better than Fuji’s 44mm throat at the same 18mm. Or is it? Measure the actual mount, and the 46.1mm turns out to be a generous figure including the bayonet recesses. The real circular size is only 43mm and the internal diameter once any mount is fitted is only 42mm. The electronic contact array removes a further 4mm but fortunately not in a bad place. On the Fuji X mount, the contacts are placed to prevent any real chance of a full frame body (the same applies to Canon’s EF-M mount).

sonyjune1526

Sony got in by the skin of their teeth, and it is this mount diameter which actually starts to impose design contraints on lenses and makes some of them larger. A good example is the 85mm f/1.4 GM. That, in its purest form, would be a lens normally positioned >85mm from the sensor with an aperture diameter 0f 60mm. However, many of image-forming rays from this would be obstructed by the E-mount. A complex telephoto construction is therefore needed which reduces the virtual size of the lens aperture as seen from the focal plane and simultaneously moves its apparent location closer (placing the rear nodal point of the lens somewhere between 18mm and 85mm). Most lenses longer and/or faster than 50mm f/1.2 will need some increased complexity of design to condense the exit pupil.

Telecentric design

But against this, there’s a fortuitous benefit. Digital sensors, with their optically active filter/low-cut/IR glass packs, don’t respond well to very oblique angles of ray incidence. If you can make a telecentric lens – one which produces an almost parallel bundle of image-forming rays from a greater register distance – you’ve overcome this issue. That is what Olympus did with the original FourThirds format, which if scaled up to full frame size would have had a 77mm register – and they made their lenses telecentric, which means they produce a relatively parallel ray bundle, with a long back focus. Although FourThirds is now almost obsolete, it did have this odd advantage (also a real challenge which Olympus overcame in the creation of a fully retrofocus 7-14mm zoom with a 38mm register).

The point I’m making is that large size, complexity and weight are not as so many state ‘laws of physics’ relating to making good lenses. They may simply be the most expedient solution. Remove all constraints – as Sony did with the RX1, Minolta did with the TC-1, and Ricoh did with the original film GR – and exceptional lenses can be made to be very compact, almost as compact as the theoretical physics will allow. Indeed it surprised many users to find large glass elements almost touching the film plane in some cameras.

Sorry to be so wordy but it needs explaining. Does it matter? Yes, if you still believe in a Sony A7/FE system which can be as compact as a Leica kit used to be. In fact the E-mount makes it possible to design slightly smaller medium to long zooms and very much smaller wide-angles, and normal sized standard lenses. To adjust your perception, it’s important to take Sator’s camera size comparison images and align the focal plane index marks, not the front or back of the camera body. It’s surprising how much of an A7RII is behind the sensor plane.

sony-wrongcomparison

The screen grab above is from Sator’s article. It purports to compare two 85mms. There’s just one small problem – it doesn’t. The lens shown fitted to the A99 on the right is the 24mm f/2 CZ SSM A-mount, not the 85mm CZ. The 85mm is 1mm shorter but 3mm fatter with a generally chunkier look, and if you align the focal plane index marks, its front would come almost exactly level with the GM lens. It’s still smaller than the GM but if comparisons are to be made this way, they really should be correct, not wrong.

Why other big lenses?

Blame Canon and Nikon. Both have had SLR mirror paths which are very generous, and there are some lenses you can adapt to Canon which will give you a damaged mirror and lens in return (those lenses can’t be adapted to Nikon at all). Makers like Sigma and Tamron have to design all their lenses to clear the Canon full-frame (EF) mirror swing, and if that means adding 5mm to the back focus and then adding even more in glass to the overall assembly to make this work, so be it.

sigma-20mmf1p4

Therefore, when a nice fast 20mm f/1.4 Sigma appears designed for a retrofocus with a 42mm physical clearance, it’s going to be the same size when remounted (if they ever do) for a skinny 18mm register. Actually, the same size plus 24mm of deadspace extension.

If you think that a fast superwide is bound to be huge, try a Voigtlander 21mm f/1.8 Ultron in Leica M fit. It’s not f/1.4, but it’s also the size of your palm not your forearm – and no doubt an autofocus lens could be made much the same. In fact you can buy an E-mount to Leica M autofocus adaptor and turn it into one. My point is that where Sony’s own lenses may sometimes be fairly large in order to deliver the best results from the existing sensors and the mount constraints, DSLR system lenses can be even larger. Where there is potential for Sony native lenses to be small, there’s very limited potential for this with DSLRs. I use a couple of rare examples, the 20mm f/3.5 Voigtlander Nikon fit wide and the Canon 40mm f/2.8 STM pancake. They are exceptions. Within the range from 28mm to 90mm, there have always been excellent and fairly compact lenses for all types of system – Contax G, Canon, Nikon, Pentax, Leica, Minolta CLE. Sony should look to these for inspiration for a core set of lenses, and seem to have done so with the 28mm, 35mm, 50mm, and 55mm. A neat 85mm f/2.8 next in line then?

Adaptors and focus calibration

The general comment that adaptors introduce error is very true, but Sator doesn’t explain why the E-mount is so prone to such errors. Let me do so. It was designed, from the ground up, to be self calibrating and not to require much precision. When the original 16mm f/2.8 pancake was launched with the NEX-3 and NEX-5, that lens had so much focus travel it could go well beyond infinity. Just 0.1mm makes a huge difference with a 16mm lens at f/2.8 – and the actual flange to sensor register of those first bodies was not even accurate to 0.1mm. Sony just made the lenses able to cover the manufacturing tolerance, because the on-sensor contrast detect focusing always got it right. You would never know if a body had 0.1mm or 0.2mm variation from spec, as the lens had more than this leeway.

SONY DSC

Why the A7 system still wins – though now old, a Voigtlander Leica screw original 12mm f/5.6 ultrawide works well using a $10 simple adaptor. A very much more expensive adaptor – $300 – turned out to have incorrect infinity focus.

Then along came awkward early buyers of adaptors and lenses like the Voigtlander 12mm, or for example the 40mm f/1.4 which was the lens that really alerted me to the problem. These lenses are calibrated to Leica focus register with the aim of a hard infinity stop. They are supposed to hit infinity just as the stars in your night sky snap into perfect focus. We found that whether this happened depended on the individual Sony body and also on any adaptors. Manual focus lenses were not self-calibrating! That’s why the Fotodiox Tough-E mount arrived, why Sony tightened up generally on tolerances after the A7 and A7R, and also why makers like Samyang wisely allow a generous over-run past infinity for manual focus lenses (their 12mm f/2 for E-mount is an example, with plenty of tolerance to handle different bodies).

Now all of Sony’s E and FE mount autofocus lenses have continued to be self-calibrating. They do not have hard infinity stops and many don’t form an image properly at all unless powered up (the power moves groups and elements into position, centres any stabilisation group, and finally performs AF). The start-up routines can also involve opening the lens aperture and closing it, often every time the shutter release is touched for first pressure. This is why expert users often prefer to AF using an assigned custom button, not the shutter release. It can save a wasted quarter-second and greatly speed your response time for action and grab shots. It’s also why manual lenses are popular, as these always shave the response time of the camera body down to an absolute minimum.

The mistake some make is to assume the Sony E-mount needs to be as precise and accurate as a 35mm SLR or DSLR. It does not. It may feel like a precision instrument but in fact it’s not. Where an SLR design requires micron precision in alignment of the lens mount and the focus plane, the principal mirror and the secondary AF mirror, the AF module, and the focusing screen – all at once – the E-mount mirrorless requires only two conditions to be met. The axis of the lens should be centred on the sensor, and should be perpendicular to the sensor (and any focus mechanism used should retain this). If this is achieved, all other degrees of precision can be covered by tolerance. Obviously the IBIS, 5-axis moving sensor, does require considerable engineering excellence to do what it does and keep everything right. But unlike the old DSLRs, it will never need you to adjust hidden screws just to get the focus working properly.

The IBIS question

Sator suggests that with such a small throat aperture, the 24 x 36mm stabilised sensor really can’t do its job. We all saw the first demonstrations of AS, or SSS, or SSI or whatever we call it – the sensor apparently gyrating over many millimetres. Those who bought the original Sony A100 and 16-80mm CZ lens also found that sometimes the sensor would be a little more off-centre for the shot and one corner would be sharply vignetted. Well, you might expect that from the A7RII with certain lenses but in fact I’ve never observed it.

The IBIS never allows the sensor to sit off-axis. It will constantly correct for your wavering hold, but always return to a centred position. It’s not trying to dive 5mm past the shadow of the lens throat or outside your lens image circle, even if it can do so in theory. The real stabilisation corrections made are within a millimetre or two, and even that is a considerable blur when there are over 200 pixels in one millimetre of travel! Consider what a 200 to 400 pixel blur looks like. What IBIS is doing often corrects shake producing blur in the region of 2 to 20 pixels.

So, the reply to the apparently valid point that the whole sensor size, stabilisation movement, lens throat size, and lens image circle combine to make Steady Shot Inside a guaranteed failure can only be this: it works. It’s like a bicycle – look at it, think about it, and it’s not promising… but in practice it works very well. It also works, however its firmware interfaces with lenses, to use OSS optically stabilised Sony lenses very successfully.

Conclusion

The Leica screw system was probably designed with its 39mm lens thread much smaller than the diagonal of the film gate because it was originally made for an 18 x 24mm ‘single frame’ (later called half-frame) format. When a fixed lens was replaced with the screw mount, the inherent problem of having this smaller than the film diagonal was missed. That gave later generations the vignetting Leica Visoflex and the limited range and performance of all lenses over 135mm focal length!

To some extent Sony has done the same thing and simple large aperture long lenses might in theory vignette. In practice they don’t. The limitations are nothing like the Leica or Contax rangefinder mounts were in the past. The argument against full frame mirrorless, or the specific design of the Sony FE/A7 series, ignores many things including simple points like volumetric heft (looks very different from overhead views of the camera footprint) and multi-body kits. I use A7RII, A7 and A6000 and all three bodies together barely take up the baggage space of a single pro DSLR.

So, just relax. The Petapixel article was not a very carefully constructed one or a balanced argument. You’re going to find many different form factors of digital camera in future. The Sony full frame mirrorless system is just one. Because Fujifilm, Olympus, Panasonic, Nikon, Pentax, Samsung and Canon have all made design decisions for their mirrorless offerings which rule out full frame it’s not going to have ‘competition’ right now, and all users of other systems will find reasons why it doesn’t work for them – or take the plunge.

David Kilpatrick

Subscribe to f2 Cameracraft our bi-monthly magazine – worldwide subscriptions by fast airmail, premium ultra-heavy print quality and the best of British printing technology (it even smells good).

The best 50mm for A7RII

After testing the Sony Carl Zeiss 55mm f/1.8 FE in 2014, I was less than impressed. I may have had a decentred example (it happened to dPreview and at least one photographer I trust to know his lens performance expectations). It was, certainly, pin-sharp on a test chart or a brick wall but the moment three-dimensional subjects were involved at wide aperture the defocused detail could be very untidy. The clip below from trees behind a building which was sharply focused is at f/1.8 and 1/2500th (a suggestion that it could be caused by camera shake is easily ruled out). See my additional notes at the end!

cz55mm1p8distance

It’s worth saying that when I had this lens I made some tests of the bokeh using very strong defocus which looked good. Many examples I’ve seen, which true believers put forward, show a figure (from full length to portrait) centre of a horizontal frame at f/1.8 with a pleasant enough looking distant background. My gripe has been with what happens when your subject is further away, or the background is not all very distant. This is an expensive lens but it seems to me to have fussy bokeh with too much CA fringe and also more focus-related colour shift than desirable.

Here is a full size example with EXIF. Honestly, the best standard lens around? //www.pbase.com/davidkilpatrick/image/162847304

Now I’ve got a fair collection of 50, 55 and 58mm lenses and also the little Canon 40mm f/2.8 STM which is my alternative to having a 35mm and a 55mm. No matter what the lens – Pentax, Minolta, Sony 50mm f/1.4, Helios, Zenitar, Nikon, CZ Jena – the full aperture between f/2 and f/1.4 always proves to be a touch soft. They all have residual aberrations that the CZ 55mm f/1.8 design has eliminated. While they can have a smoother bokeh, they also have marked colour shifts and uncorrected CA. Generally, they also all perform extremely well once stopped down to f/8 and most designs are great by f/4.

Despite the advantage of full AF functions, the CZ 55mm does not have a particularly good close focus or maximum image scale. In use I often found myself framing up closer than 50cm. That’s half a metre – it’s even further than the old 55 and 58mm lenses of the 1960s, which generally manage 45cm. I find this limitation hard to understand. 50 years ago CZ Jena started to put helicoids on their standard 50mm lenses which enabled focus down to 35cm. We have gone backwards since then.

And then I realised I’ve already got a lens which is free from all vices, gives me AF and manual focus options using adaptors I already own, which cost me about a third of the price of a CZ 55mm – and I was not being used on my A7RII. We bought a good used example of the Sony SAL 50mm f/2.8 Macro to use with our Alpha DSLR.

First of all, I compared this with the idea of buying a Zeiss Loxia 50mm f/2, by fitting it to the LA-EA3. Although the focusing ring does not communicate to the camera to invoke magnified manual focus, the lens has a Focus Hold button which can be set to this. The focusing throw is steep but in practice very accurate focus is easily set. At f/2.8, the lens is already perfectly sharp with some contrast improvement at f/4. The lack of vignetting and distortion, the flatness of field and generally very attractive smooth defocusing without CA issues make the lens better than typical fast standard designs.

On the LA-EA4 with autofocus, a limited set of AF functions ends up activated and there’s always the issue of the slight delay and sound caused by mechanical aperture operation. AF-C is of limited use, along with this video functions. However, I don’t generally use this type of lens for action or for video.

I made plenty of non-image tests by defocusing bright edges, both ways, and could find no hint of colour problems. I then set up a small food shot using the close focus – exactly the reason I find a lack of close focus restricting – and made tests at f/2.8, f/5.6, f/11 and f/22 to look at the bokeh. My conclusion is that I will be hard pressed to find anything technically better, or with a more pleasant character to the background defocus, in the c.50mm focal length. The series covers all four apertures.

I am aware that one comment will be that f/2.8 simply isn’t wide enough. There’s no significant differential focus and you’d need 50mm f/1.0 to get what many photographers want. However, this is all to do with viewing size. We all tend to see pictures on smartphone screens, on Facebook, or even on our own camera three-inch screens. In fact, at f/2.8 there isn’t enough depth of field for a typical real-world use of a full page reproduction and f/5.6 is just about right. For a poster, f/11 would be good. At f/22 the whole image is slightly softened as expected and it’s just there to complete the set.

For the moment – at least until a Batis version of the 50mm f/2 Makro Planar appears and answers all my demands perfectly – I think this Minolta-derived 50mm macro will do fine as my ‘standard’ lens.

David Kilpatrick, aka ‘some random blogger’ (©SAR comments March 2016)

Added August 30th 2016: Sony has announced an E-mount 50mm f/2.8 Macro focusing to 1:1 with a stated RRP of $500 – really, they must have read this article in March. In the meantime, during the Brexit fiasco I caved in and bought a 55mm f/1.8 CZ, suspecting the price would be 20% higher soon enough (and sure, it was). My new example is no better than those I originally tested but it has its uses and in a flat plane – no defocused image to screw the results up with an ugly mess – it’s the sharpest 50-55mm I have used. I’m still using the 50mm macro and recently spend a month using the Samyang 50mm f/1.4, which is not as sharp as the CZ but handles blur and bokeh more elegantly. Both lenses don’t really excel at suppressing Longitudinal CA, one of the strengths of the A-mount macro. Hopefully the new SEL FE 50mm macro will also give clean, colour-shift free foreground and background bokeh.

Added July 29th 2017: I have now bought the 50mm f/2.8 Sony FE Macro, and put my A-mount macro lenses up for sale. The E-mount focuses to 1:1 rather closer than I would like, at 16cm which indicates its internal focusing changes the focal length to something more like 37mm to 1:1 (16cm is a pure 40mm at 1:1 assuming no optical thickness to the lens). It’s an extremely sharp lens with bokeh as good as the A-mount 50mm and no trace of CA.

Voigtländer FE 10mm f/5.6 and 15mm f/4.5 III

cameraswithVSMVFEwides-web
I got to try out the first new Voigtländer Sony FE mount lenses with electronic aperture setting and manual focus control with a quick overnight test during the UK Photography Show at the Birmingham National Exhibition Centre, on March 19th 2016. The pre-production 10mm f/5.6 Hyper-Wide-Heliar and 15mm f/4.5 Super-Wide-Heliar are two of a trio reaching the market in Spring 2016 – the third is a new version of the 12mm f/5.6 Ultra Wide-Heliar. We also tried the 10mm in Leica M mount; the test cameras were the Sony A7R II and Leica M 240.

First of all, no other Voigtländer lenses yet have the Sony E-mount with electronic connections, similar to the Zeiss Loxia models. Cosina, the manufacturer of Voigtländer lenses, also makes some Zeiss lenses and the operation of these designs is probably identical to Loxia 21mm, 35mm and 50mm models. The electronics could allow in-body control of the lens aperture but for these lenses, the aperture is mechanically set on the lens itself with a 1/3rd stop clicked ring that can be de-clicked by pushing back, turning through 180° and putting an alternative index mark in place. The focus distance set is transmitted to the camera, along with the focal length. This allows a digitalogue display in the finder, a marker moving on a bar from close to infinity.

15mm-Emountrear-web

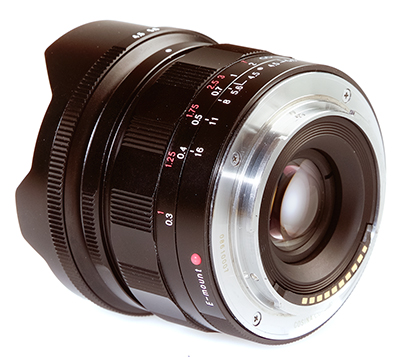
For the E-mount, the close focus of the 10mm and 15mm is impressive and identical at 30cm. This contrasts with the M-mount minimum focus of just 50cm. The mechanical focus is very smooth indeed and the whole metal-bodied barrel and mount feels solid and precise. Depth of field markings are conventional (that is, based on pre-digital circles of confusion, or a typical A4 print rather than a 100% view on a 27 inch monitor screen). The optical design for the Leica M mount is clearly identical but the mount is very different with no electronics, and indeed no way of telling the Leica body the focal length or aperture in use. The EXIF data from Sony E-mount files is precise, with Leica it depends on the user manually entering the focal length, and a clever algorithm that uses the camera metering to work out the f-stop being used.

15mmvoigt-twomounts-web

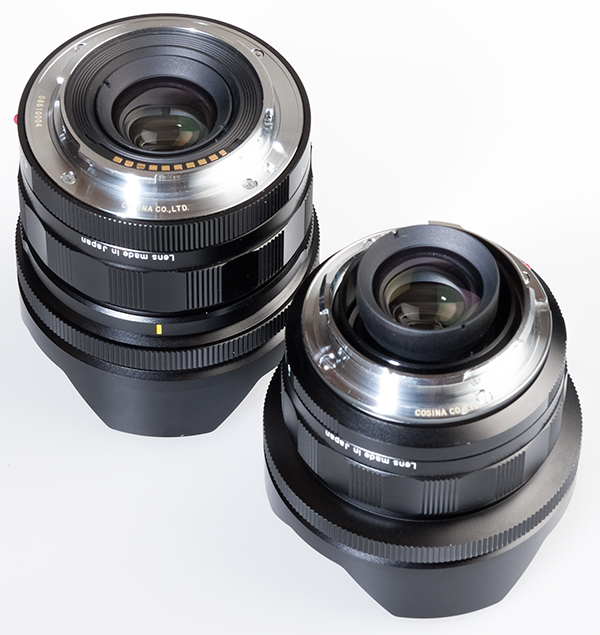
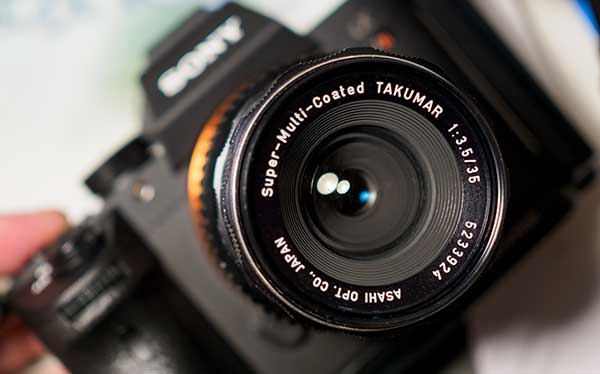
Here are 10mm Hyper-Wide-Heliars in E-mount and M-mount.

10and10-web

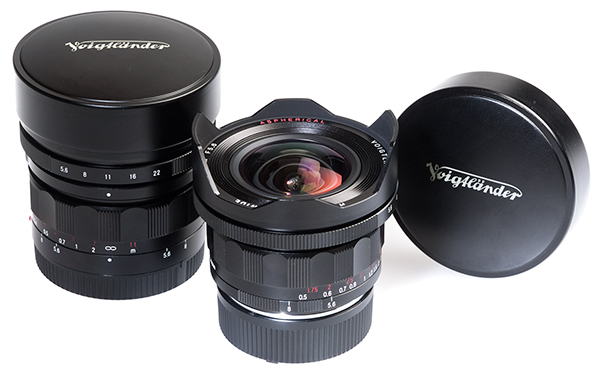
The lenses have fixed petal type lens hoods and come with well-fitting front caps. The use of filter systems will depend on adaptors like those already found for the 15mm MkIII Leica M, but probably custom designed for the 10mm.

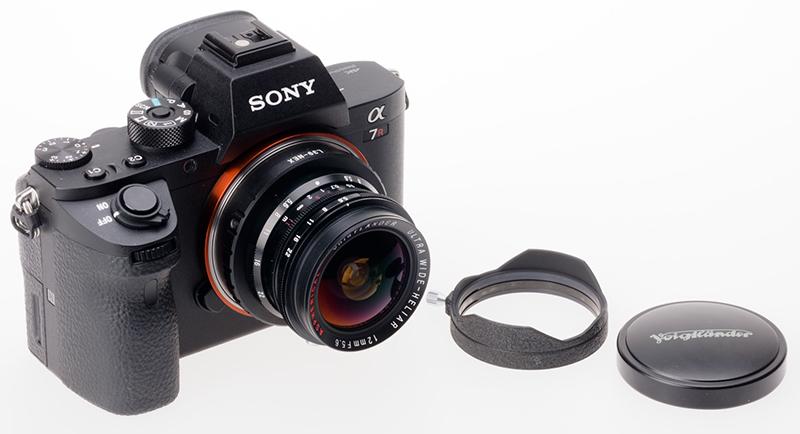
Here, as a final product shot, is the original 1990s 12mm f/5.6 Ultra-Wide-Heliar Leica screw mount, with its detachable hood removed, next to the new 10mm. The new 12mm is similar in size to the 10mm, reflecting an optical design intended to be more compatible with digital sensors with improved vignetting control and freedom from colour shifts. It’s fair to say, though, that with the Sony A7R II I have been using the old 12mm with very good results. I can also tell you the new lenses are much sharper especially towards the corners.

old12and10web

It’s this sharpness which comes as a really welcome surprise with the 15mm f/4.5 design. It can be used wide open with confidence. Because the lenses have mechanical apertures, they don’t open up for focusing like purely electronic E-mount types – you focus at the working aperture, or for extra accuracy open the lens up, focus, then close down. When you touch the focus ring and move it, the magnified focusing of the Sony body is automatically activated, returning to a full view when you take first pressure on the shutter release. In practice this is a very fast and accurate manual focus method needing no button presses on the camera body.

The geometric distortion of the lenses is minimal – they are almost perfectly orthographic but far from isometric! Objects near the ends and corners of the image can appear extremely distorted simply because they are projected with such rigorously rectilinear drawing. This is not really distortion, but it certainly looks like it when a face or figure ends up placed at an extreme. The 15mm must be used with care, and the 10mm needs an advanced understanding of weirdness.

These lenses convey a built-in profile to the Sony bodies, and also to Adobe Lightroom or Camera Raw for processing (or so the dialog reports). What you see through the electronic viewfinder, and on opening a raw file, may not represent the optical truth. Studying the 10mm I found it hard to understand how any light reaches the corner of the sensor at all. I can’t measure the true fall off but I would guess it’s in the order of five or six stops. With the profile applied in-camera or by the raw converter, it’s moderated especially when stopped down a bit. This looks natural. Correct the vignetting fully, and some of the natural appeal of the image is lost.

We must wait to review what may be primary choice for many users, the 12mm.

The 10mm Hyper-Wide-Heliar f/5.6

This lens displays an exceptionally straight geometry, even when used on the Leica M 240 body which has no added firmware correction function. Whatever profile is being passed to the Sony bodies probably only concerns vignetting (our Leica test indicated it may not really need a lens profile). It has 13 elements in 10 groups and covers the widest angle ever achieved with a true wide-angle on the 35mm format, 130°.

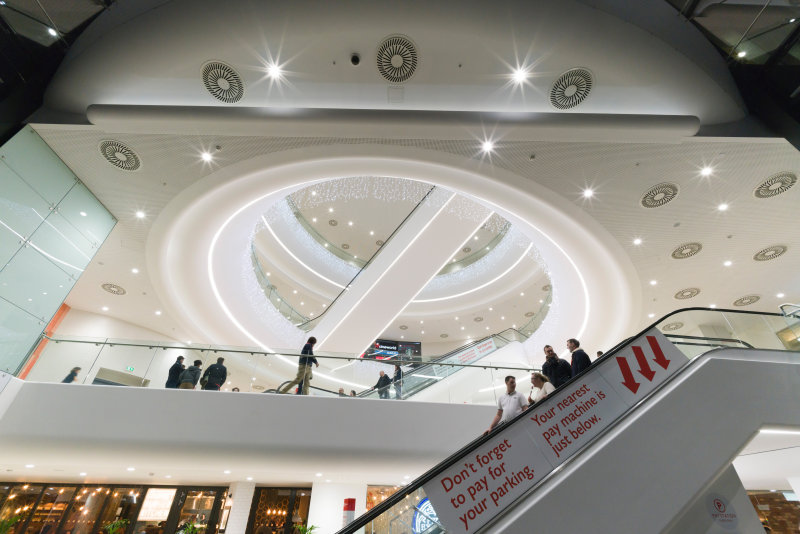
Of course, I took a few tests inside the NEC but the first subject which really lent itself to the extreme angle was the giant illuminated sign. I was about a metre away from this, but a standing adult is about half the height of the letters. All the pictures used in this article can be clicked-through and will take you to the pBase Gallery which allows access to the ‘Original’ A7RII (level 10 JPEGs, full size) along with all the essential metadata. Please note these pictures are all copyright and if you wish to share them, please link to the pBase Gallery. You may download and examine them for your own research but they may not be reproduced.

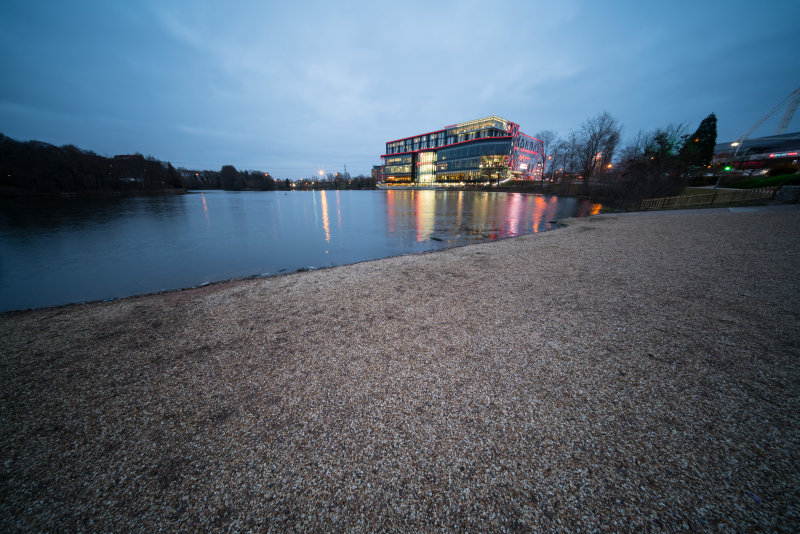
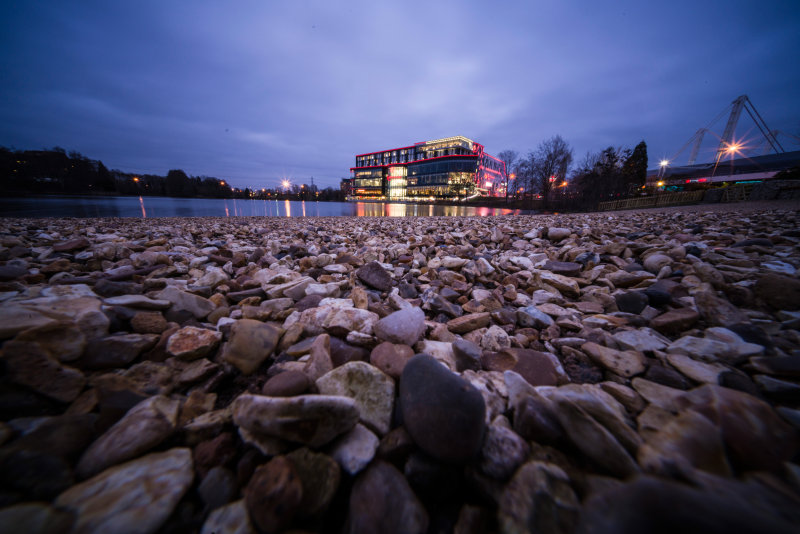
Outside the exhibition centre there’s an open land drain (Pendigo Lake) which stops the entire place from flooding. It’s about seven feet deep and fed by drains from below all the exhibition halls. With the 10mm fitted, I found a suitable supporting post. You’ll see that the beach gravel shows some softening and elongation towards the corners, almost inevitable regardless of the sensor cover glass specifications sometimes blamed for this. The lens geometry forces the elongation. This shot at f/8 has no added correction at all for vignetting.

But with a lens like this, simple extreme wide views can be disappointing or pointless. You need to exploit its potential to do what other lenses can not do. The Sony A7R II can also go where other cameras might not – such as nested into the gravel, using the rear screen folded out for viewing the composition.

This is stopped down to f/22, and in fairness the diffraction softening means nothing is really as sharp as it can be. The diaphragm stars from the lights are neat. Depth of field doesn’t get much deeper than this.

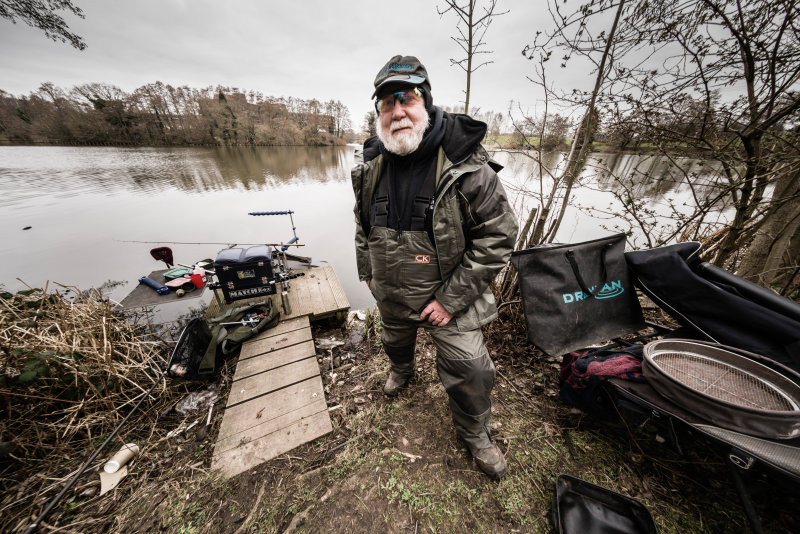
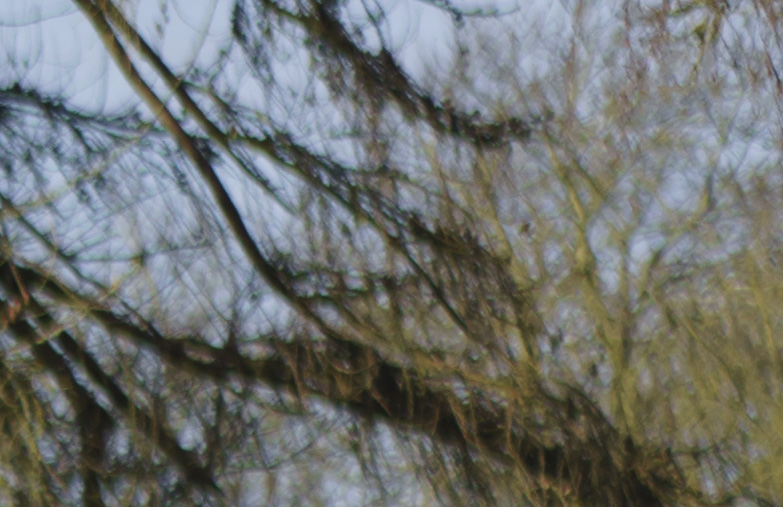
This picture is from the next morning, walking back past the lake. ‘Not often you get to photograph Father Christmas fishing’, my friend here joked. He told me the history of the ‘lake’. Seven friends had gathered, for a fishing competition – pick their spot, set up, three hours to fish, winner with the biggest catch by weight. I’d been using a tripod so Steady Shot was turned off, and this hand-held shot at 1/6th was just OK. I found that because of the magnified scale of detail towards the outer field, if you do get shake it can be almost invisible in the centre but really blur the corners. I’m still trying to work out exactly why sensor based stabilisation manages to handle this change of scale caused by lens projection, but it does. Shots with SS on were generally perfect, those without could be surprisingly poor considering the very short focal length. I’ve processed this picture a little to suit the subject, but it shows the potential of the 10mm for environmental portraiture and editorial work. Because a shift of just inches in the lens position changes the shot so much with the 10mm, a tripod would have been impossibe here (I was leaning forward almost vertically above his foot for this).

Here’s a funky use of the 10mm extreme angle and scalar distortion. It’s a quick grabbed shot on leaving the exhibition hall, and it’s not even vaguely sharp, except rather oddly in the view through the coach windows. The LED lighting has strobed some detail at the left hand side.

I liked the effect with the bus so much I tried a few trucks through the car window in the morning. However, they lacked shape and form. This passing car and trailer was about the best. The progressive shutter captures a very strange effect from the wheels.

Here’s a more conventional use of the 10mm. The weather was pretty dull and actually, night scenes were better. Stopping right down, again, takes the edge off sharpness. The 10mm seems about at its best around f/8 or f/11 (which is exactly where I use the old 12mm at the moment).

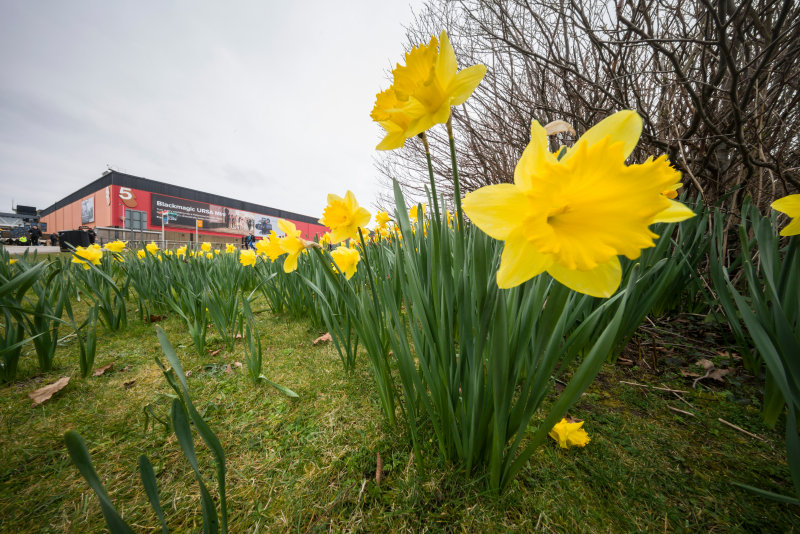
Before moving on to the 15mm, a change of location. Next to the ‘lake’ there’s a new Resorts World hotel, casino and outlet mall complex with restaurants. Brightly lit at night, it was a far better subject for these wide lenses than anything else! Even in the daylight, it was interesting.

You’ll also find a vertical version of this in the pBase gallery. It’s hand held, and the detail throughout really says everything you need to know about the 10mm and its practical uses. Although I believe the 15mm is substantially better optically – simply not as ‘stretched’ – I placed my order for a 10mm after doing this test. It is, after all, about the same price as Sony’s supremely boring but widely praised CZ 55mm f/1.8 – and you’re getting something with a unique commercial and creative edge instead of exactly the same old standard lens we’ve had around for ninety years, slightly improved…

The 15mm Super-Wide-Heliar f/4.5

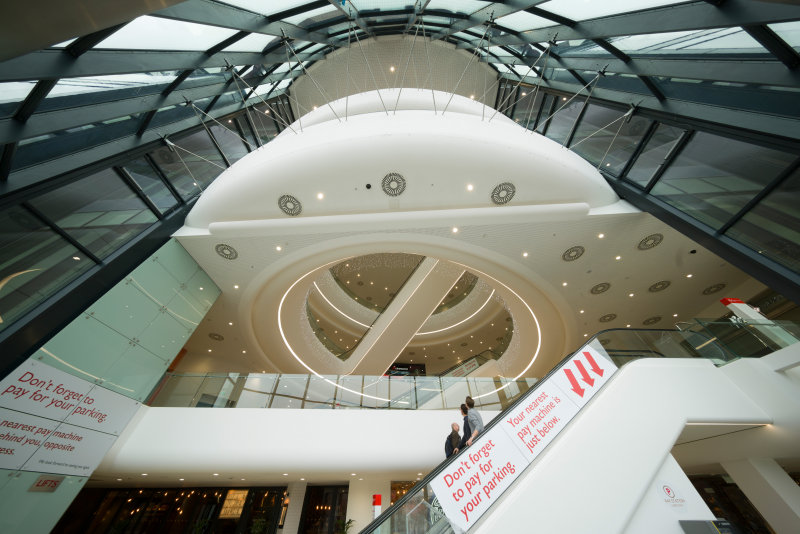
With only 11 elements in 9 groups, this 110° lens is version III of a popular favourite. Optically identical to the M mount version, the big attraction is not just the lens, but the E-mount functionality. However, having used various 15mms before version III, I have to say this lens is just outstanding optically. It resolved such fine detail that on the interior view at night of the Resorts World mall, moiré patterns are thrown up by the pattern of pegboard type holes in the architectural ceiling surface. Please note that’s not vignetting at the top, below, it’s the lighting in the mall.

Even if you don’t bother to click through and examine the full sized images for the other shots, please do take a look at this. It’s also handheld with SS, and not at the very slowest ISO. The resolution at f/8 is extreme and other shots taken, including those at f/4.5 maximum aperture, show the same quality. I’ve been testing lenses for over 40 years now and this is simply one of the best lenses I have used. This particular interior is almost like a 3D test target for lenses, too!

The 15mm causes me a problem. I already own a Sony CZ 16-35mm f/4 and it simply isn’t this sharp.  It can’t do the same thing on a 42 megapixel sensor, it is acceptable and all very good, but not on this level. The 15mm is better than the 10mm and in many ways a more generally useful focal length. But… I’ve got my 16mm covered. 10mm is a better partner. If I dd not have my 16-35mm, I’d team up the Voigtländer 15mm with a 24-70mm. Only even the new 24-70mm Sony f/2.8 probably won’t match this (I have taken a few shots on a pre-production sample, but remember, this Voigtländer is also pre-production).

The 15mm is a great angle for shots like this and it resists flare well. This is not a tripod shot, it used the fishing platform at some risk of an expensive camera and lens taking a dive.

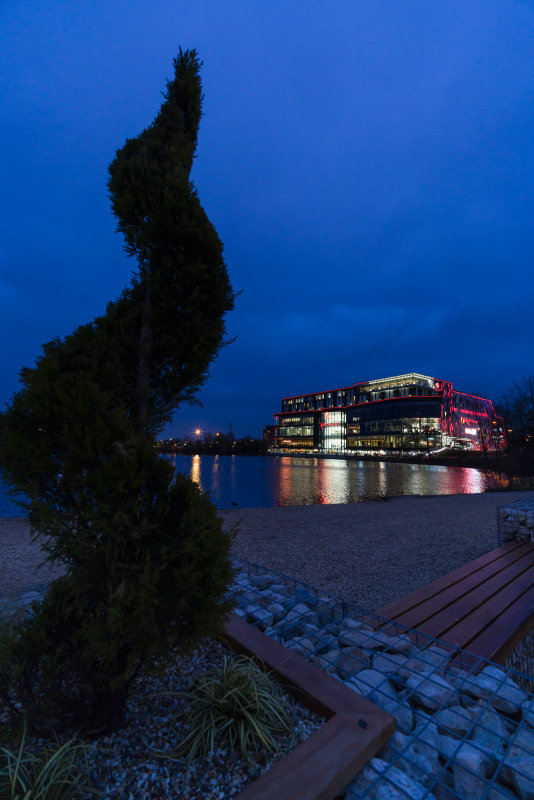
Here’s a hand-held, stabilised, very high ISO shot stopped down enough to keep the topiary fairly sharp. It’s much easier to get the horizon level with the display function available in the Sony A7R II and the brightness of the EVF for night shots. Otherwise, this would be much harder. I found it almost easy to take pictures like this casually using the 15mm (it’s harder with the 10mm which needs that little bit more care in levelling up).

The 10mm on Leica

Just to prove that the straight-line geometry and reasonable vignetting are not entirely down to any kind of electronic profile, a couple of Leica 240 shots start here with one using no adjustments in raw conversion to correct illumination or geometry.

Here’s a slightly more creative use of the lens. Getting the camera in position was not easy and the A7R II would have been quicker to set up, but we wanted to check out the Leica version too.

Conclusion

If you have not purchased any wide-angles shorter than 20mm, it’s worth buying both the 15mm and the 10mm – or maybe just the 12mm on its own. The prices in the UK should be around £839 including VAT for the E-mount 10mm and £724 inc VAT for the 15mm – or less. At The Photography Show, these lenses were being ordered in some quantity especially on the professional days. A surprising number of mainstream professionals now use Sony A7R II and it seemed that almost all my pro magazine readers who came for a chat at the Master Photographers Association stand either had Sony or Fujifilm X. Those handling commercial assignments generally had the A7R II and most were using their Sony kit alongside Nikon or Canon. You can get pretty good (if huge) 15mm lenses for these DSLRs but you simply can’t get a 10mm. The closest is Canon’s 11-24mm EF zoom; at 11mm this does not even begin to approach the image quality of the Hyper-Wide-Heliar. You could also buy an A7R II with this lens for less than this zoom alone (definitely so at the show prices where £700 was slashed off the A7R II body).

For those who own 16-35mm or similar lenses, the 10mm is a logical buy. It’s especially useful with the A7R II rather than the A7 II or A7S models, because the 42 megapixel sensor allows sensible cropping away of geometric extremes. One photographer I talked placed an order just to dispense with his bulky Canon 17mm tilt shift and DSLR – a crop from the 10mm angle of view is all he reckons he’ll need in future.

Our thanks for Hardy Haase of UK distributors Flaghead for the overnight loan of the lenses, and thanks to the NEC and Resorts World environmental landscaping completed this year for creating some half-decent subject matter. Flaghead is also the owner of Robert White, the famous UK professional dealership in Poole, Dorset, whose founder is no longer with us. They took over the premises and shop before Robert’s death, and continue his name and reputation. This is their own direct outlet for the Voigtländer lenses

– report and all example photographs by David Kilpatrick, publisher and editor of f2 Cameracraft and Master Photography magazines. Product photographs by Richard Kilpatrick. To subscribe to our premium quality bi-monthly magazines, visit www.iconpublications.com

See: Flaghead – www.flaghead.co.uk; Robert White – www.robertwhite.co.uk; US distributor, CameraQuest – Cameraquest.com; B&H for US orders, 10mm lens E-mount link, B&H product listing.


1 2 3 18