
The launch of the Alpha 350, with its small 0.74X viewfinder, makes a proper eyepiece magnifier attachment an essential addition to the Sony accessory range. Olympus, Nikon and Pentax all have such magnifiers, which permit a full view of the screen for most wearers and make all the difference to the manual focusing and general comfort in composing shots. We tested two devices, one of them the highly affordable Seagull 1x-2.5x right angle finder, and the other Olympus’s ME-1 1.2X ocular magnifier. (more…)
Tag: Sony
-
360° panorama (QuickTime VR) from A700
Daniel Oi – who provided our most popular external link in recent weeks with his Glasgow Merchant City surround-vision stitched VR panorama – has created a superb view of the Kibble Palace glasshouse at Glasgow’s Botanical Gardens: (more…)
-
Low-cost Marumi LCD protector panels
Kenro has announced the release of a series of new LCD panel protectors from Marumi. (more…)
-
A quick vertical bracket for DSLRs
Moving a DSLR – preferably without vertical grip because of the further imbalance created – to portrait format shooting on a small tripod ballhead produces an unstable arrangement where the head is stressed. The camera may sag unless the head is tightened, and if the lens is heavy, it may also unscrew itself from the normal tripod bush tightening. A L-bracket is the ideal solution for mounting your camera for a portrait session or any other situation where most of the images will be vertical.
The best solution is a rotating camera cradle, but these are expensive and often add too much bulk. They will keep the lens centered around its axis, so compositions don’t need radical changes to camera position. Flip-over L brackets which move the lens axis but provide a swift change from vertical to horizontal composition are OK, but usually place the camera off the centre of the ball head action, again stressing it unduly.
Here is a really cheap DIY solution, a binocular tripod bracket retailing in the UK for £14.99 under the brand Viking:
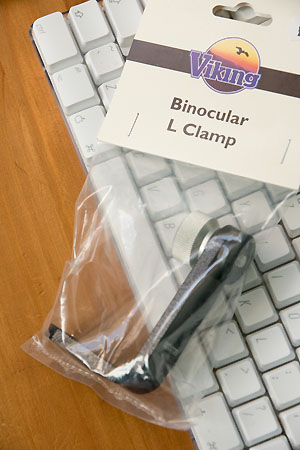
As you can see, the binocs are intended to sit outside the L, not inside. A black hard plastic washer/spacer is glued to the outside of the threaded clamp, which has two threads to attach to tripods depending on the position you want (these are on the short arm of the L), and the single one for the binoculars. The plastic washer is easily removed by sliding a craft knife into the glue, it pops off instantly. You could just reverse it, but the shiny washer would have no grip on the camera baseplate.
Instead, I glued a layer of IKEA tacky thick vinyl drawer lining textured sheet to the inside upright of the L. Some rubber sole from a shoe repair shop would be equally good, or any suitable plastic, rubber or foam of the right thickness. It should be more than 1/16th thick, otherwise the tripod screw will hit the base of the Alpha tripod socket and not tighten (a washer can be used on the other side, it has a slim one already).
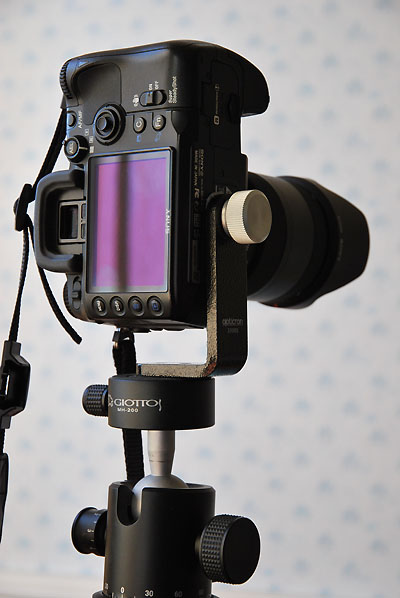
Here is the result. It is shown on a Giottos ball head (as ever, missing some of its rubber knob grips, which come off in a matter of days when working). The head is fitted with the Giottos quick release top unit, replacing its normal head. A quick release insert is fitted to the L base permanently, so it’s very easy to remove the rig. It would be possible to make a longer tripod screw for the camera and mount a further quick release insert on the long arm – the screw going through the insert, the arm and then into the camera. This would make rapid switching from vertical to horizontal mounting easy. I have Giottos heads on several of my tripods and monopods, and a bunch of these quick release tops, so I may convert it this way but would need to locate or cut exactly the right length of 1/4 Whitworth screw.
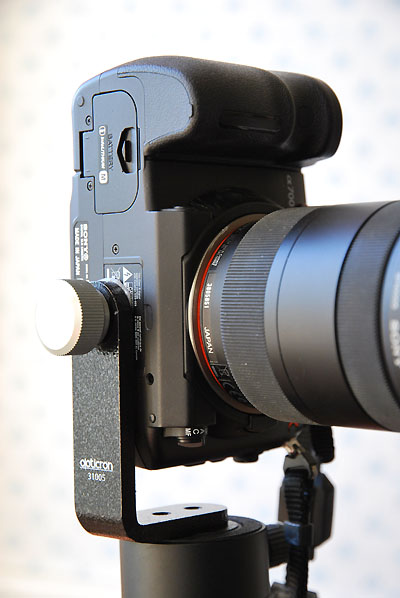
You can see here that the original name of the clamp is Opticron 31005. It should be easy to locate, and cost around US $25 in other markets – or less. It has just the right amount of space for the Alpha 700, and the IKEA sheeting provides almost enough grip – there is probably a better alternative industrial sheeting, floor tile, old mousemat or similar material. The further to the end of the two tripod threads places the lens axis neatly over the centre of the tripod. This will not work with a vertical grip fitted, but I’m not a fan of vertical grips and with the A700 any tripod shooting is normally triggered using the free wireless remote control supplied.
– David Kilpatrick
-
A700, 6400 ISO, seven raw processors
There’s a lot of controversy right now about whether or not the image structure of the Alpha 700 files at very high ISO – mainly 3200 and 6400 – is as clean as raw processed results from other comparable cameras like the Canon 40D (does not offer ISO 6400), the Olympus E-3 (does not offer ISO 6400) or the Nikon D300. At the heart of this is the way different raw processors handle file conversion, and most specifically, the current performance of Adobe Camera Raw 4.3.1. (more…)
-
Sony Alpha 200 – guided tour and overview
The Sony DSLR A200 is now on sale, following the end of Alpha 100 production. Although it is without any doubt the Alpha 100 replacement mentioned by Sony executives in October 2007, when they first revealed that the 100 was no longer being made, it is not an exact equivalent and represents a mixture of upgraded performance and simplified specification. Because it has gone in two directions at the same time, the A200 poses a problem for A100 owners. (more…)
-
An amazing 360 degree panorama
Daniel Oi is a dedicated and experienced Alpha system user currently staying in Glasgow. He’s created a particularly impressive 360 degree panorama of a tiny area of the city centre which has unexpected magic in its Christmas lighting garb. Go down Buchanan Street, turn towards George Square, and you will walk through this Georgian enclave with street cafés, galleries, bookstore, museum and an atmosphere quite unlike the busy main drag or the vast square it links.
http://cnqo.phys.strath.ac.uk/~daniel/Panos/MerchantCity.movÂ
This is well worth a visit!
– David
-
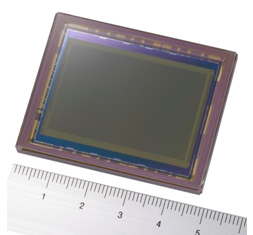
Sony 24.8 megapixel full frame CMOS announced
Sony Corporation today announced the development of a 35mm full size (diagonal:43.3mm) 24.81 effective megapixel, ultra-high speed high image quality CMOS image sensor designed to meet the increasing requirement for rapid image capture and advanced picture quality within digital SLR cameras.
-
A700 and A100 rear LCD screen resolution
Sony say that the Alpha 100 has a 230,000 pixel rear screen and the Alpha 700 has 920,000 pixels. What they don’t make entirely clear is how many individual R, G or B pixels are used to create each ‘pixel’ of the image (complete RGB). In fact the 920,000 pixel screen is VGA – 640 x 480 – in display resolution, which is 307,000 pixels not 920,000. What is going on? We took some macro images to show you. (more…)
-
The Haoda split-image/microprism screen
HAODA FU has been supplying alternative focusing screens for the 5D and A100 since 2006 and for many other makes before this. While the Alpha system DSLRs are not intended to have user-changeable screens, it is relatively easy and risk-free.
The worst that is likely to happen is that you end up with dust on a screen and find this distracting. Minolta AF SLRs had interchangeable focusing screens from the start with the 7000 and 9000. The screeens, like this Type S for the 9000 with crossed graticle markings, came in a rigid plastic case complete with a pair of screen changing tongs. The case has a slot into which the screens can be placed, vertically, during changing.

The Haoda screens, being the much smaller digital size, come in a small dust sleeve packed in a memory card case, which happens to be the perfect size. Unlike the 5D/A100 screen, a Haoda screen does not have a tab on the side to aid removal, nor does it have any position locating pins. It is a plain rectangle. I have not photographed the screen on its own as it really doesn’t lend itself to a useful image!
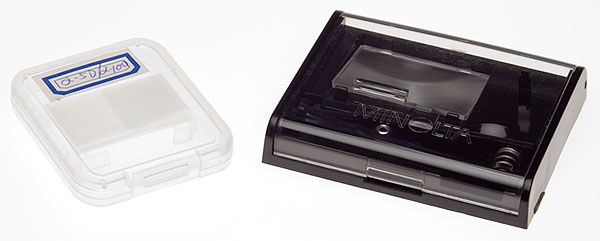
You can see here the screen as it arrives, labelled for Alpha 5D or Alpha 100, next to my 1986 screen kit for the original AF cameras. In order to change the screen, you need a well lit, dust free, uncluttered table like my studio light table.
Suggestions that you use fabric or carpet to place cameras on are a bit ill-advised unless you have a freshly unpacked or washed large microfibre cleaning cloth to use.
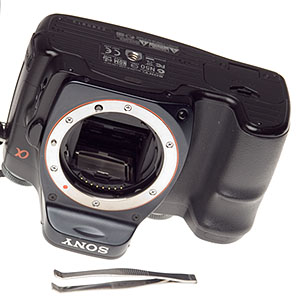
The camera should be placed upside down – not on its back, but resting on the prism/flash shoe area, so the screen is facing upwards. Remove the lens.
Unlike CCD cleaning, you do not need to lift the mirror or power the camera up at all.
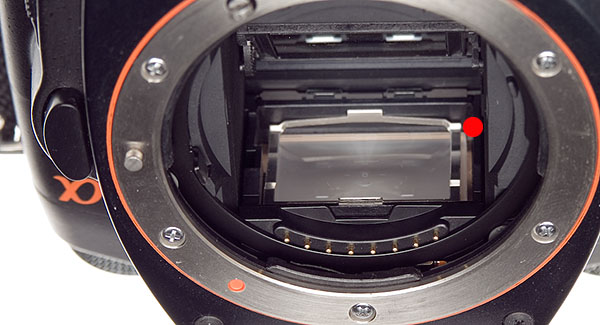
Here is a view of the A100 with its own screen fitted. Look carefully at the area near the red dot. You will see that the bright metal clip holding the screen has more space on this side (the S of the Sony prism logo side).
Some screen is visible sticking out beyond this, and then there is some space. This is how the original Alpha screen, which has one small locating pin, seats. Since the Haoda screen is plain, with no lugs or pins, it can move from side to side within whatever free space remains.
It is not symmetrical, and the microprism/split-image central focus aid will only be in the right position if you get the screen in the correct way round. Compare it with the original screen, and you will quickly see which way it goes in.
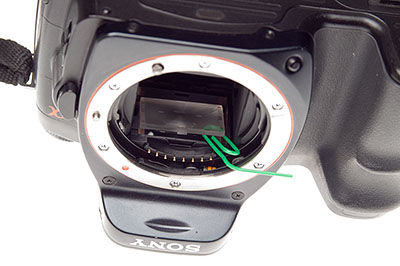
To remove the original screen, it is easy to unclip the metal spring frame from the front. Just push the metal tab visible in the shot above inwards a little and easy it upwards. I found that a fingernail works fine but my small forceps with a bent end (from a craft shop) could have been used.
With the camera in this position, you can withdraw the metal clip without disturbing the screen itself. At the front of the screen there is actually a small tab which can be grasped with tweezers, but you can’t see this, it is hidden below the clip’s front catch.
To ease the screen up, a plastic coated paper-clip is ideal. It is smooth, and the rounded end is used to flip the screen up from the gap at the end seen in the earlier shot, so it rests slightly out of the well. Then the clip can be used to support the screen as shown below, allowing you to grab the tiny lug with tweezers or very fine pliers.
Once the screen is out, just hold it by the sides with clean fingers. The focusing area is slightly inset all round, so any risk of oil or moisture getting far enough on to the surface to be seen is minimal. I do not recommend wearing gloves, you need to be able to feel the tiny, lightweight object easily.
Once the screen is out, popping in the Haoda replacement is easier. There is a brass shim frame under the screen, and below that a clear LED display relay screen. These should not be disturbed.
Just slide the Haoda screen from its dust wrapping, and holding it by the ends with the SHINY SIDE UP pop it into the camera and let gravity do the rest. If necessary, nudge it into place with the plastic-covered paperclip tool.
On older SLRs, the groundglass faced the lens and a condensor was positioned above this, sometimes moulded on to it. The focusing image fell directly on the ground surface. On newer models (late 1970s on) a fresnel condensor was sometimes moulded on the surface facing the lens, and the ground glass surface is on the other side of the screen – facing the prism/eyepiece.
With the A100, the original screen has a slight condensor moulding rather than fresnel and you can see the gentle curve of the shiny side. The Haoda either has no condensor moulding, or so little than the shiny side looks flat. Even so, the shiny side faces the lens/mirror and the working side of the screen goes DOWN as you pop it in the camera.
It will not be centered first time. Put the retaining clip back in, carefully inserting its smaller rear tab into the slot visible at the back of the focusing screen well. Do not clip in it fimrly.
Now, lift the camera STILL UPSIDE DOWN to your eye and look through the finder (no lens needs to be fitted, just have some light available). You will see the Haoda split-image and prism annulus in the middle, and it probably does not line up at all with the focus aids of the LED-screen which has remained in the camera, and provides the markings you see all the time.
Tilt the camera slightly left or right side down a degree, and gently tap the camera body at the other end, so the new screen can slide in its over-long well. You will see the Haoda focus aids move. It took me two minutes to get mine perfectly aligned with the focus marks, both vertically and horizontally. There is no need to put up with a wildly off-centre mismatch.
Taking care not to shake the camera and move the screen, push the retaining clip down at the front, to put the screen under the normal spring pressure which will now hold it in place. In practice, although the pressure is very slight, the screen does not shift around.
Despite great care you will probably have some tiny dust present on the microprism (its facets hold dust well) and this will show up with slower lenses. It will disappear with fast lenses. My installation was pretty clean, and I know from long experience with screens that chasing a single dust speck or fibre wriggle can lead to introducing even more and ruining your screen. The less you handle it on installation, the better.
In use, the Haoda focusing aid is much bigger relative to the DSLR APS-C/DX format than it would be for a full frame, leading me to guess that the screen is cut down from one made for conventional SLRs. However, when centered up by my ‘tapping the camera’ method the focus circles neatly fit some of the AF aids. I think it’s important to get the new screen as well centered as possible, or you will be unhappy with the installation.
When the image is totally out of focus, the microprism breaks up dramatically:
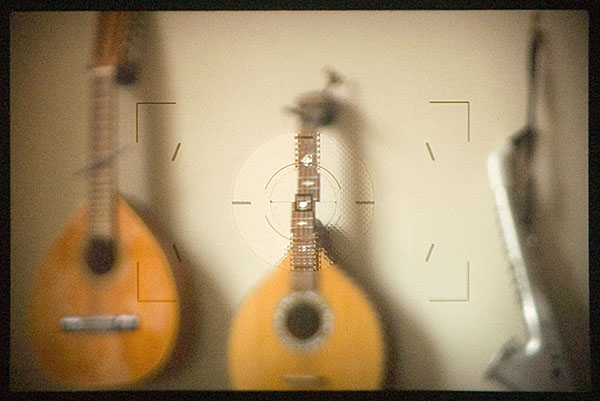
You can also see that the split image, which is horizontal rather than the Minolta originated 45 degree angle (first appearance in the SRT-303b), shows clearly that the subject is not in focus while also showing a sharper view due to the clear lightpath through the two angled faces of this aid.
The microprism consists of a grid of miniature split image aids, alternating facets set at opposed angles.
Bringing the image into focus, as long as your finder eyepiece dioptric correction is correctly set and you have good eyesight, the microprism mosaic pattern will gradually lessen and turn to a watery shimmer, easily detected by moving the camera a little.
If you have poor eyesight, the split image focus aid provides a better tool. You will still see a slight step in any suitable target line or edge. It’s finding the target which is harder, especially for portraiture. You still have full AF of course, fitting this screen does not switch off or change your autofocus! It does enable better confirmation that the AF has locked on to the right subject.
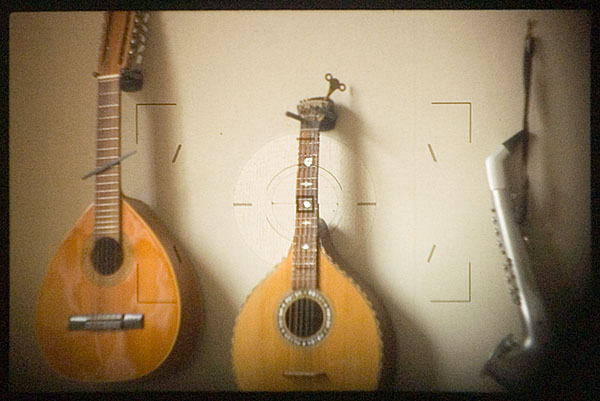
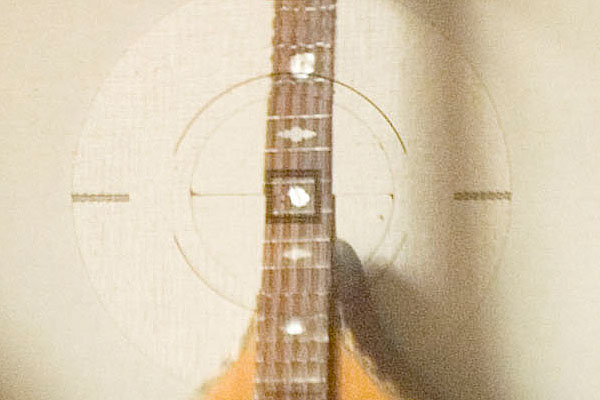
This setting above would be typical of an AF error – I have actually focused on the wall behind the instrument. A viewfinder focus magnifier can useful. The Sony right-angle finder FDAA1AM for Sony or Minolta incorporates a 2.5X magnification, there is a cheaper copy of the original Minolta Vn finder now made by Seagull in China, and a fixed 2X straight ‘tube’ accessory can be found on the used market. Here’s a magnified view:
In case you are wondering how an earth I got live pictures through an A100 finder, I did not use my Zigview and capture video! They are actually taken using the Loreo 35mm f/11 ‘PC Lens in a Cap’, a tiny simple lens with fixed infinity focus which can be placed close enough the finder eyepiece to get a good view.
Focusing is adjusted using the finder dioptre wheel. These images are hand-held, as mounting the camera together and adjusting the exact position of the Dynax 5D used to take these shots proved extremely difficult. AS solved the problems of shake at 1/13th (ISO 400) well enough to get decent views of what you actually see on the Haoda screen.
The screen shots occupied less than half the full frame.
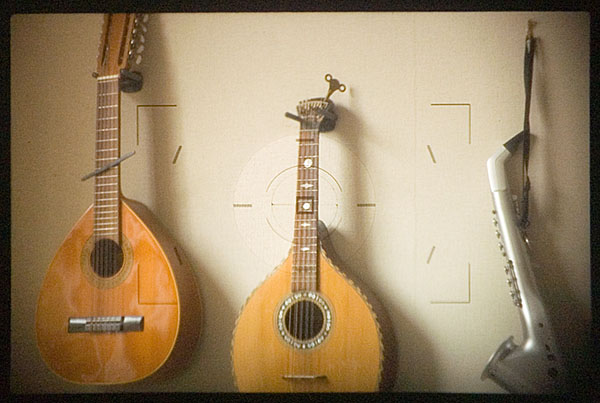
Here is the focused image, with the microprism now totally clear (no shimmer) and the split image lined up:
To test the Haoda screen, I used my 50mm f/1.4 original series Minolta AF lens. This lens, over 20 years old, is extremely sharp from f/2 downwards though it shows a dramatic glowing flare at f/1.4 with a sharp image core. Optimum apertures are around f/2.8 to f/5.6, with a slight loss at f/8, and more marked diffraction loss at f/11 and f/16.
In the past I have found focusing with this lens to be unreliable using AF, and the standard screen gives a very poor indication of depth of field through the viewfinder.
The Haoda screen, you will notice, darkens much more in the outer field. With a lens like the CZ 16-80mm or the KM 11-18mm the groundglass field is dark, and with superzooms which run to f/6.3 at the tele end, you will not appreciate the dim view. With a 28-75mm f/2.8, 28mm f/2, 100 or 50mm macro lenses, 100mm f/2.8 SF and of course the 70-200mm SSM f/2.8 the Haoda is fine.
The benefit of this more ‘interceptive’ groundglass is much more accurate previewing of depth of field. You actually see what you will get, instead of a much sharper impression of focus in depth. This is a complex issue which I can’t go into here, but modern focusing screens from the Minolta ‘Acute Matte’ onwards do not relay accurate visual information about depth of field. You will have noticed that the clear area of the split image shows the subject apparently sharp even when the lens is well out of focus. Modern screens, designed for extra light with today’s tiny viewfinder prisms and slow zoom lenses, are midway between clear and groundglass. Haoda’s screen is still a modern type, but it’s not as deceptive – or bright – as the standard Minolta/Sony screen, and it’s much more like the Minolta Type M matt screen which was offered as a service-fitted alternative for the Dynax 7D.
Out and about, I used my 50mm f/1.4 with more confidence. Here’s the very first ‘focus test’ target I found:
It’s taken at a sensible 1/200th, f/2.8 – exactly the kind of aperture where a back focus error would often take the edge off shots with this great vintage lens. I used DMF (Direct Manual Focus) and fine-tuned the focus using the microprism for this subject, and here’s a section of the shot at 100 per cent:
Clearly, the Haoda screen is agreeing with the manual focus and sensor position well enough. I did some further tests of very difficult subjects with several lenses and conclude that there is a very slight difference – focusing with the Haoda leads to a very minimal back focus, less than often encountered with AF. However, infinity is true, and by using manual focus you quickly learn how to target different subjects to place the focus correctly. You also learn how tiny depth of field can be at apertures like f/2.8 or even f/4.5 with a focal length like 50mm.
In theory an additional copper shim would correct the error, placed before inserting the screen. Since I have no spare shims and there is no source for them, this is strictly theory. I do not feel it would be safe to make one using Cinéfoil (a Roscolabs product sometime used to shim larger format screens) and the error is so slight it does not concern me much.
It is now time to take the A100 with its newly fitted screen out into the world and find out whether the edge darkening, the large distracting focusing aid and the overall metering response work out well. My first shots indicate that the Haoda screen meters much like the standard, but that large clear area of microprism and split image is not part of the A100’s matrix metering program, and I can see some unwanted metering errors occurring. To identify these will take time. My first walkround with more challenging subjects indicated that setting a minus factor – between -0.7 and -1.3 stops – may be necessary in high contrast, sunny conditions when using matrix metering on the A100.
In some ways, having good eyesight and not needing aids like split image or microprism, I would prefer a plain groundglass with grid lines as an aftermarket screen for the A100. I miss the Type L grid lined screens I always used to install in my film SLRs, and the grid display of my Konica Minolta A2 electronic finder. I like the Nikon models like the D80 where a grid can be displayed at choice.
Only you will know whether you need a screen like the Haoda combined split image and microprism and whether you are willing to undertake the camera gynaecology (or should that be proctology?) to change it.
For more details visit Haoda Fu’s website and ordering page. I shall be reviewing some of Haoda’s other products here as well. My Haoda order was paid for by credit card; email contact was personal and excellent; the package arrived within a few days to the UK.
There was no documentation enclosed and instructions for the 5D/A100 are not found on his website (there is one downloadable PDF for a Canon model which can be found, and this mentions discarding their copper shim; I do not suggest this is done with 5D/A100 installation).
– David Kilpatrick