
My review of the Alpha 550 has caused controversy because of the blue sky noise. I might as well say that over the last week, I’ve used the 550 in a wide range of conditions – some very bad conditions included – and its failure to match ISO 100 finesse would not worry me at all. The performance at higher ISO settings is so much improved it’s worth putting up with the minimum of ISO 200, and a touch more noise than the best ISO 100 results from the Sony CCD sensors.
Even so, something was clearly happening during the period of sunnier weather used for my earlier A550 tests. I used Auto ISO initially, because I had not realised how readily the camera will select settings right up to 1600. Auto ISO has thrown up some surprises. Here’s something to consider:

Please note that although ‘process’ symbols are shown with these Adobe Bridge/ACR images, the defaults were restored and then each picture was set back to defaults. They are all shown relative to each other in density, the image preview built by ACR. There is no question of DRO or any other tonal setting interfering with the apparent exposure – DRO does not affect the .ARW file, ACR discards any DRO generated embedded preview in my setup prefs, and DRO was not being used anyway.
It has already been noted by other reviewers that the A550 has considerably more headroom without clipping, even compared to the A350 which was already a top-ranking camera for dynamic range. This is what I meant when I compared its default images to Canon with Highlight Tone Preservation switched on, or KM/Sony older models using the Hi200 setting. This can mean that the A550 is really ISO 100 at its lowest on-sensor gain setting, but the exposure system is programmed to underexpose by a stop and the post-processing (BIONZ) is set up to boost the gain.
Why would Sony do this? Perhaps they read the many posts referring to the Alpha 900 and 700 ISO settings. The on-sensor gain controls the main ISO steps, but a rather cleaner post-process gain adds the 1/3rd step intervals. Experienced Alpha 900 users set ISO 320 manually because the sensor is at its optimum at roughly ISO 160 (DxO tests bear this out). The standard ISO 200 setting can produce more noise than ISO 320 because two different digital stages are used to produce the gain.
In search of superior high ISOs, they may have realised that the early gain stage (on the chip assembly) is inferior to the later BIONZ processor, and you can indeed get better high ISO by underexposing a lower ISO setting, then processing it with clipped blacks. That’s a Nikon technique, which has served them well. It’s also a technique used by experienced DSLR owners.
Now consider the four shots above. They are all taken at ‘ISO 200’ but the camera was set to auto ISO. Other shots in the same set show ISO 250, 500 etc confirming the auto ISO was in operation. They are taken in the afternoon in Scotland, so it is fairly near to the end of the day for sunshine by 14:49hrs, around an hour away. But the two locations at 50 minutes apart, 14:00hrs and 14:49hrs, should not have the extreme variation in exposure shown here.
Just what is going on for an exposure of 1/400th at f/11 to look correct at ISO 200, with the dark sandstone buildings of Jedburgh at the end of October? 1/400th at f/11 is the ISO 200 exposure for full sunshine in midsummer (aka f/16 light). You hardly ever find f/16 light in Britain unless you are on the beach, surrounded by pale concrete, in a field of golden corn or out on a lake.
50 minutes later, exposures range from 1/60th at f/11 to 1/100th at f/11 – that is, more or less, from two to three stops more. In fact these exposures are in line with what I would expect, it’s the 1/400th at f/11 which is the odd one out. I have no evidence to suggest that my CZ 16-80mm has an aperture which fails to stop down consistently.
Now look at some sky samples:
Here is an in-camera JPEG version which shows less noise – the in-camera process is equal to using much stronger NR in raw conversion than I would normally choose for ISO 200:

Now for the same processed from raw – notice that despite the noise, it is slightly more detailed or sharper:

This is a reprocessed second version of the original noisy sky instance. Here, I have used Adobe Camera Raw 5.6r1 defaults, which include some basic sharpening and also 25 on the chroma NR scale. No exposure adjustment is made at all. This view, by the way, looks more or less due north and it is not a case of a brighter sky underexposed; also, the stone and the chimney pots look normally exposed.

This is the 1/100th at f/11 shot, processed exactly the same way. It’s interesting in that I expected to see much lower noise, but in fact it’s much the same. The sky density is similar as well. The view is slightly more towards the east. While my Alpha 380, 200, 100 and even 700 shots are capable of showing blue sky noise at ISO 100 and as much as this as 200 it’s not as obtrusive.

Finally, this is the 1/60th exposure – perhaps more what would be expected at ISO 100 in this light with f/11. Here, I have set -1 EV exposure reduction in Adobe Camera Raw to get much the same final sky tone density. The noise is lower.
Checking other images I’ve taken since, I am now suspicious about the Auto ISO function in the Alpha 550, and whether it reports the gain applied to each shot accurately. It’s hard to reconcile the same ISO 200 setting shown in EXIF with the range of exposures encountered, and the actual exposure of the raw file. Yet ISO 250 was also selected for this shot taken a few minutes before the chimney shot:

This is also included in the main report (click image to view full size on pBase). If I darken the sky as much as the other examples, I get noise similar to the 1/60th ISO 200 clip, or better.
Since making these tests, I’ve started using the Alpha 550 only on fixed ISO settings, with some misgivings as intermediate gain like ISO 250 or 320 might possibly be yielding better results. I just feel something is happening in the BIONZ stage, perhaps involving analysis of the Auto ISO images and compensation for deviations from the reported EXIF Auto ISO setting. This is just a hunch. Fixed settings seem to be equal to the worst case from Auto ISO. Here’s a textbook example, 1/125th at f/16 for a blue sky on November 3rd, facing due north, at 14:19hrs, ISO 200 fixed setting, ACR 5.6 defaults as above:

The answer seems to be to overexpose your manual ISO 200 shots by not simply one stop, but as much as two stops when shooting raw. At least if Adobe Camera Raw is used, recovery of normal tones (not burned out highlights) will fully restore the exposure from 1 or 2 stops over depending on the subject.
Here is an overexposed image, taken at 1/80th at f/10, ISO 200, in mid-day sunshine:

Below is what the sky looks like in a normally exposed image (1/250th at f/10), processed using Adobe Camera Raw defaults (including sharpening at 25/1/25/0 and NR at 0/25), looks like:

And here, finally, is what an adjusted ACR process from the overexposed image looks like with sharpening turned off, NR set to 25/50, exposure and brightness determined by the simple process of using Auto (which can be set as a default in ACR if you want to consistently make generous – over – exposures ‘to the right’):

This is much more how I expect to see a sky looking from the base ISO of a 2009 DSLR release, viewed at 100 per cent. From this stage, different types of sharpening can be applied to suit resized versions for different purposes.
Results with other raw converters, as more become available for the Alpha 550, may be finer in noise structure than ACR or may offer less scope for overexposing – ACR is well known for its ability to recover highlights. I do not intend to go much further into this with tests of converters, but I hope I have shown how the ‘true ISO’ of the A550 is difficult to pin down especially in Auto ISO mode, and how it is possible to benefit from the great high ISO performance of the camera (just use it!) and at the same time secure good low ISO results for travel and landscape shots where a clean blue sky is important.
It’s important to note that in-camera JPEGs will not necessarily show similar noise levels. If they do it’s not so easy to fix without using NR software. I prefer to shoot raw for many reasons.
So, why not be very happy with the Alpha 550 as a choice? Here are two pictures. You can view the full size Alpha image, and the Nikon D3S image resized to match 14 megapixels, by clicking on the smaller size here. Of course the Nikon image is better, though 1/250th at f/5.6 and ISO 400 is more of a step away from 1/250th at f/9 and ISO 200, and I’m not sure the light was SO different on the two occasions:


– DK
Category: Opinion
Opinion pieces from our editors and contributors
-
Alpha 550: sky noise, exposure and Auto ISO
-
Stunned by the beautiful game
Peter Crouch cuts a striking figure on the football pitch at the best of times and when recently asked to train the UK Sony ‘Twilight Football’ team ahead of their big game on the 22nd September, the outcome was some simply stunning imagery. (Editor’s note – continue reading to see the ‘stunning imagery’… but have somewhere handy to put the hair you tear out)
(more…) -
7fps – marketing point or real benefit?
ALL the current DSLRs made – whether by Canon, Nikon or even Sony with the A700 and A900 – state their maximum fps continuous shooting speed as being with NO autofocus, and NO exposure metering changes. There’s a lot of talk on forums about the 7fps of the new Alpha 550 – 14.3 megapixel CMOS APS-C with a good high ISO capacity – being in some way crippled because it has been made clear by Sony that this speed applies to a ‘lockdown’ of focus and exposure with the first frame. This is not surprising as it’s a quiet, mirror-up mode using the off-sensor live view to maintain contact.
(more…) -
Crop or cram? Pixel density versus the big view…
The Alpha 900 offers an unrivalled view through its 100% prism finder. The extra brightness, as well as the size and clarity, make most subjects far easier to photograph well. For some users, however, the full frame camera brings a disadvantage in terms of reach and resolution. You need lenses 50% longer (and thus twice the size, and four times the cost!) to fill the frame with the same distant sports and wildlife subjects. I don’t need to remind anyone how popular these two subjects are with amateurs, and sometimes, how important to professionals.
(more…) -
Alpha 850 – 24 megapixel 3fps in 900 body
Sony’s new Alpha 850 will be identical to the Alpha 900 in size, handling and external design – including the omission of onboard flash. The camera, expected to be launched before September, uses the same 24.6 megapixel CMOS sensor as the Alpha 900 but has – it is rumoured – only a single BIONZ processor, and a very slightly modified viewfinder. It is shipped without the Remote Commander (this becomes an optional extra) indicating that minimum retail price is Sony’s aim.

This is a screen grab from Fotobrenner.de in Germany who have the body only offered for €1999.00 and the kit with SAM 28-75mm f/2.8 new lens for €2699.00. As listed that makes the body about 10% more expensive than the current street price of the Alpha 900 – indicating either that the A850 prices are RRP and will rapidly fall, or that the A900 is about to get a price hike. They offer the A900 for €2499.00 and that would – pro rata – make the UK street price for the A850 about £1599. Please note: though the 28-75mm picture is authentic, the body shown has the AF switch set to C – just like the Sony shots of the A900 issued to dealers. Maybe they would do this for all packshots for some reason, maybe it was chance – more likely. It would be unlikely to happen again for the 850 shot so I reckon this is shopped.
(more…) -
New skins versus old wine – A350 or A380?
As the generation of Alpha 200, 300 and 350 reaches early retirement age it may be the time to grab bargains. The new Alpha 230, 330 and 380 have plenty of bonus points to win over new users despite the critical lack of video capture. But the older generation has some very tangible benefits.
The most obvious changes in the ‘Plus-30’ range are the use of a new smaller battery (NP-F50AM) shared with Cyber Shot consumer models, a dual MS ProHG Duo and SD card interface, substantial reduction in weight and size, improved rear LCD screen with auto brightness adjustment (only on the A330 and A380), and a radical overhaul of the graphical user interface to include sample picture tips (pioneered by Nikon).
(more…) -
Sony Alpha 230, 330 and 380 update

The new Alpha 230, 330 and 380 models are radical ergonomic redesigns of the existing 200, 300 and 350 series. There is a 15% reduction in size (volumetric) and weight, an update to the styling, and a completely revised user interface with graphic representation of setting adjustments – with a built-in ‘handbook’ to accompany the modes and options. They also have mini-HDMI image output, compatible with Bravia TVs and with interactive software inside the camera to allow the Bravia’s own remote control to change, orient and zoom into images (Bravia Sync). Twin card storage is MS ProHG Duo/SD and only one card is usable at a time, with a hardware switch to change slots. A smaller battery type (shared with the HX1 Cyber Shot) is used. A new self-timer drive mode grabs a quick burst of 3 or 5 frames, cutting the chances of spoiled portraits and groups shots when someone blinks at the wrong moment.
The new flashgun HVL-F20AM operates as a wireless flash controller for the full-frame α900. “While Sony’s flagship DSLR does not have its own integrated flash, the HVL-F20AM can be used as an inexpensive trigger for wireless remote flash heads” according to Sony UK.
(more…) -
Nikon D5000 first day – quick HD vid
True to promise, the Nikon D5000 did become available on May 1st in the UK, and my review camera turned up mid-day in time to be photographed and have its battery charged. Taking it out on my walk to the post (regrettably, to send in large sums of VAT and tax…) the sun came out though it was a very cold and windy day. With the sun, the breeze dropped to a reasonable level and on the way back I was struck by the motion of the trees, leaves and flowers.
(more…) -
Canon EOS 500D video HD example
My first tests with the Canon EOS 500D were posted on cameracraft.online, but given the number of search engines now flagging up this site for Canon 500D searches, I’m putting this post here as well.
This is an edited selection, shot in a mixture of 1080 and 720 modes, assembled using iMovie and written as a 720p final project for YouTube. Please feel free to link directly to the YouTube vid or to this page.
(more…) -
Sigma classic 400mm tele quick rechip
There is no need to dismantle the mount of the original series Sigma AF TELE 400mm f/5.6 lens, to bring non-functional versions (old chip) up to speed with later film and current digital SLRs. The whole process takes under five minutes, and requires two tools – a small Philips screwdriver, and a precision end cutter.

The appeal of the original AF TELE and the later, identically sized, AF APO TELE should be obvious. They weigh in at less than 900g in the first non-apochromatic version, which like the later apo (1053g) will only focus to around 4 metres. The cost and weight penalty for the later, much larger, Apo Tele Macro focusing down to 1.5m is considerable.
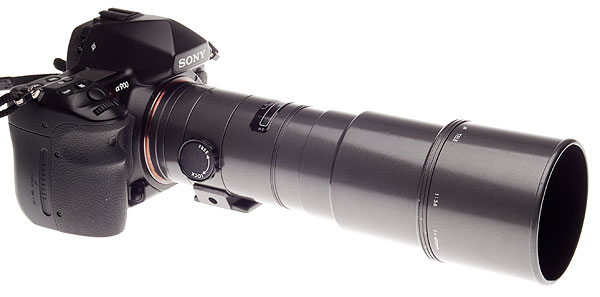
This lens – an original version in gunmetal finish – is impressively solid, a real metal barrel with a precision made extending hood, lined like the rear lens tube with flock anti-reflection black. The mount is well made, the tripod collar is ultra-neat though fitted with only a 1/4 inch thread:

The dilemma is that inside this lens is a chip which means it won’t function at all on digital SLRs and many later film SLRs (almost anything which actually says Dynax or Maxxum on it won’t work, this lens was made for the original 5000-9000 Minolta AF series). It will not even work in a manual focus mode, as the chip reports an error, not just ‘no lens fitted’.
The answer is to rechip the lens using a new contact plate array fitted with a new chip, provided for around $60 including post by James Lao in China:
http://eadpt.cn.webz.datasir.com/eadpen.htm
This service is absolutely reliable, James emails to check the lens type you want to rechip, sends using signed-for post and I had my new chip in just four days to the UK.
Some reports on how to rechip the lens advise dismantling the entire rear mount. This is not needed, nor is any sanding or cutting with a hacksaw. A pair of miniature end cutters as used in the electronics industry for trimming wire exactly will do the job – so will luthier’s fret end cutters, and many pliers with high precision wire cutters.
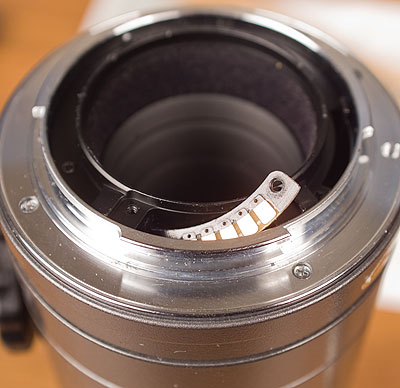
The original contact array looks like this:

Note that the board does allow the countersunk head screws to lie fairly flat. Removing the screws over a suitable tray, with the lens held sideways, requires a No 1 jeweller’s screwdriver – 1mm or 1.5mm will do well. I used a screwdriver set with an illuminator in the handle.
With the old board still attached to its ribbon cable, just ease it up, twist it and push it into the void the left as viewed here. If badly placed, it can inferfere with the aperture mechanism, so after fitting your new chip and testing the lens, I suggest opening up again, pulling the old board out and cutting it off for good. It will never be needed again. Check the aperture lever operation anyway to make sure the board, when pushed into the lens, is not jamming the action.

Here’s the contact side of the James Lao board. Note that it has excess substrate on the ends, which will need shaping down to fit, and that the screw holes are brass lined. This will result in the screws being very slightly raised when it is fitted, but this is not an issue, just a cosmetic difference.

On the back is the new chip, connected by small wires instead of a ribbon cable. It is not as fragile as this shot indicates, nor are you likely to damage it through static unless you groom the cat first then rub a balloon, stick it to your 8ft 6 regulation height ceiling and walk across a nylon shag pile carpet wearing crimplene trousers. But it is not 1975, so no worries there…

This is a pair of fine end cutters (so called because the clipping edge is right at the front, not set back by angled grinding/sharpening). It can be used to clip off the excess, then nibble the correct shape at each end, with minimal effort and no risk. No dust is created but little bits of board do fly off and land in watching eyes, so wear glasses or protective goggles if you do this. I wear off-the-shelf reading glasses, it makes this sort of small work much easier.

The trimmed new board will fit easily and firmly into the space left by the old one.
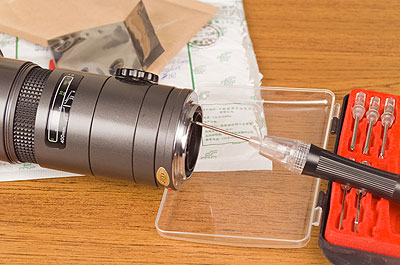
Here’s how I replaced the screws. My screwdriver is a good enough fit to hold the screw and introduce it to the hole with the lens safely over the lid of the screwdriver kit. Do not stand the lens upright and do it from above, you risk losing a screw inside the lens. This way is safe.

Once fitted, it is perfectly functional though the trimmed ends and non-recessed screws make it look a touch agricultural. You could black-pen the ends I guess, but this is not going to affect flare or any other aspect of the final picture quality. Note the flock-lined rear lens tube – these optics were well made, 20 years ago.

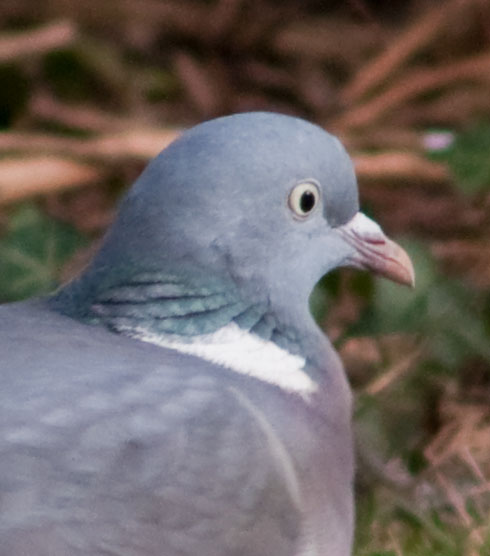
Taking the lens out on the A900, not a very good day, ISO 400 and really wide-open are the defaults, I found that it absolutely must be stopped down to f/8 to be useful. This quick snap of a blackbird on the roof actually shows very fine detail:

This is un-sharpened, with some NR, and is at +1.3 plus brightness boost in processing – in other words, really ISO 1600 on the A900, not ISO 400 as set. The tiny hair-like feathers are resolved at f/8. Not all my first attempts to autofocus the lens were as accurate, it’s easily confused and dithers even if it does not hunt. Into the light, it’s pretty awful on anything which shows the serious level of CA present in an original version at f/8, click the image for the full size view:

Colour bokeh? Yup, red and green, your own Christmas decorations provided free for every tree. It can be improved in ACR from raw, but really, this sort of subject (edge of full frame shown) is best avoided.

Here’s another quick snap in the garden, not much sun but not totally dull, again managing f/8 with a reasonable shutter speed (1/200th I think on this one). The 100 per cent clip from the A900 shows a decent level of detail, without adding any sharpening:
It’s soft but remember this is part of a five to six foot wide image. At f/11, which I may get to try in better weather, and at ISO 100 on the A700 cutting off the rather CA-prone outer field and getting that valuable effective 600mm-angle view – well, it’s probably worth it. I do not get much better than this, and often get worse, from the Minolta 500mm f/8 mirror lens on the A900 at ISO 400.
The rechipping operation is so fast and hassle-free there is no great risk in buying one of these lenses at a bargain price, against the risk it will not work on your digital SLR. You can make it work. For 7D/5D owners where the resolution is less challenging, it would be a great buy. Do not expect fast focus – it is not – but the handling more than makes up for that. Balance and feel are just great, and the sliding collar which covers the moving focusing ring is a great design feature.
– David Kilpatrick