Nikon celebrates a significant milestone this month, with the production of its 60 millionth NIKKOR interchangeable lens. The landmark figure is the culmination of over 50 years of Nikon’s commitment to supplying professional and amateur photographers alike with the best possible equipment.
Five million lenses have been produced in the last seven months alone, after total production of NIKKOR lenses reached 55 million in August 2010. Since then (more…)
Sony Corporation announced today it will disclose the basic specifications of its “E-mount” for interchangeable single lens cameras, without fee, to manufacturers of lenses and mount adaptors, starting April 1st, 2011. This was previously confirmed at the photokina press conference – now they have revealed that Carl Zeiss AG, Cosina, Sigma and Tamron will all be working on the E-mount system as independent lens makers.
“This opens the way for manufacturers of various lenses and mount adaptors to effectively develop products conforming to “E-mount” specifications”, say Sony.
The NEX E-mount revealed – ten contacts, three flanges and a mere 18mm of register distance…
“Users of the Sony’s NEX-3, NEX-5, NEX-VG10 and other E-mount compatible Sony digital imaging products to be launched in the future will now be able to use interchangeable lenses from both Sony and various other manufactures, while they will also be able to attach non-Sony lenses to their Sony digital imaging products via a mount adapter. Sony believes the growth of digital imaging products employing the “E-mount” will further increase the enjoyment of photography and video shooting among an even wider range of users.
“These basic specifications will be disclosed to manufactures of lenses and mount adaptors following a predefined process of approval and the signing a license agreement with Sony.
“As of today, the decision to disclose basic specifications of the E-mount has been endorsed by the following companies.”
(there follow these manufacturer statements)
Carl Zeiss AG
As an independent lens provider, Carl Zeiss welcomes the disclosure of the E-mount specifications by Sony. It helps manufacturer’s product development, benefits customers and therefore assists in establishing E-mount as a new, healthy and strong system on the market.
Cosina Co., Ltd.
Cosina Co., Ltd is excited by the potential of Sony’s E-mount which enables to a large-size image sensor to be incorporated in a compact, interchangeable lens camera. We have high expectations for the E-mount with its aims to create a new photography culture, and express its assent to Sony’s decision to provide information related to E-mount.
Sigma Corporation
Sigma Corporation fully supports Sony’s decision to disclose basic E-mount specifications. We believe this move will spur the further growth and diversification of camera system across the industry, provide photo enthusiasts with a wealth of choice and enrich in their photographic lifestyles.
Tamron Co., Ltd.
Tamron Co., Ltd endorses Sony’s decision to disclose basic E-mount specifications. We aim to offer our customers new solutions and unprecedented photo-shooting enjoyment through the manufacture and sale of E-mount lenses.
Editorial comment: at the photokina conference, the wording used seemed to imply that independent E-mount camera bodies were also a possibility. Of the makers above, three already have a history of making rangefinder or compact style large sensor bodies – Zeiss (to date, film only); Cosina (digital, in the form of the Epson Leica mount bodies with 6 megapixel Sony sensors) and Sigma (the DP-1 and 2 series have fixed lenses, but would be a natural candidate for conversion to E-mount form). If this was to be the case, in a future announcement, the E-mount would be established as an alternative to the Micro FourThirds system with a capacity to use sensors in formats between 2X and 1.5X with existing lenses, and possibly up to full frame in a secondary configuration with a different range of lenses (backwardly compatible with smaller sensors).
Is this the same Sony people rant about being protective and exploiting their customers? No. It is Sony listening to their customers. It’s Alpha becoming the 21st century equivalent of Leica.
Edited from Sigma Japan’s announcement:
Sigma’s lenses for Sony mount may have a potential aperture operation problem when used with the Sony α33 and α55 Interchangeable Lens digital cameras.
To overcome this issue, we will be offering, free of charge, a modification service to our customers who have purchased a Sony α33 and α55 and own Sigma lenses for Sony mount. This phenomenon will only occur with Sony α33 and α55 cameras. Future production of Sigma lenses will be fully compatible with these cameras.
We deeply apologize for any inconvenience caused to our customers. Phenomenon
When shooting with a Sony α33 and α55 cameras, the aperture may not work properly and a “camera error” message will be displayed on the camera. Lenses requiring the modification
All current Sigma’s lenses for Sony mount.
For lenses discontinued several years ago, a modification may not be available. For further details, please contact your nearest authorized Sigma Service Station. Support for this issue
We will be offering a modification service for our current range of lenses free of charge. Please contact your nearest authorized Sigma Service Station. World Network Mark for compatible lenses
Future production of Sigma lenses will be compatible with these cameras. The above sticker will be put on the product box of compatible lenses.
For further information, please contact your nearest authorized Sigma Service Station. Editor's comment:Depending on whether the aperture problem is entirely mechanical (the coupling) or also involves electronics, it would be fair to assume that problems with the A33/A55 may not be restricted to Sigma independent lenses, but may also apply to other makes, especially older lenses. Brands made by Sigma such as Quantaray are almost certain to be affected. We await Sony's statement on compatibility with older lenses, including Minolta. Please note that the Alpha adaptor for the NEX E-mount provides normal aperture operation with Sigma lenses; how the A33/A55 mount differs we have yet to see.
OVER the past few days I’ve been looking at the NEX-5 and a range of lenses and optical systems. I’ve got adaptors for C-mount (16mm/TV/CCTV) lenses, Leica 39mm screw, Minolta MD and the LA-EA1 for Alpha A-mount. The NEX-5 has proved able to provide a surprisingly bright focusing image through a classic German microscope:
It also proved very competent with the Sigma 70-300mm f/4-5.6 OS lens, the adaptor providing power for the OS which is fully functional, and also for auto exposure, leaving only manual magnified focusing to tackle. (more…)
The Japanese camera and photo product manufacturing association CIPA has issued a press release PDF, containing a table of predicted figures, relating to 2009-2011 projections. Here we reproduce the text and the table (as a JPEG). (more…)
Manual control and quirky design 50mm F2 to 22 tilt/swing lens
Basic optics on synthetic bellows, glass lens
Typically available used for £70 to £120
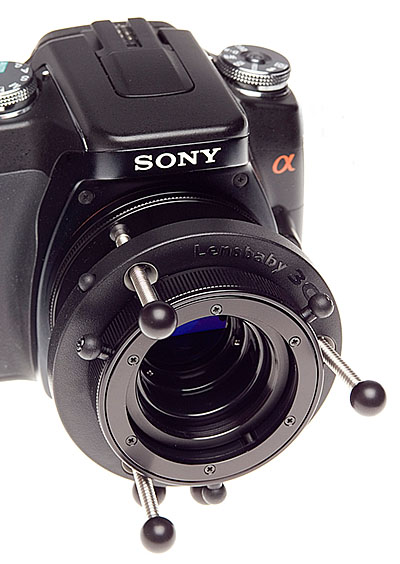
One of the digital photography creative tools that made a splash in the early 2000s, the Lensbaby is a novelty item you can find for very little outlay. A low-cost meniscus lens mounted on a flexible concertina tube with an SLR mount-fitting at the other end, it’s a similar theory to the Diana or Holga cameras sometimes used by professionals to capture a feel of post-modern grunge, it used aberrations creatively.
The third-generation Lensbaby 3G – not to be confused with contemporary mobile phones – launched in 2006, following a second-generation move to glass optics in the original design. Lensbaby 3G provides more sophistication, with controllable focus, tilt or swing that holds position, and screw-thread fine-focus refinement. In 2008 it was updated as the Lensbaby Control Freak.
The Lensbaby 3G and Control Freak cost rather more second hand than the early plastic models, but in good condition has a lot to offer for photographers looking for a funky, retro effect and a hands-on ritual for creating an image. The nearest modern equivalent is the Lensbaby Composer 2, which is around £350 with optics (beware cheap listings without glass).
We reviewed the Lensbaby 3G in 2007 – and have revised the review to keep it relevant for used lens buyers.
Lensbaby 3G (2007) specifications
50mm coated achromatic glass doublet
Three-post tilt/swing and focus from under 30cm to beyond infinity plus fine focus thread
Automatic exposure is possible in aperture priority mode for most digital and film SLR camera bodies; a fixed correction may be needed. Some Nikon models allow manual exposure only.
Since then it has gone through two revisions, increasing in price and complexity as well as quality. The third generation uses a low dispersion multi-coated glass achromatic doublet lens, introduced with Lensbaby 2, but adds precision control of three points of tilt and swing on threaded posts plus a fine-focus stage in a helical thread.
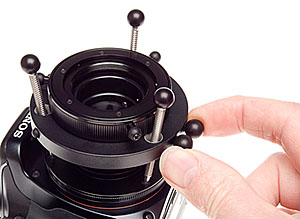
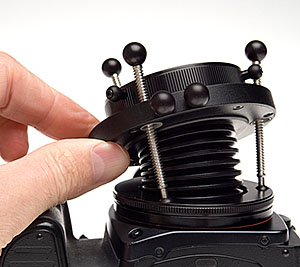
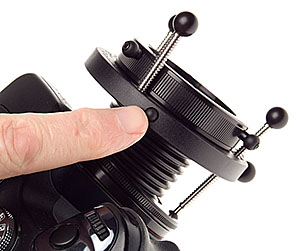
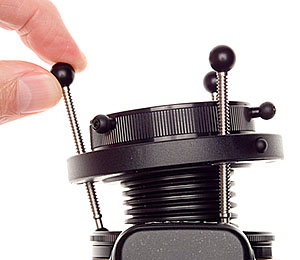
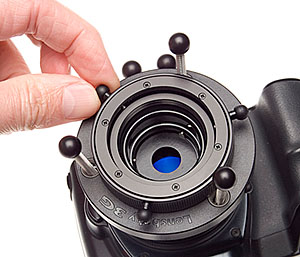
The clever part is the unlock and lock system which grabs all three screw-gear posts simultaneously. Just squeeze the Baby’s balls together, and it releases grip instantly allowing:
Fingertip adjustment if the camera is being held in both hands (use two fingertips either side to rock the lens angle and press it back for focus).
More control with finger and thumb. This is your start point, rough setting, of both focus and skew. It helps to be looking through the finder when doing this.
Lightly depress a small button located perfectly for your shutter finger, and the setting is locked. You can usually bring another finger over to do this while two are holding the lens position. It’s rather like playing the ocarina, but not many people play ocarina these days.
Then, fine tune the skew with the three screw posts (with black ball knobs on their ends).
Finally, hone the focus using the focus collar which has three lugs to make handling easier.
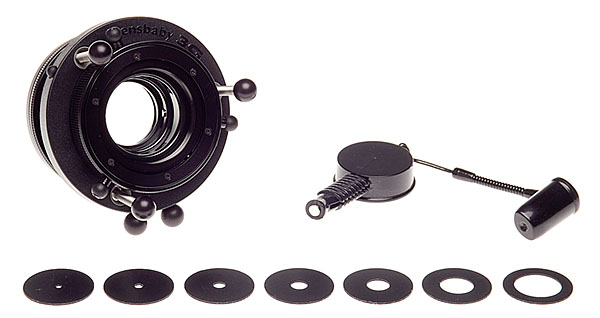
The aperture system is unusual. Small magnetic plastic rings drop into the lens front, and are held firmly by a set of three spring-loaded ball bearings which the ring pops behind. To remove or insert the ring, a probe with a magnetic tip is supplied. It works perfectly. This probe has a small tub on its other end, neatly re-purposing a Kodak film can lid as its cap, to hold the unused aperture discs. It also has a pen-top cap for the probe end to prevent its very limited magnetic field getting anywhere near sensitive components.
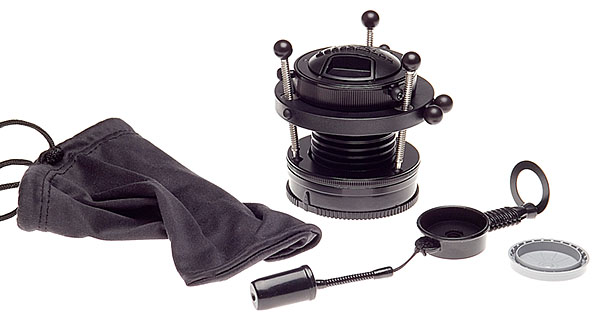
It comes with a good quality rear mount cap properly labelled for the Lensbaby but custom made for M-AF/KM/Alpha, and a good clip-in front lens cap, and a soft pouch. Great to see an independent maker offering full support for the Alpha system with such an unusual product, rather than ignoring the minority and only going for the lowest common denominator brands!
The maximum effects of the Lensbaby 3G are obtained on full frame cameras, but we tested it on an APS-C format using the Sony Alpha 100. It is also sold for 4/3rds format, which will be even more challenging. Some camera systems use a near-60mm lens type, but Alpha uses a 50mm version, which is better all-round. Maybe one day I’ll be able to follow up with a test on the full frame Alpha…
The outer zone of the image field has the most aberration, distortion and vignetting to exploit for effect and much of this is lost in theory on the small digital format. Enough remains within the 15.8 x 23.6mm sensor view (above) to be exploited, generally using wider apertures – full aperture of f/2 was used for the existing light snapshot above which makes a shopping mall and chainstore anonymous though our shoppers remain sharp.
Here the Lensbaby shows a weakness, which can only be solved easily by taping some ND gel filter to a wide aperture, or obtaining an ND4, 8 or 16 filter to fit the (undocumented) 37mm filter thread. Studio flash shots at f/11 or f/16 – pretty much what my 300/300/600 Elinchrom rig demands at minimum power for small still life – show almost no typical Lensbaby effects and can actually come out sharper than many premium grade prime or zoom lenses, even at full bore!
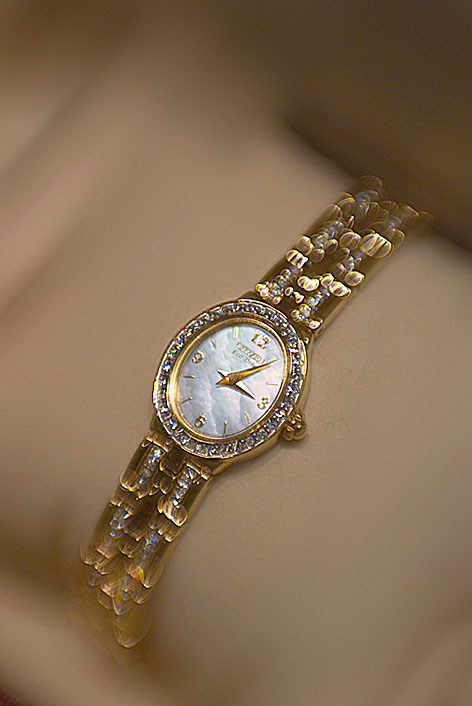
You must work at f/2 to f/4 for maximum visible special effects. Even this is at f/2 – wide open. How about sharpness, shooting through a jewellery shop cabinet at such a wide aperture, hand held, visually focused on the Sony Alpha standard focusing screen? Here’s a 100 per cent section of the shot above:
As you can see, there are complex and attractive effects from the aberrations and the tilt/swing, but the core image as shown by the lettering on this tiny ladies’ watch is pin-sharp under the mushy glow.
Here’s another example from the same set of quick snaps. This can blow up to 20 x 16″ and still look great. You can get soft focus using Photoshop but you just can’t get the complex blend of optical effects present in this shot.
Lensbaby glass lens performance
At f/5.6, the lens begins to appear rather sharp across its entire field. From f/8 to f/22, you can actually use it as a good quality tilt-swing lens with a fixed degree of rise, cross or fall (it’s all one action). Instead of narrow planes of sharp focus intersecting an image unexpectedly you can get traditional large format style focus in depth. Just set the shot up wider open (the f/2.8 aperture is better for focusing than completely naked f/2), insert the f/11 of f/16 aperture disc, and you’ll be very surprised by the sharpness and lack of chromatic fringes. With digital SLRs you lose some sharpness at apertures smaller than f/11 because of diffraction.
This is not why Lensbaby 3G is bought. Most users will take it into the wide world, using it for fashion, stock, still life or architectural interpretations. They will work with f/2, f/2.8 or f/4 and tilt the lens plane to create a vortex of sharpness with dramatic blur streaming out from it. Atf/4 the shot above uses the lens swung to put the plane of focus through the stamen tips and the petal edge, and blur the further part of the flower more.
Achieving sharp focus with Lensbaby 3G
The instructions for Lensbaby remind you to be very careful with your digital SLR’s dioptric viewfinder correction. They do not tell you why. Most DSLRs are poor for manual focusing as they don’t have old-style ground-glass screens, they have extra bright versions which are nearly transparent.
This makes it possible for the eye, if misfocused by the eyepiece, to see unfocused images as sharp. It may be worth getting a matt screen when someone like Haoda makes a plain one. Focusing the Lensbaby with the split-image/microprism Haoda screen is not so easy.
There is a secondary effect of this which Lensbaby do not mention; these screens don’t give an accurate preview of depth of field. This applies to nearly all modern SLRs. You will see more depth of field than you actually get. The results from Lensbaby may surprise you by appearing more extreme in the final image than you set up for, so it is best to make tests before using the lens on a non-repeatable commission.
It’s worth doing some imaginary assignments. For example, a shot for an illuminated sign supplier. They would want their sign sharp, but want the creative focus of the Lensbaby 3G to obscure the location.
An imaginary assignment: capture a shop’s sign in a shopping centre
Full f/2 aperture might be right for the effect, but at 100% magnification it’s clear that a small focusing error has made the sign a little less sharp than the detail in the background. You would, if you did some tests like this, decide that with Lensbaby it’s necessary to take many different shots, tweaking the focus or the swing/tilt screws a tiny amount, maybe fitting different apertures.
A 100% crop of the sign in the overall shot shows the Lensbaby 3G on 2007 tech was hard to focus accurately – modern systems offer sharper screens and magnification.
You just can’t rely on a single shot with visual focus preview via a DSLR focus screen. This is at 100 per cent, equal to an A2 print at screen resolution, but that’s how picture get examined these days.
Should it be used for weddings or portraits? Difficult question. Unlike Photoshop effects applied later on, Lensbaby blur is indelibly written into your capture. What is needed for the future is a Lensbaby Plug-In or filter suite for Photoshop which copies the results from this £175+VAT specialised optic for jobs where you just can not afford to sacrifice the original shot to pure effect.
As for value for money, my initial thought was that it was too expensive – you can get a complex zoom for the same. Then I remembered the old Rodenstock Imagon. Really, it was not so very different optically and you paid £600 when £600 was real money for this with a focusing tube and few aperture discs.
Lensbaby 3G creative apertures
Now why Lensbaby currently only supplies plain aperture discs with the lens I have no idea, as for a very small outlay you get a kit of creative aperture shapes such as star and heart or slot, and cut-your-own blanks – a mere $9.95 kit, trivial compared with the cost of the lens which is more than many popular wide range zooms.
Imagon-style perforated, patterned aperture discs would make it wonderful for soft focus portraits and zany shaped apertures – like f/11 hearts, stars, slits, asterisks, triangles and so on – could create brilliant bokeh effects. Of course you can make your own from black paper but it’s not magnetic, and you would have real trouble drilling the multiple holes for a classic soft-focus lens diaphragm. A leather punch can be used with the magnetic material blanks.
Two examples using the star-Creative Aperture (added Dec 2008 revision)
They could also make a pinhole aperture and some high definition f/11-f/22 apertures with precision foil edges to the hole, reducing the diffraction issue. The existing apertures are not very precisely cut and the material is very thick by iris diaphragm or Waterhouse stop standards.
So, Lensbaby 3G has plenty of potential for add-on accessory modules or DIY custom apertures. Overall, the clever functionality of the mount makes it worth the money. For further UK regional information, visit www.intro2020.co.uk. For international information, see Lensbabies.com
Update: new LensBaby models (Control Freak, Muse and Composer) have been introduced in December 2008. They have interchangeable lens units, offering a choice of plastic or glass optics, and refined designs. Wide, tele and close up adaptors are also available. The Control Freak is the new 3G update.
I CARRY a camera everywhere, because you never know when a good photograph is round the corner. I also just grab the camera from my office, and rarely think to check the settings. Today, I managed to shoot everything with Super Steady Shot (Anti-Shake) carefully switched off on my Alpha 100.
In the studio, or when making tests, I may switch SSS off. It’s not needed or desirable with tripod shots, or flash. In fact it can spoil tripod shots by reacting incorrectly to reflected vibrations. Now I have been reminded that I should switch it back on the moment the tripod or flash shoot is finished. That’s what I mean by slightly stirred. Memory stirred. Or intentions. Whether I will remember and intend is another matter.
This is not a ‘good’ photograph but like many I take, it may have a value to someone writing about architecture, history, or conservation. I’ll revisit it on a better day. It was taken at 16mm on the CZ 16-80mm, carefully focusing at 35mm before zooming back to 16mm, as the lens never focuses accurately at the extreme wide end on the A100. The exposure was a very safe 1/100th at f/10. Even so, the image is not as sharp as I have come to expect from routine hand-held shooting with SSS enabled.
While I will shoot a group of people without asking, I won’t aim my lens at a single individual without the courtesy of asking permission. There was no problem apart from folk milling about between my lens and my sitter, who was asked just to keep working and not worry about the camera. But, aware that I should work quickly and not take endless pix, I once again failed to spot the SSS was turned off. The exposure was running at around 1/25th wide open, at the long end of the lens. In Leica or Minolta CLE days I would not have thought twice, I could hand-hold this, but I would have taken great care. Breathe in, calm the body’s natural sway, squeeze the shutter smoothly. SSS has made me careless. Also, the small viewfinder of modern DSLRs has made me less aware of focus. For reasons everyone will know, the central focus locked on to the wall, not my subject. I thought I had locked and recomposed, but perhaps the lens made a final tweak and revised my setting. At f/4.5, this was enough to take the edge off the shot. Like it or not, there was shake. All three frames I shot showed shake, one so badly it was not usable. The chosen shot here was on the verge of being unusable when enlarged to A3+ picture library dimensions:
This gives a very unfair view of the shot, since it is enlarged to 17.5 megapixels, and when output to a size suitable for a 6 x 4 inch print it’s as sharp as you could want. We used to try to judge images from 6 x 4 prints. Now, we really can see that bit of directional shake and that focus error. Even so, with the softness and slight ISO 400 noise, it has a painterly look and will go in the library.
If you click the photo, you will open a full sized clip (at the size suitable for A3 to A2 printing on watercolour paper). The artificial edges created by the watercolour filter are most effective, and it handles the colour in skin tones well despite producing a dense black for the hair and charcoal shades for the shoulder wrap.
Obviously there are very few images where this is appropriate treatment, and it is an off-the shelf filter, which makes it not really your own creative work. There are some other options – programs like Painter, and sets of special effect filters – but the same can be said of these as well. In the end, if the process applied to an image makes it serve its purpose better or enhances it visually, reasonable productivity dictates that it’s OK to use ready made shortcuts.
And one shortcut I must remember not to take is to grab the camera without checking every single setting – including the SSS switch. It is just too easy to shoot all day with it off. In my experience SSS will sharpen up many shots at normal shutter speeds, let alone those at hard to handhold settings. I didn’t lose my shot, but it could have been better.
As a footnote, in sending my subject a copy of her portrait, I realised we had spoken before (Edinburgh is a very small place) – at a Friends of the Earth Scotland booth during one of the many green festivals or events which happen in the city.