Sony A7RIII review in Cameracraft

Read David Kilpatrick’s review of the Sony A7RIII

Cameracraft January/February started the A7RIII test report, and March/April 2018 continued it. Both are free to read here. In the second issue you’ll also find the review of the 24-105mm f/4 FE G OSS lens. In the first issue, Gary Friedman looks at the RX10 series and one-inch sensor quality as well – and David tests the Voigtländer Nokton 40mm f/1.2 Aspherical FE manual focus lens, Sigma 16mm f/1.4 DN DC, and Samyang 35mm f/2.8 AF FE.

Part 1

Part 2


Photoworld and Image – complete digital 28 issue archive!

issues-fan
We are able to offer, now, the complete 28-issue digital archive in page-turn format for the final eleven years of Minolta Image and Photoworld (as it became) from 2002 to 2011. For only £10, a one-off payment, you unlock the complete collection of digital versions of the printed quarterly magazine.

This collection forms a fascinating document, showing the transition from the last heyday of Minolta to the merger with Konica in 2004 and the launch of the Dynax 7D, through the takeover by Sony in 2006 and up to the launch of the NEX E-mount system in 2010 and beyond.

Click to view the full digital publication online
Read Minolta Photoworld 2002-2011
Publisher Software from YUDU

Voigtländer FE 10mm f/5.6 and 15mm f/4.5 III

cameraswithVSMVFEwides-web
I got to try out the first new Voigtländer Sony FE mount lenses with electronic aperture setting and manual focus control with a quick overnight test during the UK Photography Show at the Birmingham National Exhibition Centre, on March 19th 2016. The pre-production 10mm f/5.6 Hyper-Wide-Heliar and 15mm f/4.5 Super-Wide-Heliar are two of a trio reaching the market in Spring 2016 – the third is a new version of the 12mm f/5.6 Ultra Wide-Heliar. We also tried the 10mm in Leica M mount; the test cameras were the Sony A7R II and Leica M 240.

First of all, no other Voigtländer lenses yet have the Sony E-mount with electronic connections, similar to the Zeiss Loxia models. Cosina, the manufacturer of Voigtländer lenses, also makes some Zeiss lenses and the operation of these designs is probably identical to Loxia 21mm, 35mm and 50mm models. The electronics could allow in-body control of the lens aperture but for these lenses, the aperture is mechanically set on the lens itself with a 1/3rd stop clicked ring that can be de-clicked by pushing back, turning through 180° and putting an alternative index mark in place. The focus distance set is transmitted to the camera, along with the focal length. This allows a digitalogue display in the finder, a marker moving on a bar from close to infinity.

15mm-Emountrear-web

For the E-mount, the close focus of the 10mm and 15mm is impressive and identical at 30cm. This contrasts with the M-mount minimum focus of just 50cm. The mechanical focus is very smooth indeed and the whole metal-bodied barrel and mount feels solid and precise. Depth of field markings are conventional (that is, based on pre-digital circles of confusion, or a typical A4 print rather than a 100% view on a 27 inch monitor screen). The optical design for the Leica M mount is clearly identical but the mount is very different with no electronics, and indeed no way of telling the Leica body the focal length or aperture in use. The EXIF data from Sony E-mount files is precise, with Leica it depends on the user manually entering the focal length, and a clever algorithm that uses the camera metering to work out the f-stop being used.

15mmvoigt-twomounts-web

Here are 10mm Hyper-Wide-Heliars in E-mount and M-mount.

10and10-web

The lenses have fixed petal type lens hoods and come with well-fitting front caps. The use of filter systems will depend on adaptors like those already found for the 15mm MkIII Leica M, but probably custom designed for the 10mm.

Here, as a final product shot, is the original 1990s 12mm f/5.6 Ultra-Wide-Heliar Leica screw mount, with its detachable hood removed, next to the new 10mm. The new 12mm is similar in size to the 10mm, reflecting an optical design intended to be more compatible with digital sensors with improved vignetting control and freedom from colour shifts. It’s fair to say, though, that with the Sony A7R II I have been using the old 12mm with very good results. I can also tell you the new lenses are much sharper especially towards the corners.

old12and10web

It’s this sharpness which comes as a really welcome surprise with the 15mm f/4.5 design. It can be used wide open with confidence. Because the lenses have mechanical apertures, they don’t open up for focusing like purely electronic E-mount types – you focus at the working aperture, or for extra accuracy open the lens up, focus, then close down. When you touch the focus ring and move it, the magnified focusing of the Sony body is automatically activated, returning to a full view when you take first pressure on the shutter release. In practice this is a very fast and accurate manual focus method needing no button presses on the camera body.

The geometric distortion of the lenses is minimal – they are almost perfectly orthographic but far from isometric! Objects near the ends and corners of the image can appear extremely distorted simply because they are projected with such rigorously rectilinear drawing. This is not really distortion, but it certainly looks like it when a face or figure ends up placed at an extreme. The 15mm must be used with care, and the 10mm needs an advanced understanding of weirdness.

These lenses convey a built-in profile to the Sony bodies, and also to Adobe Lightroom or Camera Raw for processing (or so the dialog reports). What you see through the electronic viewfinder, and on opening a raw file, may not represent the optical truth. Studying the 10mm I found it hard to understand how any light reaches the corner of the sensor at all. I can’t measure the true fall off but I would guess it’s in the order of five or six stops. With the profile applied in-camera or by the raw converter, it’s moderated especially when stopped down a bit. This looks natural. Correct the vignetting fully, and some of the natural appeal of the image is lost.

We must wait to review what may be primary choice for many users, the 12mm.

The 10mm Hyper-Wide-Heliar f/5.6

This lens displays an exceptionally straight geometry, even when used on the Leica M 240 body which has no added firmware correction function. Whatever profile is being passed to the Sony bodies probably only concerns vignetting (our Leica test indicated it may not really need a lens profile). It has 13 elements in 10 groups and covers the widest angle ever achieved with a true wide-angle on the 35mm format, 130°.

Of course, I took a few tests inside the NEC but the first subject which really lent itself to the extreme angle was the giant illuminated sign. I was about a metre away from this, but a standing adult is about half the height of the letters. All the pictures used in this article can be clicked-through and will take you to the pBase Gallery which allows access to the ‘Original’ A7RII (level 10 JPEGs, full size) along with all the essential metadata. Please note these pictures are all copyright and if you wish to share them, please link to the pBase Gallery. You may download and examine them for your own research but they may not be reproduced.

Outside the exhibition centre there’s an open land drain (Pendigo Lake) which stops the entire place from flooding. It’s about seven feet deep and fed by drains from below all the exhibition halls. With the 10mm fitted, I found a suitable supporting post. You’ll see that the beach gravel shows some softening and elongation towards the corners, almost inevitable regardless of the sensor cover glass specifications sometimes blamed for this. The lens geometry forces the elongation. This shot at f/8 has no added correction at all for vignetting.

But with a lens like this, simple extreme wide views can be disappointing or pointless. You need to exploit its potential to do what other lenses can not do. The Sony A7R II can also go where other cameras might not – such as nested into the gravel, using the rear screen folded out for viewing the composition.

This is stopped down to f/22, and in fairness the diffraction softening means nothing is really as sharp as it can be. The diaphragm stars from the lights are neat. Depth of field doesn’t get much deeper than this.

This picture is from the next morning, walking back past the lake. ‘Not often you get to photograph Father Christmas fishing’, my friend here joked. He told me the history of the ‘lake’. Seven friends had gathered, for a fishing competition – pick their spot, set up, three hours to fish, winner with the biggest catch by weight. I’d been using a tripod so Steady Shot was turned off, and this hand-held shot at 1/6th was just OK. I found that because of the magnified scale of detail towards the outer field, if you do get shake it can be almost invisible in the centre but really blur the corners. I’m still trying to work out exactly why sensor based stabilisation manages to handle this change of scale caused by lens projection, but it does. Shots with SS on were generally perfect, those without could be surprisingly poor considering the very short focal length. I’ve processed this picture a little to suit the subject, but it shows the potential of the 10mm for environmental portraiture and editorial work. Because a shift of just inches in the lens position changes the shot so much with the 10mm, a tripod would have been impossibe here (I was leaning forward almost vertically above his foot for this).

Here’s a funky use of the 10mm extreme angle and scalar distortion. It’s a quick grabbed shot on leaving the exhibition hall, and it’s not even vaguely sharp, except rather oddly in the view through the coach windows. The LED lighting has strobed some detail at the left hand side.

I liked the effect with the bus so much I tried a few trucks through the car window in the morning. However, they lacked shape and form. This passing car and trailer was about the best. The progressive shutter captures a very strange effect from the wheels.

Here’s a more conventional use of the 10mm. The weather was pretty dull and actually, night scenes were better. Stopping right down, again, takes the edge off sharpness. The 10mm seems about at its best around f/8 or f/11 (which is exactly where I use the old 12mm at the moment).

Before moving on to the 15mm, a change of location. Next to the ‘lake’ there’s a new Resorts World hotel, casino and outlet mall complex with restaurants. Brightly lit at night, it was a far better subject for these wide lenses than anything else! Even in the daylight, it was interesting.

You’ll also find a vertical version of this in the pBase gallery. It’s hand held, and the detail throughout really says everything you need to know about the 10mm and its practical uses. Although I believe the 15mm is substantially better optically – simply not as ‘stretched’ – I placed my order for a 10mm after doing this test. It is, after all, about the same price as Sony’s supremely boring but widely praised CZ 55mm f/1.8 – and you’re getting something with a unique commercial and creative edge instead of exactly the same old standard lens we’ve had around for ninety years, slightly improved…

The 15mm Super-Wide-Heliar f/4.5

With only 11 elements in 9 groups, this 110° lens is version III of a popular favourite. Optically identical to the M mount version, the big attraction is not just the lens, but the E-mount functionality. However, having used various 15mms before version III, I have to say this lens is just outstanding optically. It resolved such fine detail that on the interior view at night of the Resorts World mall, moiré patterns are thrown up by the pattern of pegboard type holes in the architectural ceiling surface. Please note that’s not vignetting at the top, below, it’s the lighting in the mall.

Even if you don’t bother to click through and examine the full sized images for the other shots, please do take a look at this. It’s also handheld with SS, and not at the very slowest ISO. The resolution at f/8 is extreme and other shots taken, including those at f/4.5 maximum aperture, show the same quality. I’ve been testing lenses for over 40 years now and this is simply one of the best lenses I have used. This particular interior is almost like a 3D test target for lenses, too!

The 15mm causes me a problem. I already own a Sony CZ 16-35mm f/4 and it simply isn’t this sharp.  It can’t do the same thing on a 42 megapixel sensor, it is acceptable and all very good, but not on this level. The 15mm is better than the 10mm and in many ways a more generally useful focal length. But… I’ve got my 16mm covered. 10mm is a better partner. If I dd not have my 16-35mm, I’d team up the Voigtländer 15mm with a 24-70mm. Only even the new 24-70mm Sony f/2.8 probably won’t match this (I have taken a few shots on a pre-production sample, but remember, this Voigtländer is also pre-production).

The 15mm is a great angle for shots like this and it resists flare well. This is not a tripod shot, it used the fishing platform at some risk of an expensive camera and lens taking a dive.

Here’s a hand-held, stabilised, very high ISO shot stopped down enough to keep the topiary fairly sharp. It’s much easier to get the horizon level with the display function available in the Sony A7R II and the brightness of the EVF for night shots. Otherwise, this would be much harder. I found it almost easy to take pictures like this casually using the 15mm (it’s harder with the 10mm which needs that little bit more care in levelling up).

The 10mm on Leica

Just to prove that the straight-line geometry and reasonable vignetting are not entirely down to any kind of electronic profile, a couple of Leica 240 shots start here with one using no adjustments in raw conversion to correct illumination or geometry.

Here’s a slightly more creative use of the lens. Getting the camera in position was not easy and the A7R II would have been quicker to set up, but we wanted to check out the Leica version too.

Conclusion

If you have not purchased any wide-angles shorter than 20mm, it’s worth buying both the 15mm and the 10mm – or maybe just the 12mm on its own. The prices in the UK should be around £839 including VAT for the E-mount 10mm and £724 inc VAT for the 15mm – or less. At The Photography Show, these lenses were being ordered in some quantity especially on the professional days. A surprising number of mainstream professionals now use Sony A7R II and it seemed that almost all my pro magazine readers who came for a chat at the Master Photographers Association stand either had Sony or Fujifilm X. Those handling commercial assignments generally had the A7R II and most were using their Sony kit alongside Nikon or Canon. You can get pretty good (if huge) 15mm lenses for these DSLRs but you simply can’t get a 10mm. The closest is Canon’s 11-24mm EF zoom; at 11mm this does not even begin to approach the image quality of the Hyper-Wide-Heliar. You could also buy an A7R II with this lens for less than this zoom alone (definitely so at the show prices where £700 was slashed off the A7R II body).

For those who own 16-35mm or similar lenses, the 10mm is a logical buy. It’s especially useful with the A7R II rather than the A7 II or A7S models, because the 42 megapixel sensor allows sensible cropping away of geometric extremes. One photographer I talked placed an order just to dispense with his bulky Canon 17mm tilt shift and DSLR – a crop from the 10mm angle of view is all he reckons he’ll need in future.

Our thanks for Hardy Haase of UK distributors Flaghead for the overnight loan of the lenses, and thanks to the NEC and Resorts World environmental landscaping completed this year for creating some half-decent subject matter. Flaghead is also the owner of Robert White, the famous UK professional dealership in Poole, Dorset, whose founder is no longer with us. They took over the premises and shop before Robert’s death, and continue his name and reputation. This is their own direct outlet for the Voigtländer lenses

– report and all example photographs by David Kilpatrick, publisher and editor of f2 Cameracraft and Master Photography magazines. Product photographs by Richard Kilpatrick. To subscribe to our premium quality bi-monthly magazines, visit www.iconpublications.com

See: Flaghead – www.flaghead.co.uk; Robert White – www.robertwhite.co.uk; US distributor, CameraQuest – Cameraquest.com; B&H for US orders, 10mm lens E-mount link, B&H product listing.


Sony A7R II review by David Kilpatrick

Sony’s A7R II has a unique position in the mirrorless ILC world, creating the largest image files at over 42 megapixels from an in-body five axis stabilised sensor with exceptional performance given by backside illuminated CMOS.

My reviews in print of the Sony A7R II have now appeared, in the British Journal of Photography, f2 Cameracraft and Master Photography magazines. All three make slightly different points, and reflect growing experience of the camera which I bought from WEX as one of the first despatched on July 28th. The UK best body-only price then fell from their £2,695 to just over £2,000 from one main Sony dealer (at an event promotion) in under three months.

Despite finding bargain deals or importing directly, since the introduction of the A99 only three years ago I have lost about £3,500 keeping up with Sony full frame camera bodies. I’ve also spent around £2,000 buying other Sony models like the NEX-6, RX100, RX100 MkIII, RX10, and A6000 to cover the shortcomings of every different full frame model – and £2,000 or more updating my lenses.

So why invest in the A7R II when experience tells me the Sony system loses value faster than any other, yet so often falls short of performing as required?

One body for all lenses

The A7R II almost matches medium format digital, and gives great results with rangefinder (Leica) fit wide-angles. It has enabled me to add a 12mm f/5.6 Voigtländer Ultra Wide-Heliar to my kit for sharp, tint and vignette free 120° architectural and creative work. I write about lenses, and with current and future adaptors, this body lets me focus and make test shots with all lenses from Canon, Nikon, Pentax, Leica and many others. Click the Heliar image below for a link to a full size (slightly cropped and straightened from 42 megapixels) file. It’s actually shot at f/11 though the pBase data says f/5.6, that how the camera’s Lens Correction app works.

Caerlaverock Castle

There’s no lens made which disagrees with the 42 megapixel sensor as far as I can tell. My kit includes the 12mm mentioned above, the 16-35mm f/4 Carl Zeiss OSS, the 24-240mm f/3.5-6.3 Sony OSS, the 28mm f/2 Sony OSS FE (look out for individual reviews shortly); a 40mm Canon f/2.8 STM pancake, a 24mm Samyang tilt-shift, 85mm Sony SAM f/2.8, Sigma 70-300mm OS and a whole bunch of interesting older stuff used on adaptors.

With the Lens Correction App configured for SS with each manual lens, the very high resolution of the A7R II sensor allows a stable view for precision magnified focus well beyond the ability of any AF method or reliance on focus peaking alone. Doing this at working aperture ensures no focus shift on stop down. The results show me quickly which lenses are excellent performers without needing an optical bench or test charts (give me a single LED light and a darkened room, and I can find out what I need to know about any lens very quickly).

driedflowers-A7RII-web

Most Sony and Sony Carl Zeiss zooms do yield good sharp images on 42 megapixels but it’s easy to exceed their best by fitting something like my 1970-ish SMC Takumar 50mm macro (used for the shot above), or even my Russian 50mm f/2 tilt-adapted Zenitar. I found the 28-70mm f/3.5-5.6 OSS which was fine on A7 II inadequate for critical quality on the A7R II and after tests concluded the 24-240mm was the best option to replace it. To learn why FE/E mount zooms and OSS lenses are never likely to blow away fixed focal length unstabilised types like the Zeiss Loxia or adapted classic RF and SLR optics, wait for my 24-240mm review.

Having said size matters, I downsize many of my final images to as small as 9 megapixels. I don’t need 42 megapixels (7952 x 5304) for every image and for some it’s ridiculous. I’m still selling thousands of stock images* taken with DSLRs from six megapixels up. So for general ‘field’ use, most lenses are more than OK, as I can reduce the file size right down 3600 x 2400 pixels when noise needs cutting, depth of field is a problem, or general sharpness is poor.

One sensor for all image shapes and sizes

With the A7R II, unlike the A7R, all the APS-C E-mount lenses work properly (they never have their OSS forcibly disabled). The auto cropped image is 5168 x 3448, 17.8 megapixels, and that’s a perfectly useful size for all personal and most professional work. The 0.78X EVF is, of course, completely filled to exactly the same visual quality as when a full frame lens is used – the user experience with an APS-C lens is identical to that with full frame.

As with downsizing or lens based cropping, I can crop full frame captures right down to less than a quarter of the A7R II image and have a file acceptable to Alamy for stock library use, or to a client directly for almost any reasonable editorial use. That same crop can go full page in a wedding album, or make a fine A3/16×12 print. It’s like using 120 rollfilm again, you can find pictures within pictures.

lemurs-fullframe

A 240mm shot clearly not close enough…

lemurs-240mmf9-iso400-crop

This is a 3600 x 2400 crop. That is, an image large enough for full page publication or a 12 x 18″ photo/inkjet print (click to view full size)

With many lenses which don’t cover full frame, a 24 x 24mm crop is perfect. The Sigma prime lens ART trio (19mm, 30mm and 60mm f/2.8 AF without stabilisation) all do well on this basis. I had a 16 megapixel square format digital back on Hasselblad V and the square format is a favourite. Unlike Olympus, who offer a 1:1 ratio capture, Sony only includes 3:2 (35mm shape) and 16:9 (HD widescreen) – I’d love them to add a proper 1:1 square image seen in the EVF and on screen, a perfect 28 megapixel crop.

The high resolution FF image also means there’s less need to stitch panoramas or use shift lenses. Canon’s 17mm f/4 TS-E tilt shift lens was introduced in 2009 when their full frame 12 megapixel 5D has just been upgraded to the 21 megapixel 5D MkII. On the A7R II, using its maximum 12mm shift reveals serious loss of outer field sharpness even at apertures like f/10, f/11 and f/13 which are optimum on other ways. It’s not a sensor cover glass problem as the Canon 5DS R revealed exactly the same weakness. Downsize the image to 12 megapixels, which the lens was probably first designed for, at everything looks sharp. But here’s where 42 megapixels can pay off – I just need to use a 12mm Voigtlander or a Sigma 12-24mm, crop a 14 x 21mm area from any part of the 24 x 36mm frame, and I have a 14 megapixel image allowing even more effective ‘shift’ than the Canon. And I can, of course, use the Canon via an adaptor if needed.

The same kind of strong cropping works for telephoto wildlife shots (300mm lens, better than 500mm on 14 megapixels) and for macro work (1:1 on full frame, 2.2:1 at 14 megapixels). You need to remember all the time that traditional depth of field calculations just don’t work well with sensors of 36 megapixels and over. When you view a full size A7R II image at 100% on a non-Retina iMac or HP 27″ monitor, you are looking at part of a six foot wide ‘print’. Depth of field tables, still used today, were based on viewing a 10 x 8″ print from a similar distance! This problem is reduced by higher resolution screens but sometimes, you simply need a smaller image size.

Canon 5DS/R (in proportion with earlier models) have useful M-RAW and S-RAW formats, allowing the cameras to become full frame 28 or 12 megapixels with a single menu change. This function is missing from Sony raw files and would be a great firmware enhancement, if it was possible.

Reasons to buy the A7R II

SONY DSC

Having used two other A7 series bodies, and started the transition to the FE lens series with some mix of adapted glass on the way, why didn’t I stick with the far more realistic and practical A7 II, or the A7R which was paid for and at 36 megapixels just as useful a large file size?

  • Internally or externally recorded 4K video though not a commercial offering from my side might well be a request from a future client. I don’t make videos though many years ago I did made 16mm films and many 35mm slide based dual and multi projector AV programs. However, I know many still photographers who have found sufficiently high-end clients for video to invest the time. I wouldn’t touch any video production, even a brief 20-second ad clip, for under four figures. It’s fun to experiment with until any serious use emerges. Also, excellent Super-35 crop format video.jamesgem-1371-web
  • Completely silent operation when needed – though not compatible with any kind of flash, the fully electronic shutter is an option for wedding ceremonies and I’ve used that function already. It is also useful for shooting stills when someone is making a video, or during quiet concerts, in meetings, or when you simply don’t want the sound of a shutter to be heard. When silent is not needed, electronic first curtain (not provided on the A7R) improves shutter lag time and cuts vibration
    .SONY DSC
  • It’s also got a 500,000 actuation life shutter built to more than pro specification and a superior 0.78X electronic viewfinder, a slightly improved body flange for the lens mount (now common to all the II models, tighter and more precise than the original machining), no light leaks. And the mode dial is improved with a locking button, the Multi Function Accessory shoe is further improved in contact reliability, the ocular is T* coated and gives better eye relief.SONY DSC
  • It will perform well with all kinds of lenses and the 399-point wide area phase detection AF array built in to the sensor functions partly, or completely, with more native Sony and converted Canon lenses than ever before. It betters the A7R and A7 II in this respect, though I sold the Canon 85mm f/1.8 USM above as it didn’t work with the II having worked well on the A7R. Metabones have now fixed this, but my adaptor is a cheaper non-programmable type… you get what you pay for!
    Canon5DS-6400-web
    This is what you get from the Canon 5DS at ISO 6400, default, for shadow detail and noise (click to enlarge a 100% view of this section from a much larger file)


    Compare the separation of the black ribbon, and the shadow detail in general, from a similar shot ISO 6400 A7R II file, using the same lens and settings (click to view enlarged).

  • The back-illuminated CMOS sensor has a dynamic range – and a contrast curve or gamma function through controlled A to D conversion – which provides an ideal raw file for subsequent adjustment at lower ISO settings. Here, the difference seen above between the Canon 51MP sensor and the Sony 42MP is striking. The Sony images may often look softer and lack punch, but they reveal two stops more detail in the tones close to deep shadow. It’s probably been designed this way to allow s-Log gamma settings for professional video, producing flat neutral results ideal for grading to match from take to take. This happens to be very flattering to skin tones and it’s no surprise the A7R II is rivalling Fuji’s X-Trans sensor amongst fans of the flesh.jamesgem-1685-web
  • The same sensor has awesome practical performance in low light without sacrificing resolution, and noise levels which allow surprisingly high ISO settings for critical subjects like wildlife where fur and feather textures are easily damaged by noise (or noise reduction). Properly processed from raw, or shot as JPEG in camera, ISO 800 can be used as an everyday setting and 1600 will not even harm landscape detail. Up to 6400 an effectively noise-free full size image can be extracted, and at 12,800 to 25,600 some downscaling is all that’s needed to clean up. Admittedly, it’s never going to match the 12 megapixel A7S or A7S II at 51,200 and has a limit at 102,400 rather than marching on to an insane 409,600 EI as that body does.SONY DSC
  • Compared to buying an A7 II, remember that with the A7R II you get two Sony batteries and an external charger (about £150 in official value) as well as the ability to operate the camera from any 5v 1.5A USB source (not just to charge the battery internally, but to shoot using USB power)
    .SONY DSC

    You also get a neat tether-trap locking cage which screws into the camera side and can secure your USB and HDMI cables against accidental disconnection or strain on the connectors.
  • Final reason – going beyond the A7R II specification does not seem to offer further compelling advantages. It doesn’t have any major flaws or shortcomings except perhaps the single card slot and some doubts about the durability of the body, weatherproofing, and the quality of the lens mount (see below). I’m not in need of more than 5fps and 22 continuous raws before slowing down, and if I am the smaller Sony models like the A6000 and my RX10 do some pretty neat extra high speed sequences. So, for the first time since the sale of my A900 to get the A99, I feel I have a long-term camera no matter what Sony does in six months to make it hopelessly out of date.

What’s could be wrong?

First up, the poorly specified and designed lens mount and low precision body/lens relationship. Where Minolta A, Fuji X, Pentax, Leica and nearly all good makes secure the body and lens bayonet mounts using six screws, the E-mount uses only four even for the top end bodies which may have to support lenses approaching 1 kilo in weight. The four-screw fitting creates two axes of potential tilt restrained only by diametrically opposed screws, six-screw design is better but actually a five screw design beats both as you can’t draw a diameter across any two screws and create a tilt axis.

sonyjune1526

The E/FE lens-body system is built round a concept of achieving final accuracy in alignment and focus without needing precision in every component. The nominal 18mm mount to sensor register doesn’t have to be perfect (and seems to vary by at least ±0.1mm). All Sony E and FE mount lenses compensate for variations and use free-floating magnetic focus often combined with floating OSS – they don’t have fixed infinity stops. Just as the bodies don’t have to be all that precise, the lenses themselves don’t need to be. As long as both work with the sensor to AF perfectly, the overall system is self-correcting.

You soon find out the limits of E-mount precision when buying adaptors for older manual lenses or modern Canon EF lenses. I’m sure Zeiss makes due allowance in the design of manual focus Loxia lenses, and Voigtlander has specifically allowed the new E-mount range planned for 2016 (10mm, 12mm and 15mm) to focus past infinity because they are aware of the variable register of the system. I have measured many adaptors and the only safe decision for the engineer is to fall short of the target register. Some very expensive adaptors turn out to be 0.3mm thicker than others for the same mount (I’ve found this in Leica M, Canon FD and Canon EF adaptors). The lenses being adapted often have a fixed infinity stop and are designed to hit this precisely. Combine a 0.1mm ‘plus thickness’ Sony body with a 0.2mm plus adaptor, and your manual wide angle lens won’t focus on infinity.

So, one overall issue is that despite the high cost, the Sony FE/A7 series range of bodies and lenses lacks the precision engineering of past systems and it’s designed that way. When you find one side of your pictures always seems soft with wide-angle, wide zoom or very fast lenses you have encountered the limitations of Sony precision and quality control.

Secondly, the A7R II has such large files and a slow overworked processor relative to those files and the massive task of running a high resolution, high frequency EVF and many clever software functions. Any kind of systematic ‘chimping’ to check each shot after taking may leave you frustrated. Depending on your choice of card and some unknown spin of the CPU’s internal dice, you will sometimes encounter long file writing times and a brief lockout from playback.

Install the 14-bit (in 16-bit container) raw uncompressed format introduced in October 2015 through a firmware update, and the situation may improve. With Firmware V2.0 I’ve seen typical write to card times halved but identical shots could take varying times and the worst case remains close to 10 seconds for the light to go off on a single shot. Most of time it’s clearing about 1 second after 2 second auto review, and disabling auto review has no apparent effect on this, or the time the camera takes to respond to a fresh shutter actuation.

Secret solutions

Since you’ve been patient, and listened to why the A7 system in general has a few failings, here’s how to get the best optical performance and general response from it.

SEL70200G_A-1200

First of all, for the best optical performance use lenses where OSS can be disabled but in-body SS allowed to operate. The internal 5-axis sensor based stabilisation of the A7II/RII/SII is awesome. In-lens OSS is impressive but by its design will always lose you some resolution, often more towards one side or corner of the image than centrally. Amended paragraph, see comments: To see how good your stabilised lens really is, turn off stabilisation and shoot something using flash or at a high shutter speed.

But… if you turn off Steady Shot or OSS on the A7R II, you disable it in the body and the lens. You can not turn it off for the lens, but keep it working in the body. Only the 90mm f/2.8 Sony G OSS Macro, the 70-200mm f/4 Sony G OSS (above) and the 28-135mm f/4 Sony G PZ OSS offer the on-lens switch. So if you want stabilisation, you can’t choose to have it provided by the body with these lenses. You can do so with Canon, Sigma and Tamron lenses used on a Canon EF adaptor – their IS, OS or VC will operate normally when the SS in the body is disabled. In fact you must never use these lenses with both methods turned on together, or the result will be unsharp. This is a problem we first noticed with the Olympus system, where their lens and body stabilisation do not communicate and it’s possible to us none, just body, just lens or ruin shots by turning on both together. The Sony body used with third party lenses does allow this; used with Sony lenses, it prevents it.

The A7R II will switch between internal SS, lens OSS and a combination depending on settings. But it won’t tell you what it is doing, which makes this intelligent function something of a handicap. As a rule, if you can lock the camera down (tripod) or use a very fast exposure (studio flash, shutter speed 4X the focal length of the lens) shooting with no stabilisation at all will offer the best results.

sonyjune1527

Secondly, don’t use ‘AF With Shutter’ all the time. It’s convenient sometimes, but every time you take first pressure on the shutter, your E-mount AF lens will initialise a short routine involving focus position recalibration followed by AF. It costs you a variable extra lag before the shutter fires, maybe 1/15th to as long as 1/4 second. Instead, turn this off and AF will default to the centre button of the rear controller (you can change this assignment). You then use this to AF for each change of subject, composition or distance but if nothing’s changed you do not touch it and you do not re-AF. You save battery life, and you eliminate the whole shutter-button-AF delay cycle. You can now capture pictures, using electronic first curtain shutter or silent mode, within 1/20s of pressing the shutter.

Thirdly, for action shots prefer stops close to full aperture on E-mount lenses for the same reason – the aperture closing action involves a delay you can clearly identify and it’s longer with apertures like f/16. But for maximum reaction speed, use a purely manual lens. The camera knows there’s no aperture to be closed so it misses out that stage. It knows there’s no AF. You can get down to a mere 1/50s shutter lag, faster than most photographers can think. If you are used to older DSLRs which typically fire the shutter between 1/15s and 1/8s after you have pressed the button, you’ll anticipate and fire too early for action shots. Beware the LA-EA adaptors for A-mount lenses as you can’t turn off the aperture lever actuation. These adaptors will always add a delay even if you fit a manual lens.

I’m not going to delve into how you use focus peaking, magnification, setting the slowest shutter speed to be used by the Auto ISO function and so on. You can find out about this from countless videos and blogs, not all of which feature grandmothers, sucking and eggs. Nor will I recommend JPEG noise reduction and image settings in camera, since I don’t use JPEGs. Remember that your picture style and adjustments, like extra sharpening or contrast, will be reflected in the view you see through the EVF and on-screen. They will affect focus peaking, the histogram and what the image looks like when you use magnified manual focus, too. My tip is ‘stay neutral’ for the best EVF experience and ability to judge and control your results, especially if shooting raw. Camera Standard – boring but it won’t fool you into making adjustments which are not needed.

smailhomsony16-16-p-h-srgb-web

A 16mm landscape with careful focus checking, and only just enough depth of field even at f/16 if the end result is going to be a 1m wide print

Read the manual, think about all the functions of the camera, assign your custom buttons, set your parameters. My set-up includes (routinely) Auto ISO 200-1600 because within that range the A7R II files have low noise and good textural sharpness and there’s no great benefit in dropping to 100; AWB; 1/250th slowest shutter speed because the world moves and I’m very happy with 1/250th at ISO 800 rather than 1/125 at ISO 400 for nearly all my walkabout shots; AdobeRGB because I need that but actually sRGB is better matched to the EVF and rear screen, and will give you a more accurate histogram; no JPEGs because I don’t need them; Airplane Mode on; compressed raw unless there’s a really good reason; AF-S and Centre point focus; no face recognition, no smile shutter, no tracking, nothing clever with AF; single shot; generally Aperture Priority but sometimes P, M or very rarely S; Date Format file folders; SS on; electronic first curtain; setting effect on; finder and screen at default brightness and colour; grid lines 3 x 3; focus peaking low, yellow; lens correction enabled; 2 secs review, or none.

– David Kilpatrick, all images except front and rear views of A7R II body and 70-200mm lens are ©David Kilpatrick/Icon Publications Ltd; please do not link directly to images or copy

* You need thousands on offer to sell dozens…


Sony’s Zeiss 24mm f/2 Distagon ZA SSM T* reviewed

The Sony Zeiss 24mm f/2 SSM Distagon ZA T* is probably the best, or equal to the best, in its class. It may perhaps be the best ever 84° angle fast lens ever made for the general SLR system market, and I would happy to pitch it against any of the current equivalent offerings for medium format digital.

The initial journey with the 24mm f/2 was not one of intensive companionship – I am long past the stage of getting hold of a wonderful lens and then shoehorning all my photographs into that lens’s view just because I love the glass. I’ve been through that phase. I remember when I was 18 and my then fiancée (Shirley – still here!) bought me a brand new 35mm f/3.5 SMC Takumar, my first ever multicoated lens as well as my first new boxed product. I shot almost everything with that lens for a month…

A full-frame Alpha 900 study at full f/2 aperture. Check the sharpness in the central – very limited – sharp focus zone by clicking the image for a full size version.

My review of the 24mm appears in the British Journal of Photography for January 2012 but was written in November, and at the end I comment that I do not think I would buy one. Well, between writing that and publication – after returning the test lens loaned to me by Paul Genge of Sony UK – I placed my order. I sold a set of lenses including a 28mm f/2 Minolta RS and a 17-35mm Konica Minolta D to pay for it.

Check current availability and price at B&H Photo Video (opens in a new window will not lose this page).

Why?

It was partly medium format which persuaded me. I’ve been experimenting with MF digital, first using a Hasselblad with a Phase One P20 and then shifting to a Mamiya 645 AFII with a 22 megapixel ZD 37 x 49mm back. Once you put the Zeiss on the Alpha 900, the image quality jumps to match the level of a similar MF pixel count. And without spending into the tens of thousands you can’t match the angle of view at a higher pixel count.

These two cameras both shoot 22 megapixels over a 16 x 12″ print shape (the Alpha 900 being cropped) and both were current in 2008 – though the Mamiya ZD model was shortly to disappear. And the two lenses have similar coverage.

I looked at the corners of my MF shots on a 35mm lens (nearly identical angle of view) – to be clean, they demanded f/11. And then I looked at the corners on the Zeiss, which are even cleaner by f/4. Finally, I considered what Sony may have in store – 36 megapixels on full frame. Everything I’ve seen from the 24mm – including its performance on the A77 and A55 – indicates it will not run out of resolution even if full frame goes well over 50 megapixels.

Then I had the job of looking back over the Alpha 900, Alpha 55 and Alpha 77 pictures taken with the 24mm, and preparing some comparison shots. This was when I realised that my normal line-up of zooms, no matter how good, never got the same from any camera – APS-C or full frame – as this CZ prime. It may be bulky, take large filters, and cost nearly £1,000 but no other solution on any format from NEX through A77 to MF offered the same as the 24mm on Alpha 900. You will, however, be surprised later on to see just how well the tiny NEX 16mm f/2.8 does in comparison when both lenses are stopped down to f/8.

The 35mm 2:3 format shape offers a bit of vertical composition ‘rise or fall’ potential compared to to 3:4 shape of my Mamiya with 35mm wide–angle. Beyond this, the 24mm offers both CD and PD focus with different adaptors on the NEX system, and smooth near-silent AF during video on the Alpha 65/77 and future models. It’s both future-proof and a future classic.

Photojournalism or architecture

Because the 24mm has a fast f/2 maximum aperture, it’s seen as a choice for news, documentary, reportage, sports, and close quarters party or family shooting. Though a little vulnerable because of its size, it does this job well. Unlike tele lenses, any mark on the front glass of a wide-angle like this will show in pictures when the aperture is stopped down. Special care should always be taken of retrofocus and fisheye lenses with vulnerable front elements, my own lens will get a Sigma EX DG 72mm UV filter. Why Sigma? I ran a series of ad hoc tests on filters and these turned out to be just as good as Hoya Pro 1 Digital at half the price, and with better multicoating.

At f/2, struggling with light for a hand-held shot with 1/40th at ISO 1600 on the Alpha 55, the 24mm showed surprisingly clean imaging from the boat to the lights on the cliff top.

Here’s a shot taken at f/2.5, 2/3rds of a stop down from wide open – a sensible aperture to give that hint of extra depth of field and improved optical performance. Click the image to view a full size A55 image on pBase.

When fitted to my A55 or A77, the 35mm-equivalent field of view is also a good general lens for photojournalism (what you get is more or less a Fuji X100 equivalent, but hardly pocketable). The performance over the APS-C field of view is so good that working at full aperture carries little penalty at all except restricted depth of field. The geometry and field flatness over the restricted field mean  you could use the lens for artwork copying and get a better result than the 50mm f/1.4 of 30mm f/2.8 SAM macro will produce.

Over full frame, this technical excellence makes the lens attractive to the commercial, industrial and architectural photographer. Whenever you need to apply a strong software correction, focal length figures are thrown out of the window. For example, once the on-board lens correction in the A77 is applied to the 16-50mm f/2.8 SSM lens at 16mm the true minimum focal length equivalent becomes close to 17mm not 16mm.

Hasselblad’s 28mm superwide for its HD series cameras has strong barrel distortion, relying on in-camera and Phocus raw software converter functions to remove it. So while the lens claims to be a 17mm equivalent, that is only true over absolute full-frame 645. On their digital sensors, it’s only equal to a 21mm and the correction means the true crop is more like a 23mm.

A second effect of applying any in-camera or post-process distortion correction is loss of true image pixels. Either you crop the frame after sampling down, or the image is interpolated upwards to fill the frame. Both solutions are far from satisfactory because unlike a fixed interpolation, the value ranges from 0 to whatever maximum is involved (typically between 3% and 7%) and all of this is never a clean ratio.

Above: a sea horizon (the top of the crop is the top of the frame, and it is full width). Top, CZ 16-80mm at 16mm 0n Alpha 77, uncorrected, showing complex wave-form distortion as well as vignetting despite stopping down to f/11. Centre: CZ 24mm on Alpha 900, uncorrected, at f/13. Bottom: 24mm after applying a 2% barrel distortion correction. Click image to view a larger version.

Here the 24mm CZ shines. It really uses all the 24 megapixels of the A900 or indeed the A77, because geometric correction rarely needs to be applied. It has a true 24mm focal length which does not need to be quietly changed to 25mm or 26mm by applying a lens profile. If a 35mm retrofocus AF lens was made for MF digital to this standard, even without the f/2 aperture, it would be hailed as a world-beater. The most that’s needed is a correction of 2% (+, removing barrel distortion) in Adobe Camera Raw and this restores something like a sea horizon near the top of a landscape format frame to a perfect straight line.

No correction is applied here to this full frame 24mm Alpha 900 image – a central horizon, and straight lines which are not parallel to the frame edge, make the 2% distortion (similar to many standard 50mm lenses) no issue at all.

For many subjects, depending on the distance and a ‘rigour’ of the shot (the sea horizon is the most demanding example) no correction at all will be needed. This applies to most interiors, and always to scenes like mountain views or forest landscapes where there is no perfectly flat horizon.

The Alpha 900 is so close to MF digital quality I should really forget the attractions of MF systems. Nearly everything I see from them which impresses me is down to using prime lenses of first quality like the Zeiss and Mamiya 80mm f/2.8 standards and working in a methodical way often using a tripod, minimum ISO, mirror-up operation. Applying the same parameters to Alpha full frame lifts the end result to match – and the CZ 24mm f/2 is a key to unlock that quality.

At f/14, the 24mm is not losing detail sharpness on the Alpha 900 as long as the correct raw processing parameters are applied. To secure this depth of field, f/14 was needed – a medium format camera would require f/27. Holding the camera, viewing and composing this shot were all aided by the ergonomics, weight and viewfinder quality of the Alpha 900. Click image for a full size version on pBase.

This is a dual-purpose or multi-purpose lens. Where the 16mm focal length of the NEX SEL 16mm f/2.8, the Alpha SAL 16-50mm f/2.8, the CZ 16-80mm or SAL 16-105mm all cover the same nominal angle not one of these has the same neutral geometry, even illumination and good corner to corner sharpness at wider apertures. Corrected by software, they don’t have the same true angle and the outer field can become noisy because of extra sensor-mapping gain applied to reduce vignetting.

The size and SEL comparison!

But I would like to show you something surprising. I am a great fan of the 16mm NEX f/2.8 pancake, which is one of the few such lenses made to have a positive (pincushion) simple distortion pattern and a cup not cap shaped field of focus. It is a revolutionary inverted telephoto design of great simplicity, with only 5 elements, enabling the lens to be 16mm focal length yet have a rear node position over 20mm from the sensor – thus avoiding all kinds of vignetting and colour shift problems.

People who don’t understand how to use a focus plane where the corners are focused FURTHER than the centre – the exact opposite of the CZ 24mm f/2 where the corners are focused CLOSER than the centre – do tests like landscapes wide open and wonder why the grass either side of their feet dissolves into blur. Actually all the little 16mm needs is modest stopping down, as would be applied by any professional using a Super Angulon for that matter, to f/8.

First of all, have a look at some lens sizes. I like this shot, as it shows just how big CZ had to make the 24mm to get what they did. It dwarfs the SEL 16mm for NEX and the classic Minolta 28mm f/2 RS:

I’d like you to see the exact comparison between Alpha 900 with 24mm CZ and NEX-5 with SEL 16mm.

This is the A900 and 24mm, entirely uncorrected and uncropped – the building on the right actually does not have a straight wall, don’t be fooled into thinking there’s a sudden burst of barrel distortion! Aperture f/8.

This the NEX with 16mm, corrected in ACR; I’ve tried to keep the camera positions very close but this was real-time shooting and with viewfinder versus screen composition, not so easy. You can see that the 16mm has slightly less true angle of view when corrected but don’t judge from the foreground flower tub, just check the horizontal angle. This is also at f/8.

You can click each image and view a full size JPEG. I have made both of them 24 megapixels, exporting from the NEX to the same size file as the Alpha 900. That may be unfair but you can judge. My opinion is that both the NEX 14 megapixel sensor and the SEL 16mm are underestimated by far too many owners; as far as ISO noise handling goes, the 16mm f/2.8 on NEX is actually as ‘fast’ as the 24mm f/2 on Alpha 900 but that comparison may change with future full frame bodies. As for depth of field, the f/8 shot on APS-C would need to be at f/13 on full frame to match, but in practice both are well covered.

Using the NEX 16mm in different conditions would produce a different result – wide open in a room interior, the corners would be likely to look very blurred. My scene above conforms to the cup-shape focus plane of the NEX lens, and works against the cap-shape focus plane of the CZ 24mm.

Remember as a general rule: barrel distortion = corners focused close than centre. Pincushion distortion = corners focused further away than centre. Moustache or wave form = a doughnut normally of closer focus between centre and corners, but when a full frame lens with this type of distortion (like the 16-35mm CZf/2.8 – or a more extreme example, Canon’s 24-105mm f/4 L) is used on APS-C, you get this doughnut at the corners and more or less have straight barrel distortion not waveform. No distortion at a given distance usually means a flat focus field, the quality which Carl Zeiss highlighted when naming the Planar lens.

Alternatives to the 24mm

The best way to get the 84° coverage with similar near-perfect rendering is to go for the mid-range of a high end zoom. As it happens, Sigma’s 8-16mm is better at 16mm than any of the above-mentioned APS-C options and you can also get a pretty good 16mm from their 10-20mm options and Tamron’s 10-24mm. Tokina’s 11-16mm f/2.8 is weakest at 16mm, best at 11mm. The older Sony 11-18mm is not wonderful at the longer end.

On full format, 24mm at the bottom end of the 24-70mm CZ is no match, it has more distortion and softer corners; 24mm in the middle of the 16-35mm CZ f/2.8’s range is better but with strong complex distortion, more even than the Konica Minolta 17-35mm f/2.8-4 D lens (which manages f/3.2 wide open at 24mm). You might think Sigma’s 12-24mm full frame zoom could be good at 24mm, and perhaps version II HSM when it finally become available for Alpha will prove to be. The original, which I still use mainly for its superb 12mm results, places its worst extreme of field flatness deviation at the image edge when set to 24mm.

I have used Canon’s 24mm f/1.4 USMII and this is faster, larger and more expensive than the Sony CZ lens in almost perfect proportion. Like the CZ f/2 it is a nearly perfect lens, with a hint more barrel distortion and slightly soft extreme corners on full frame wide open. The same goes for the Nikon 24mm f/1.4. I’ve also used Canon’s 24mm TSE tilt-shift and this lens betters the CZ for technical and architectural uses, as it should – so does their 17mm f/4 TSE, which has no match in any format. But such lenses can’t also be used for everyday autofocus image grabbing whether professional or family.

Last question, then. If such a perfect lens can be made at f/2, surely all the affordable 24mm f/2.8 designs could be just as good? We wish! Wouldn’t it be great if the classic Minolta 24mm f/2.8 AF which Sony never transferred to the new Alpha range proved to have the same optical excellence as the CZ? It does not. Nor do the Canon 24mm f/2.8, or the Nikon, or anything made by Pentax or Olympus, or even Leica.

The 24mm f/2 used at f/2.8 on the Alpha 55. Try this with a classic Minolta 24mm f/2.8 and even on APS-C you won’t get the same corner to corner even illumination. Here the focus is on the distance, not the tourists – they are also showing a surprising amount of movement at 1/40th. Click the image for a full size view.

This 24mm is the most recent AF 24mm prime lens to have been designed for full format. Zeiss have designed a slightly more complex manual focus 25mm f/2 Distagon for Cosina partnered manufacture, available for Canon and Nikon, since Sony showed the 24mm at photokina 2010. But Sony’s full-frame DSLR rivals, Canon and Nikon, have not gone for this sub-£1,000 RRP ‘moderately fast’ 24mm niche.

If there’s one competitor, it is Sigma’s excellent 24mm f/1.8 EX DG, which uses a larger 77mm front diameter glass unit to reduce vignetting to the absolute minimum. Distortion is higher, and the lens at present has no HSM version. This makes it less future-proof for Alpha system owners, and also less compatible with NEX and with video shooting in general.

Features of the 24mm

Because it’s a fixed focal length, the 24mm is a very plain lens – it has only two controls and one moving ring. There is an AF/MF switch, though unlike SAM lenses this lens can always be controlled from the body. With SAM type lenses (built in non-supersonic focus motor) it is essential to use only the lens switch, and never to use the body switch instead while leaving the lens set to AF. This is because any attempt to focus manually may damage the gears and motor unless the switch on the lens is specifically disengaged.

Manual focus or held focus can be set or toggled using the single on-lens button. New Alpha models like the 77 allow a wider range of functions to be assigned to the lens button, which is described in the menus as a Focus Hold button. Direct Manual Focus is also supported on bodies which offer DMF, meaning that once focus is confirmed and locked by your pressure on the shutter button, you can fine-tune focus by eye before firing.

The manual focus action is very smooth and well balanced, not too light and not too short in throw (which can be an issue with shorter focal lengths. The focus scale is minimal, behind a traditional Minolta-style clear window, with a depth of field indicator to the minimum f/22 aperture. Really, such markings mean little today as we expect so much from higher resolution sensors. It is time that Sony, and others, built parameter-governed DoF calculation into firmware.

Here, f/5.6 was judged to be fine for the degree of differential focus wanted – at ISO 400, by tungsten kitchen spotlights and window light mixed, on the Alpha 77 hand-held with SteadyShot and manual ‘peaking’ focus.

The CZ design is clearly corrected for medium distance work but retains its performance for close-ups. Unlike Sigma’s design which achieves 1:2.7 image scale, or the new manual Zeiss 25mm which focuses down to 18cm and 1:4, the Alpha lens focuses to 19cm (actually, I make it 18cm as the scale goes beyond the 19cm marking) and manages a 1:3.4 image. Don’t be fooled by distances! The front element of the CZ is already 12.2cm from the sensor plane, and the lens hood takes another 3cm or so. The actual clearance when shooting at close range is minimal. For comparison, the SEL 16mm f/2.8 for NEX will only focus down to 24cm, and the front of this lens is only 40mm from the sensor, leaving a clear 20cm between camera and subject. The Nikon and Canon f/1.4 designs are limited to 25cm and are, quite simply, nothing like as useful for close-ups as the CZ.

You might think that the 16-50mm f/2.8 or the 16-80mm CZ could match the combination of wide angle and close focus found on the 24mm – but not so. To get similar close-ups even at a 24mm setting is not possible – an extra 6 or 7cm in minimum focus distance, when you are talking an 83-84° angle of view, makes a big difference.

Moving in to minimum focus, the bottom wing of the lens hood was only 1cm away from the subject – under 19cm from bread roll to sensor, but only 6.8cm from bread roll to front element. At f/3.2, a hand-held 1/40th was needed (the closer you get, the less you can rely on SS to handle speeds like 1/15th). Focus peaking again enabled the manual focus point to be precisely judged. Great bokeh too.

With a non-rotating front thread, 72mm is one of the classic Minolta sizes. It is necessary to use slimline filters, as with the 20mm f/2.8. It’s interesting to compare the revived older lens with the newer one. The 20mm has only five mount contacts, being non-D specification where the 24mm has eight and reports much more accurate focus data. The 20mm has no lens button, uses screw drive focus, and has a close limit of 25cm at which it has a 1:7.7 image scale. There is also a considerable difference in the build and feel of the CZ; I have no doubt it contains some plastic, but it feels like a good solid piece of engineering and is stated by Sony to have a metal lens barrel. Not metal-skinned plastic, like NEX lenses.

As for coatings, Minolta’s legacy was a use of multiple layer (super achromatic) coatings to rebalance both the contrast and the colour transmission of the entire AF lens range (except designs made by third parties, like the 100-400mm APO). This advantage over other makes was never capitalised on, and made some Minolta designs seem lower in contrast than competitor’s equivalents. No-one ever complained about the colour though! Zeiss’s path from 1975 onwards was to use multicoatings a different way, maximising contrast and light transmission but permitting each lens design to have its own colour transmission quality and variation in contrast. Contax RTS lenses were always praised for their resistance to flare and their extreme macrocontrast.

Since the advent of digital, both overall contrast and colour transmission have become less critical – no need for packs of filters to balance lenses for repro purposes, no need to test Kodachrome with a clip-test to set this up. Just post process or shoot a WB card to taste. Also, Sony Alpha lenses are made in many places – the old Minolta unit, the new CZ-Sony collaboration, co-developed with Tamron and apparently also with Sigma, built by Shanghai Optical or some other owned and partnership facilities in China, made in Thailand but not apparently any more in Malaysia…

While distortion associated with viewpoint and perspective perception is always a companion to shorter focal lengths, over the field of the Alpha 77 (equal to a 35mm lens view or so, in full-frame terms) shapes and solids look natural. At f/4, and ISO 1250, I’ve chosen to downsize this 77 file to 3600 x 2400 pixels (click the image to open). This still allows you to see how clean the light sources in-shot are, with absence of colour fringes. Depending on conditions 1 pixel CA cancelling may be needed with the 24mm.

So, we have here a lens with a Zeiss design and a T* coating which is entirely unlike any Minolta legacy design and will surprise those used to the way ex-Minolta lenses perform. It is fairly immune to flare, not entirely so when confronted with bright sources just outside the image margin, but without the strings of coloured patches associated with 24mms and light sources in the shot. It focuses silently and at a speed which means you may not notice it.

The lens itself weighs 555g, and at 76mm length and 78mm diameter it’s smaller than the 16-50mm f/2.8 SSM which weighs 22g more. I’m not a big fan of lenses you can not clasp in one hand while also operating the lens release mount of a camera; optics this size and weight are about the safe limit. You can not compared the lens-juggling friendliness of the 28mm f/2, for example, with either the 24mm or 16-50mm and even the 16-80mm zoom is much easier to handle in the field. It’s best to remove or fit the hood before changing the lens, don’t leave it in storage position.

The hood reverses over the lens neatly. The whole item, when in this configuration, is a bit large to handle for safe and secure lens changing.

The finish is lustrous, with rubber rib grips that collect dust and dander readily. The supplied lens hood is surprisingly flexible plastic, with a slight spatter finish to the exterior and a kind of semi-flock paint on the inside. It is efficient, but a poor fit with a not very firm bayonet locking action. It’s easy to get the alignment wrong and it’s not as firm or solid as most other Sony hoods. The rear lens cap is still the frustrating one-orientation only design inherited from Minolta, which leaves even those with a quarter of a century of lenscap-fitting experience fumbling for the correct position.

There is of course a Zeiss front lens cap and you get a free blue badge on the lens itself!

Format, pixel count and cropping

For many years when using film I found wide-angle zooms were not essential, standard zooms were useful, and tele zooms were vital. Generally, with any wide-angle you can zoom with your feet or by doing little more than leaning forward or back a bit. Either that or you simply need the widest lens you can get. Whenever I fit my Sigma 8-16mm or 12-24mm on their respective formats it’s the 8mm or 12mm end which is needed. I only end up zooming in if for some reason I decide to leave the lens on, and move to a different situation without time to switch lenses.

With film, you could crop and enlarge. Small pixel count DSLRs made that difficult or impossible – when you are trying to make 6 megapixels do a full page magazine image, cropping is not an option. Zooming in to fill the frame every time became vital from 2000 to 2008 when the first full frame 24 megapixel models arrived.

I think that 24 megapixels has finally made cropping an alternative to zooming. You may need 9 or maybe 12 megapixels, or if you are shooting entirely for the web you may need no more than 2 megapixels. Fixed focal lengths of exceptional quality, sharp all over the frame in the plane of focus, start to be useful. It has never been a good option to crop wide-angle zoom shots asymmetrically, using just one corner. With a lens like the 24mm you can crop any composition out of the high resolution frame and it will not look so different from an on-axis shot with a narrow angle lens.

Lens resolution really does count, as I have found. For three years I used the Alpha 900 with a range of lenses, including the 24-85mm Minolta RS I keep for convenience. When working with medium format lenses on adaptors, I could see that zooms while ‘sharp enough’ usually came nowhere near realising the potential of the 900. Then, using the 24mm, I saw the same pixel-level sharpness pop out. After a month using the 24mm (kindly loaned by Paul Genge) my ordered Alpha 77 finally arrived. I had already seen how the 24mm got the maximum from 16 megapixel APS-C, and this was followed by discovering its power to do the same at 24 megapixel APS-C.

A standard Sony leather-look lens posing pouch is supplied.

How far can this go? If Sony’s 24 megapixel APS-C sensor formed the basis for a full-framer, it would be a 60 megapixel monster and match all but the most expensive medium format image sizes. I believe the 24mm CZ could go there if Sony chose to.

And that, in the end, is why I changed my mind about owning one. The hour or two of useful daylight and howling gales outside have not allowed me to make much use of it yet – but this is a lens for the long term. And for tomorrow’s Alphas as well as today’s.

– David Kilpatrick

Footnote: added February 2016 – I’m now selling this lens, as I don’t think Sony is likely to produce an A99 model II with functions that will restore what I want to have (notably, GPS – they are most likely to drop this). I’m looking at a move to native FE-mount lenses and probably the 25mm f/2 CZ Batis, even though it’s weaker for close-ups, vignetting and distortion.

Here is a recent example of a full aperture shot on the A7RII with LA-EA3 adaptor –

http://www.pbase.com/davidkilpatrick/image/162677066

Sony Alpha 77 review – tomorrow today

It must be two years ago, at least, that an Australian sports photographer confided he had seen a Sony prototype which would blow away everything – an Alpha which could shoot at incredible frame rates (he mentioned 15fps) and follow focus. It may have been something unlike the Alpha 77, which follows focus 12fps with locked preset exposure, or in any appropriate exposure mode at 8fps. Or it may have been an early experiment. Whatever it was, the 77 is close to this rumoured prototype .

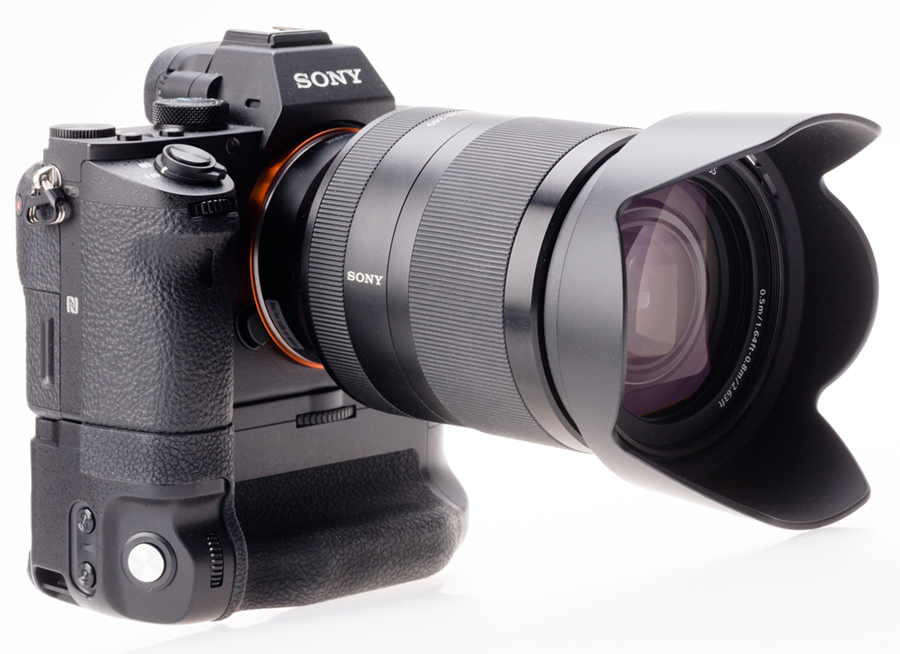
The Alpha 77 is a successor to the Alpha 700. Here is beside my old and well-worn 700.

The viewfinder

The Alpha 77 is a camera that points the way for future development, whether of DSLT (Sony ‘Translucent’ mirror technology) or entirely mirrorless SLR-mount bodies. It’s the OLED viewfinder with 2.4 megapixels of self-illuminating RGB which changes the game. It makes the transition from optical to electronic viewfinders likely for everything except a limited choice of professional optical viewfinder DSLRs. EVFs will not be unique to Sony and it will continue to develop in resolution, colour fidelity and refresh rate.

But this type of viewfinder has a specific limitation. Unlike earlier EVFs, the Sony OLED has a threshold below which it simply turns the pixel illumination off entirely. To save battery power, this is set to a relatively high black level and clips the three-quarter tones straight to d-Max. All EVFs are slightly unsatisfactory to the human eye because there’s no real shadow detail to see if you switch your glance away from well-illuminated parts of the view. The new OLED has dead black shadows and it doesn’t matter how much your brighten it, the cutoff is based on exposure level in the image.

If you own an A55/33/35 then the new finder is so far removed it might as well be an entirely different era, not just a generation. The area surrounding the huge visual image is dead black, not milky and luminescent like the A55. The shooting information is set neatly outside the image, not overlaid at the edge overlapping picture detail. The colours are bright and the information text, though smaller to the eye, is crisper and far more legible.

One comment (added after this was first published) – the A55/33/35 may be considered better in very low light. In good light, the OLED/24 megapixel combination is excellent. In low light, it shows noise until focus and exposure are confirmed by shutter pressure, at which point the view clarifies and the noise reduces. In near darkness, its shows very strong noise, mainly red, which largely obscures any visible detail. In conditions where exposure was 15 seconds at f/2.8, ISO 100, using the A55 and A77 side by side the A55 was better. It looked grey and flat, but surprisingly detailed and bright into shadows which were too dark to penetrate by eye. The A77 gave a contrasty screen or finder image with little useful detail, nothing in the shadows, and very strong noise. Clearly the CMOS sensors are responsible for whatever level of detail is visible, and the A55 sensor seems to me have a couple of stops more lift to tones on the threshold of its sensitivity. The EVF types differ in the A55 showing more shadow detail with lower contrast, and lower colour saturation so the noise does not look bad. Bottom line, the A55 is half way to night vision; the A77 is like turning on an old UHF analogue colour TV, no signal, just noise.

There will be users who complain that having vital information just above and below the image area means they don’t see it because of their specs. But the A77 has the best eyepoint and visibility for this info of any model to date. All I can say is that if you ensure you are using the EVF correctly, you will always be in touch with what the camera is doing.

This shows a ‘busy’ finder display – in fact, everything overlaid on the photo here can be turned off leaving just the active focus point (a single one, if you use centre spot focus) and the neat information bars above and below the image area. The rest of the field is dead black too, not milky grey like the Alpha 55, and the contrast is high. This image is dropped in and has no connection to the information displayed!

The result is a very graphic view of your composition. Despite the impressive size of the apparent viewfinder image, it is not as large visually as the Alpha 900. The A700 for example is 95% field at 0.90X of a 1.5X sensor coverage, a viewfinder ‘size index’ of 0.57X (0.95X0.9/1.5). The A900 is 100% of full frame at 0.74X, index 0.74X. The A77 is 100% of 1.5X format at 1.09X, index 0.726X. It’s therefore closer to the A900 than the A700.

The A77 eyepiece glass is much closer to the eye than the A55 or previous SLR models, and the upper positioned eye-sensor turns the finder on and off with precision saving power but causing no delays.

But has Sony got the figures right? The A55 claims to be 1.1X and 100% view. Each camera has a different eyepoint – 27mm for the A77 compared to a mere 19mm for the A55 – but this should not be allowed to influence the stated apparent magnification. Placing one camera to each eye, the A77 has an almost 20% larger apparent viewfinder field (linear) than the A55 and about 30% larger than the A700. It is just a fraction smaller than the A900 as the calculations indicate.

It looks to me as if the A55/35 manual misrepresents the EVF size in that camera, it very clearly is not larger than the A77. Perhaps they include the dead space not used for the image but for data. In the A77, the data display is tight and efficient and it can show everything you ever want including the ISO in use when you select Auto ISO.

All the other figures agree. It also makes the A77 finder view an almost perfect match for Nikon’s full frame DSLRs, which have a slightly smaller apparent screen size than the A900.

The less-shadow-detailed aspect of EVF works for composition much the same way early Leica viewfinders did. The scene is simplified, and this tends to concentrate the eye on impact and simple compositions. Using the A900 alongside the A77, I was struck by the way the A900 puts you in touch with texture, colour, subtle light, and fine details. The A77 reduces the world to simpler tones and connects you to shapes, composition and impact.

As for flicker, shearing when panning, clarity of focused detail – well, these are all limitations, but much reduced in this new finder. What is not so limiting as the A55 or the earlier NEX models is the speed of startup from sleep. The A77 finder really does go to sleep (the A55 is very good at failing to switch off) and wakes up so rapidly, as your eye approaches the finder, you don’t miss the shot. Combined with the mere 1/20th second shutter lag, this SLT gets back to the responsiveness of classic non-AF SLRs.

You can cycle through these displays or choose to skip one or more when pressing the Display button (there’s a menu item to configure exactly what information each press shows you, with separate settings for the EVF and the rear screen). These diagrams from the manual do not represent the finder very well. Our colour version, using a finder overlay file supplied by Sony, gives an accurate view of what looking through an A77 finder is like.

Here I am, I’ve written stacks about the viewfinder and not even begun to describe it fully. Tell you what – go and find one, try it. I can’t photograph it adequately (I have tried) and it would be exhaustive to go through the deep menu settings of the A77 which let you decide for example how many different information-display setups you scroll through when you press the Display button. Don’t want EVER to see the horizon level guage? Then set the camera to skip it. Hate the graphic display of f-number and shutter speed scales against each other? Deselect that too.


From the Alpha 77 Karma Sutra – left, position for portrait photography; right, position for those who like to video themselves and still look as if they are in eye contact with the viewer.

And then there’s the rear screen. It has a double hinge and rotate action, of which more later. It is a top grade screen, 3 inches and nearly a megapixel. If you plug an HDMI monitor in to the camera, that will take over providing a better solution for studio or video previewing. Even a 20 inch or larger HDTV set looks sharp when fed from the Alpha 77.

The menus of the A77 require the attention to website presentation detail best reserved for the galley-slaves* of dPreview. Trust me, if there’s anything which can be set on any other Alpha, it’s probably settable on the 77 or not there at all. I’m sad to see that I can only control my auto ISO range minimum between 100 and 12800, and my maximum between… 100 and 12800! Of course this is great. I can have auto ISO over any possible sensible range but not ISO 50.

*Queried on dPreview forums – I’m an ex-newspaperman. Galleys are proofs of type (or the metal itself) and if you’ve ever worked on the TV listings or the Sports pages, you’ll know what it means to be a galley-slave in editorial terms – form before function, and function before fun! Well, I can have fun. I do not have to reproduce every single screen and menu because there’s no big boss saying that’s how it is done! It’s great work that dPreview undertake. But as someone else has already done it, I prefer to spend my energy doing the stuff they haven’t done. Then you can read both.

ISO 50? What use is that, with less dynamic range than 100?* It’s a great deal of use. In my studio with powerful flash – which this camera can cope with perfectly, having a setting to over-ride exposure simulation in the EVF/screen and do auto gain for modelling lights – it gives me an extra stop instead of being forced to work at a setting like f/13 or get overexposure. Outdoors in bright light it combines with the 1/8,000th top shutter speed to remove the need for a 4X ND filter to get superwide apertures, but due to reduced dynamic range, it’ll still clip whatever highlight would have been clipped with an overexposed ISO 100 shot. In the studio I can control my contrast to use it well.

*This is Sony’s own statement in the manual, page 139: “The recordable range of the brightness of a subject (dynamic range) is slightly narrower for areas where ISO is less than 100.”. DxO Labs tests actually say that colour depth, tone depth, dynamic range and signal to noise ratio are all at their best if you set ISO 50, but they also show that ISO 50 is really ISO 63 overexposed a bit and ISO 100 is really ISO 80 underexposed a bit. Where that leaves the intermediate 64 and 80 settings on the camera we can only guess.

As well as all the info in the finder and on the back LCD, you get this top plate LCD which means you can close the back one. Even when the camera is asleep (power save mode) the sensor must still be receiving and handling the image, as the exposure display will change when you move the camera around. I’d guess this is a low power mode which also enables the system to continue to monitor exposure between frames during sequence shooting.

At first I did not fall in love with the Alpha 77 – when my purchased firmware 1.02 version body locked up on me in front of one Canon and one Nikon user I was just a little angry with it. It could have done this somewhere quiet, on its own, without spectators. Even now with firmware 1.03 I am not sure it won’t repeat the cataleptic fit, but it shows no signs of doing so. See my section on the Movie mode later on, though…

The SLT mirror and ghosting

I’ve tested the Alpha 77 in the most demanding lighting conditions. Sony says the SLT mirror (a very thin film of plastic stretched on a frame) has new mirror and antireflection coatings. They have also paid extra attention to the design of the AF module and the interior of the darkchamber, to avoid reflections.

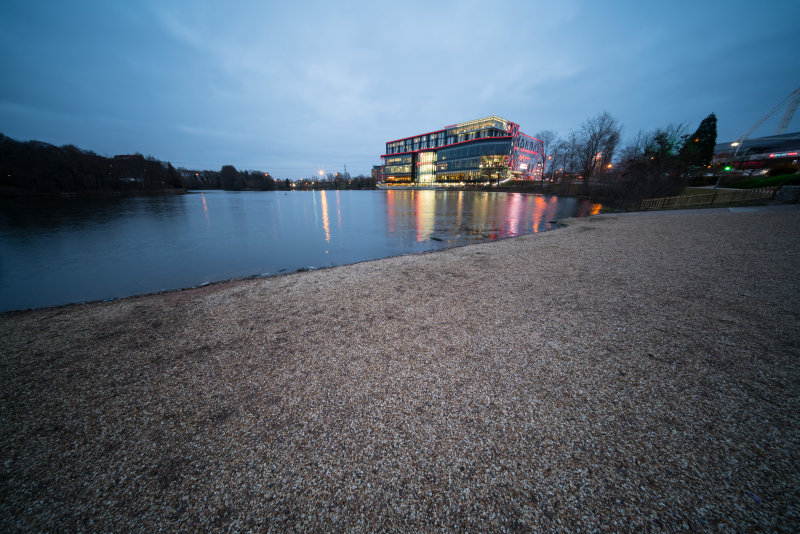
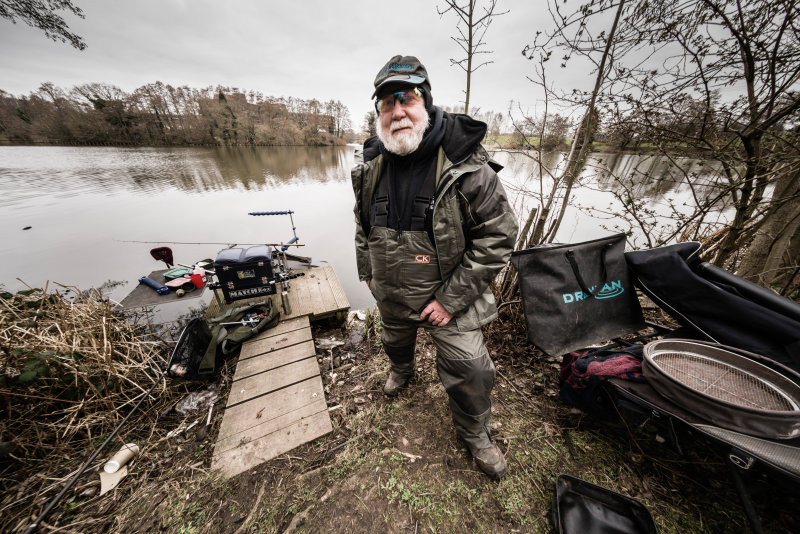
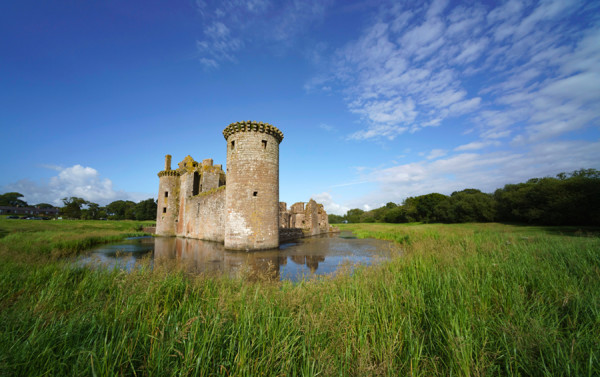
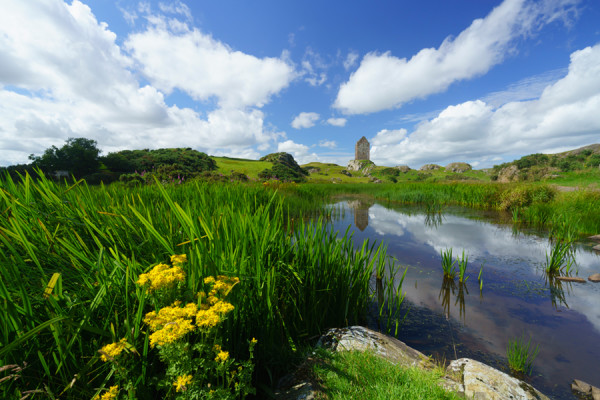
Though some colour fringes on the bright water definitely hit this 16-80mm CZ shot (along with a colour bokeh issue making those in the foreground magenta and those to the rear greenish) there was no hint of any ghosts or flare in dozens of shots taken in conditions like this.

This light is extreme, and the patches of sun and reflection are placed exactly where the Alpha 55 tended to produce flare. The Alpha 77 shows no sign of it, and has not in any of our photographs so far.

As far as loss of sharpness goes, I do not believe there is any more significant sharpness loss from the SLT pellicle than there is from, for example, the rear filter permanently fitted into a 300mm f/2.8 Apo G tele. Both are between the lens and the sensor and both are plane clear optical elements. If anything the glass thickness and distinct double air to glass surfaces of a rear mounted filter make it far more likely to degrade an image than the SLT. Almost any filter you fit in front of the lens is going to have a greater effect (unless you spend a stack of money, a really bad effect on 24 megapixels – we’ve replaced our older Minolta, pre-digital Hoya and other filters with the latest Sigma EX DG after testing them).

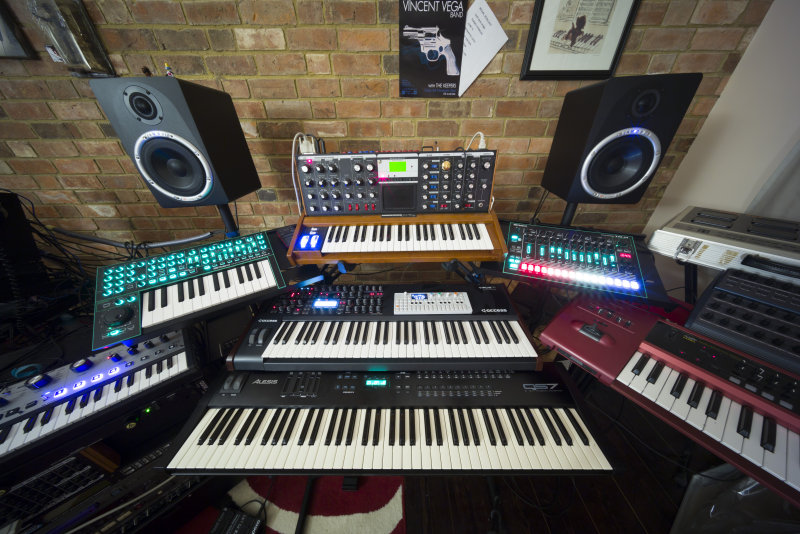
This is just a routine test I ran at all ISO settings to check colour and tonal response. Not noise. I already knew before doing this that the noise thing was a non-issue for the simple reason that this sensor beats anything else out there; I’ll start pixel-peeping for noise when another maker comes along and shows they can do this pixel density better. The colour is also very consistent indeed across the ISO range and the feathers in the mask retain the expected detail up to ISO 3200.

This picture was taken using a setting I quickly discovered is just perfect for news, PR, presentations and images needed quickly from events – the Small JPEG in camera, with DRO enabled, at ISO 3200. Sampling down to one quarter of the file size (still large enough for an A4 print) creates a dead sharp, low noise image. Photographers do some good, occasionally – this is a cheque for £3000 being presented to DJ Dave Lee Travis for the PACE Centre charity, by the Master Photographers Association. Their annual dinner happened just a week after I got my Alpha 77. I was confident enough to risk taking all my press and PR shots on the new camera.

And this is a 100% pixel level view of that shot without any post processing.

Input and feedback

Then again, having to set up the camera and realising the full extent of the customisation possible through the Menu and Fn buttons, I felt depressed. This was almost like handling a Canon 7D – one of those cameras where, if someone passes it to you, you can never be sure if it has been configured only for photographing flocks of ibis flying behind bare poplar trees. Would its 19 AF points and 11 cross type sensors do the 7D trick of locking on to a sweet wrapper someone dropped on the lawn instead of the wedding group a yard further away?

Well, yes. The A77 can do that sort of wrong stuff if left on wide area focus – but it doesn’t light up the wrong AF points in the finder to fool you, and it does not require programming of AF preferences to avoid proximity or response speed errors (both Canon and Nikon pro models can disappoint if used ‘out of the box’, and need their defaults changing depending on your typical photo situations). Instead, if provides very accurate feedback about which sensors are being used. And it has Face Detection which really works, because this is a live view camera 100%. I have never liked Face Detection much until the SLT EVF generation arrived. Even then, not much.

Face detection kept the focus on photographer Paul Cooper (right) accepting the president’s ribbon of the MPA from Henk van Kooten (left) despite Henk’s focus-target jacket moving into the foreground of the AF zones. Taken by stage lights at ISO 3200

I had to take a few shots where a person receiving a presentation was facing the camera, and the presenter often stepped into shot with back of head to the lens. With Face Detection on, the A77 never once switched focus to the nearer person, and always stayed locked on to the subject facing me. This is a situation where the above-mentioned makes, if allowed to use wide area or multi point AF, tend to shift focus to the foreground intruder because as conventional DSLRs they don’t have Face Detection in optical viewfinder mode.

The auto exposure of the A77 seems to be more closely linked to active AF points than any previous model. It may have 1,200 metering zones on the CMOS sensor but it will bias strongly towards correct exposure at the point or points of focus, especially if the central point coincides with a very bright are. I do not mean it is literally spot metering. I mean that, for example, in my office with medium lighting and a very bright computer screen if the camera is aimed at the screen the exposure in matrix mode, with centre spot focus, becomes correct for the screen and the rest dark. When the screen is moved away from the centre zone, exposure increases by two stops even though the overall image contains about the same brightness.

What I’m seeing may not be the same sort of meter-linking-to-AF that is found in the Canon EOS 400D, as an example. This will give you over or under exposure if the focus point hits a dark or light area. The A77 biases towards avoiding overexposure. A dark subject at the central focus point does not seem to brighten the image the same way a very light subject, like a screen, darkens it.

This is not like separate metering cell TTL, the classic Minolta honeycomb. It isn’t even like a camera with centre weighted or spot optically fed meter cells. Every point on the sensor is a spot meter even though you can only ‘spot meter’ from the centre. Every point is equally sensitive down to EV–2 (ISO 100 with f/1.4 lens) and up to EV17. It is four times more sensitive as a matrix/centre-weighted meter than the Alpha 900 and a staggering 16 times more sensitive than A900 spot metering mode. It also has +5 to -5 EV exposure compensation compared to the A700’s+/-3EV (A900 – 3EV, expanded to 5EV by later firmware, but the 700 was never improved – see comments, originally I referred to A900 as 3EV either way, as that’s in the manual). And whatever things the SLT mirror does, it seems to feed the new AF module plenty of light – it’s able to focus in conditions half as bright as the A900. Added comment: the A77 metering is four times as sensitive as the new Canon D1 X, so although that camera has amazing sensitivity up to ISO 204,800 the A77 will actually meter exposure in lower light.

So, after a couple of weeks, I began to realise that the A77 was giving an even lower failure-rate than the A55. I had learned which settings to prefer – three zone focus for example is far better than old-style wide area and almost makes single centre spot focus redundant. I was finding that exposure is generous but never highlight-clipped, because it’s read from the actual imaging sensor; you can trust the simulation given by the EVF, too, and adust the +/- over-ride with confidence.

The camera stopped being complex and started to suit my declining mental powers. Life is a curve. You start just learning to set shutter, aperture and focus. In your prime, you want to set twenty different things for every shot and switch from P to A to S to M with C or S or A and -2 sharpness and ten stop HDR then portrait look for the next one. Ultimately as the brain cells sneak off for a nap you find good old shutter speed, aperture and focus do you just fine.

If you need reminding in big print, let the rear LCD see the light of day, and you get this big clear information pane on demand.

Now some cameras have fooled me, there are no dials and they just hid this stuff from me so I’d end up with bad things like the optically soft set of landscape pix I shot at 1/2000th and f/5.6 (wide open) on the NEX-5 last month. But the Alpha 77 with its top plate LCD info display, its ‘come to life’ burst of finder shooting information when you take first shutter pressure and confirm focus – well, it is constantly reminding me what I am doing. I know other cameras and other Alphas have finder displays, even the NEX was probably telling my longsighted eyes what it was up to, but the Alpha 77 presents working information better than any camera I’ve used. It is simply a very clear and well designed display both in-camera and on the rear screen.

If you enable image review, the SLT cameras slow down. I fold the rear screen to face the camera back. I have turned off image review. I shoot with confidence just as I would once have done on film and sometimes I do not check a single image until I’ve copied the card contents to my computer.

Button pushing

The Alpha 77 has loads of buttons despite Sony’s one-time insistence that they planned to have fewer mechanical components in future. There are nine push buttons, one rocker button and one control wheel on the back of the camera alone; five push buttons, one collar switch, one shutter and control wheel on the RH top. Then there’s the stray stop-down button, the lens change release and the AF-mode switch living round the mount.

Rear screen folded away and protected – that’s how I use the camera all the time. Plenty of buttons to push – and you can have fun swapping their functions round to confuse your friends!

Several of these buttons can have their functions modified so they no longer do what it says on the silkscreened white or blue print (white for shooting mode, blue for playback). If you are particularly odd you can even swap round functions and confuse people who borrow your camera (shades of Canon!). If you are relatively normal you can leave this well alone. You may customise the stop-down preview button to show the final picture effect instead (stop-down plus picture style and shutter speed result) and through the menus you can change the behaviour of lens-resident Focus Hold. The instruction manual omits to mention these are on the lens, and not on all lenses – some owners have spent ages looking for the Focus Hold button which does not exist on the camera.

What’s most odd about the A77 is that three of the main dedicated-function buttons are completely interchangeable. ISO (next to the shutter) AEL and AF/MF (under your thumb) can all be changed to do anything from the following long list of functions:

AEL Hold*
AEL Toggle*
Spot Meter with AEL Hold*
Spot Meter with AEL Toggle*
AF/MF Control Hold*
AF/MF Control Toggle*
Object Tracking
AF Lock*
Aperture Preview (stop down)*
Shot Result Preview (final picture simulation)*
Smart Teleconverter*
Focus Magnifier*
Memory
Exposure Compensation*
Drive Mode*
Flash Mode
AF Area
Face Detection
Smile Shutter
ISO*
Metering Mode
Flash Compensation
White Balance*
DRO/Auto HDR
Creative Style
Picture Effect
Image Size
Quality

*The entries I’ve marked with an asterisk already have their own dedicated buttons for which these are normal function choices (AEL button, for example, covers all the first four but can only do one function, preset in menus).

There is one button you may want to modify if you own lenses with a Focus Hold button. The AF/MF button, by default, performs this function with most lenses (it switches to MF when pressed, the same effect as holding focus). So it’s almost a spare button, given that there’s also an AF/MF switch on SSM/SAM lenses and a body AF/MF/S/A/C switch too. Since it sits right next to the AEL button and closest to the rear control wheel, it a natural choice for any function you might want to use in a hurry.

You can not change the function of the Finder/LCD manual switch button, the Drive Mode, the White Balance or the Exposure Override. You can switch the Preview and Smart Teleconverter buttons between two functions each only. The Fn button accesses all the parameters you can’t reach directly through any custom button (like setting the Auto ISO range) and most that you can (like Face Detection). Its full function list is:

Memory Recall (only present when mode dial set to MR)
Scene Selection (only present when mode dial set to SCN)
Movie (only present when mode dial set to Movie)
Drive Mode
Flash Mode
AF Area
Object Tracking
Face Detection
Smile Shutter
ISO and ISO Auto setup
Metering Mode
Flash Compensation
White Balance
DRO/Auto HDR
Creative Style
Picture Effect (only active for JPEG-only shooting)

The Display button can not be customised and only serves to cycle through Display setups – but you can customise those, and thus what the button does for you (above, Menu to set which finder display states you wish to cycle through, ticked). The Help (?) button can also not be customised, which if you don’t want potted hints and tips makes it redundant in shooting mode, though it serves as the Trash button when reviewing images. The Playback also can’t be customised, nor can the Menu button (which can return to Last Used or Top by setting a preference), nor the top LCD illuminator button. This one is interesting because it toggles – the panel light remains on until the camera goes to sleep, or it’s pressed again to turn off.

In use, I found there was one button missing which would make a huge difference to this camera. The 12fps ultra high speed shooting mode is only accessible through the mode dial. Because of the way the camera handles bursts of frames and buffering, it would be useful to be able to shoot normally in any mode (single frame, or other continuous speed) and switch to 12fps by holding down or toggling a button (preferably holding down, say, the AF/MF lock reassigned for this purpose).

Here’s a neat touch – as long as you have a lens with no MF/AF switch on it, you can set M focus on the body selector, and pressing the AF/MF button will do autofocus for you, letting it go will lock the focus back to manual. That’s another reason to like my 16-80mm CZ on the A77 – ideal for studio products or architecture, or indeed for landscape. It does not work with the 18-55mm SAM. There is in fact a bit of an overall mess with SAM, SSM, and standard lens focus types including the assignable DMF (direct manual focus) to the AF-A mode. There are some lenses where you are warned never to use body MF setting always only to use the lens switch. What you will find is that some menu items are greyed out, and some buttons don’t work, if a mismatched combination is set.

Lens compatibility

The new 16-50mm f/2.8 is enabled for in-camera lens corrections

This leads to the general question of lenses and the A77 generation. It seems there’s some additional information chipped into some but not all lenses which enables the Lens Correction function (Vignetting, Chromatic Aberration and Distortion) for in-camera JPEGs. Raw files are unaffected, and I don’t know if this information is used to enable better panoramas but that would be a practical fringe benefit. But since the 18-55mm SAM, 55-200mm mk2 SAM, and 18-250mm (an old design relatively) are in the release firmware along with the 16-50mm SSM maybe there’s no info in the lenses themselves, and future firmware will add more.

The oddest incompatibility is the manual’s statement that Front Curtain Shutter should not be set on ON for ‘Konica Minolta’ lenses (added note – see Comments at the end of this article, some discussion of this). First of all, the description of Front Curtain Shutter is misleading. When this is set to ON, it means NO front curtain shutter – electronic gating instead. When it is off, you are using the physical Front Curtain, the blades uncover the sensor to start the exposure. The manual does make it clear that by Front Curtain Shutter Sony means No Front Curtain Shutter.

But what is a Konica Minolta lens? There are very few, nearly all were made by Tamron. Konica Minolta never even got round to rebranding the Apo G lenses, they just changed the box and the lens cap and left Minolta as the name on the lens. I have a 28-75mm Konica Minolta, a 17-35mm Konica Minolta and at one point I had an 18-200mm, and of course, the kit 18-70mm and various horrible full frame plastic lenses like the 28-100mm. I think there are 75-300mms in KM guise.

Everything else prior to Sony was Minolta because KM simply never made any, or if they did, it amounted to no more than a box label change. To confuse things, some of these Konica Minolta like the 18-70mm, 18-200mm and 75-300mm became Sony lenses without a single substantial change. And many Minolta lenses became Sony lenses while retaining a heritage right back to pre-D days or the origins of the AF system itself. The 28mm f/2.8 is the most obvious example, the 50mm f/1.4 another.

Why would an electronic front curtain produce overexposure or inconsistent exposure only with Konica Minolta lenses? Given the very fast response time (1/20th of a second) and high speed of the system (1/250th flash sync, 1/8,000th shutter) the only thing I can think of would be the speed of aperture closing action. It is also something which would be invisible in revised lenses; maybe the Sony 18-70mm kit lens actually has aperture blades which close 50 milliseconds sooner than the KM equivalent.

This would also mean earlier Minolta lenses, not just KM, might produce overexposure (aperture still not fully closed when exposure commences) or uneven exposure (aperture continues to close down during part of the electronic progressive gate-opening). The same would apply to many third party lenses.

I’m pretty sure this is why the warning is made, and that singling out Konica Minolta lenses is an error. Any one individual lens may have sluggish diaphragm, indeed a common cause of overexposure in all A-mount lenses is incomplete stop-down. So the advice should be don’t use ‘Front Curtain Shutter’ set to ON with anything except Sony A-mount lenses – or test your independent lens before use.

A warning about not setting Micro AF adjustment with third party lenses is given, as usual. This is because the makers borrow lens identity codes. The Sigma 12-24mm f/4.5-5.6 Mk1 has the same code as the Minolta/KM 28-80mm kit lens. This issue will also affect the behaviour of the Auto Lens Correction register, which in our body does not have any effect on the CZ 16-80mm for example but does correct the new 16-50mm. I would guess ‘correctable’ lenses have extra information, older and third party lens won’t. So don’t bank on this function fixing JPEGs from your ‘heritage’ of early Sony glass!

Sigma has issued a list of lenses which are known to have AF problems with the Alpha 77/65, and will upgrade them free of charge. You can read the list here: http://www.sigma-photo.co.jp/english/news/info_111014.htm. It includes the 18-250mm HSM OS, which we have. Ours does not seem to have any issues at all on our A77 with firmware 1.03. I’ve also tested the 8-16mm and 100-300mm OS, 70mm macro and 70-200mm f/2.8 HSM Macro MkII. These are not in the warning list and all seem to work well, even though they do not work reliably with the Alpha 55.

The A77 has Fast/Slow AF options and I’ve used Fast. The accuracy of the AF is much better than any previous Alpha model.

Autofocus and exposure

The 19-sensor, 11-cross AF module is not most densely populated – the A900 has 10 extra hidden ‘tracking assist’ line sensors bringing it up the same total (they are there, they just don’t have screen markings) and its central double cross sensor is technically the best type around. But having eleven cross sensors does more good in practice.

AF has a new mode, Zone. This creates three groups of sensors left centre and right which act like mini wide zones. Wide Area focus can, of course, locate widely spaced details which are concurrently in focus. Zone identifies the zone with the most focused points, then works within this area. It can use information about the change in confirmed focus within one zone to help track the subject into the next zone. It also gets the exposure right more of the time.

Because the sensor is feeding image data to an analysing computer, Face Recognition and Object Tracking can be linked to the AF. There must be some theoretical speed penalty – something must be slowed down by microseconds if you enable these functions. I can’t detect it. The only slowdown is the time you take to press the central controller button to register an subject for tracking. Smile Shutter is also possible. My subjects normally scowl so I don’t use this.

The focus point – here, centre focus spot aimed first at the family and then held using the shutter release to recompose the scene – helps determine exposure. The 1200-zone metering has correctly placed the baby’s white clothes in the value range 250 to 254 RGB.

The most reliable and accurate focusing method remains central single spot focus, or local selectable single spot. Now that all of these are cross-type, there is no compulsion to stick with the centre and recompose, but it’s a habit hard to lose. I have already observed that the metering in spot mode is 16 times more sensitive than spot metering in the 900, and I would guess that when the system biases matrix metering values to the centre focus point, there’s a related gain if not that much. There is a proper near-IR AF illuminator in the camera body – Minolta tradition lives on! Without flash, it really is possble to focus in the dark and the EVF does a very grainy but usable job as a night vision viewer too. The illuminator also enables focusing on plain surfaces as it projects a pattern.

The SLT mirror of the 77 diverts 30% of light to the AF module, but this is actually more than the old semisilvered patch and double mirror system used to let through in SLRs. The AF sensor itself may not be any more sensitive, it’s simply getting a much better image feed. This 30%, by the way, means the light reaching the sensor is reduced not by the 1/3rd to 1/2 a stop sometimes mentioned, but by .6 of a stop or nearly 2/3rds of a stop. 50% would be one stop. (See comments at the end of the article for some more precise figures on the mirror split provided by Dr Daniel Oi).

My experience so far with the camera indicates that exposure is very reliable over the entire EV range. I simply leave it on the matrix multi-zone setting. The EVF warns me if it’s going to bias too much to the focus point.

High speed shooting

This brings me to the aspect of high speed sequences. No cameras in this class has ever achieved 12fps, let alone at 24 megapixels. In theory you get 13 raw or 11 RAW+JPEG frames before the camera slows down, and it looks as if the buffer must hold about 320MB. The camera does not have a dual processor like the Alpha 900, and it does not benefit from the robust performance of fast CF cards.

Autofocus is provided in Hi drive mode, along with AE (8fps, accessed via the Drive function button, in any shooting mode). Using this shooting speed you have full control.

In Speed Priority AE mode (the 12fps setting on the mode dial) the focus is locked before frame 1 if you have the camera set to Single (S) AF, but in exchange for this, you can set both the ISO and the aperture. You can also set these if you use Manual focus.

If you set the focus mode to C (Continuous) then both AE and AF continue during shooting. You can set the ISO, but not the aperture, so the ISO is your only way control the shutter speed. Added note: the Canon 1D X has now bettered this record high speed shooting by providing 14fps. This mode in the Canon locks both AE and Focus with the first frame, locks the mirror up, and you must use Live View on the rear screen to compose the shot. For focus tracking with viewfinder, the 1D X is limited to 12fps.

12fps is very impressive. It makes a huge difference in action work. I often test sequence shooting on the local races, and I quickly found that even tracking a horse (necessary to keep it in the frame at all for more than one shot at 3fps) certain frame rates just produced two stages in its stride, repeated. The horse was galloping at 2.5 clops per second and I was shooting at 5fps. With 7fps it gets better, 8fps or 10fps still better and with 12 fps you reach the point where four different positions of the legs are recorded.

Also, it becomes possible to aim the camera at a fixed spot like a hurdle, and fire, capturing several positions of the horse before it leaves the field of view. It is not as necessary to pan with the subject every time to get more than one shot.

Animation of three hand-held frames, cropped from a Sigma 70-200mm shot taken at 70mm, showing how 12fps captures very fast action in relatively small steps. At 5fps, the second frame would have the horse leaving the right-hand edge.

In practice, you certainly get your 13 raw or 11 R+J shots at 12fps or the slower AF-capable Hi 8fps setting – or indeed at the slower 3fps rate. But you don’t get anything like the same continuous shooting capability as past models even if you knock the JPEG size right down. You’ll get around 18 Normal Small JPEGs (6 megapixels, lowest quality) at 10 to 12fps before the rate slows down to an erratic 3fps with occasional half to one second pauses. For raw files, after your 13-ish burst is up, you may get between 0.5 and 1 frame per second with occasional one to two second pauses. With an average SD card (20MB/s write) you will wait 15-20 seconds after the last shot before being able to shoot fast bursts again.

Here’s another sequence, this time as stills without the annoying animation you can’t turn off 🙂

And here, below, is a 100% crop from the original ISO 800 raw file processed using Adobe Camera Raw 6.5 (Sharpness 50, Radius 0.5, Detail 0, Masking 0; Luminance NR 25, Luminance Detail 50, same from Chroma NR)

Sharpness? The 12fps C-AF setting forced the Sigma 70-200mm to be at f/3.5, two thirds of a stop down from full aperture, but also gave a shutter speed of 1/6400th. I could have perhaps picked another detail with slightly more punch, and looking at all the shots, my prefocused point was actually about 1 metre behind the horse (if the AF refocused during this sequence, I can’t see any evidence in the images). The 8fps or Single-Shot AF 12fps settings allow control of aperture, and I know that f/5.6 would have cleaned up. Just remember you are looking at a section of an image something between 6ft and 8ft wide, it’s very easy to view a tiny clip like this as if it was just another digital image.

I tried one technique, shoot 2, 3, 4, 6 frames with brief pauses – as if catching different moments of an event, in bursts. Even though I spread the 10fps bursts over a ten second interval, by the time I had totalled 20 raw frames I was down to the single shot per second or worse situation.

To follow up, I shot a burst then allowed the buffer to write for about 8 seconds before firing again. I got seven frames at 12fps, which fits in with the card in use taking about 15 seconds to finish writing from a 13-frame burst.

For one of the horse racing tests, I shot one burst of frames and as the camera slowed down, two horses fell and two jockeys were injured, one requiring a stretcher. I was unable to get ANY pictures of the incident as it happened, and by the time the Alpha 77 was able to shoot again, the ambulance crew was on the track. Each race gave me just two chances to shoot a burst so I’m afraid that testing every single setting combination on the camera was not possible.

Panorama speed mystery

There’s something I don’t understand about the raw, file and buffer handling of the Alpha 77. Shooting panoramas – which have to start with exactly the same frame by frame 24 megapixel data readout – I counted 42 frames apparently firing at something close to the 12fps maximum, then creating a panoramic JPEG, and the finished 6.7MB JPEG file was written to card and the buffer cleared before I had time to see if the light was still on.

What exactly is happening here? How could the processor and the buffer somehow handle the throughput of the wide panorama with at least double the number of continuous burst frames I could get with even the smallest JPEG – and then do all the computing to assemble the panorama and write it to card, leaving me ready to shoot immediately?

I ask this because when shooting panoramas with the Alpha 55, my 15MB/s SanDisk Ultra II SD card failed – it was not fast enough, could not handle the data and became corrupted. Clearly panorama shooting is data intensive one way or another. But in the Alpha 77 it appears to be allocated buffer and processing power which is denied to more useful motordrive sequence shooting.

Movie shooting does not enjoy the same fast buffer clearing. Shoot any higher quality movie beyond a mere blip on the button, and you can’t fire a still frame for some seconds. With some HD-movie systems, you actually shot a still frame during the movie and lose nothing except a couple of movie frames; with others, you can end the movie by pressing the shutter and capturing a still. In yet other makes, you can shoot a still but lose two seconds during the movie. All these solutions are valuable when still shots could be important. The A77 movie function does not permit any such choice and may block all shooting by occupying the buffer to card writing process for many seconds.

And, in reverse, you can not initiate a movie while the card write light is on. I tried this with one of my horse race test subjects. I decided I would shoot the front runners going over a hurdle, get my 12fps burst, then do a few seconds of movie of the stragglers who reach the spot a few seconds later. Although I could have shot further (faltering) still frames, movie shooting was blocked out with a warning message telling me ‘Writing to Memory Card – Unable to Operate’. When raw shooting was set, this lasted many seconds, but interestingly with the small JPEG option only two or three seconds were blocked out.

After my tests of the high speed shooting functions, I conclude that to cover some sports events well you would need a pair of Alpha 77s, or the 77 and some other camera – and you would need to keep a close eye on the card writing light. As a result of the performance with my SD cards giving write speeds around 20-30MB/s I ordered a SanDisk 45MB/s Extreme Pro, and plan to get a 95MB/s card when they are available.

Added after receiving the SanDisk Extreme Pro 16GB 45MB/s card: burst shooting is not extended, using raw it varies from capturing 10 to 12 raw frames at maximum rate, sometimes with a single frame jumped (two groups of 5-6 frames) which never happens with my ordinary Transcend 20MB/s card. Buffer to card writing is reduced to around 10 seconds from around 20, but at least with this extra card speed, there is no way to extend the approximate 1 second unbroken raw shooting burst.

The Alpha 65 and 77 are the only DSLR/T cameras so far made which use the USH-1 SDXC specifiction to allow writing data at this kind of rate. They are ahead of the card game. But they need to have this capability. Anyone expecting to make full use of the high speed drive functions and best video quality of the 77 with cards like the faithful wallet full of Transcend 16GB Class 10s we have been using will be disappointed.

The dedicated Movie mode

On the mode dial of the A77 there is a movie position. This does not mean it has changed, like some Canon models, to be incapable of shooting unplanned movie clips – you can do this at the press of a button, like other Sony models. What the Movie icon means is that you gain access to manual control of ISO, shutter and aperture. As a penalty, you lose AF.

Why? That is easy to answer. The AF sensors in the 77 are rated for f/5.6 aperture use. Default movie apertures range between f/3.5 (typically set on fast lenses) and f/6.3 (well, with an f/6.3 zoom lens there is little choice). AF works best in this range. If you really want to shoot AF movies at f/2.8 on a 200mm lens, try by all means. I have tried at f/3.5 and for every clip which has a smooth focus transition, there will be another where the SSM, SAM, HSM or plain old screw drive makes a sudden shift.

So if you want to work at f/1.4, leaving focus to AF would be a disaster. Apart from making constant shifts, there’s a big chance of hunting. I worked with the 24mm f/2 SSM Carl Zeiss for a while, and this lens does not find focus easily in low light with any camera. On the A77 for video it was auto-set to between f/2.8 and f/4 in low light. Video AF happens at the actual working aperture, not wide open like still AF. Being stopped down a little improved the 24mm’s accuracy.

And if you want to work at a smaller aperture than f/6.3 – say f/16 for a deep focus effect with a superwide lens – then AF simply would not work at all. The Manual Focus restriction placed by using the Manual Movie mode is necessary despite the howls of protest it’s produced from those who don’t understand the technology involved. A side benefit of setting Movie mode on the dial is that your view through the finder is cropped correctly to the HD area before you start filming, which makes composition easier – see below.

In the Movie position on the Mode dial you might believe you can use the self-timer. The manual ticks that box. We had to check it, but although you can set the Drive state, including self-timer, doing so has no effect on Movie shooting. Nor can you shoot stills with the Mode dial in this position. Various other manual details, such as indicating flash can be usedin this mode, are also incorrect or there’s a small firmware glitch with the camera. I would expect the shutter release to be operational with the mode dial set to Movie, so that stills could be captured. It is disabled and you can’t take still shots at all if the dial is in this position. Be warned!

Not only that, but after I had pressed the Self Timer 10 second setting when in Movie mode, the LCD top display showed a single frame symbol plus the 10 from the self-timer mode, and the shutter release was disabled even after returning the mode dial to Program or other settings. The Drive mode had to be reset to get it out of this tangle.

As for the instant Movie button, it’s not in the best place – a long thumb reach for on and off actions to start and end clips and the placing tends to make me tilt or move the camera needlessly. When adjusting the viewfinder dioptre to switch from working with spectacles to working without, it’s so close to the dioptre control I push it occasionally by mistake. I would like the Movie mode to switch operation to the main shutter release OR the movie button.

It’s worth noting that picture effects (see later pages) can be applied to movies, as can all other image adjustments, and will be seen in the finder as you shoot.

But what you won’t see until the moment you press the movie button is the working HD movie area. It is a surprisingly fierce crop from the full sensor, not just a top and bottom slice to HD 16:9 format. This is required for the Steady Shot digital, pixel-shift based movie stabilization which does not move the sensor like regular SS. It reduces the 1.5X area to something like a 1.8X area, not as much ‘zoom in’ as using the 1.4X smart converter but enough to cut heads and feet off subjects you have pre-composed using the full finder. There are indicator marks on the display, that’s true, but you will find them hard to see in many conditions even if you remember to use them.

Shot with the 24mm f/2 lens – no way to move back or zoom out for the movie, but plenty of space you would think for the 16:9 HD crop.

This is what the HD movie viewfinder field switches to when the Movie button is pressed (slightly re-composed horizontally but not cropped at all). The movie stabilization need the surrounding pixels. It highly effective, both through the live viewfinder and when viewing the results, and totally silent unlike sensor-shift SS. It also does not warm the sensor assembly up as much.

A caveat to movie shooters. Select the highest quality AVCHD 2.0 formats (the camera will warn you) and you may not be able to play them, burn them to disc other than Blu-Ray, or import them into HD movie editing with programs like Apple iMovie. No doubt this will change with updates, but right now apart from Sony’s PC-only Picture Motion Browser (they have now had half a decade to port it to Mac) there are few programs which can recognise the 1080/50 or 60p 28Mbps format and even fewer which edit it. You will need to buy software to do so. On my system, Toast Titanium 11 includes Roxio HD viewer and because it is a Blu-Ray compatible disc authoring package, this was able to handle the .MTS files in all formats, and convert them to formats editable using iMovie. Roxio offers similar PC utilities.

Sony PMB is also very useful for GPS data handling, map viewing and correcting GPS data. While Adobe Bridge with the GPS Panel (download from Adobe) installed allows viewing and editing of co-ordinates, it still has no link to Google Maps, Microsoft Virtual Earth, or any other useful location display.

Sound

There is no provision for audio notes or audio only recording, which is a bit of a waste of built-in functions as this would be possible and can be useful. Audio notations attached to images are popular with travellers and journalists.

The stereo sound is not much different to the NEX or Alpha 55 despite being capable of 48kHz (better than CD) sampling. The microphone under its unusual top grille seems less prone to wind noise than most DSLRs; the wind noise reduction feature, a bass cut filter, is additionally effective. Body handling noise is present, so is lens focus noise.

The external mic socket provides 5v phantom power for popular condensor mics, and is stereo too. No provision for fixed gain is made – auto level or gain is always on. The camera needs an option to disable auto gain so that a preamp or mic with dB cut choices can be used to control a fixed sound level; better would be three levels, like Nikon; even better still a proper sound level monitor display and full control in fine steps like Canon. Without at least one of these options the Alpha 77 can not considered for semi-pro or professional live sound video work.

GPS Data

While I think that the GPS on the A77 has so far proved faster in locking and more accurate in positioning than the A55, it’s hard to quantify as I have not used both together for long enough in difficult locations. To improve your GPS, download this file:

http://control.d-imaging.sony.co.jp/GPS/assistme.dat

Create a folder on your SD card inside the PRIVATE/SONY directory and call it GPS. Copy this file into it, put the card in your camera, switch on. Go to GPS in the main menus and make sure it’s turned on, then look at the GPS ASSIST entry and you will find the assist data starts on the day you download and lasts a month. Visit the assist.dat download once a month or more often to keep your GPS working with the fastest and most accurate lockon and co-ordinates. Do not worry if you format or change cards, once in the camera the assist.dat file is copied to internal GPS memory. Your original card does not have to be present.

Sony state 15 seconds or more to acquire or change position, and variable accuracy due to GPS being a US military provision which can be subject to deliberate degrading. In this model, when no GPS signal can be detected on power up, the camera simply turns off GPS embedding (on the A55, it uses the last co-ordinate). But if you are out and about, the last position may be shown on some pictures. I don’t think I move that far in 15 seconds

.

An example of GPS map location from Media Pro and Google Maps – click on the image for a full size screen shot.

Adobe gripe – it’s long overdue for Bridge to have a GPS map function when Lightroom does. As it happens I use Media Pro for all my digital asset management. When this was Microsoft Expression Media 2 it has its own Virtual Earth window, but now it’s been taken over by Phase One, that has been replaced by auto-opening a web browser Google Earth window. I don’t really need to see maps at raw file stage, but it could help with filenames. I like my filenames to be a ‘catchline’ format – an alphanumeric string which contains a key word about the subject. That could be simple like venice2011-15.jpg or a bit more precise like guideccasangiorgiovenice2011-15.jpg.

Mouthful? Not ISO compliant? Not ancient PC friendly? Sure. But very useful indeed many years later when searching for stuff. And access to GPS map location helps me decide filenames, then later on input metadata for caption, keywords, description, and much more. With 15,000 finished images stored on my system everything which helps me identify them is valuable.

Image formats and styling

The Alpha 77 has a stack of great functions and features I will never use. That’s because they are not available if you shoot either RAW or RAW+JPEG. They include multi-shot modes (combining tonal range for HDR, or reducing noise for low light and high ISO) and in-camera post processing effects.

There are some of these JPEG-only modes I feel comfortable with. Panoramas, as an example, don’t provide a raw file and you can’t bracket exposures. You have to trust the camera despite the huge range of tones and light a wide panorama can cover. If you choose your start position well (including the brightest highlight area of importance) exposure is very reliable, and at low ISO with Fine quality, the JPEG is of a professional standard.

Standard JPEG (click images for 1000 pixel wide version)

Three-shot HDR using 3EV spread

Three-shot HDR also works well, especially at low ISO settings of 50 or 100 and in Extra Fine JPEG. The 24 megapixel file gives plenty of scope for reducing to a smaller final result. There is also a special HDR Painting mode, which processes the file with a masking effect to create what is currently a popular ‘look’. Unlike the standard range of HDR settings, this is far from being a straight image and the lack of a raw file or normal JPEG to back it up means it’s only for fun.

Over the top with HDR Painting style, High strength – it actually works best on dull, wet days with grungy subjects!

More ‘only for fun’ stuff includes soft focus, selective colour against mono (called ‘Partial Color’), toy camera, miniature effect, two monochrome looks including one which uses three exposures, ‘pop color’, posterization, retro photo, soft high key. All of these are irreversible real time post processing. You have no normal backup when shooting.

The post-processing method offered by Nikon and others, where you can apply similar effects to raw or JPEG files already stored on your memory card and create a new version, is preferable. For standard HDR shots on Sony’s current models, a normal JPEG is saved along with the three-shot HDR and that’s good. For any of the Picture Effect post-processes, even multishot, no standard result is saved – all you get is the processed file, after a wait of 10 seconds or considerably less.

Selective yellow on monochrome – but that’s the only shot I have. No raw, no standard JPEG…

You do get a pretty accurate preview of the result in the EVF. If the stop-down preview button is set to ‘Shot Preview’ mode instead of ‘Aperture Preview’, you also get a simulation of the effect of your shutter speed – so flowing water brief time exposures (up to 30 seconds) can be previewed to see exactly which shutter speed suits the water movement best. Along with exposure simulation, there should be no reason why your shot ever goes wrong.

The Auto ISO Multi-Shot mode, Multi-Frame Noise Reduction, captures six frames and creates one JPEG. The pixel alignment seems very accurate and shots at settings like ISO 3200 show an improvement in detail which would be hard to obtain even by good raw processing. It’s not so much the noise that is reduced, it’s the overall quality of the image which improves. Using the high 25,600 ISO setting which can only be accessed in this mode shows that it’s slightly inferior to a straight 16,000 ISO shot despite the six-frame synthesis.

For all these multi-shot modes, the 12fps function of the Alpha 77, SSS, and the quiet, mirrorless shutter action combine well. They are all usable without much effort or worry, hand-held. The one ‘tonal range’ adjustment which does operate in RAW+JPEG mode, though only the JPEG is changed, is the DRO or DRO+ setting which uses a single shot.

High speed shooting also benefits exposure, DRO and white balance bracketing. Early information and the use manual state that you can define the number of exposures for bracketing, and the range covered, with the Alpha 65. In fact it is limited to three shots. The Alpha 77 gives you a choice of 3 shots at +/-3EV, the same at 2EV, then 3 or 5 shots at 0.7, 0.5 or 0.3 EV intervals. It is missing the obvious 1 EV step choices and that will baffle many, especially HDR raw users who would like 5 shots at 1 EV intervals.

Flash

The Alpha 77 has a proper, threaded, high grade studio flash sync terminal as well as the usual Minolta i-type hot shoe. Like the Alpha 700 and 900 (and unlike the consumer level cameras, including the Alpha 580) it can have the HVL-F58AM or 43AM wireless control capable flash mounted on the camera to control group/channel wireless strobes with power ratio. It can also use HSS (burst flash with shutter speeds up to 1/8,000th and corresponding power attenuation). It can not officially use the HVL-F20AM as a wireless controller, but owners have found it works – with a slightly longer than normal delay in flash firing, according to Gary Friedman, who has compared it with the pop-up flash wireless control.

The flash sync Prontor-Compur coaxial connector (PC flash socket) is sealed behind a cover shared with the Remote Release socket. This cover was so tightly sealed it threateed to break a fingernail opening it the first time, a small screwdriver was needed.

The most important change for professional and enthusiast owners is the long-overdue addition of a menu item which prevents the EVF or LCD live view from showing actual exposure when Manual aperture and shutter are set.  This item is under Live View Display, and is called ‘Setting Effect’ – off or on. While this nomenclature is not exactly transparent, it describes the function well as all picture styles and creative effects normally shown in the finder are also bypassed. The important thing for studio flash users is that you can set 1/125 at f/16 with modelling lights, and see a normal finder view not a black hole. You still must remember to set white balance to Flash or Daylight, otherwise the camera will set it from the modelling light K.

It is best to use one of the three Memory registers (accessible through Menu screen after turning the Mode dial to MR, Memory Recall or Register) to store a manual exposure, fixed WB, low ISO, Setting Effect OFF preset for studio work. Then you can return to any other setting and get your accurate exposure and ‘look’ preview back again.

The internal pop-up flash (GN12) has the usual range of first, second curtain, fill-in, off, auto options; TTL Pre-Flash, ADI, and also manual power control down to 1/16th which can be useful for triggering slave flashes if you don’t have a cable or a wireless trigger (and Minolta shoe adaptor). Because the body is weatherproofed, the flash shoe cover is a softer plastic type which seals tightly. Don’t lose this shoe cover or swap it for one of your others.

And the rest

By the time I’ve written this single review article, it will be one-third the length of the complete camera guide books we used to do for Hove twenty years ago. The Alpha 77 has so much more to discuss.

You will be concerned about high ISO quality, diffraction, resolution, having good enough lenses. I would question whether the new 16-50mm, used wide open, is a ‘good enough’ lens – let alone the 18-55mm SAM also being offered as a kit lens. Just don’t worry. Whatever your existing lenses are capable of doing, the 24 megapixel sensor will give you more of it. Let’s say your favourite lens is really only good up to 12 megapixels. It will be just as good if you use the 12 megapixel Medium size JPEG option on the Alpha 77, and if you do that, the 1.4X Smart Teleconverter function will also deliver a 12 megapixel drawn from the centre of the field only – so most likely just as good.

Rather too distant heron, shot using the 2X Smart Converter for JPEGs (this is actually a clip from a raw file processed in aCR to match). ISO 3200, 70-300mm SSM G lens. Click image for 1000 pixel version

Click image for 1000 pixel 100% size clip from ACR processed version (my density choice)

Click image for Capture One Pro 100% clip from raw (ditto)

Click image for in-camera processed (JPEG Fine, Low level of NR) 100% clip (camera’s density)

I am now shooting with auto ISO set to go from 100 to 3200 instead of 1600, I have started using Medium and Small JPEGs with DRO+ to ensure exposure correction for events type shots, I’ve tried all the lenses I have and the only thought is that I need to stick around f/8 to f/11 for safety. Balancing extra depth of field with a hint of diffraction loss. I’m using the manual focus ‘peaking’ function to check the accuracy of my AF (this shows a coloured line on correctly focused details, when the AF/MF button is pressed in). I am not so worried about low light, high ISO as I first thought. It’s actually as good as the 16 megapixel sensor when needed, and when it’s not, the extra resolution repays careful low ISO technique.

The new tilt, hinge, flip, swivel and cartwheel rear screen is just great for the few times I need to use it. The EVF may consume more power (470 images versus 530 per battery official rating) than the big rear screen but I no longer need to switch between the two for menu and function operations. Because of the new design, all positions found on other cameras from hanging-under to almost flat on top (R-1 style) are possible except facing forwards and positioned to the side. There are firmware or orientation sensor errors, as the imager can appear upside down in more than twisted position. The hinge design makes a vertical grip possible and also allows a wider range of tripods or quickmount plates.

The A77 has all the focus and AE hold and lock, slow sync, focus point shift, exposure over-ride and other key functions I need. It claims to be weatherproof, and having nearly broken that thumnbnail off opening the flash sync cover  I do believe the seal is tight. The card slot door is not so reassuring and I see no trace of any proper sealing, not even a labyrinth design.

I am baffled by Sony’s indecision about ON/OFF switch design, the camera labelling is the reverse of the Alpha 55/33/35 or 580/560 etc, though the action is the same. The direction is the reverse of the NEX-5. But there is one consistency, to turn any camera on the movement is always from left to right – whether Alpha 100, 700, 900 and whether the switch is rotary or a slider. Maybe this is the rule they stick to.

You can not configure the directionality of the two control wheels, as you can with Nikon, and for some reason I have always tried to open or close the aperture by taking the wrong directione. That is because the wheel directions go against the old Minolta protocol that turning the aperture ring to the right opens up, turn to the left stops down.

Like the Alpha 700, the Alpha 77 has magnesium alloy body shell combined with other metal and plastic components. It has the proper strap-lug fixed into the mag alloy casting, like the 700 and 900. This lug and triangle-ring design, as opposed to the slot-type strap fixing of the lesser camera bodies, is always a clue that the structure is based on a good solid metal skeleton. The overall design and balance of the Alpha 77 are as good as any Alpha I’ve used. There are hints of the 700 and also some memories of the Dynax 7xi present in the sculpturing of the body. To those who say it looks a bit like a Canon, yes, it’s true that Canon design has caught up with 1990s Minolta style in the last couple of years…

Conclusion

From the initial press meeting with Sony, where cameras were prototypes and the images were not allowed to be shown, I decided that if I could work for a year with the Alpha 55 and have no problems then the Alpha 77 was a safe investment. The viewfinder is a pleasure to use, though EVFs differ from optical screens in one important respect, that the eye can not compensate for small errors in the dioptre setting. With an OVF like the Alpha 900, I can set the dioptre midway between what’s needed for my sight with and without glasses, and get along fine with either. That can not be done with the EVF and it demands a precise dioptre setting for each. I have found it more comfortable to use without specs, so they spend too much time perched on my head, hanging from my collar or stuffed into a pocket.

It will be another year before I know just how wise the decision to go with EVF SLT models has been. And maybe another ten thousand words.

– David KiIpatrick

Please read the comments for some notes on corrections, which I will continue to make.


The Alpha 580 – a three-way view

Once I had a quarterplate hand-and-stand camera, vintage 1920s. Attached to the front standard was a small reflex viewfinder, giving a miniature composition you could use at waist or chest level. On the same standard was a folding wire frame, with a companion eye-sighting window flipping up from the side of the body. This gave a direct view from eye level. But for the most accurate framing and focusing, a groundglass screen at back could be used with the shutter open and a viewing hood folded out.

Those three ways of viewing have never been available in a modern SLR. Until now! The Alpha 580 (for which you can also read 560 throughout this review, give or take the sensor) is the first modern SLR to offer three entirely different viewfinder systems, all with their own unique focus and exposure methods. There have been cameras made by Alpa and Praktina which had optical finders tucked in alongside their pentaprism, and Rollei invented a finder which could switch from eye-level to waist level at the flick of a lever. But the Alpha 580 offers three through-the-lens systems and it’s unlikely any DSLR will do so again.
This is a 10-page article – please use the navigation bar at the bottom to move on to the next page, or click the ‘Continue Reading’ link to view as a single long article (this function is not very reliable though and may produce an ‘undefined’ error)

Continue reading »