9 July, 2007 – As take up of High Definition (HD) gains momentum in Europe, Sony is to launch a major Pan-European marketing campaign to demonstrate the breadth and depth of the company’s HD proposition and to educate consumers about the intricacies of HD.
Author: David Kilpatrick
-
New Alpha and lens range launch imminent
THE appearance of press-release resolution (14Mb) images of the new Alpha – un-named but thought to be the Alpha 200 or 300 because of the product code earlier assigned to shots of prototypes at PMA – combines with reports on various forums from European Sony executives visiting Japan to suggest that the launch announcement for the new model and a range of full-frame lenses is imminent. (more…)
-
Sony and ASDA team up in UK for photoprinting service
ASDA and Sony launch fastest digital photo printing service on the market
Britain’s second largest supermarket chain invests in multi-million pound deal to install 260 kiosks in 130 stores across the UK to maximise customer convenience and profits
LONDON, 20th June 2007 – By the end of 2007, ASDA customers will have access to the fastest digital printing facilities on the market with new Sony printing kiosks. The Sony kiosks utilise state-of-the-art printing technology to create standard 4×6″ photos at market leading speed.
-
Sigma UK offices break-in and theft
Press release from Sigma 1.30pm today – their phone lines have just been restored after a day out of operation, were cut via hatch in road by the gang:
-
Sony GPS-CS1 tracker and software
THE FIRST QUESTION anyone asks about the Sony GPS-CS1 device is whether it will work with their non-Sony digital camera. The answer is yes but you may need to buy some extra software, as it only comes with software to link up to Sony Picture Motion Browser. If you can ensure that you buy the product sold as GPS-CS1KA it should include a copy of this software in full. If you buy the product coded only as GPS-CS1, it may have nothing apart from a patch-updater program you are supposed to use with your existing Sony installation. So make sure you know exactly what you are buying (there appears to be no price difference, and very few retailers are making any distinction between the two bundles). There seems to be no reason to continue offering the kit with the updater only. (more…)
-
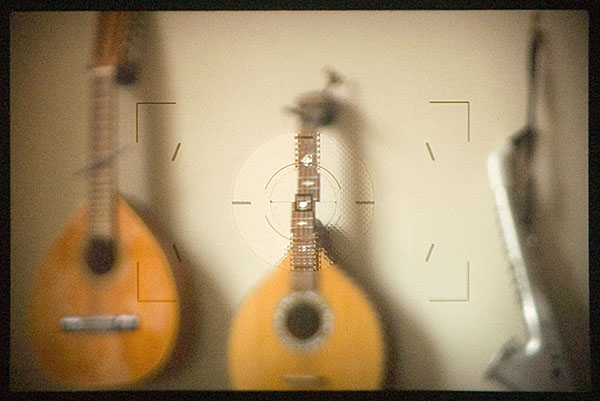
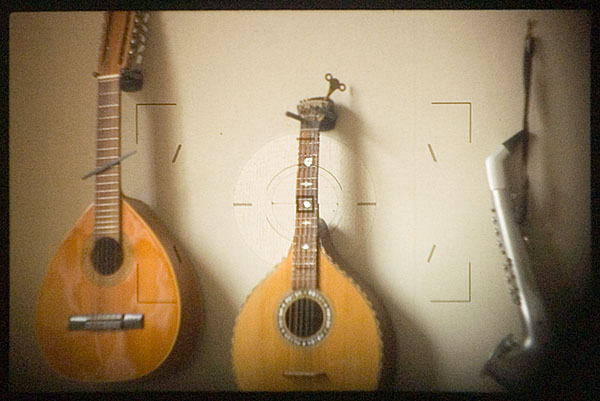
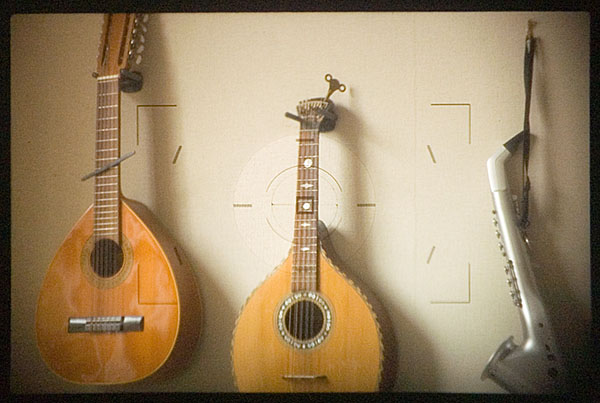
Studio light-table technique
YOU MAY want to learn exactly how I shoot the product photographs which appear in my own articles here at Photoclubalpha. I use a studio light table with an opal plexiglass transilluminated scoop. This is the method I have used now for over 25 years and it’s saved me a lot of time, and earned me a lot of money.
My current light table is the smallest, and not quite the cheapest, I’ve owned. My first table was 1.2 metres wide, and was constructed to fit a standard large sheet of opal Perspex, gloss one side, matt the other. This was obtained by special order through a sign-making firm. To build the table, I bought Dexion modular storage construction battens cut to length to my order by the Dexion supplier, with their own corner joints, feet and castor wheels. Additional pieces were bought to allow changing the leg height, and creating a low glass table a bit like a coffee-table but with a 1.2 metre square heavy plate glass sheet. This was given ground edges by the glass supplier to allow safe handling.
This table served me for seven years in a commercial studio. It cost about £200 overall in 1981. We built a second one in 1982 for our satellite studio, and continued to use Dexion for constructing many sets and props. Eventually we had colour glossy sheets, about two dozen graduated and rainbow flexible sheets, and many accessories for the tables which were sold with our studio on moving to Scotland in 1988.
At that time, a FOBA or Manfrotto studio table cost about £500 so the D-I-Y approach was well worthwhile. With its heavy plate glass under the ICI Perspex, my table was also capable of supporting products like large valves made locally for the North Sea oil industry, which no commercial table could handle.
In Scotland, space was at more of a premium and we bought an Elinchrom Light Table. This was only 80cm wide and cost nearly £1,000 but it tilted and adjusted in such a way that the entire unit could be turned into an almost vertical configuration for storage, and wheeled into a corner of the studio. It used a 5mm thick clear Perspex sheet as well as an acrylic opal scoop, and could support moderate weights. In 1995, we switched to digital studio capture using the Leaf Lumina, sold our electronic flash and installed Systems Scandles ballasted daylight fluorescent lighting on ceiling tracks. The Lumina was a scanning camera, taking from 10 seconds to 3 minutes to capture each still life shot.
When the Minolta RD3000 digital SLR arrived, we compared its 2.9 megapixel images with the 27 megabyte true coincident RGB files of the Lumina and – amazingly – decided we could switch to the RD3000. The Elinchrom table was sold with the entire digital studio – lights, tracking, Lumina, massive studio stand used to keep the Lumina rock solid, and so on. For some time we survived without a studio light table, using the alternative method of placing products on a glass sheet and lighting a white paper drop underneath them. This does avoid lightspill on to the product from adjacent illuminated acrylic, but it’s time consuming.
To match the clean look of today’s publications and websites and ensure rapid, top quality small product and packaging shots you need a texture free background which can be lit from behind or below. Another inexpensive solution is a plate glass table and sheet of mylar-type tracing foil (opal inkjet roll for backlit prints is suitable – your lab may be able to sell you a plain length to use).
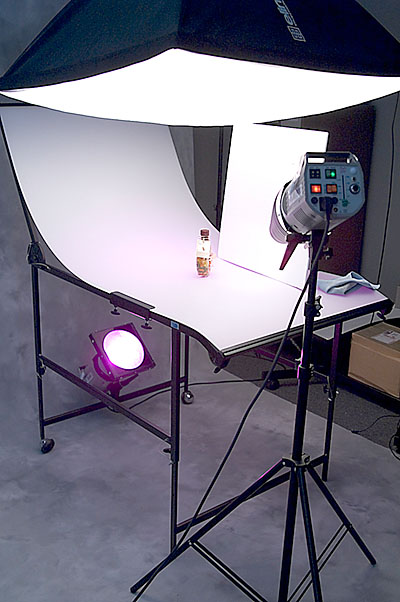
Our current table is a Tre-D which has a 75 x 150cm acrylic sheet, adjustable height frame, castors, adjustable back angle and movable backlight spigot. The bend applied to the opal sheet gives it enough rigidity to support most small product groups as long as the edge clamps are firmly tightened. However, there is no supporting glass or thick acrylic sheet. A heavy camera and lens – like the 70-200mm SSM on a body – can ‘pop’ the table’s tensioned scoop unless you are careful.
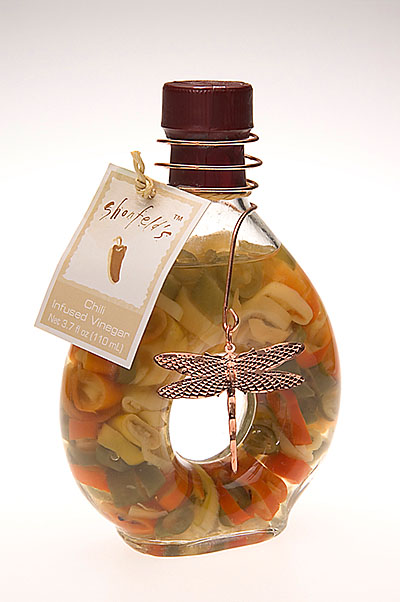
The basic use is with white light, using a softbox – anything from 60cm to 1m square will illuminate the entire table width. The backlight provides a smooth graded grey to the top of the shot or can be set to ‘white out’. Check your DSLR exposure warning display, or use proportional modelling lights very carefully to avoid excess transillumination. The brightest white should just record a hint of tone. The shot above on Dynax 7D (our normal studio camera, as it has a PC flash sync socket) has no filters on the trans-illuminating light. In this’white’ bottle example the backlight, snooted accent light and softbox were at 18Ws/18Ws/37Ws. The snooted head is aimed to miss the label, and hit the copper butterfly to pick it its texture.
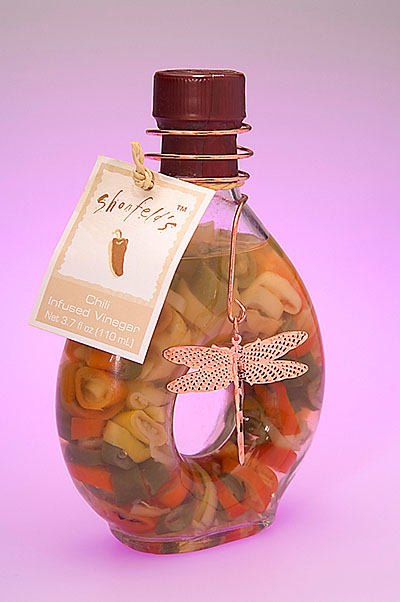
In the ‘mauve’ bottle example, a deep purple gel is fitted to the backlight, and its power increased to 75Ws, while a white reflector panel (see set-up shot, top) is positioned to alter the rendering of the butterfly. You can not ‘light’ reflective objects with a direct source; instead, you should light a white reflector or use another softbox. The butterfly would not show without the use of the large white polystyrene ceiling tile as a reflector. The large softbox dilutes the background light colour, which is why a strong gel must be used on the backlight.
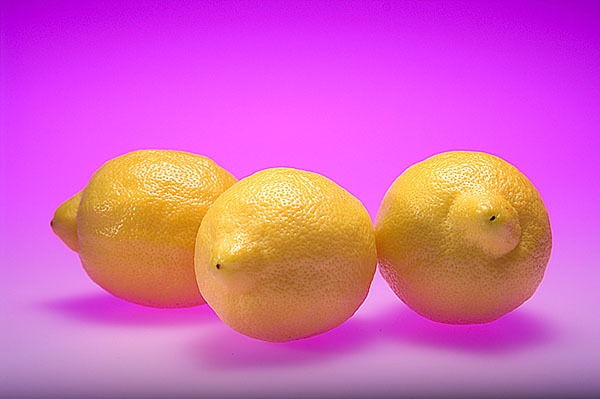
To make the rather vile and tasteless lemon example above, the top light was changed to a 44cm rigid softbox with honeycomb, angled back to keep the white light off the opal sheet behind the fruit. A highly focused optical spot skims across low down to prevent the underside of the lemons going orange, except for a small rim. Note that the shadows are now the backlight colour.
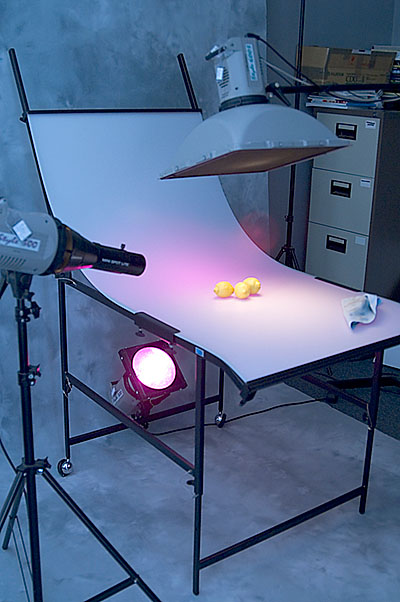
These examples took literally a few minutes. Studio still life table work is profitable, efficient and easily added to a social studio without eating workspace. Our studio here is a room only 10 x 12 feet but there is plenty of space for the 9ft wide Lastolite canvas roll you can see on the floor and behind the table. Note the lint-free cloth lying on the table; it’s essential to keep dust and spots away all the time.
The lemons shot is again on Dynax 7D, which does a great job with over-the-top yellows (not many DSLRs are good with yellows). You can also use the tungsten modelling lights of your flash heads, when you have a system such as the Elinchrom kit used here (Style 300 x2 heads, Style 600S x1 head). One disadvantage of such set-ups with professional studio flash is that even at minimum power, the heads are so close that exposures are around f/11 to f/22.
My Dynax 7D has Memory 1 (the 1 position on the top right-hand control dial) programmed for 1/160th second, f/14, ISO 100, Daylight White balance, Manual exposure. This is a great feature of the camera. To shoot in the studio with the table, I just turn the dial to 1 and the memory function sets me up instantly for a typical product shot. Update: I’m still using the same basic settings on Memory 1 slot of the Alpha 900 in 2012.
Here, for once deviating from the Alpha system, are two examples produced to show how you can use flash and tungsten. The camera used is the Fuji S3, fitted with the Sigma EX DG 150mm f/2.8 Macro 1:1 lens. This is a superb lens. The S3 was not so ideal in the studio, as these images required extensive dust-spot cleaning. The 7D white background shots I take of all my product shots never need cleaning, as the sensor is clean, and 7Ds just don’t pick up dust the way some cameras seem to.

The Fuji also could not be turned down to ISO 100, and the smallest possible aperture was f/22. Results were acceptable but f/22 is hardly ever truly sharp, due to diffraction effects. Ideally, it should be possible to use moderate apertures like f/8 for any studio product where depth of field is not needed. My purpose here was to contrast an f/22 shot with the very fast full aperture of the Sigma lens, and to do this, a tripod exposure with tungsten modelling lighting and no flash was used.

There is a little added warmth. I feel that the wide aperture creates a shot more in line with today’s visual aesthetic – we are increasingly used to seeing very shallow zones of focus. Minimal depth of field is very popular in product, food, jewellery and other fields. If you work commercially, make a comparative pair of images like this, to show to clients. Or just shoot the job two ways!
The Tre-D 75 x 150cm studio light table as shown, with adjustable height legs, adjustable tilt scoop and rear castor wheels for moving costs under £300 including VAT and delivery in the UK from Studio Lighting Services Ltd. A smaller version is made for £88+VAT and delivery, 50 x 90cm. There are many alternatives now including Kenro, Hama, Jobo and small table-top mountable versions which work with wireless or other battery powered flash are sold for shooting eBay items. You can still make your own but Dexion seems to have become impossible to find now. There’s no reason why good plain carpentry should not create a workable studio table at minimal cost!
Light table work is not as straightforward is this article may imply. Some products require supporting free of the illuminated surface, and may need boxing in with black ‘flags’ to reduce reflections. Black panels, as well as white reflectors, create the shaping present in difficult objects like perfume and drinks bottles. For 95 per cent of the small items I shoot to illustrate articles on photography, direct work on the plain white table with one softbox overhead and two underlights (one front as well as one rear) create exactly the grading and plain fields I need.
The professional angle
As for the value of a light table – when I started in commercial studio photography in 1979 (Lister Kilpatrick Associates, in partnership with Steve Lister) our price for a single product packshot was around £50 ($100) for a rollfilm E6 transparency shot on a monorail 5 x 4 with RF back. My house was worth £23,500 when I sold it to buy a large propery and create my own studio. That same house is today worth over £300,00 – about twelve to fifteen times as much, allowing for improvements.
The price you can expect to get these days for single product shots on a white background is about £25 ($50) for a digital capture 6 megapixels or up. In bulk, it can reduce to as low as £10 ($20). Times have changed! In the world of 1979, a couple of packshots had the same value as one week’s staff wages. Some days we would shoot 30 or more. One job we had was to photograph every single type of brick made by a brickworks. It took longer to change the film than change the bricks…
In the late 1990s, with the new RD3000 kit in place, we were approached to quote for routine capture of all ColourBox gift items (these were little ceramic bears of the type commonly known as ‘collectible’). The rate on offer was a mere £2 per website shot – we didn’t even consider it. That was matching the company’s existing deal elsewhere. ColourBox went into liquidation. They were clearly spending too much on their photography.
Even with today’s fatally eroded work rates for routine commercial photography, a light table can boost productivity to dozens or even hundreds of shots a day. The entire shooting process for something like my Lensbaby 3G review took less than 15 minutes including careful visual arrangement of the aperture discs using a straight-edge, and air-puffer cleaning of the items once positioned. No retouching of any kind was needed on any of the shots and only a single .MRW raw file was taken on the Dynax 7D for each one. If you can photograph 100 items in a working day at £10 or even £5 a capture, it’s as good an overall rate as many bylined photographers working on national magazine and newspaper supplement commissions make.
The real problem today is that the ‘white background cut out’ shot is so universal that its simplicity and speed has undermined the value of images which take half a day to set up. By our 1979 standards, when a typical day’s still life work might result in two or three variants of a commissioned product shot and bill out around £500, a competent regionally based GP-commercial studio should be able to bill out the same at £5,000-7,500. Since it just ain’t gonna happen, the simple studio table shot is about all today’s typical client can expect.
– David Kilpatrick FBIPP AMPA (since this is about an aspect of professional photography, for once you might as well have my professional quals after the name!)
-
The Lensbaby 3G creative zonal focus tilt-swing lens
- Manual control and quirky design 50mm F2 to 22 tilt/swing lens
- Basic optics on synthetic bellows, glass lens
- Typically available used for £70 to £120
One of the digital photography creative tools that made a splash in the early 2000s, the Lensbaby is a novelty item you can find for very little outlay. A low-cost meniscus lens mounted on a flexible concertina tube with an SLR mount-fitting at the other end, it’s a similar theory to the Diana or Holga cameras sometimes used by professionals to capture a feel of post-modern grunge, it used aberrations creatively.
The third-generation Lensbaby 3G – not to be confused with contemporary mobile phones – launched in 2006, following a second-generation move to glass optics in the original design. Lensbaby 3G provides more sophistication, with controllable focus, tilt or swing that holds position, and screw-thread fine-focus refinement. In 2008 it was updated as the Lensbaby Control Freak.
The Lensbaby 3G and Control Freak cost rather more second hand than the early plastic models, but in good condition has a lot to offer for photographers looking for a funky, retro effect and a hands-on ritual for creating an image. The nearest modern equivalent is the Lensbaby Composer 2, which is around £350 with optics (beware cheap listings without glass).
We reviewed the Lensbaby 3G in 2007 – and have revised the review to keep it relevant for used lens buyers.
Lensbaby 3G (2007) specifications
- 50mm coated achromatic glass doublet
- Three-post tilt/swing and focus from under 30cm to beyond infinity plus fine focus thread
- Waterhouse Stops: f/2 (no disc), f/2.8, f/4, f/5.6, f/8, f/11, f/16, f/22.
- Size: 76mm h x 90mm w
- Filter Thread 37mm (undocumented).
- Weight 161.59g
Lensbaby 3G Compatible mounts (in 2008)
- Canon EF (EOS)
- Nikon F
- Minolta-Sony A
- Pentax K
- 4/3rds system
- Leica R
Automatic exposure is possible in aperture priority mode for most digital and film SLR camera bodies; a fixed correction may be needed. Some Nikon models allow manual exposure only.
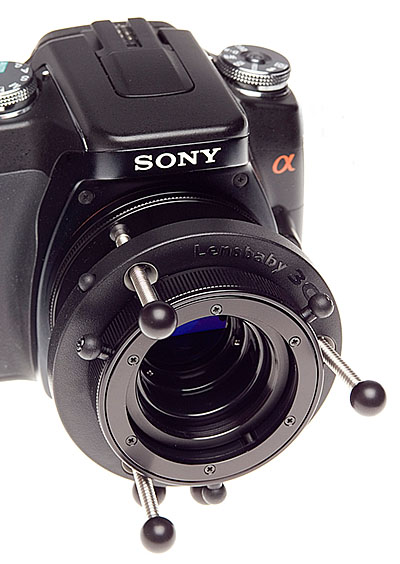
Since then it has gone through two revisions, increasing in price and complexity as well as quality. The third generation uses a low dispersion multi-coated glass achromatic doublet lens, introduced with Lensbaby 2, but adds precision control of three points of tilt and swing on threaded posts plus a fine-focus stage in a helical thread.
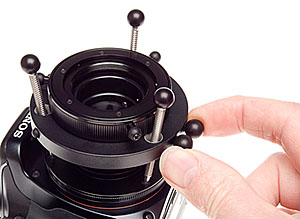
The clever part is the unlock and lock system which grabs all three screw-gear posts simultaneously. Just squeeze the Baby’s balls together, and it releases grip instantly allowing:
Fingertip adjustment if the camera is being held in both hands (use two fingertips either side to rock the lens angle and press it back for focus).
More control with finger and thumb. This is your start point, rough setting, of both focus and skew. It helps to be looking through the finder when doing this.
Lightly depress a small button located perfectly for your shutter finger, and the setting is locked. You can usually bring another finger over to do this while two are holding the lens position. It’s rather like playing the ocarina, but not many people play ocarina these days.
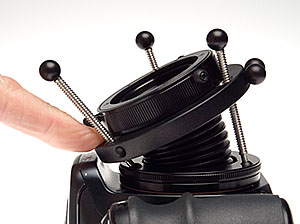
Then, fine tune the skew with the three screw posts (with black ball knobs on their ends).
Finally, hone the focus using the focus collar which has three lugs to make handling easier.
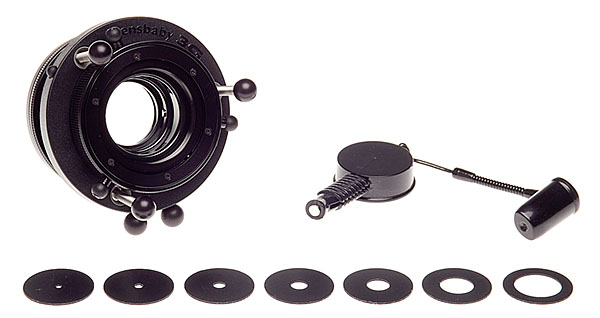
The aperture system is unusual. Small magnetic plastic rings drop into the lens front, and are held firmly by a set of three spring-loaded ball bearings which the ring pops behind. To remove or insert the ring, a probe with a magnetic tip is supplied. It works perfectly. This probe has a small tub on its other end, neatly re-purposing a Kodak film can lid as its cap, to hold the unused aperture discs. It also has a pen-top cap for the probe end to prevent its very limited magnetic field getting anywhere near sensitive components.
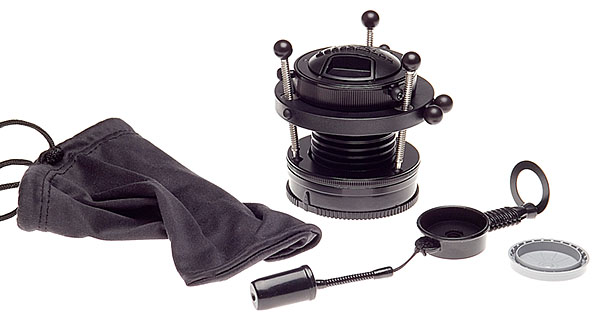
It comes with a good quality rear mount cap properly labelled for the Lensbaby but custom made for M-AF/KM/Alpha, and a good clip-in front lens cap, and a soft pouch. Great to see an independent maker offering full support for the Alpha system with such an unusual product, rather than ignoring the minority and only going for the lowest common denominator brands!
The maximum effects of the Lensbaby 3G are obtained on full frame cameras, but we tested it on an APS-C format using the Sony Alpha 100. It is also sold for 4/3rds format, which will be even more challenging. Some camera systems use a near-60mm lens type, but Alpha uses a 50mm version, which is better all-round. Maybe one day I’ll be able to follow up with a test on the full frame Alpha…

The outer zone of the image field has the most aberration, distortion and vignetting to exploit for effect and much of this is lost in theory on the small digital format. Enough remains within the 15.8 x 23.6mm sensor view (above) to be exploited, generally using wider apertures – full aperture of f/2 was used for the existing light snapshot above which makes a shopping mall and chainstore anonymous though our shoppers remain sharp.
Here the Lensbaby shows a weakness, which can only be solved easily by taping some ND gel filter to a wide aperture, or obtaining an ND4, 8 or 16 filter to fit the (undocumented) 37mm filter thread. Studio flash shots at f/11 or f/16 – pretty much what my 300/300/600 Elinchrom rig demands at minimum power for small still life – show almost no typical Lensbaby effects and can actually come out sharper than many premium grade prime or zoom lenses, even at full bore!
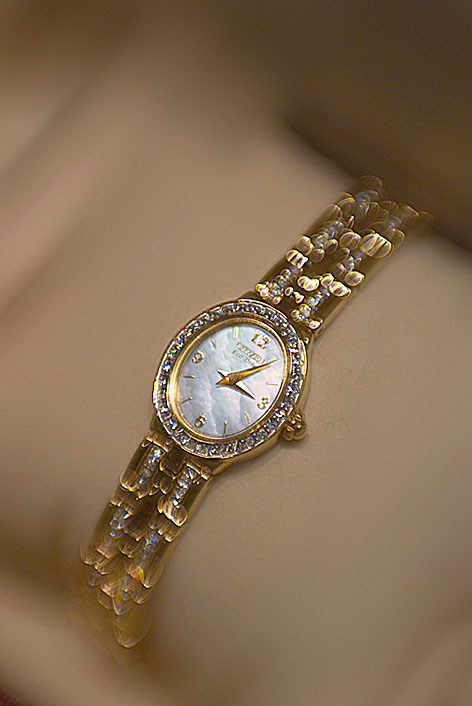
You must work at f/2 to f/4 for maximum visible special effects. Even this is at f/2 – wide open. How about sharpness, shooting through a jewellery shop cabinet at such a wide aperture, hand held, visually focused on the Sony Alpha standard focusing screen? Here’s a 100 per cent section of the shot above:
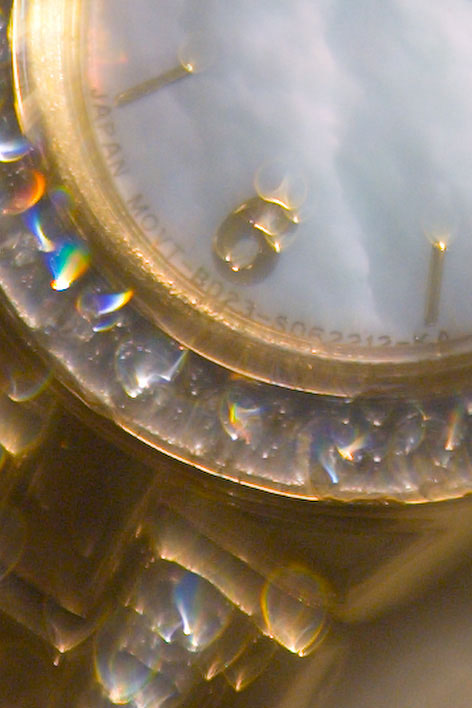
As you can see, there are complex and attractive effects from the aberrations and the tilt/swing, but the core image as shown by the lettering on this tiny ladies’ watch is pin-sharp under the mushy glow.
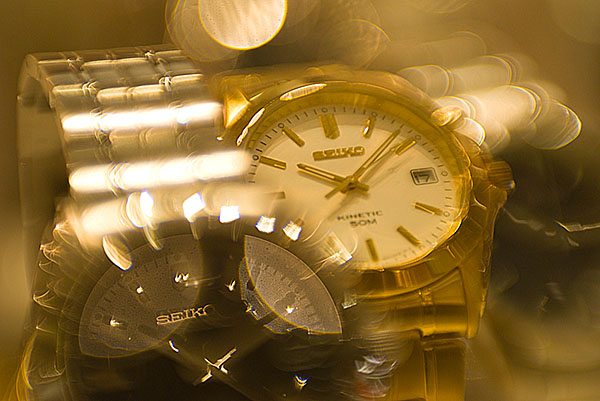
Here’s another example from the same set of quick snaps. This can blow up to 20 x 16″ and still look great. You can get soft focus using Photoshop but you just can’t get the complex blend of optical effects present in this shot.
Lensbaby glass lens performance
At f/5.6, the lens begins to appear rather sharp across its entire field. From f/8 to f/22, you can actually use it as a good quality tilt-swing lens with a fixed degree of rise, cross or fall (it’s all one action). Instead of narrow planes of sharp focus intersecting an image unexpectedly you can get traditional large format style focus in depth. Just set the shot up wider open (the f/2.8 aperture is better for focusing than completely naked f/2), insert the f/11 of f/16 aperture disc, and you’ll be very surprised by the sharpness and lack of chromatic fringes. With digital SLRs you lose some sharpness at apertures smaller than f/11 because of diffraction.
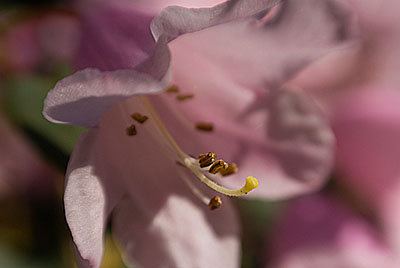
This is not why Lensbaby 3G is bought. Most users will take it into the wide world, using it for fashion, stock, still life or architectural interpretations. They will work with f/2, f/2.8 or f/4 and tilt the lens plane to create a vortex of sharpness with dramatic blur streaming out from it. Atf/4 the shot above uses the lens swung to put the plane of focus through the stamen tips and the petal edge, and blur the further part of the flower more.
Achieving sharp focus with Lensbaby 3G
The instructions for Lensbaby remind you to be very careful with your digital SLR’s dioptric viewfinder correction. They do not tell you why. Most DSLRs are poor for manual focusing as they don’t have old-style ground-glass screens, they have extra bright versions which are nearly transparent.
This makes it possible for the eye, if misfocused by the eyepiece, to see unfocused images as sharp. It may be worth getting a matt screen when someone like Haoda makes a plain one. Focusing the Lensbaby with the split-image/microprism Haoda screen is not so easy.
There is a secondary effect of this which Lensbaby do not mention; these screens don’t give an accurate preview of depth of field. This applies to nearly all modern SLRs. You will see more depth of field than you actually get. The results from Lensbaby may surprise you by appearing more extreme in the final image than you set up for, so it is best to make tests before using the lens on a non-repeatable commission.
It’s worth doing some imaginary assignments. For example, a shot for an illuminated sign supplier. They would want their sign sharp, but want the creative focus of the Lensbaby 3G to obscure the location.
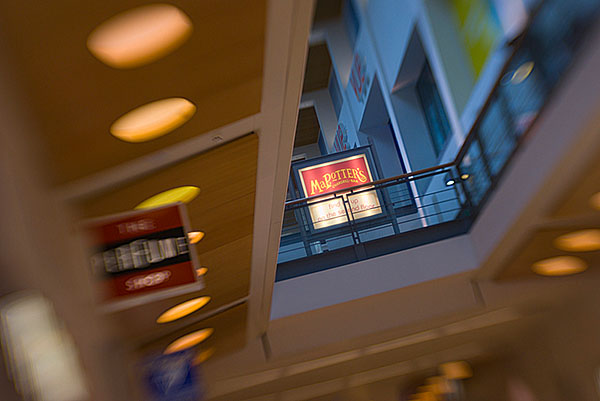
An imaginary assignment: capture a shop’s sign in a shopping centre Full f/2 aperture might be right for the effect, but at 100% magnification it’s clear that a small focusing error has made the sign a little less sharp than the detail in the background. You would, if you did some tests like this, decide that with Lensbaby it’s necessary to take many different shots, tweaking the focus or the swing/tilt screws a tiny amount, maybe fitting different apertures.
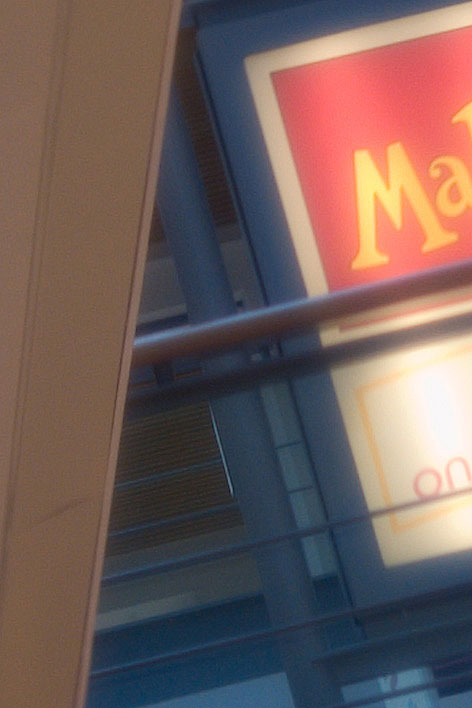
A 100% crop of the sign in the overall shot shows the Lensbaby 3G on 2007 tech was hard to focus accurately – modern systems offer sharper screens and magnification. You just can’t rely on a single shot with visual focus preview via a DSLR focus screen. This is at 100 per cent, equal to an A2 print at screen resolution, but that’s how picture get examined these days.
Should it be used for weddings or portraits? Difficult question. Unlike Photoshop effects applied later on, Lensbaby blur is indelibly written into your capture. What is needed for the future is a Lensbaby Plug-In or filter suite for Photoshop which copies the results from this £175+VAT specialised optic for jobs where you just can not afford to sacrifice the original shot to pure effect.
As for value for money, my initial thought was that it was too expensive – you can get a complex zoom for the same. Then I remembered the old Rodenstock Imagon. Really, it was not so very different optically and you paid £600 when £600 was real money for this with a focusing tube and few aperture discs.
Lensbaby 3G creative apertures
Now why Lensbaby currently only supplies plain aperture discs with the lens I have no idea, as for a very small outlay you get a kit of creative aperture shapes such as star and heart or slot, and cut-your-own blanks – a mere $9.95 kit, trivial compared with the cost of the lens which is more than many popular wide range zooms.
Imagon-style perforated, patterned aperture discs would make it wonderful for soft focus portraits and zany shaped apertures – like f/11 hearts, stars, slits, asterisks, triangles and so on – could create brilliant bokeh effects. Of course you can make your own from black paper but it’s not magnetic, and you would have real trouble drilling the multiple holes for a classic soft-focus lens diaphragm. A leather punch can be used with the magnetic material blanks.


Two examples using the star-Creative Aperture (added Dec 2008 revision) They could also make a pinhole aperture and some high definition f/11-f/22 apertures with precision foil edges to the hole, reducing the diffraction issue. The existing apertures are not very precisely cut and the material is very thick by iris diaphragm or Waterhouse stop standards.
So, Lensbaby 3G has plenty of potential for add-on accessory modules or DIY custom apertures. Overall, the clever functionality of the mount makes it worth the money. For further UK regional information, visit www.intro2020.co.uk. For international information, see Lensbabies.com
Update: new LensBaby models (Control Freak, Muse and Composer) have been introduced in December 2008. They have interchangeable lens units, offering a choice of plastic or glass optics, and refined designs. Wide, tele and close up adaptors are also available. The Control Freak is the new 3G update.
– David Kilpatrick
All photographs © David Kilpatrick/Icon Publications Ltd may not be reproduced or copied without express permission. Studio photographs taken on Konica Minolta 7D with 28-105mm Sigma HS UC III zoom, Elinchrom flash, and Tre-D light table. Even at the lowest power on the two 300 and one 600 Ws heads the aperture was f/14. This is also the set-up I use for stock image table top objects. Lensbaby could only reasonably be used with a tripod and the modelling lights as the source.
-
Flash choices for the Alpha DSLRs
TESTING the flash options most widely sold for the Minolta/Sony unique hot shoe system became a necessity after the launch of the Alpha 100. Despite the reliability of automatic TTL off-the-film flash metering ever since Minolta first introduced it with the Auto Electroflash PX series in 1981, things began to go wrong with the shift to digital SLRs. (more…)
-
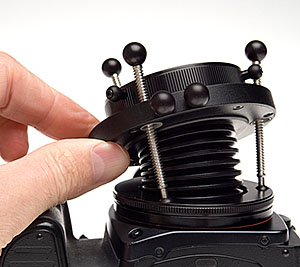
The Haoda split-image/microprism screen
HAODA FU has been supplying alternative focusing screens for the 5D and A100 since 2006 and for many other makes before this. While the Alpha system DSLRs are not intended to have user-changeable screens, it is relatively easy and risk-free.
The worst that is likely to happen is that you end up with dust on a screen and find this distracting. Minolta AF SLRs had interchangeable focusing screens from the start with the 7000 and 9000. The screeens, like this Type S for the 9000 with crossed graticle markings, came in a rigid plastic case complete with a pair of screen changing tongs. The case has a slot into which the screens can be placed, vertically, during changing.

The Haoda screens, being the much smaller digital size, come in a small dust sleeve packed in a memory card case, which happens to be the perfect size. Unlike the 5D/A100 screen, a Haoda screen does not have a tab on the side to aid removal, nor does it have any position locating pins. It is a plain rectangle. I have not photographed the screen on its own as it really doesn’t lend itself to a useful image!
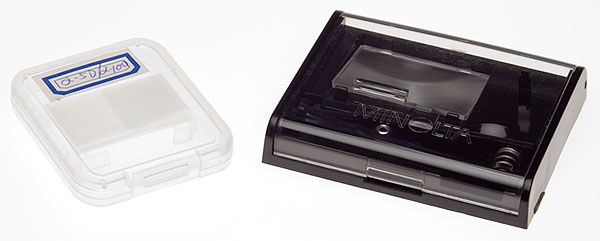
You can see here the screen as it arrives, labelled for Alpha 5D or Alpha 100, next to my 1986 screen kit for the original AF cameras. In order to change the screen, you need a well lit, dust free, uncluttered table like my studio light table.
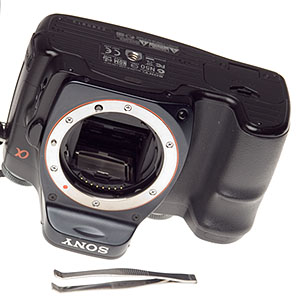
Suggestions that you use fabric or carpet to place cameras on are a bit ill-advised unless you have a freshly unpacked or washed large microfibre cleaning cloth to use.
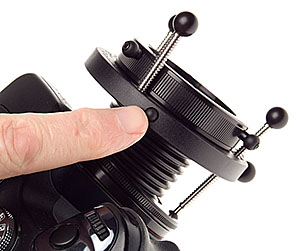
The camera should be placed upside down – not on its back, but resting on the prism/flash shoe area, so the screen is facing upwards. Remove the lens.
Unlike CCD cleaning, you do not need to lift the mirror or power the camera up at all.
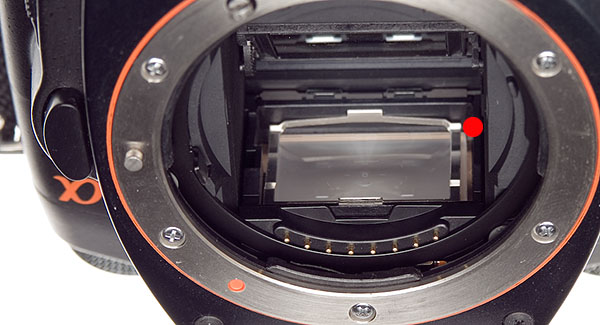
Here is a view of the A100 with its own screen fitted. Look carefully at the area near the red dot. You will see that the bright metal clip holding the screen has more space on this side (the S of the Sony prism logo side).
Some screen is visible sticking out beyond this, and then there is some space. This is how the original Alpha screen, which has one small locating pin, seats. Since the Haoda screen is plain, with no lugs or pins, it can move from side to side within whatever free space remains.
It is not symmetrical, and the microprism/split-image central focus aid will only be in the right position if you get the screen in the correct way round. Compare it with the original screen, and you will quickly see which way it goes in.
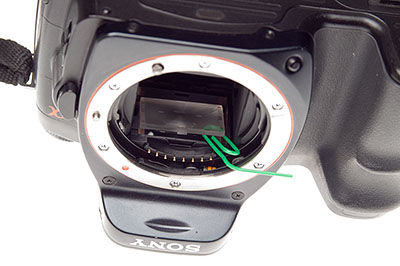
To remove the original screen, it is easy to unclip the metal spring frame from the front. Just push the metal tab visible in the shot above inwards a little and easy it upwards. I found that a fingernail works fine but my small forceps with a bent end (from a craft shop) could have been used.
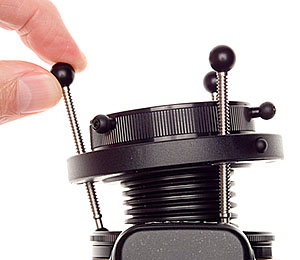
With the camera in this position, you can withdraw the metal clip without disturbing the screen itself. At the front of the screen there is actually a small tab which can be grasped with tweezers, but you can’t see this, it is hidden below the clip’s front catch.
To ease the screen up, a plastic coated paper-clip is ideal. It is smooth, and the rounded end is used to flip the screen up from the gap at the end seen in the earlier shot, so it rests slightly out of the well. Then the clip can be used to support the screen as shown below, allowing you to grab the tiny lug with tweezers or very fine pliers.
Once the screen is out, just hold it by the sides with clean fingers. The focusing area is slightly inset all round, so any risk of oil or moisture getting far enough on to the surface to be seen is minimal. I do not recommend wearing gloves, you need to be able to feel the tiny, lightweight object easily.
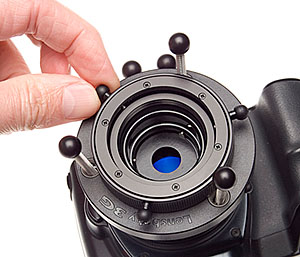
Once the screen is out, popping in the Haoda replacement is easier. There is a brass shim frame under the screen, and below that a clear LED display relay screen. These should not be disturbed.
Just slide the Haoda screen from its dust wrapping, and holding it by the ends with the SHINY SIDE UP pop it into the camera and let gravity do the rest. If necessary, nudge it into place with the plastic-covered paperclip tool.
On older SLRs, the groundglass faced the lens and a condensor was positioned above this, sometimes moulded on to it. The focusing image fell directly on the ground surface. On newer models (late 1970s on) a fresnel condensor was sometimes moulded on the surface facing the lens, and the ground glass surface is on the other side of the screen – facing the prism/eyepiece.
With the A100, the original screen has a slight condensor moulding rather than fresnel and you can see the gentle curve of the shiny side. The Haoda either has no condensor moulding, or so little than the shiny side looks flat. Even so, the shiny side faces the lens/mirror and the working side of the screen goes DOWN as you pop it in the camera.
It will not be centered first time. Put the retaining clip back in, carefully inserting its smaller rear tab into the slot visible at the back of the focusing screen well. Do not clip in it fimrly.
Now, lift the camera STILL UPSIDE DOWN to your eye and look through the finder (no lens needs to be fitted, just have some light available). You will see the Haoda split-image and prism annulus in the middle, and it probably does not line up at all with the focus aids of the LED-screen which has remained in the camera, and provides the markings you see all the time.
Tilt the camera slightly left or right side down a degree, and gently tap the camera body at the other end, so the new screen can slide in its over-long well. You will see the Haoda focus aids move. It took me two minutes to get mine perfectly aligned with the focus marks, both vertically and horizontally. There is no need to put up with a wildly off-centre mismatch.
Taking care not to shake the camera and move the screen, push the retaining clip down at the front, to put the screen under the normal spring pressure which will now hold it in place. In practice, although the pressure is very slight, the screen does not shift around.
Despite great care you will probably have some tiny dust present on the microprism (its facets hold dust well) and this will show up with slower lenses. It will disappear with fast lenses. My installation was pretty clean, and I know from long experience with screens that chasing a single dust speck or fibre wriggle can lead to introducing even more and ruining your screen. The less you handle it on installation, the better.
In use, the Haoda focusing aid is much bigger relative to the DSLR APS-C/DX format than it would be for a full frame, leading me to guess that the screen is cut down from one made for conventional SLRs. However, when centered up by my ‘tapping the camera’ method the focus circles neatly fit some of the AF aids. I think it’s important to get the new screen as well centered as possible, or you will be unhappy with the installation.
When the image is totally out of focus, the microprism breaks up dramatically:
You can also see that the split image, which is horizontal rather than the Minolta originated 45 degree angle (first appearance in the SRT-303b), shows clearly that the subject is not in focus while also showing a sharper view due to the clear lightpath through the two angled faces of this aid.
The microprism consists of a grid of miniature split image aids, alternating facets set at opposed angles.
Bringing the image into focus, as long as your finder eyepiece dioptric correction is correctly set and you have good eyesight, the microprism mosaic pattern will gradually lessen and turn to a watery shimmer, easily detected by moving the camera a little.
If you have poor eyesight, the split image focus aid provides a better tool. You will still see a slight step in any suitable target line or edge. It’s finding the target which is harder, especially for portraiture. You still have full AF of course, fitting this screen does not switch off or change your autofocus! It does enable better confirmation that the AF has locked on to the right subject.
This setting above would be typical of an AF error – I have actually focused on the wall behind the instrument. A viewfinder focus magnifier can useful. The Sony right-angle finder FDAA1AM for Sony or Minolta incorporates a 2.5X magnification, there is a cheaper copy of the original Minolta Vn finder now made by Seagull in China, and a fixed 2X straight ‘tube’ accessory can be found on the used market. Here’s a magnified view:
In case you are wondering how an earth I got live pictures through an A100 finder, I did not use my Zigview and capture video! They are actually taken using the Loreo 35mm f/11 ‘PC Lens in a Cap’, a tiny simple lens with fixed infinity focus which can be placed close enough the finder eyepiece to get a good view.
Focusing is adjusted using the finder dioptre wheel. These images are hand-held, as mounting the camera together and adjusting the exact position of the Dynax 5D used to take these shots proved extremely difficult. AS solved the problems of shake at 1/13th (ISO 400) well enough to get decent views of what you actually see on the Haoda screen.
The screen shots occupied less than half the full frame.
Here is the focused image, with the microprism now totally clear (no shimmer) and the split image lined up:
To test the Haoda screen, I used my 50mm f/1.4 original series Minolta AF lens. This lens, over 20 years old, is extremely sharp from f/2 downwards though it shows a dramatic glowing flare at f/1.4 with a sharp image core. Optimum apertures are around f/2.8 to f/5.6, with a slight loss at f/8, and more marked diffraction loss at f/11 and f/16.
In the past I have found focusing with this lens to be unreliable using AF, and the standard screen gives a very poor indication of depth of field through the viewfinder.
The Haoda screen, you will notice, darkens much more in the outer field. With a lens like the CZ 16-80mm or the KM 11-18mm the groundglass field is dark, and with superzooms which run to f/6.3 at the tele end, you will not appreciate the dim view. With a 28-75mm f/2.8, 28mm f/2, 100 or 50mm macro lenses, 100mm f/2.8 SF and of course the 70-200mm SSM f/2.8 the Haoda is fine.
The benefit of this more ‘interceptive’ groundglass is much more accurate previewing of depth of field. You actually see what you will get, instead of a much sharper impression of focus in depth. This is a complex issue which I can’t go into here, but modern focusing screens from the Minolta ‘Acute Matte’ onwards do not relay accurate visual information about depth of field. You will have noticed that the clear area of the split image shows the subject apparently sharp even when the lens is well out of focus. Modern screens, designed for extra light with today’s tiny viewfinder prisms and slow zoom lenses, are midway between clear and groundglass. Haoda’s screen is still a modern type, but it’s not as deceptive – or bright – as the standard Minolta/Sony screen, and it’s much more like the Minolta Type M matt screen which was offered as a service-fitted alternative for the Dynax 7D.
Out and about, I used my 50mm f/1.4 with more confidence. Here’s the very first ‘focus test’ target I found:
It’s taken at a sensible 1/200th, f/2.8 – exactly the kind of aperture where a back focus error would often take the edge off shots with this great vintage lens. I used DMF (Direct Manual Focus) and fine-tuned the focus using the microprism for this subject, and here’s a section of the shot at 100 per cent:
Clearly, the Haoda screen is agreeing with the manual focus and sensor position well enough. I did some further tests of very difficult subjects with several lenses and conclude that there is a very slight difference – focusing with the Haoda leads to a very minimal back focus, less than often encountered with AF. However, infinity is true, and by using manual focus you quickly learn how to target different subjects to place the focus correctly. You also learn how tiny depth of field can be at apertures like f/2.8 or even f/4.5 with a focal length like 50mm.
In theory an additional copper shim would correct the error, placed before inserting the screen. Since I have no spare shims and there is no source for them, this is strictly theory. I do not feel it would be safe to make one using Cinéfoil (a Roscolabs product sometime used to shim larger format screens) and the error is so slight it does not concern me much.
It is now time to take the A100 with its newly fitted screen out into the world and find out whether the edge darkening, the large distracting focusing aid and the overall metering response work out well. My first shots indicate that the Haoda screen meters much like the standard, but that large clear area of microprism and split image is not part of the A100’s matrix metering program, and I can see some unwanted metering errors occurring. To identify these will take time. My first walkround with more challenging subjects indicated that setting a minus factor – between -0.7 and -1.3 stops – may be necessary in high contrast, sunny conditions when using matrix metering on the A100.
In some ways, having good eyesight and not needing aids like split image or microprism, I would prefer a plain groundglass with grid lines as an aftermarket screen for the A100. I miss the Type L grid lined screens I always used to install in my film SLRs, and the grid display of my Konica Minolta A2 electronic finder. I like the Nikon models like the D80 where a grid can be displayed at choice.
Only you will know whether you need a screen like the Haoda combined split image and microprism and whether you are willing to undertake the camera gynaecology (or should that be proctology?) to change it.
For more details visit Haoda Fu’s website and ordering page. I shall be reviewing some of Haoda’s other products here as well. My Haoda order was paid for by credit card; email contact was personal and excellent; the package arrived within a few days to the UK.
There was no documentation enclosed and instructions for the 5D/A100 are not found on his website (there is one downloadable PDF for a Canon model which can be found, and this mentions discarding their copper shim; I do not suggest this is done with 5D/A100 installation).
– David Kilpatrick
-
Shaken… and slightly stirred
I CARRY a camera everywhere, because you never know when a good photograph is round the corner. I also just grab the camera from my office, and rarely think to check the settings. Today, I managed to shoot everything with Super Steady Shot (Anti-Shake) carefully switched off on my Alpha 100.
In the studio, or when making tests, I may switch SSS off. It’s not needed or desirable with tripod shots, or flash. In fact it can spoil tripod shots by reacting incorrectly to reflected vibrations. Now I have been reminded that I should switch it back on the moment the tripod or flash shoot is finished. That’s what I mean by slightly stirred. Memory stirred. Or intentions. Whether I will remember and intend is another matter.
I only photographed three situations when spending a couple of hours in Edinburgh. I parked near the mosque, which happens to be surrounded by good cafés and close to a music shop I wanted to visit. Ten minutes waiting for good sun on the mosque itself failed me, but in walking on my route I passed a university building with carefully preserved old signs:

This is not a ‘good’ photograph but like many I take, it may have a value to someone writing about architecture, history, or conservation. I’ll revisit it on a better day. It was taken at 16mm on the CZ 16-80mm, carefully focusing at 35mm before zooming back to 16mm, as the lens never focuses accurately at the extreme wide end on the A100. The exposure was a very safe 1/100th at f/10. Even so, the image is not as sharp as I have come to expect from routine hand-held shooting with SSS enabled.
In a café for a quick lunch, the scene in front of me struck me as pretty good with one internet wifi connection user concentrating on his laptop. A longish first exposure reminded me to switch to ISO 400, but I didn’t check the SSS switch. Nor did I manage to focus any of four different shots as intended. The AF despite being set for centre focus tended to hit the background scene. The CZ, despite being the best lens around optically, is not making friends with me right now.
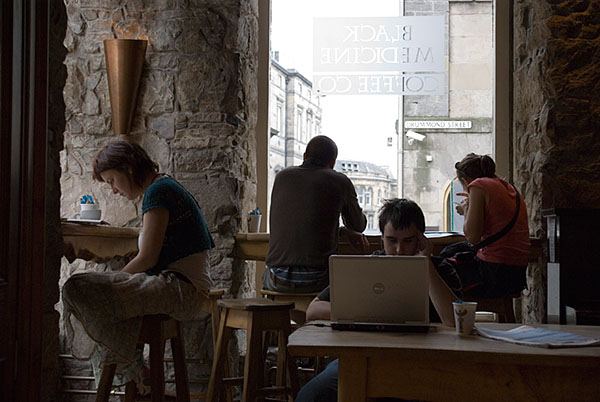
While the lighting is natural, it’s not what I needed for an internet café scene which might find a use in my markets – serious newspapers, magazines, and books or websites wanting natural-looking real life shots. The Black Medicine Coffee Co offers entirely free wifi, and I guess a return visit from time to time might produce a better image. I am happy with the compositional flow, the relative positions of the heads (the elements to which the eye is drawn) but it’s not the best shot, just the best focus.
However, on departing I visited the subterranean loo (Edinburgh basements generally provide loo space) and passed a truly classic composition, partly created by the café’s own decor and lighting, and partly by a perfectly poised Mac Powerbook user with a glowing Apple symbol and a scatter of still-life elements in best Dutch school arrangement!
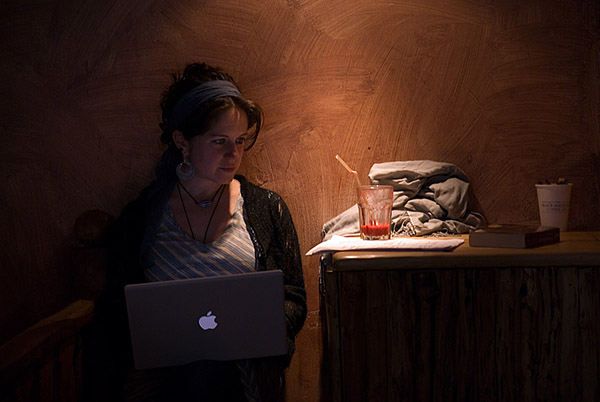
While I will shoot a group of people without asking, I won’t aim my lens at a single individual without the courtesy of asking permission. There was no problem apart from folk milling about between my lens and my sitter, who was asked just to keep working and not worry about the camera. But, aware that I should work quickly and not take endless pix, I once again failed to spot the SSS was turned off. The exposure was running at around 1/25th wide open, at the long end of the lens. In Leica or Minolta CLE days I would not have thought twice, I could hand-hold this, but I would have taken great care. Breathe in, calm the body’s natural sway, squeeze the shutter smoothly. SSS has made me careless. Also, the small viewfinder of modern DSLRs has made me less aware of focus. For reasons everyone will know, the central focus locked on to the wall, not my subject. I thought I had locked and recomposed, but perhaps the lens made a final tweak and revised my setting. At f/4.5, this was enough to take the edge off the shot. Like it or not, there was shake. All three frames I shot showed shake, one so badly it was not usable. The chosen shot here was on the verge of being unusable when enlarged to A3+ picture library dimensions:

This gives a very unfair view of the shot, since it is enlarged to 17.5 megapixels, and when output to a size suitable for a 6 x 4 inch print it’s as sharp as you could want. We used to try to judge images from 6 x 4 prints. Now, we really can see that bit of directional shake and that focus error. Even so, with the softness and slight ISO 400 noise, it has a painterly look and will go in the library.
But can anything better be done?
Photoshop provides an answer. One of the very oldest Artistic Effect filters, Watercolour Paint, is a favourite of mine for prints on watercolour type paper from images which are small, or have focus errors, or noise. It quantises the image into blobby posterized zones with ragged bleed edges and a random overlap. Applied to a shot like this, it also creates perfectly sharp edges to the face and hair, while brightening the eye-whites and the Apple logo. The overall image processed through the Watercolour Paint filter (settings 9, 1, 0) loses any of the distracting imbalance between the sharper painted wall and the portrait element. It also looks uncannily like many of the real art prints on show just over the road from the café! Slightly Vettriano in feel, with solid blacks and simple outlines. Here is a section, after watercolour processing:

If you click the photo, you will open a full sized clip (at the size suitable for A3 to A2 printing on watercolour paper). The artificial edges created by the watercolour filter are most effective, and it handles the colour in skin tones well despite producing a dense black for the hair and charcoal shades for the shoulder wrap.
Obviously there are very few images where this is appropriate treatment, and it is an off-the shelf filter, which makes it not really your own creative work. There are some other options – programs like Painter, and sets of special effect filters – but the same can be said of these as well. In the end, if the process applied to an image makes it serve its purpose better or enhances it visually, reasonable productivity dictates that it’s OK to use ready made shortcuts.
And one shortcut I must remember not to take is to grab the camera without checking every single setting – including the SSS switch. It is just too easy to shoot all day with it off. In my experience SSS will sharpen up many shots at normal shutter speeds, let alone those at hard to handhold settings. I didn’t lose my shot, but it could have been better.
As a footnote, in sending my subject a copy of her portrait, I realised we had spoken before (Edinburgh is a very small place) – at a Friends of the Earth Scotland booth during one of the many green festivals or events which happen in the city.
– David