Lightroom 2 tackles all Alpha RAWs
The latest release of Adobe Lightroom, v2, handles all Sony Alpha and earlier KM digital camera raw formats including the Alpha 700, 200, 300 and 350. It is also updated, along with the final release of Adobe Camera Raw 4.5, to handle Nikon D700. Because Canon appears to have left their filetype identical to the A400, their new 1000D was recognised immediately by ACR even in 4.5 beta version.
Lightroom 2 costs £69+VAT ($99 US) as an upgrade to Lightroom 1.4.1 (the final version of v1), but it does not upgrade the program. Instead it installs as an additional v2 package. If you opt for a 30-day trial, your original LR serial number is unaffected. Be careful with LR catalogues, though; LR2 will ask if you want to upgrade your library/cats, and if you do so, they will no longer be usable by LR1. While your old catalogue will remain, any new additions or changes will affect the new one only, and should you want to revert to LR1, you will have to go back in time. It’s better to start a new small catalogue to test LR2 during the trial period, in case you decide not to upgrade (unlikely!).
We therefore installed LR2 and said no to updating existing catalogues, creating new ones instead. Like 1.4, LR2 offers you the option to browse existing folders without moving or duplicating the files – you can use it like a replacement for Adobe Bridge for digital image browsing. It also offers you the choice to hide all your JPEGs if you shoot JPEG+RAW, and only see the .ARW (or other RAW) files. Beware – deleting a raw file will also take its companion JPEG to trash, unless you have opted to view RAW and JPEGs from the same shot as separate files.
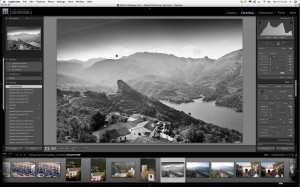
Lightroom has some good editing and creative features. One which is original is the Graduated Filter, which can apply not only exposure but contrast, saturation, sharpness and other parameters in a blended swathe with control over angle, gradation and intensity. Here is a quick monochrome conversion example (the next frame on the thumbnails shows more or less the original colour shot) from an Alpha 200 image by Shirley Kilpatrick:
The operation seems faster, and LR2 picked up perfectly on all the .xmp sidecar or database embedded adjustments made to images already processed in ACR/Bridge. It shares the image adjustment database. This means that you can make changes to a raw file’s development in either ACR/Bridge or Lightroom, and when next opened by either application, the most recent state of the file will be used. But it’s not so easy to retain one set of changes in Lightroom, and a different set in Bridge. Instead, you can take a snapshot of the processing and hide in the stack for that image before making further Lightroom changes.
But it’s good to see the preview thumbnails quickly convert to the last state of ACR processing when first examined in the LR browser:

Lightroom detects previous ACR adjustment when this A700 is selected
Lightroom v2 is capable of eating HD space. It saves large (16-bit) TIFF files as a default before doing something as simple as opening the image into Photoshop. You never see these files unless you look for them, but they are hogging your disk space. Image stacks with multiple versions of the same image can do the same. Adobe recommend using 16-bit depth and ProPhoto RGB colour space to make the most of Lightroom power. That’s an 80MB TIFF for every Alpha 350 shot converted.
There are plenty of real retouching and adjustment tools within LR2, but integration with Photoshop is important. The one thing we can’t see how to do is to use the ACR 4.5 engine inside Lightroom to interpolate a file up or down in size, while also opening it in Photoshop. This is something useful with ACR does using Bridge/Photoshop, and ACR also allows you to examine your raw conversion at an interpolated 100% view. I find it useful to see my images at 5120 pixels wide (17 megapixel resolution, or a 50MB final 8-bit file) from all my cameras. Some may be enlarged 110% from the raw, some to 120%, some even to 140% but seeing them all at one constant larger export size lets me know which camera/lens combinations really do capture maximum detail, and what settings produce the best noise and sharpness balance.
Lightoom will export files (not into Photoshop) at any size you care to enter, unlike ACR which has a fixed menu of direct interpolations.
DNG Calibration
Along with Lightroom 2 come utilities, partly dependent on converting raw files to DNG format, for creating finely tuned camera profiles. A set of new Camera Profiles is downloaded and installed to be used in LR2 and ACR (CS3 and higher, ACR 4.5). These are stored in the Camera Raw directory hiding your Application Support (on Mac, probably named differently on Vista), in a folder ‘Adobe Standard Beta 1’.
Good news is that the profiles include the Minolta Dimage 5, 7, 7Hi, and A1; the Konica Minolta Dimage A2, A200, and Dynax 5D and 7D; and the Sony Alpha 100, 200, 300, 350 and 700. These auto-load if you select Adobe Beta 1 Camera profiles, and are just identified as ACR 4.4, but you can see the colours shift compared to the default ACR 4.4 or ACR 4.3 profile.
A DNG Profile Editor allows control points to be set on colours of choice in any test image (not just limited to the 24-patch Macbeth ColorChecker target which can be used for semi automatic camera profiling). You can, as their website explains, select skin tones and lock the colour, then select a red jumper and shift the colour without affecting skin. A colour map shows all the sampled colours you chose, and the shift (similar to a Delta-E map for colour accuracy) applied. You then create a new custom camera profile called ‘Red Jumper’ or whatever!
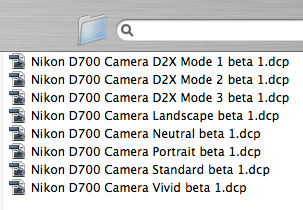
To profile a raw file or camera, you must converted to .DNG format. It is not entirely clear whether you need to do so to use the resulting profile on other images. Lightroom 2 appears to apply profiles to .ARW or other raw files. The custom profiles are stored in separate folder called ‘Camera Beta 1’, and this is already generously populated with Nikon and Canon custom profiles. For example, even the new Nikon D700 (at the time of release and of writing this) has custom profiles:

No such work has been done on the Sony Alpha models! Clearly, there room for someone with lots of time to spare to convert some Macbeth Checker shots to .DNG and take different styled JPEGs using the camera settings, to match up customised conversions and save them for Sony Alpha users to enjoy. It is not surprising that Canon and Nikon get custom camera profiles for all their models to date (except the EOS 1000D, which although recognised for raw file conversion by ACR 4.5/LR2 is missing from the list).
When you open any raw file with the recognised camera – whether DNG or the original format – the Camera Calibration pane produces a menu list:

The difference made to the shot is immediately visible – left hand side, Nikon D700 image in Neutral mode, right hand side, the same in Vivid mode:

Now please don’t complain about Nikon D700 images being used here! We test all cameras – it’s my job – and for the last week and a bit I’ve been shooting D700. I’ve lost a few shots the Alpha 700 would have eaten for breakfast, and got a few shots the Alpha 700 would not have done as well. The occasion is the wedding of the Duke of Roxburghe’s daughter, and no, I wasn’t a guest – the church is 200 yards from my door and I nipped out to join the locals and take a few pictures of the floppy hair and perfect legs of the young aristocracy.
You can also access the profiles and custom profiles using ACR/Bridge. The naming of some Nikon D700 profiles as DX2 looks reflects another function of the DNG profiling software – you can match any two different DSLRs to produce similar results:

What matters is that this bus arrives at your stop next! The Sony Alpha models all have standard profiles in the system to start you off, all you need is your colour sense to create new Custom Profiles to use when you want. By far the best way to learn about this new function is to visit the tutorial page at Adobe Labs – http://labs.adobe.com/wiki/index.php/DNG_Profiles:Editor
Navigate back for more info, but this tutorial really explains it all better than the sales pitch can.
Now, how about the noise issue? Well, it’s ACR 4.5 at heart. Lightroom 2 has improved output sharpening (they claim) but no improve high ISO noise, over the latest ACR beta or the last 4.4.1 official release. If want graded grains to make finer flour of your Alpha 700 shots in particular, you are still better off suffering the less intuitive and rapid interface of Capture One Pro v4 or v5 – or one of the many small raw converters which seem to be able to beat ACR. Adobe needs to get rid of Mr Blobby for good, he’s been hiding in that list of programmers on the splash sceen for too long.
(Note to our 80% of readers from the west side of the water – there are two references in the para above you won’t understand at all unless you watched some very bad British TV a long way back, or study the history of advertising slogans. Never worry. You get the drift!).
Synchronisation with ACR and DNG Converter
Lightroom 2 will create DNG conversions directly, and when it does so, will embed metadata applying any settings to the DNGs. DNG Converter 4.5 will, if asked to convert a folder of RAW files also containing .xmp sidecar information, embed this into the DNGs so that when opened in LR or ACR, the adjustments are preserved.
While LR1 and ACR synchronised adjustments automatically, in LR2 any ACR adjustments will be seen and applied if a folder is opened which has been processed using ACR. However, the reverse does not apply unless you ‘Save Metadata to File’ in LR2 before browsing the folder with Bridge. If you do this, all LR2 adjustments will be seen and even functions not provided in ACR – just as retouching brush and graduated filter – will be preserved and used.
If you then adjust such files further in ACR, and click ‘Done’, LR2 unique features are not lost, and shared parameters are changed. But LR2 will use its own version unless you opt for ‘Read Metadata from File’ in LR2 – it will then ask whether you want to overwrite the settings in the LR Catalogue. If you say yes, the ACR changes will then be applied in LR.
Synchronisation is not two-way and automatic in both directions, but is subject to ‘Save Metadata’ and ‘Read Metadata’ in LR2 in order to work with Bridge/ACR.
Download URLs
To download your trial, buy your copy or buy your upgrade for Lightroom v2 go to:
http://www.adobe.com/downloads/ and just look in the left hand column.
To get the DNG Custom Camera Profiles and the profiling utility (NOT installed automatically with LR2):
http://labs.adobe.com/wiki/index.php/DNG_Profiles
To upgrade ACR 4.5 beta or earlier to 4.5/DNG 4.5, the Adobe site is not yet properly amended and it can be impossible to see, hard to find. The direct links are:
For Mac – DNG Converter with ACR 4.5 – http://www.adobe.com/support/downloads/detail.jsp?ftpID=3940
For PC, the same – http://www.adobe.com/support/downloads/detail.jsp?ftpID=3941
Enjoy! This upgrade seems very worthwhile and Lightroom, with the speed and overall quality it now offers and such things as the useful Graduated Filter function offering quick fixes for bright skies, is only lacking a top class deBayer and NR routine for higher ISO Sony files.
– David Kilpatrick
Revised July 30th with section on Synchronisation


See the UK once again is being ripped of by Adobe, LR2 upgrade in the states $99 in the £90 just about twice as much, for no extra work.
Suppose we have got used to these things.
What does the “huge”tiff file do and can it be removed without losing functionality?
What small RAW program’s cater for the high ISO RAW files better, presume they are not cheap, for the occasional times I use high ISO, although it was one of the reasons for upgrading to the A700.
I am afraid until Sony is seen as a major player we will get ignored by Adobe if it needs some greater input. Does converting to DNG do any better?
All questions.
Another release from Adobe, and again still no relief in site for high ISO shooting A700 users. As you noted watercolors and blotches are still the word of the day when it comes to processing Sony A700 high ISO raw files with Adobe converters.
Geesh…2,3,4 releases and still no satisfaction…I don’t care much for the Stones, but it seems to be the song of the day when it comes to Adobe and the Sony A700.
Fairly good read, DK. It’s to bad Adobe continues ignore forum posts and rants, blog posts and rants, bug reports and samples, trouble report threads at Adobe with samples, and the cold hard facts and proof.
-Sonolta
http://www.rockriverfootball.com
http://www.sonolta.com
http://www.illinoisphoto.com
and dozens of others…