One to try with your local camera club – handheld or natural light, limited space
Bring objects and small accessories to assemble a scene
Use digital or analogue montage techniques to create a new scene
In early November, my local camera club held a non-studio table top photography evening, inviting members to bring three items along, set them up and see what photographs could be got. Lighting was either none (the room’s ceiling lights) or portable camera flash. A few backgrounds and reflectors were brought along too.
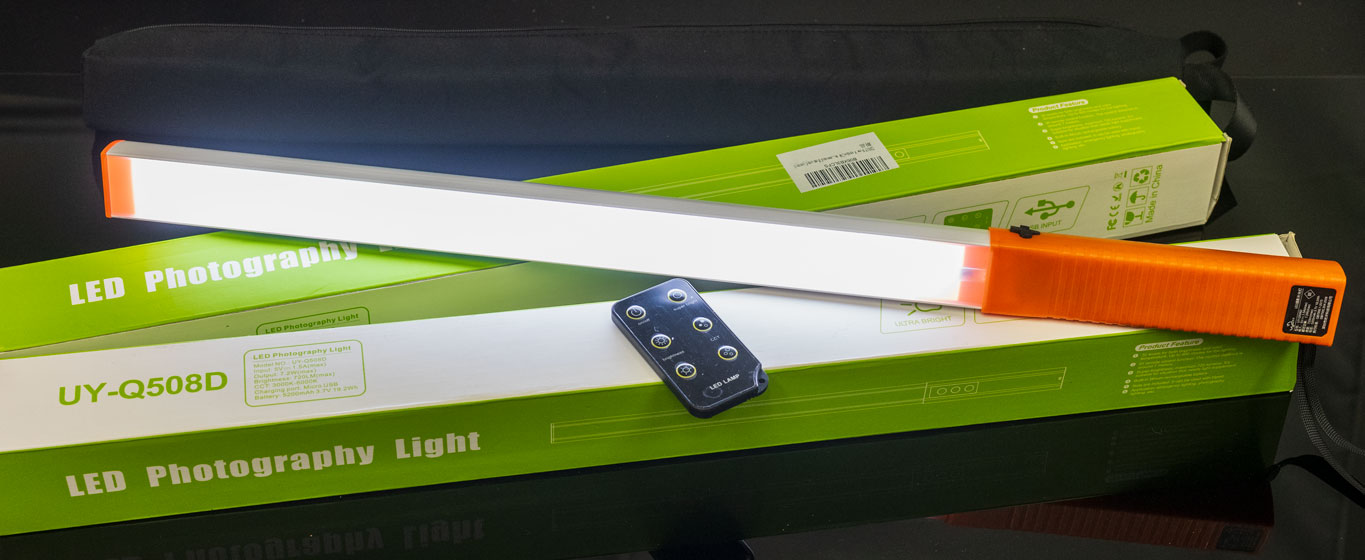
I took a candle in cut glass holder and a wooden base of polished cut teak, and some holly with berries from my garden, along with the new Tamron 90mm f/2.8 Di III VXD full frame macro lens for my Sony A7RV, and a tripod. For lighting, I brought two UYLED USB recharged photo-video light sticks with adjustable colour temperature and brightness.
This one of the frames taken. There was no black background, just a dark curtain about 2m away at the end of the room. For my set-up, the room lights were turned off, with the camera first focused and composed and locked to manual focus. ISO was set to 100, WB to Daylight, the aperture to f/16 for a long exposure moving the light sticks all round the subject to wrap the light. Aperture priority auto was used, with no EV correction for this example. A few auto exposures were made with +1 EV and the time ranged from 5s to 25s giving a choice of how much detail appeared in darker areas, and the colour of the candle flame. Moving the light sticks around gave a range of exposure times. The one I chose to work with later was the shortest exposure.
With so little light reaching the background, it’s effectively black. This could be used as a Christmas card with a message in the upper left black area, but a brighter exposure would be my choice for that. This rather more subdued shot was destined to be quickly combined with an old shot taken of my dining-room window in winter.
What may be seen straight off is the floating candle flame! That’s because where I wanted to cut the candle out in a Layer by making a quick mask using a Path, this would not work for the blended flame. The original window photo (Christmas 2006, Sony A100) is sharp, so was given brushed-in Lens Blur adjusted by eye to look right, before the flame was clone-brushed in using Lighten.
This is the Layer on top of that Background Layer, as masked. A fair amount of retouching for dust was also done, as the subject had been around for a year or so since the candle was last lit! For a ‘proper’ studio job, everything would have been scrupulously cleaned. A 61 megapixel sensor with a lens of the Tamron’s sharpness reveals even the smallest speck of dust or scratch on the glass. With the cutting out and masking, and tidying up, it took me about an hour before saving the Photoshop file as a .psd with its two Layers.
It doesn’t matter that the cut out round the flame looks rough, as the tones at its sharp edge are identical to the tones in the background image.
This is the result. It’s not entirely convincing as the glass did not have that garden view beyond it, and has a metallic look from the dark background. The candle was dark grey and I think if there had been a suitable red or green one attractively melted in the same way it would have been better. But it looks wintery!
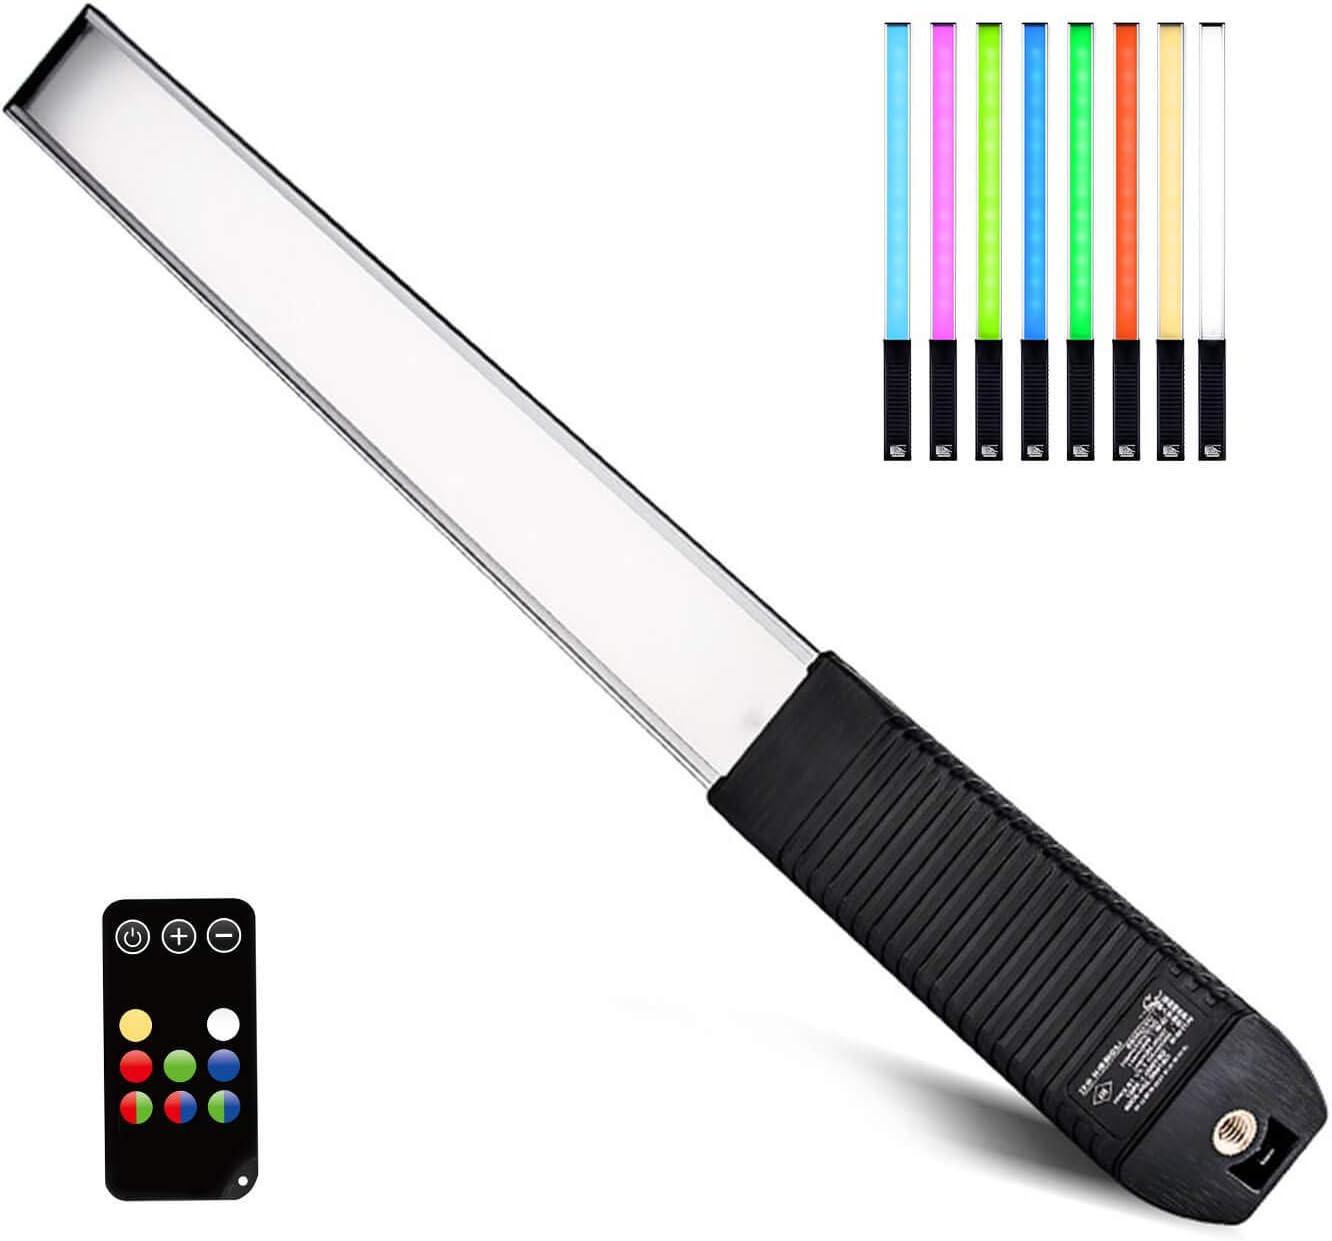
These are the LED sticks I used to wave all round the subject, either side and ahead of the camera position. They don’t seem to be made any more, as there’s a new version with full RGB colour change, otherwise similar with a tripod thread for mounting at the handle end, and the remote control for colour and dimming. The LUXCEO Q508A, below, is £49.99 on Amazon.
I’ve found my tungsten-to-daylight adjustable pair from 2018 very reliable! If a roomful of readers click any affiliate link in this article and decide to buy, I may be able to afford an RGB upgrade…
Here’s a studio shot from when I bought the light sticks, created by carefully moving one in a circle round the subject and keeping the distance and time as steady as possible. At least two circuits were made with the light at different heights, level with the subject and higher up.
This is the new Tamron. I have a report to be published in Cameracraft due out on January 1st 2025, but in a month of using it I’ve also taken many more different images – more than the magazine can show. So I’ll be putting a page of photographs here with a link on the printed page. The lens costs under £600 in Sony FE/E mount or Nikon Z mount. Thanks for the loan of the review lens to Tamron UK – https://www.facebook.com/TamronUK
The Christmas card prints were made on 20-plus-year-old Lyson 300gsm double sided Smooth Fine Art paper – a box abandoned after I got an Epson P3800 pigment ink printer (which still runs thanks to Marrutt refill cartridges and inks). These original Lyson papers don’t handle pigment inks well. But they DO work with Epson Eco-Tank ET8550 dye-based inks, even if the black is pigment. In fact they work so well that ‘Printer Manages Colours’ and no colour management at all was needed. Set the printer to Matte paper, load the main tray with A4s halved to A5, use Velvet Fine Art as the paper setting and the cards were dry enough to crease on my Unibind Creaser directly off the output tray. The Lyson paper came from Marrutt too all those years ago for tests with their Quad Black inks. I never throw anything away!
This is a follow-up to our last post about PortraitPro. Using a self-portrait taken for the purpose with bad reflections in uncoated reading specs, I went through the options of the reflection removal process. Mid-May a 15% discount was authorised for code CC524 at www.anthropics.com which applies to all 50% discounted program downloads.
It was taken on the Sony A7IV with 85mm f/1.8, tripod, ISO 400, lens at to f/8 and control through iPhone 15 Pro Max using Sony Creators’ App remote viewing and control. The screen on the A7IV was vertical and facing me, so I could also look at the camera and see the reflections move as I changed my head angle. Setting this up showed me some problems with the A7IV articulated screen design I had not realised – it can only face the self-portrait subject when folded out at the left-hand end of the camera, which with a Arca-Swiss L-plate means hanging down… obscured by the tripod head! So no L-plate but standard Arca small plate, and camera upside down compared to normal hand holding.
This is the result using PortraitPro V24. Read on to learn more, and don’t forget if you decide to get this program use Cameracraft’s additional 10% discount code, CCV245.
PortraitPro has come a long way in a few years. At the top end, the Studio Max version is a £308 program which costs £154 with the 50% download discount that Anthropics have offered ever since the days of CDs in packaging. Since no-one now buys a CD, the real price is £154 (with 10% off for Cameracraft’s code, CV245 in the latest May/June issue).
You may not need Studio Max with its 48-bit file capability, workflow from raw to exported finals, multiple image batch processing intended to auto retouch complete portrait sessions, handling of wedding groups and granular control fine-tuning its effects. The basic V24 includes this function and costs £99 less 50% download only less our 10% – so £44.55.
It is now very fast indeed on Apple Silicon and integrates with Adobe’s photo programs. Under the hood it uses some of Adobe’s functions, without venturing into Generative Fill AI to change a digital capture beyond the scope of many competitions. It uses AI, but does not rely on on stolen images or ones licensed for almost nothing in bulk from the big picture libraries. Anthropics built their platform on measurements of the human face and body, research into what people like or dislike, and many years of coding. When it uses image-based AI it draws that from your photo and its bank of facial features modelling data.
The Reflections in Glasses problem
Recently we came across a question in a professional photo organisation Facebook group asking how it was possible to remove reflections from glasses. It’s very difficult, and when it happens in a set of pictures where the photographer is unable to prevent it, it can ruin groups and presentation shots. Many battery studio-location flash heads now have very low power modelling and it’s all too easy to light your subject and fail to spot that your octa-box is reflecting in specs.
PortraitPro’s specimen example might just be good luck, so I decided to test Version 24. My studio room has shutters when blackout is needed. Two pure white plain blinds 110 x 220cm cover the tall south facing windows to prevent furniture, fabrics, art and photographs fading or warping in direct heat. They make a wonderful giant dual light source in daytime sun even in midwinter but reflect in glasses when the camera angle is not just right.
Removing reflections from specs does not come under the Eye menu – it’s under the “Inpainting menu” along with Mouth & Teeth and Remove Stray Hairs.
This is a crop from the original file.
The Reduce Reflections in Glasses view above shows other retouching functions too (notice some reductions in skin blemishes and wrinkles) but has the reflections reduction set to Off. When you select Remove Reflections in Glasses, you see choices for Off (the start position) then Options 1 to 5. Each is a different AI generated restructuring of what should be visible through the reduced reflection. My eyes are old enough to be slightly difficult and it was interesting to see the five choices.
Option 1
Option 2 (note the left eye eyelid in all these and how it changes).
Option 3 which I felt got the eye almost right, though further retouching would be needed for a portrait. It would be good enough for a PR or informal shot.
Option 4 rather odd mismatched detail.
Option 5 eyelid droop…
Option 3 got the upper eyelid almost perfect (not quite but acceptable) and the Strength slider did allow the reflection to be eliminated to the degree shown above. However, it looked better with 85% effect or even the 50% of the earlier example, a faint reflection remaining without obscuring the eye.
The time taken on my Mac M2 Studio Max was next to nothing, I didn’t bother to time it as everything happens in real time include the export from the starting 33MP JPEG to a same size with all PortraitPro’s very subtle modification of the portrait. The defaults were just right but I increased fine wrinkle reduction out of vanity!
After saving a copy of processed result I also saved a .ppx file (the Project) which is a bit like an Adobe .XML sidecar file, and re-opens your original with all the edits at the point you saved this snapshot, reversible and adjustable as needed.
A tougher test
Here’s a worse example than anything you should end up with, so I set maximum strength on this. Option 4 worked best, and despite my eyes being almost entirely obscured by double reflections in my computer reading specs, it was not a bad fix at all. My ‘proper’ specs are coated of course and don’t reflect as badly.
I’m sure I could ask Adobe AI to do something the Generative Fill after masking the reflection area, but in the time it would take me to brush a mask in place, the entire PortraitPro glasses reflection removal would be done and dusted. Is it worth £139 (after our code CCV245 discount)? That depends on what your time is valued at and whether you ever encounter an error in shooting which leaves reflections ruining a shot.
– David Kilpatrick
To see Anthropics PortraitPro Studio Max, and the other versions which start from £49.95 (right now there’s a 15% CC524 discount, update May 23rd 2024) – all include this reflection removal function alongside stacks of other tools – go to https://www.anthropics.com/portraitpro/
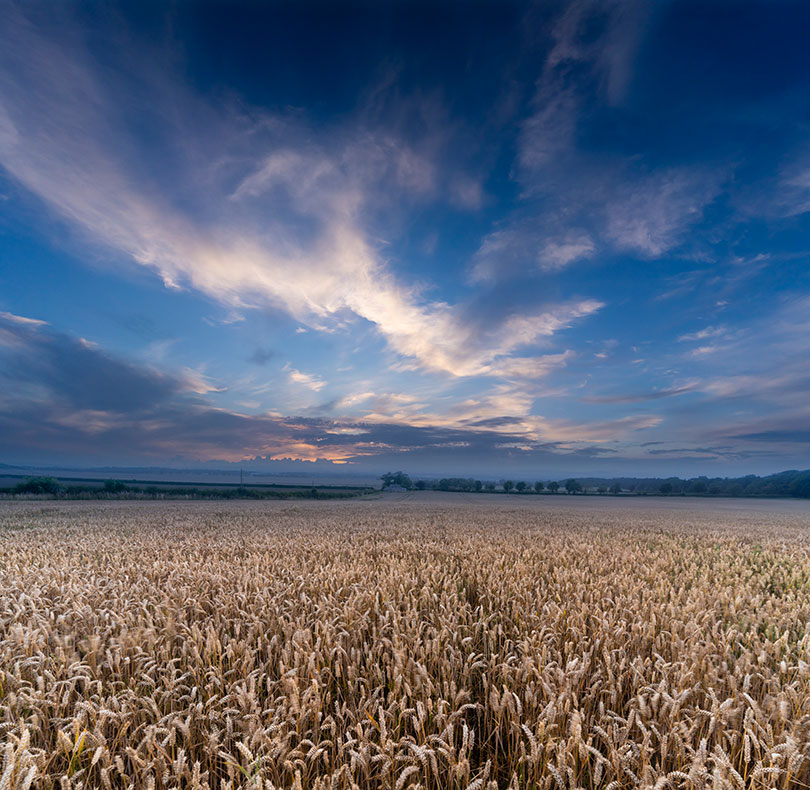
With cloud covering much of Britain and our own home territory in near the North Sea coast shrouded in featureless white for days, remember that post-processing can transform landscapes
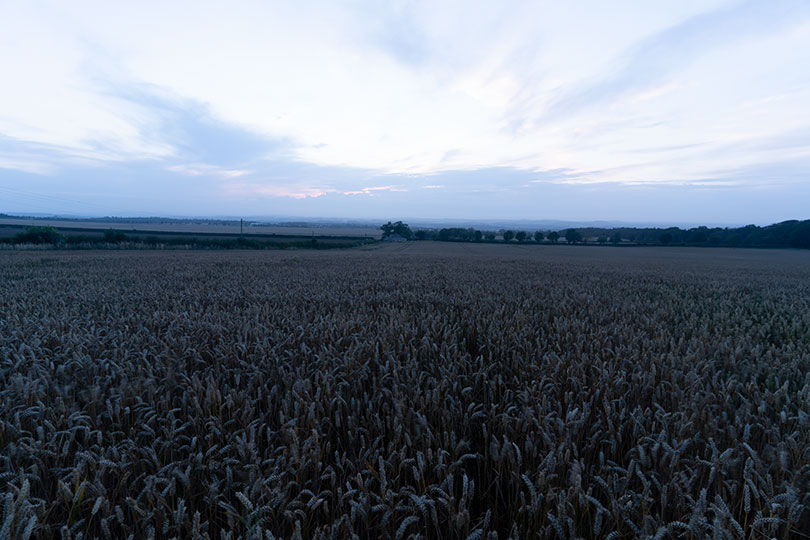
This was just a few days ago when the promise of a sunset disappeared. The sky was taken ten minutes before I expected the best sunset, and shot without any ground – it had potential for use as a stock sky to compose into other shots. The ground, a field of wheat taken from the highest point looking north-west a short distance from our office, was shot hand-held with a 1/5th exposure, stabilisation providing a sharp image from the 17-28mm Tamron FE Sony lens – but the wind blowing the crop selectively, so some ears show contrasting movement.
And that, above, is what a straight conversion from the raw capture looked like (you can also see how the sky had not morphed into a lovely sunset but instead lost any colour and became a neutral dusk). The point is that even a shot like this, in conditions like this, can be turned round by adjustment from raw and combining two frames. The almost square result is also a 170MB file, big enough for an acceptable print the size of some living room walls.
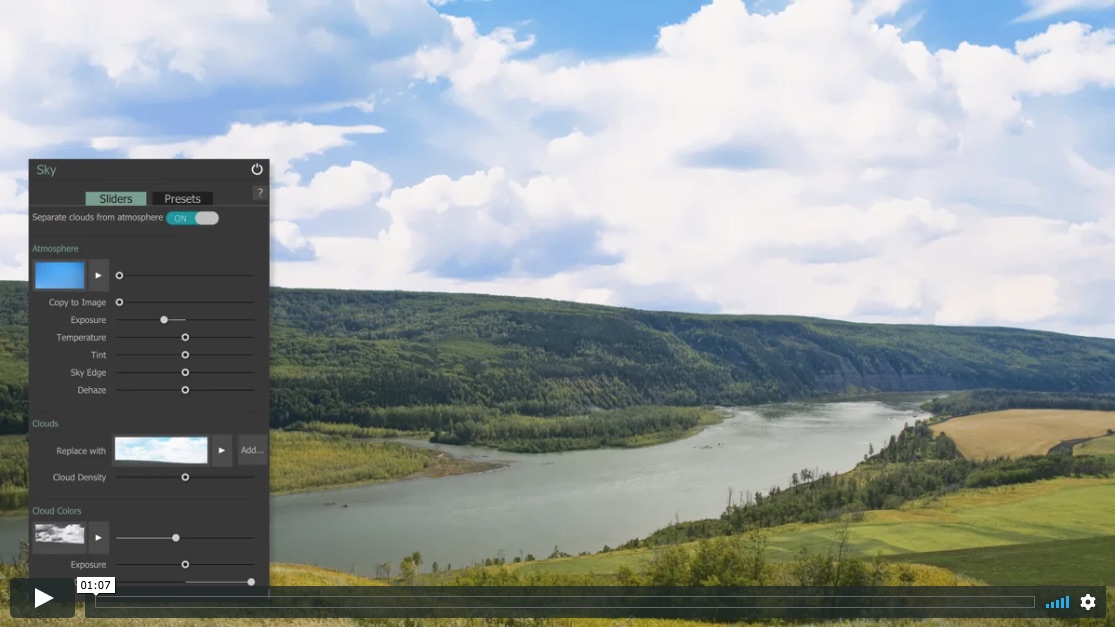
Landscape Pro as a solution when the weather lets you down
We used Photoshop for this but if you don’t have a full Mac or PC editing program, Anthropics’ Landscape Pro is purpose-designed for even more complex fixing-up and comes with its own library of royalty-free sky images (you can add your own). Here’s an example from Anthropics:
This one uses the masking functions of Landscape Pro to fit the sky to the shape of the rocks, and its controls to define water, mountain and trees as separately adjustable zones. There is also an intelligent function to create reflections in water with a realistic density. Notice that the water-weed in the foreground remains intact in the processed image and the sky reflection has been very accurately masked at the left hand side.
Using the program is well explained in a series of short videos on the Landscape Pro website. These are not the tedious kind of how-to vids you tend to find on YouTube which seem to aim to take several minutes to get to the point, maybe to enable advertising to appear. They are short and very clear in their message, and there’s a good selection (screen shot below).
There is a discount offer of 50% at the moment and an additional 20% off with our code CC8L – this code was not working when this post went out on August 16th due to a technical glitch, it is now working and can be used up to Sunday August 23rd.
Save on Landscape Pro & Portrait Pro using Cameracraft code CC8L
Code valid on any Anthropics software (PortraitPro, PortraitPro Body, LandscapePro or Smart Photo Editor), new editions, upgrades, or bundles. Download your free trial today! 50% OFF sale now on + for an EXTRA 20% OFFuse the code CC8L.
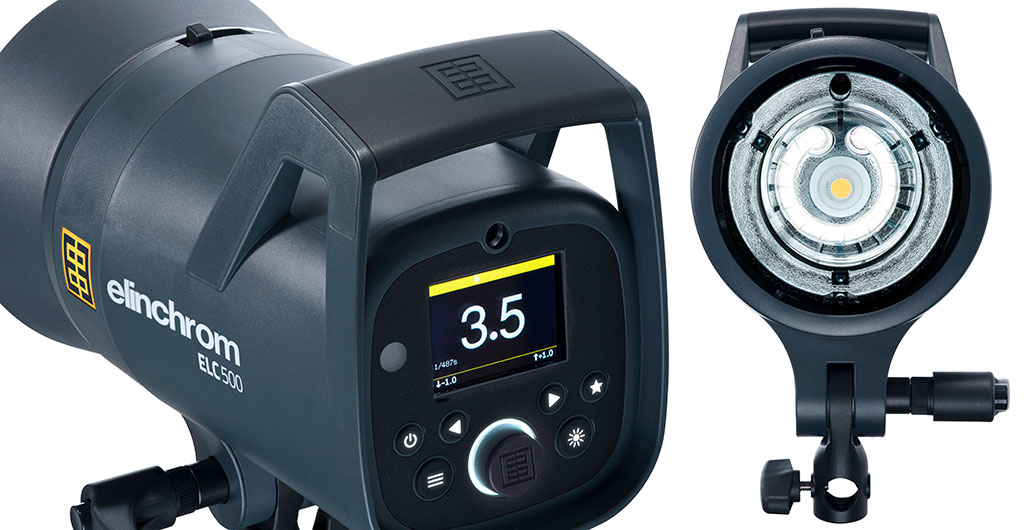
A new generation from Swiss masters of studio flash Elinca SA brings multi-platform TTL, super-fast recycling and flash durations, brilliant LED modelling and many design innovations.
David Kilpatrick has been trying out the twin head kit.
The second wave of any innovation in technology is often safer to invest in than the pioneering first generation. Studio flash offering IGBT duration and power control, allowing much the same TTL and high speed functions found in camera speedlights, has been in development for over a decade but whole generations have been orphaned by advances in wireless trigger and camera firmware.
Finally bringing this to their new mid-range ELC TTL heads – one rung below the ELC Pro and one above the BRX – Elinchrom has worked for maturity in the whole technology. So, when the ELC 125 and 500 TTL arrived they worked much like any head with the EL Skyport Pro. Days later new firmware for the triggers enabled TTL operation, across a range of camera platforms already proven with the portable ELB 500 TTL.
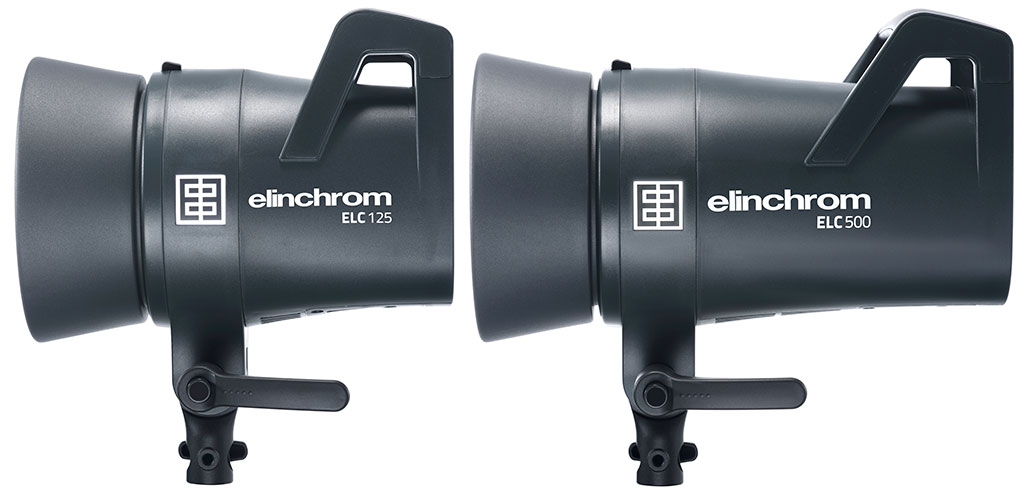
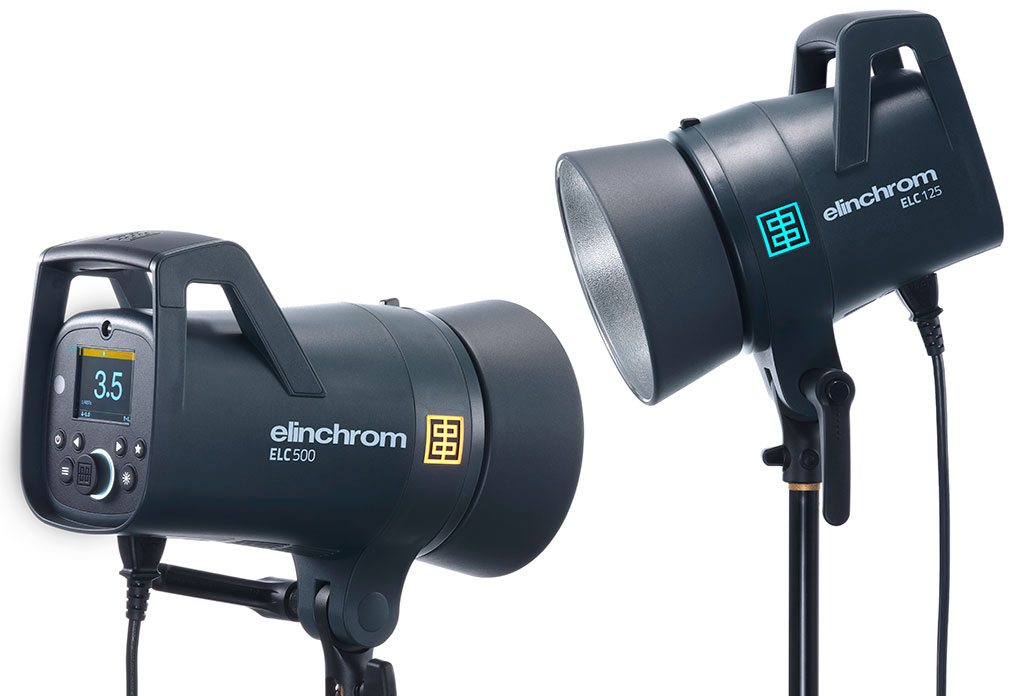
The ELC 125 TTL is a little larger than a D-Lite. The ELC 500 TTL is substantial – as expected.
New dark grey design with superior handling and balance
Pro-sumer price but professional spec
True TTL exposure with all major camera systems
Standard or high speed flash without changing heads or tubes
Robust sequence shooting
New bright LED daylight colour modelling light
Unique colour-coded logo display to show groups
Very large LCD rear info panel easy to see at a distance
Skyport and Phottix, smartphone and tablet control
Large brolly shaft tube fits third part accessories
Elinchrom shot-to-shot consistency of colour and power output
Worldwide service, UK support from The Flash Centre
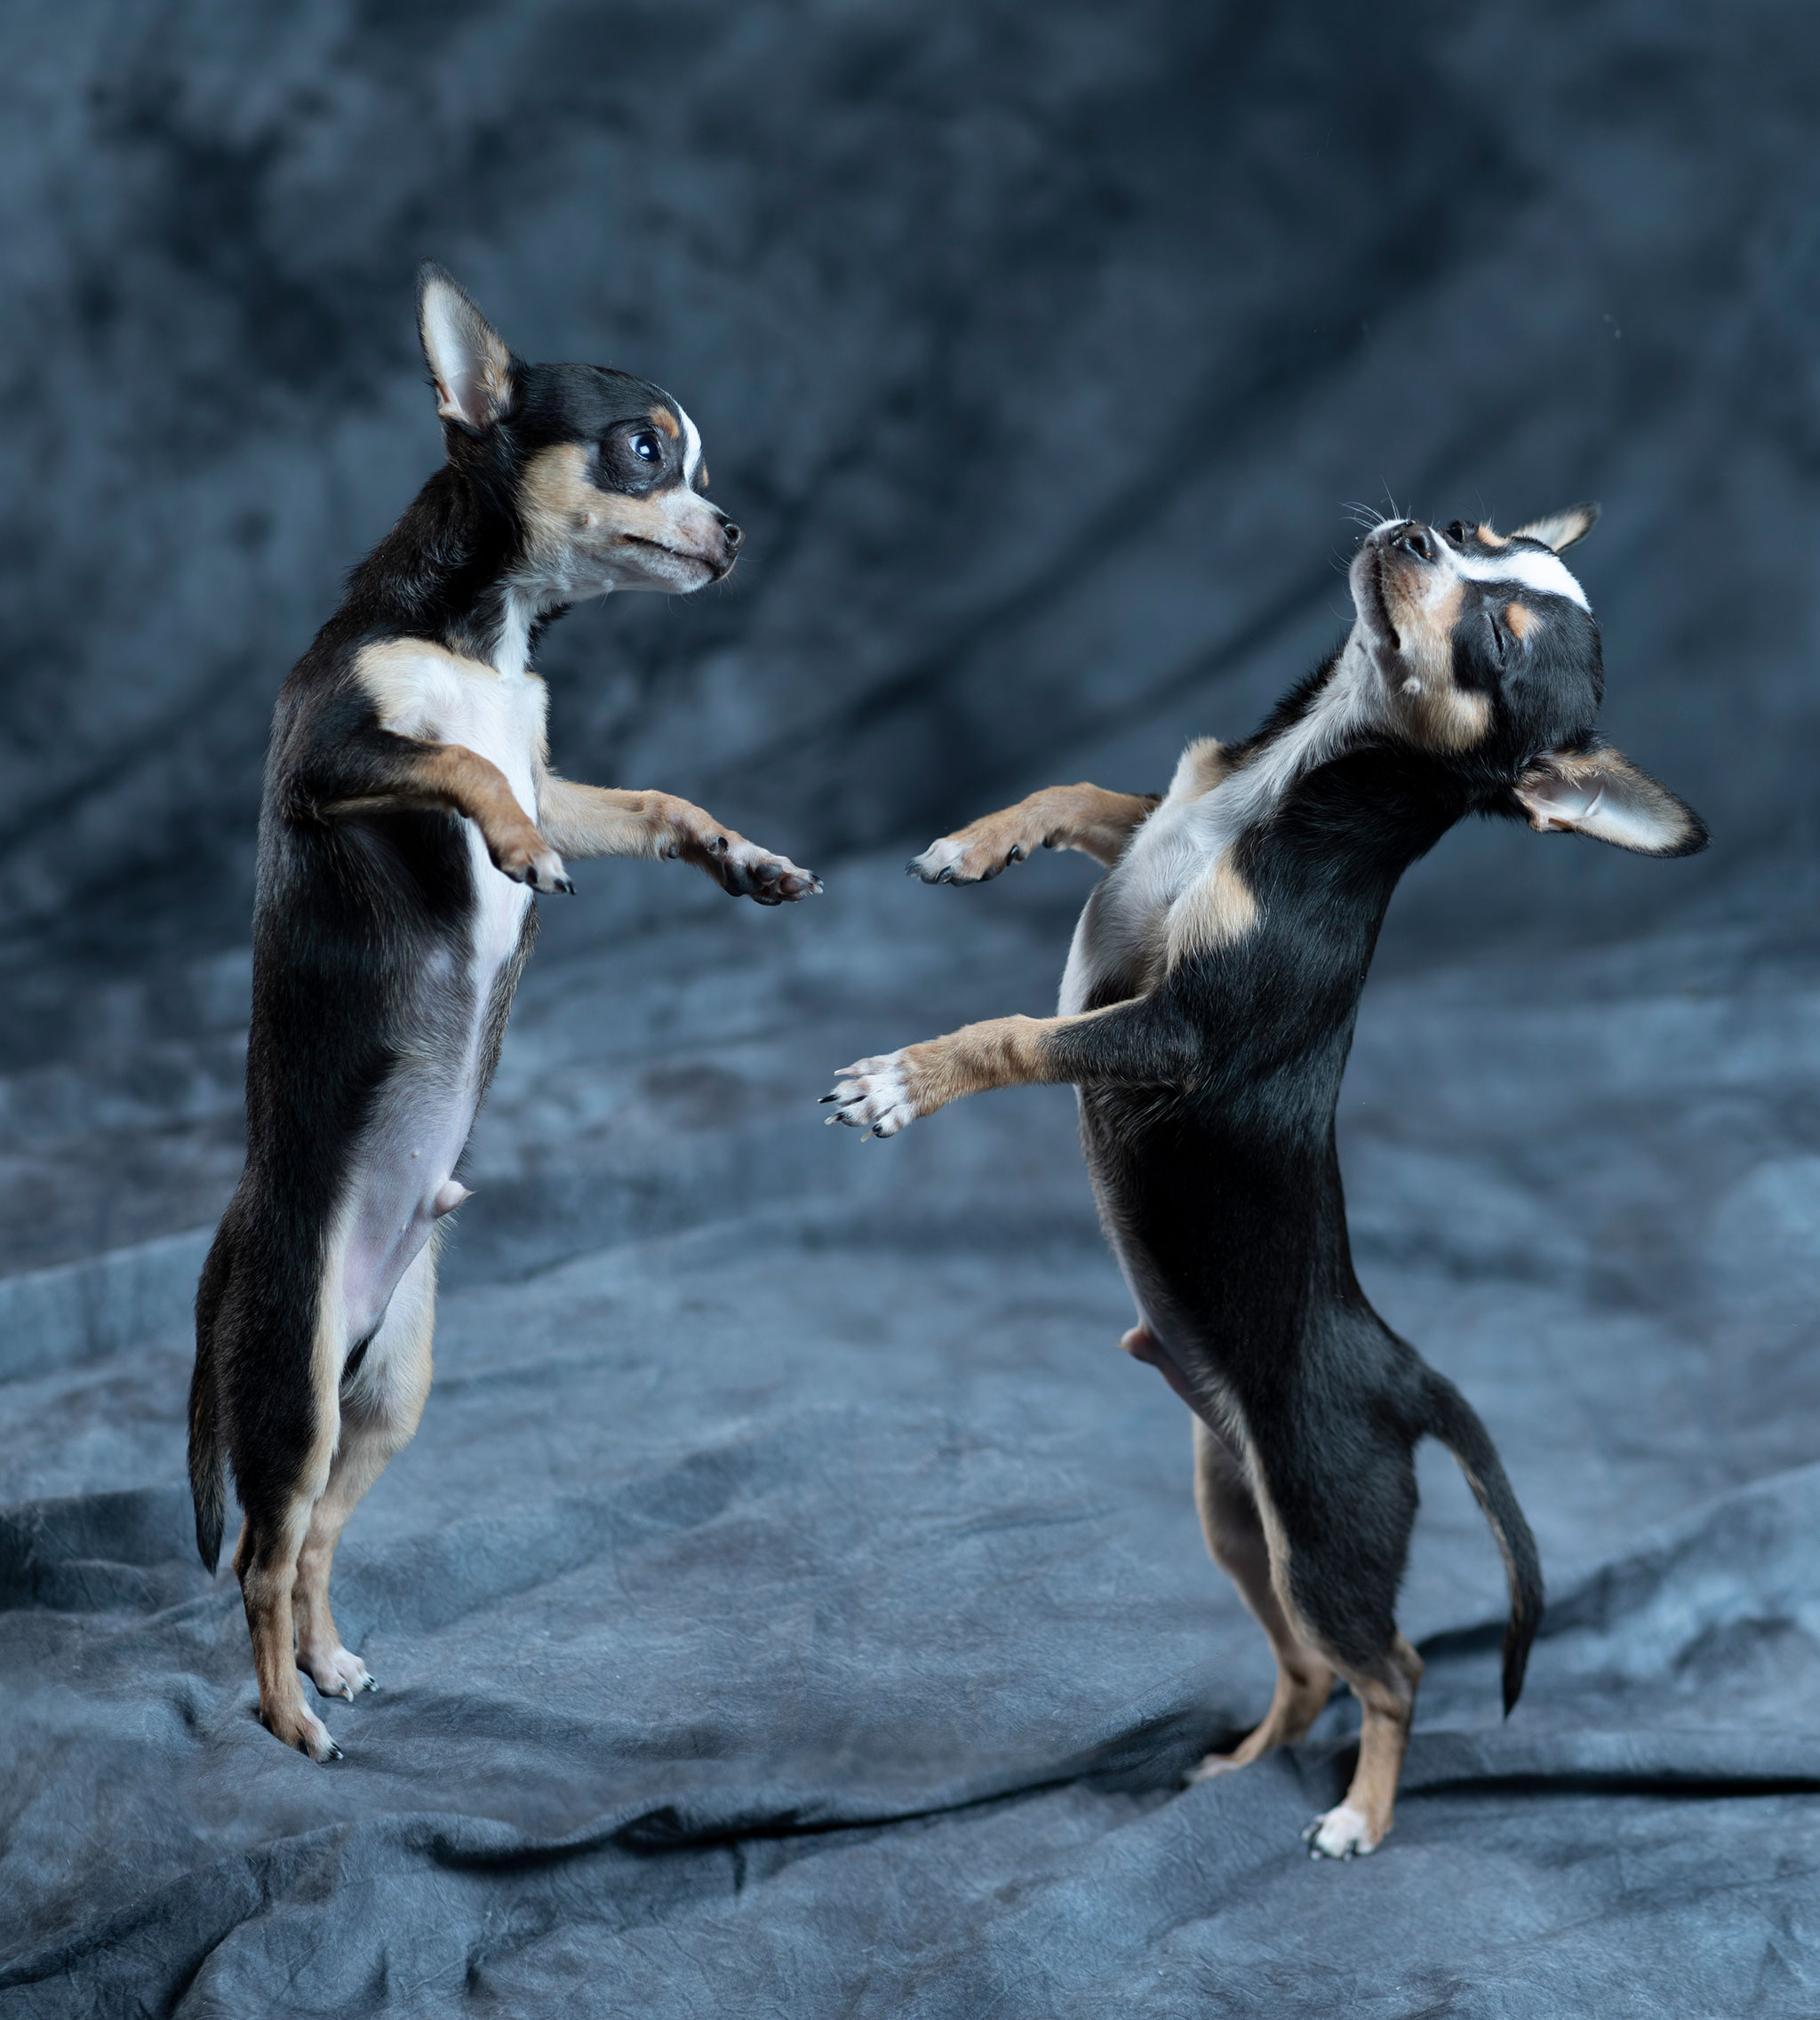
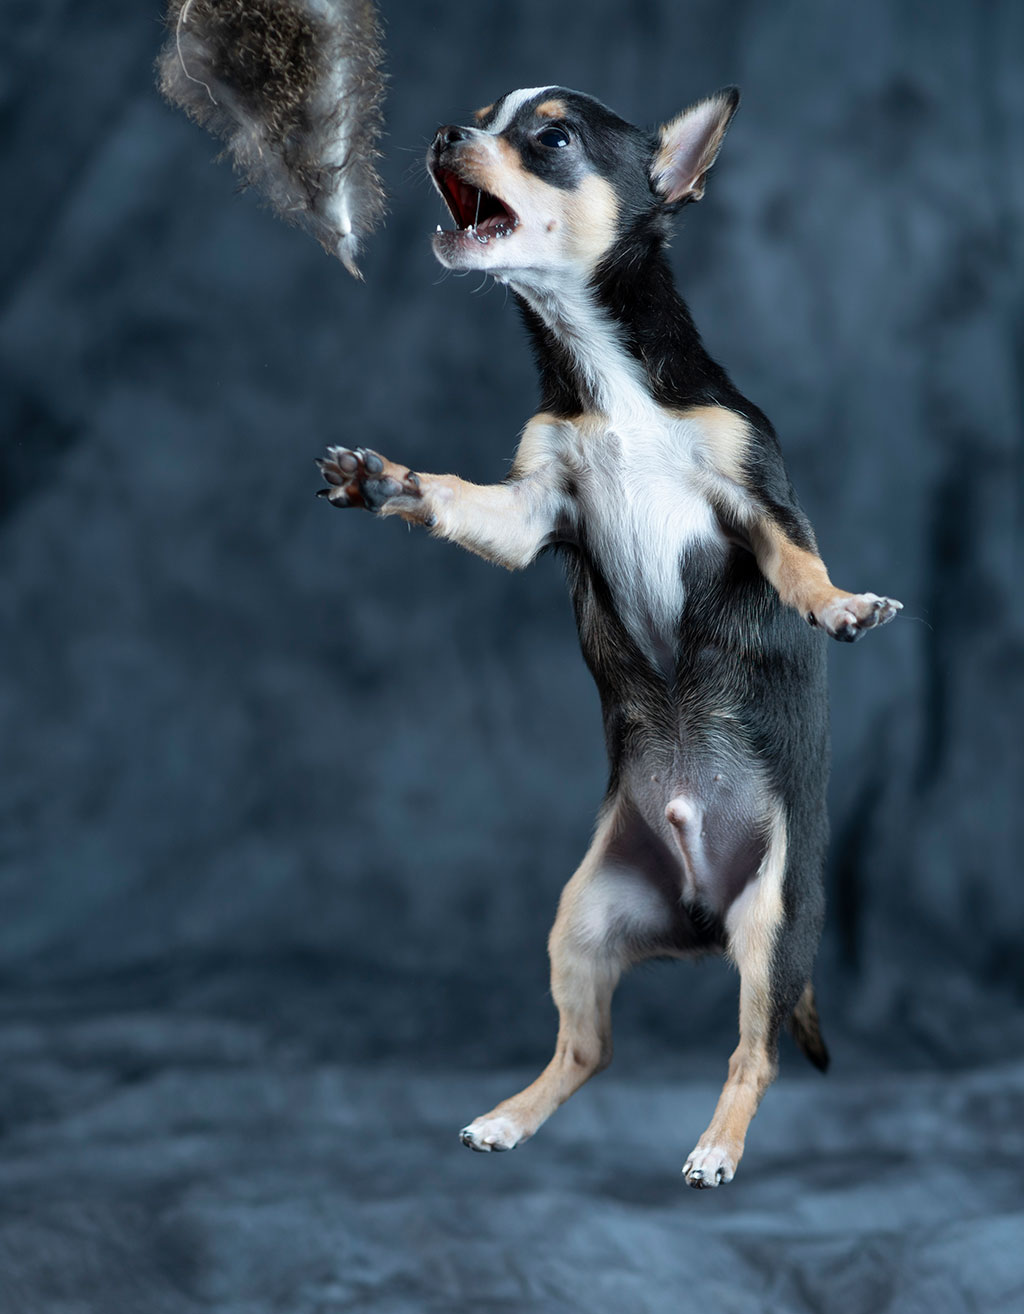
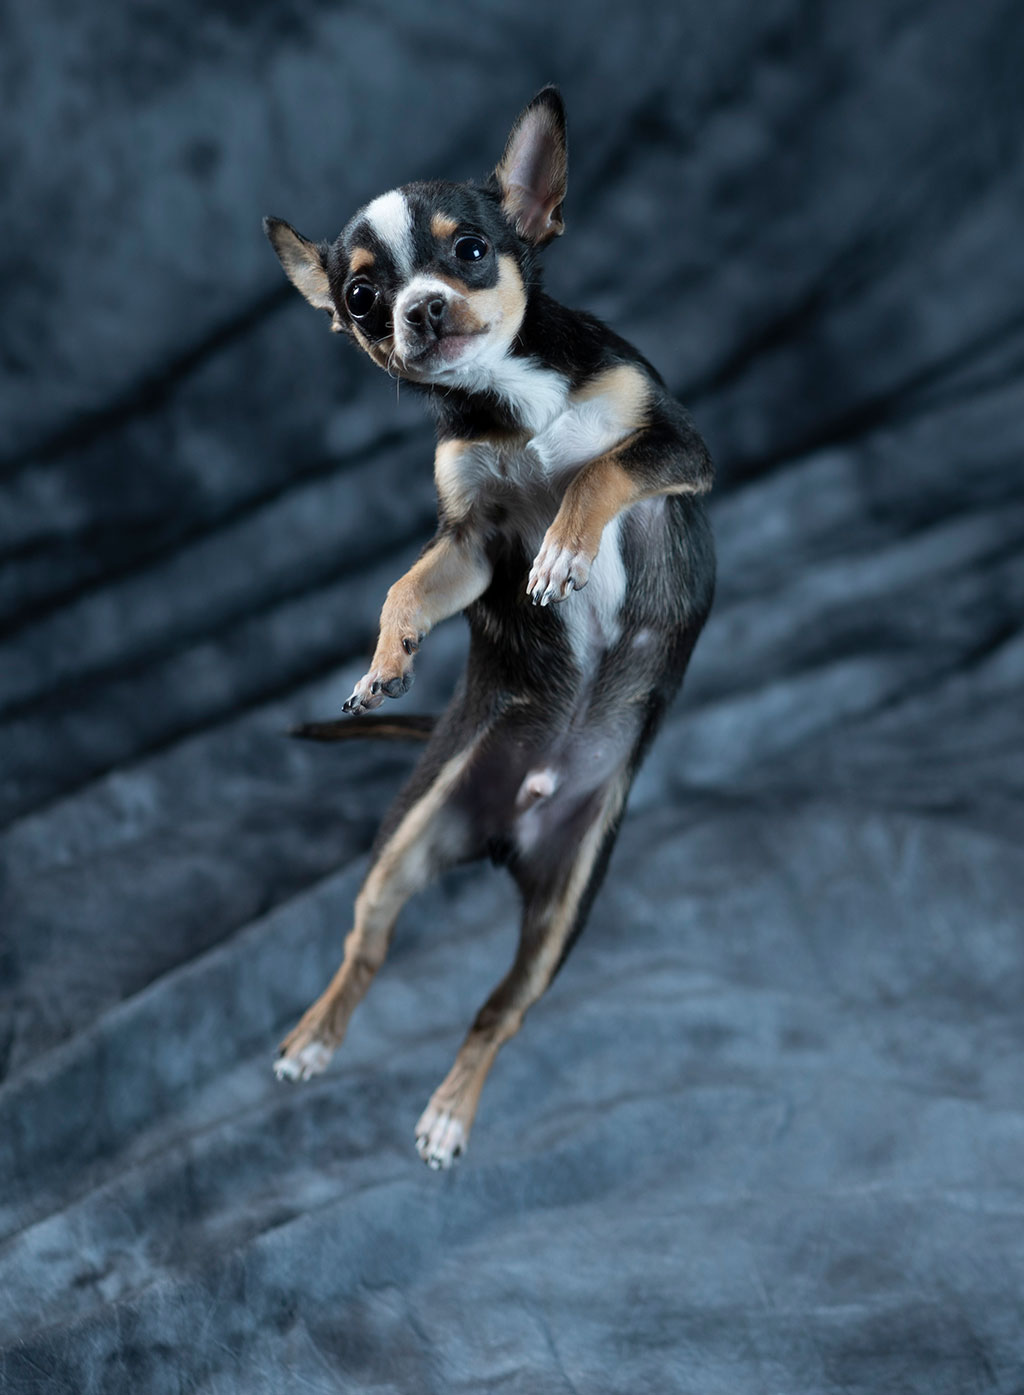
Photoshop composite warning! Alfie dancing with himself, high speed poses with Animal Eye AF on the Sony A7RIII, 85mm ƒ1.8 lens at f/2.8, and Action duration set on the two heads. Main 90cm square softbox on ELC 500 to the right of the camera, 44cm honeycomb rigid softbox on ELC 125 to the left, skimming in from side and behind, near the edge of the background.Dog handling by Assistant Editor Diane E. Redpath; lighting, camerawork and post-production by David Kilpatrick.
Canon, Nikon, Olympus/Panasonic, Sony, Fujifilm and Pentax have all been enabled to integrate into Elinchrom studio setups though the differences between the shoe fittings do mean you need a trigger for each different system you use. For medium format and anything else, the transmitters can be paired with a universal receiver.
The logo on the side changes colour to show theGroupset.The standfitting is simpleand appears to bevery strong. The centre of gravity and pivot point isbetter on the 500 when any lightshaper is fitted.
To use functions of the transmitter such as Hi-Sync (up to 1/8000s shutter speed) specific flash heads have been needed – the ELB 400 and 1200 portables with HS heads, or the D-Lite RX4, are needed to use HS. With the new ELC TTL heads HSS rather than Hi-Sync is used with a high speed shutter setting, enabling the ELC 125 to achieve this despite having a standard maximum power flash duration of 1/625s (t=0.1) which would be too short for Hi-Sync.
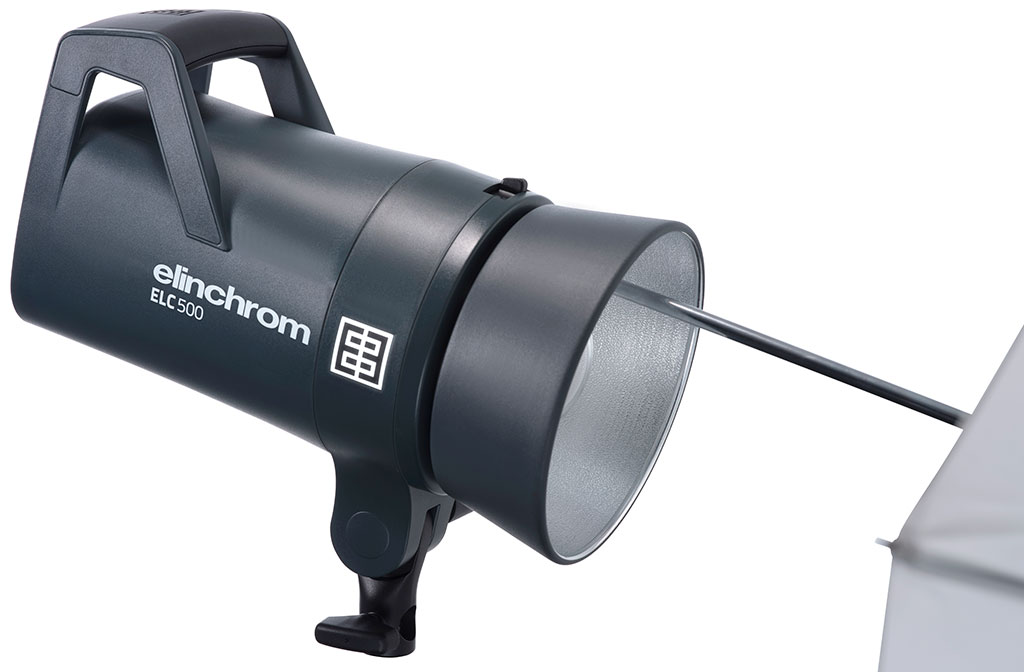
The umbrella tube is within the reflector area, as with previous Elinchrom heads, but it’s able to fit 8mm (very common) as well as 7mm (Elinchrom native, and less easily found) shafts.
The ELC heads can achieve either Standard or Action durations for any given power setting, toggled at the press of a button. The 125 can give 1/7750s and the 500 1/9430s at minimum power which is an identical 7 Ws in both cases. It’s a close enough match to mix the heads, you’re not going to see ghosting on super-fast subjects with the difference in durations involved. Since the LED modelling light in these heads is fully variable both manually and with a proportional link to flash power, it is possible to use the 500 within its 7 to 125 Ws range alongside a 125, and match the modelling to the flash exposure easily. There is no function similar to the D-Lite or BRX heads to apply a two-stop differential to modelling power.
Bright daylight LED modelling
TheLED iscentredon theflashtube and the rear display can show both modelling and flash power. The modelling when measured was sixteen times brighter than our iLux Summit 600E battery powered mono heads.
To give an idea how good the new modelling LED is, it’s a very bright CRI 91 source suitable for most daylight fill-in and video though the intelligent fan cooling of the heads works against movie lighting. It is sixteen times as bright as the LED fitted to competing battery-powered Chinese heads introduced a few years ago and still unchanged in this respect. It’s a 20W LED, which would be perfectly battery-friendly for brief use but can run all day at full output in a mains-powered head.
The head never heats up the way tungsten modelling lamp designs always have, even those with 50W peanut bulbs. This meant my 44cm rigid small soft box, conical snoot, optical spot and reflectors fitted with front diffuser or deep honeycomb could be left with full power modelling, for hours if necessary. For many photographers, the quality and brightness and proportional control of the modelling without any heat penalty will be reason enough to choose the ELC heads.
Songwriter Natalie Bays photographed using a 100cm deep octa softbox on ELC 500 close to the camera, with 44cm honeycomb rigid softbox on ELC 125 as a hair accent light behind to her right. The modelling is bright enough for reliable manual or auto focusing but also very comfortable for the subject.
While the TTL function tests out well, I’m still using a flash meter partly to check the relative brightness of each head especially when one is used for a side/back positioned accent light and one for a main light, as I did with the 125 and 500. I generally add a small amount of rim lighting to avoid dark subjects blending into the typically dark background. The tenth-stop control of these heads, individually or globally from either their very well designed and illuminated rear controls or the Skyport, allows fine tuning to traditional reversal film standards though digital shooting doesn’t need that. Just get the ratio right and don’t overexpose, at low ISO settings (anything under 800 these days) the shadows and exposure can be fine tuned from raw.
Practical photography tests with the Elinchrom ELC 125/500 TTL kit
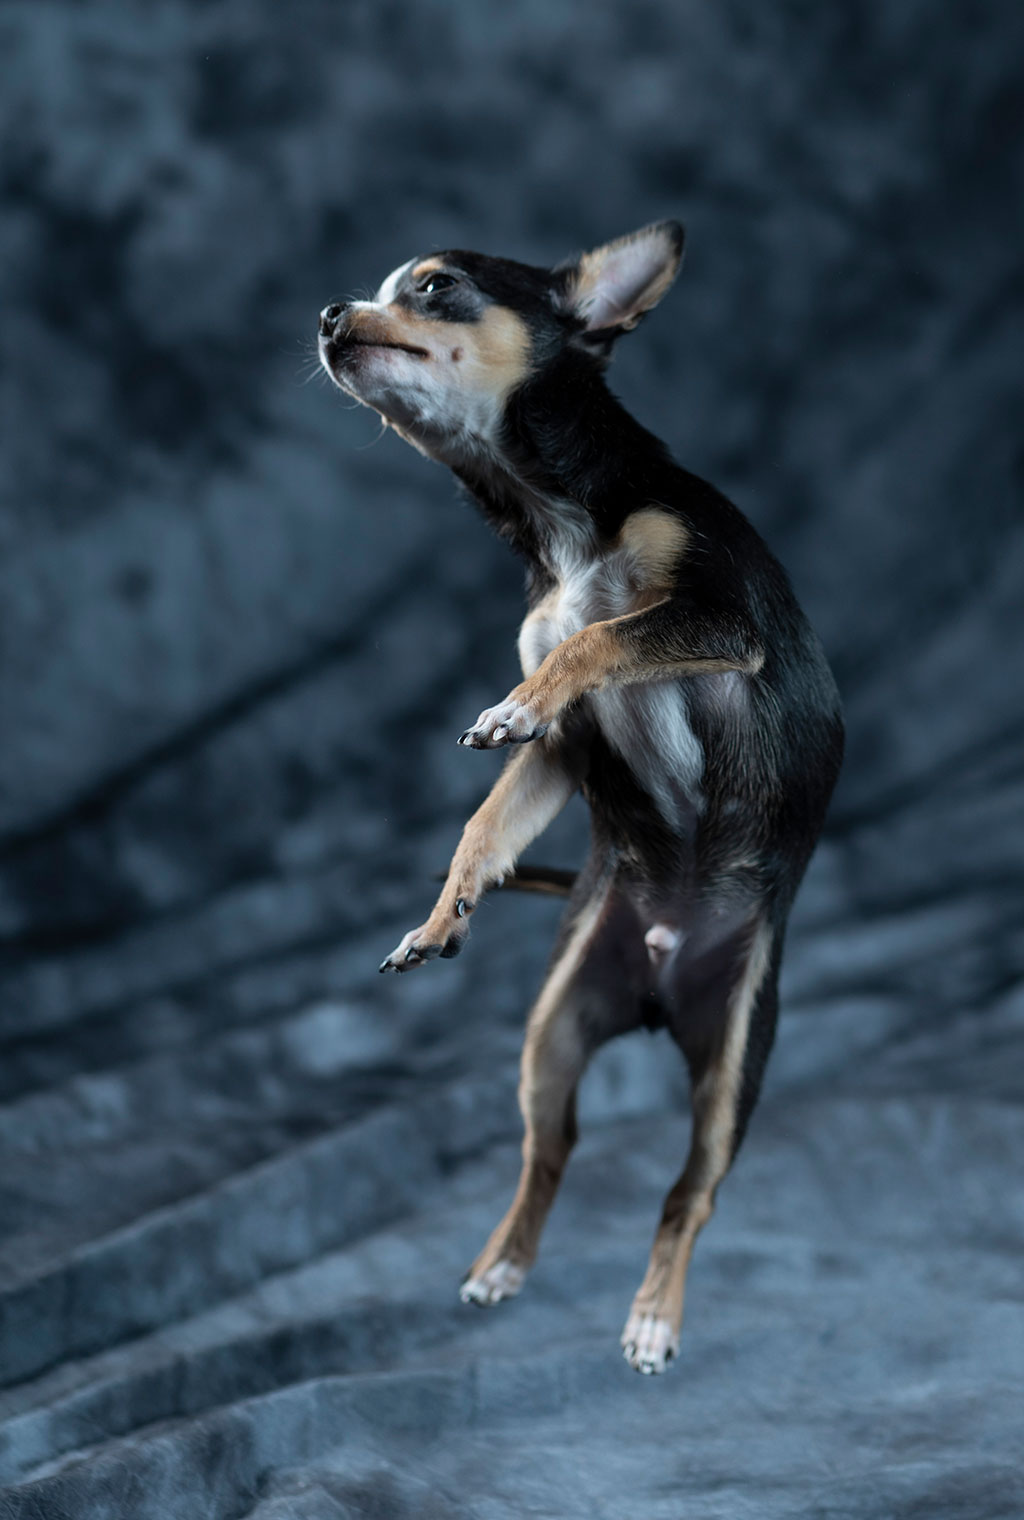
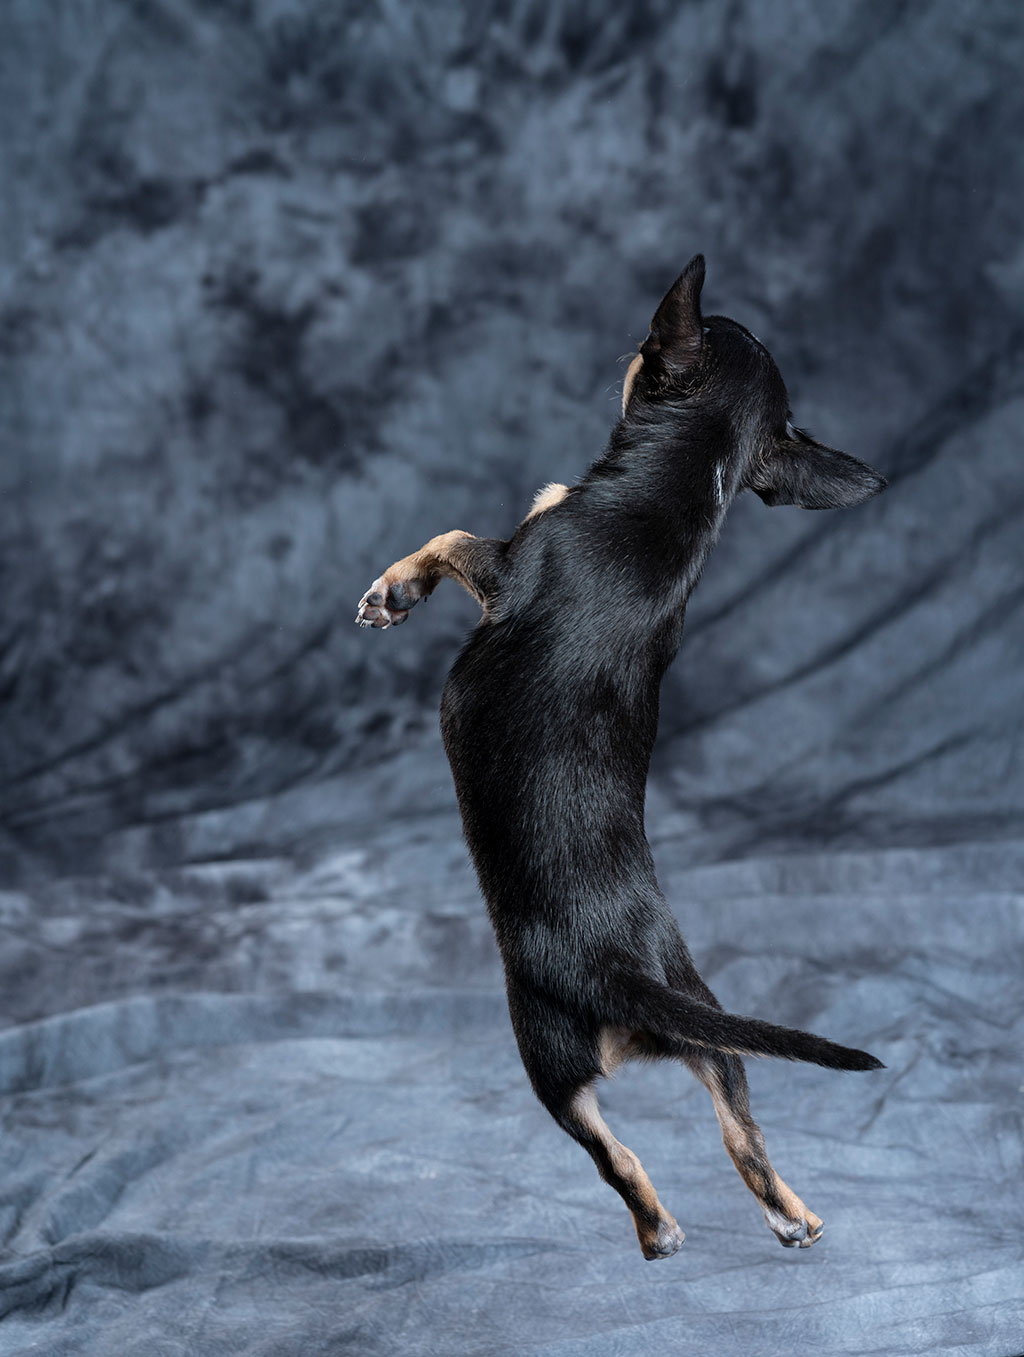
To test the 125/500 kit we did a shoot with Assistant Editor Diane’s chihuahua puppy Alfie who was up for an extended playtime jumping in the air after toys and running around the fabric backdrop. The modelling was set at full power to let the Sony A7RIII with 85mm f/1.8 FE lens track continuous focus at 8fps (Hi) and AF-C with Animal Eye AF enabled. Short bursts or single frames only were needed, and it was pretty amazing how precise the focus was working out at f/2.8. What may look like static poses were not!
Alfie’s photo shoot involved much running and jumping with AF-C and single frame or Hi drive setting. The two heads were set at low powers showing very fast durations, needing ƒ2.8 at ISO 100 with Sony’s 85mm f/1.8 lens.
We did a shoot using tomatoes dropped into a long glass of water, just for fun, using the fastest duration on both heads with closer positioning and ISO 640 to allow f/5.6, with manual focus and exposure by metering and test frames. The Hi+ setting (10fps) does reduce the dynamic range to 12-bit from 14-bit, so bright water in these is burned out, but that doesn’t really matter. The Tamron 28-75mm FE zoom used at 75mm had no chromatic aberration (always a risk with bright water reflections), and later on in the portrait below showed its sharpness, aided by the total absence of any exposure duration related shake. That’s a benefit which not all studio flash brings as durations can indeed be in the 1/200-1/500s range – the ELC 500 runs at 1/250s in standard mode at full power (t=0.1).
Water splash at faster than 1/7000s flash duration on both heads, shot using the Tamron 28-75mm f/2.8 FE at f/5.6, manually focused, ISO 400. From 10fps Hi+ sequence shots with nearly symmetrical flash to rear and sides. Below, variations on the theme – the bottom right hand shot is a composite of two frames, made possible by working on a tripod.Set-up design and tomato dropping by Assistant Editor Diane E. Redpath, lighting and camerawork by David Kilpatrick.
The longest sequence bursts were only two seconds at 10fps, and the ELCs had no problem keeping up and never lost a frame. Recycling with both 125 and 500 set to 7 Ws is just 0.06s working from 230V mains, so capable of better than 16fps. I didn’t try running the camera at full speed until it or the flash hit a barrier – trying not to use my 500,000 shot shutter life all in one day!
Start where you left off – a memory for the settings in use
One great benefit of the heads is the ‘mains always on’ function with a standby red glow on the rear power switch. The settings last used are remembered, as with most Elinchrom units even when switched off and on again at the mains – common practice with boom or track mounted heads positioned out of reach. The ELC ProHD models turn off completely if you do this and need to be switched on at the head (a service modification can change this). With ELC TTL heads, just switch off and on again at the plug and the heads come alive.
Ergonomically, the new heads are much improved. The bayonet lock is similar to the D-Lite latch but made stronger, and easier to use than a rotating rim. The tilting stand mount is very robust, the reflector centred umbrella shaft is increased to 8mm from 7mm and there’s no external one in the mount. The big grab handle on the top is needed as the barrel of the body is large to hold otherwise. The new standard reflector and other accessories are finished in very dark grey, a switch from the traditional light colour of Elinchrom. Some third party EL bayonet accessories didn’t fit the heads, as the body is tailored exactly to the profile of the genuine products. The new protective cap is compact, reducing overall storage size, but won’t fit heads with conventional modelling bulbs.
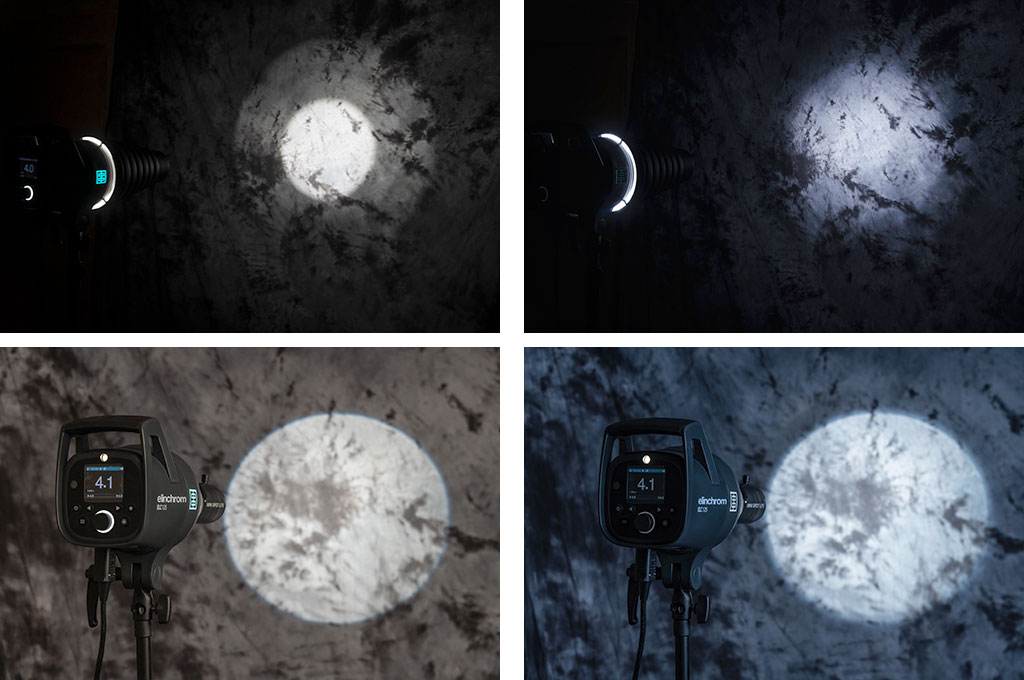
The LED modelling light in the ELC heads outputs 3000 lumens from a small circular source located dead centre of the ring-shaped flash tube. With the Conical Snoot, top, there’s a significant difference between visual modelling (top left) and flash exposure (top right). This also applies to some reflectors and also honeycomb grids, but not to softboxes with fabric panels, or umbrellas. Lower pair, the preview using the Elinchrom Mini Spot optical spot – which does not overheat with the LED – closely matches the final flash result.
The flashtube is covered by a ventilated pyrex dome. There may be a frosted one available in future to iron out any discrepancy in the modelling light and flash illumination, as previews and as shot. I found the LED gave odd effects with just a few light shapers, notably the conical snoot. Surprisingly, the optical mini spot was very faithful between modelling and flash effect – and naturally any reflected or soft sources worked just as normal. All small modelling sources produce different effects, and Elinchrom’s original Super Leuci large bulbs preview flash tube light better.
Benefits of cool running modelling with video-friendly brightness
With the new LED modelling there will be no bulbs to replace, so that’s a cost of ownership reduced. The flash tube and dome are user replaceable, the modelling LED is a service replacement. Does an LED have a longer life than a flash tube? From experience of LEDs so far, I’d suggest not. Time will tell. We have seen great advances in LEDs over the last few years. Elinchrom must be convinced that the unit they have chosen is a mature design and will have a long production life. It is, after all, the first time they have put LED modelling into an AC mains head and they have waited to be able to get this right.
As for video, each head still has an intelligently controlled cooling fan – even the 125. So they have limited use with sound recording. With any flash able to fire at a 16fps burst rate cooling is needed. For events, school portraiture, fashion or sports action shoots at typical power settings around 30 Ws per head the rate of firing may be slower but photographers don’t want thermal cut-out half way through a day of hundreds or thousands of shots. This is the big difference between the existing D-Lites, BRX, and ELC ProHD models – recommended duty cycle. At entry level you can shoot sessions with hundreds of shots, at the top level with thousands. The new ELC TTL heads have a medium-duty rating similar to BRX.
The standard duration mode, toggled to Action by pressing a button on the back panel marked with a star, offers 5600K colour temperature with a ±150K stability on the 125 head and ±200 on the 500. The LED is 5700K. Unlike flash heads with bright tungsten modelling, you won’t get a warmed-up result by using strong modelling and low flash power with a shutter speed like 1/30s or 1/60s. Photographers today often forget that some of the classic fashion, beauty, figure and portrait work of the 1960s to 90s was taken using studio flash with 650W halogen modelling turned down to minimum flash power to enable wider apertures, on medium format cameras like Pentax 67 or Hasselblad 2000F which synced at speeds like this. With leaf shutters capable of X-sync at 1/500s, speeds like 1/60s were used to allow the modelling to add warmth and enrich the colours on transparency or negative colour film. What you get from the ELC TTL heads and any mix of LED and flash, even with dragged shutter effects to combine movement flow with frozen detail, is a constant daylight colour temperature. The 3000 lumens output is enough to shoot at f/1.4 or f/2 hand-held for subjects like newborns, using no flash.
Our verdict on the ELC TTL system
In the ELC TTL heads, Elinchrom has combined most of the key features of mains studio flash with the functions of the ELB 500 TTL portable kit. The ELC ProHD models remain best for very heavy duty work, high power to 1000 Ws, and advanced programmable functions. For most users a set of ELC TTL heads will be all the studio flash needed for many years to come. The ELC 125, not much bigger than a D-Lite One, is ideal for social studios shooting portraits, groups, babies and small products.
The reliability of the brand, its 30-year history of British-Swiss synergy, and the solid service provided by The Flash Centre in the UK outweigh the cost advantages of buying one of the lesser competitors in the new field of TTL studio flash – makes which might be considered equal cost more. If your existing light shapers and accessories are EL fit, the decision is easy. If you’re moving from the Bowens S reflector fit adaptors are easy to find.
The ELC TTL heads are sold individually and also as kits – 125/125, 125/500 and 500/500. Prices start at under £500 for the single 125 to around £1,200 for two 500s in a well-designed bag, all heads coming with the new 16cm reflector and all warranted for three years.
See: www.theflashcentre.com – When enquiring please mention Cameracraft’s review! Affiliate links below help run this site if you choose to buy from them.
There’s been a controversy surrounding Steve McCurry, a photographer I have listened to on the edge of a conversation a couple of times courtesy of Kodak who were always great sponsors and put his ‘Afghan Girl’ on display at photokina 2012 where McCurry’s work was celebrated.
Here’s the story – he’s been changing, or allowing his retouchers and agents to change, the material content of some shots. This has included the removal of people, changes to their clothing, tidying up messy objects and distractions. First, this is not something new and great photojournalists never saw harm in burning in or dodging back areas of a print to make something disappear into a shadow or burn out to white. It was OK to use bleach on prints if needed to remove blemishes, including things which damaged the shot. It was even OK to use tints or pencil to enhance outlines so that newspaper reproduction didn’t lose the subject in a grey mush.
Well, here are some examples from my archives. One dates from 1969 and back when the first prints were made from this, with publication in The Guardian and various magazines, I used pencil and bleach to try to ensure the faces at the centre of the group were properly defined from the wall behind them. This was a very mild treatment and not very successful.
Here’s a not-totally straight print. Some detailed dodging and burning was done in the darkroom to try to get the definition needed between the blonde girl’s face and the wall. It was this lack of definition which meant it was never a real winner, though it did well enough in competitions. It was also taken on outdated Perutz film using a very cheap manual Hanimex lens – I was only 17 and could not afford anything more!
Once scanned, the print could be retouched digitally, Photoshop giving much more accurate control of burning-in the tone of the wall behind the girls. This is the result – it’s not a huge change. and I do not think anyone would suggest it falsifies the image.
Moving on, here’s another group of children – three kids in the timed-burst water play fountain at Alnwick Castle Garden. It’s a picture I was very pleased to catch, the best of three frames with the children at the best critical moment for action and composition. But in the darkroom I would certainly have burned in the people in the background to reduce their distracting highlights.
One of the principles of making a picture which works is to reduce it to a simple form. Extra faces always distract (we are drawn to look at faces regardless of composition). So, for this image, I retouched our the entire background scene. This would not be allowed by many competition, awards and some news or general media.
Since I offer both images as licensable stock, with the retouched version clearly identified as retouched, I don’t feel there is any wrongdoing here.
The next example is less controversial because it has no people at all. Wires interfere with the view of Hollows Tower, the old stronghold of the reiver Johnny Armstrong in the debateable lands as you pass from Scotland into England.
It’s not a massive task to remove the pole and wire mess. It falsifies the state of the scene, but only from a viewpoint which is not typical – most tourists see the tower as they drive past, from many angles.
I have not removed all the poles!
Finally, another example of where the infrastructure spoils the scene. In Holetown, Barbados, local ladies tend to dress up well to do the shopping and tend to stop to chat in the street. Even so, it’s a matter of framing and shooting quickly to catch a neat moment before they move on or something else gets in the way. And the wiring on the wall really does spoil the shot.
The retouching here was more complex. Is it a crime, or a routine part of modern photography?
My work is generally used by travel guides, or in articles and books relating to people and places, travel and everyday life. The meter on the wall clearly documents the real place. The retouched image is an imaginary place. However it’s not been removed because it was an ugly meter. It’s removed because it spoiled a shot which I liked.
You can make your own judgments on Steve McCurry or his retouchers. Did they alter the pictures because they were really spoiled by the way they were? I feel I would have been happy with the unretouched image in most cases or used less obvious major changes.
In the latest incarnation of Photoshop, CS6, the Photomerge function is faster than ever before and leverages all the context-aware, pixel matching math of the previous versions enhanced to a degree you’ll find hard to believe.
Sony NEX and Alpha cameras have the same technology built-in for their sweep panorama mode, but anyone who’s used this frequently will know that failures happen, like stepped sea horizons and double imaged or squished-flat people.
Photoshop has the menu item Photomerge under ‘Automate’ in the File Menu. It is a panoramic stitching function, but it does not need you to shoot with a tripod or even shoot with care. You can stick a wide angle lens on your camera, take two pictures with radically different vanishing points, and still end up with a neatly stitched perspective.
What you need to know is how to NAME your images or what order to shoot them in. Contrary to what you might expect, Photomerge inherits its geometry from the LAST image in your sequence. So, if you have these three images:
This is the order you need to name them. I shot these with the bottom one first, of course – my level horizon straight-on shot. Then I aimed up, and then up again, overlapping three shots. If I then select these for Photomerge, Photoshop will correctly realise I want a vertical panorama stitch but it will not use the straight-on shot to set the image angle and geometry. It always picks the LAST shot, so I must rename my JPEG conversions 1, 2 and 3 as they appear above.
If your open tabs, or the stacked order of open windows, does not place the target perspective LAST you’ll get the wrong result. Here is what happens if the first shot (the bottom one above) is placed as the first tab in a multi-tab PS window, or the top window in a stack of separate windows, before adding OPEN FILES to the Photomerge window:
I used the NEX-7 with the 16mm f/2.8 SEL wide angle for these three shots. The composite, before cropping, measures a substantial 130MB. This technique enables you to use almost any wide-angle lens to create impossible wide views.
Here is the result when you stack the shots in the right order, so the program takes its perspective cues from the vertically-correct frame (the last one shown at the top):
You have no manual control over the perspective rendering. It’s all down to feeding Photomerge the right images, in the right order. Here is the fine tuned and cropped result:
This is an unretouched merge of the three frames. I’ve been trying this on various subjects, some rather silly, and Photoshop CS6 simply nails the merging even with focus, exposure or tilted camera errors. There are much lower cost programs which stitch images and do it well, but this takes a matter of a few seconds to create a final image equal to 40 or more megapixels. Not bad for a tiny 16mm lens!
Tip: instead of adding Open Images, browse and add one at a time, making sure the perspective-key shot is the last one added.
If you shoot architectural or landscape images, this function’s enhanced performance allows you to leave behind your 8mm. Except, of course, you don’t have one. If you do have an 8mm, welcome to the world of 5mm…
Added example – the next day…
I returned to the building (the other end of it) the day after posting this article because I wanted to add something far more complex, still shot by hand, using the NEX-7 and 16mm, showing just how amazing Photomerge has become. I wanted foreground and background elements, complex geometry and a matrix of shots not just a row of them.
Here is my matrix of shots – every one of these is an 85° diagonal view, 16mm on APS-C:
Here is the result of the Photomerge window before final adjustment and cropping:
This is a 400MB+ Photoshop document and over 200MB in flattened data size. Below is the final crop, with a small rotation and correction of vertical perspective:
This is a 119MB JPEG 6919 x 6013 pixels in size, no retouching has been used and the raw conversions are default with the 16mm E lens profile. Some fringes remain visible, the image could be downsized and corrected further. Remember.. this is the often-criticised 16mm which I find to be an excellent little lens. You can download the full size sRGB JPEG saved to Level 10 quality (14MB file) from the link below if you are Photoclubalpha subscriber. It will not appear if you are not a subscriber.
MANY photographers habitually use layers from everything. I don’t! In fact, I try to minimise my time spent on post-processing shots for stock library sale, and work very quickly. If it needs complex setup or demands working using layers to be able to go back and change things, I’ve probably already wasted too much time. Here’s an example of an Alpha 700 shot created from two slightly different versions, and how it was done.


