Capturing Autumn colour better

nopolariser-vs-polariserandprofile-web

Upper: unprofiled (Standard) raw conversion. Lower: using a tunsgten-light generated custom camera profile, combined with a polarising filter, gives a more vivid impression.

Most Alpha system users know that some – not all – cameras have a special JPEG mode for Autumn Colours. They’ll also know that if you shoot raw, with no JPEG in camera, only Sony software replicates this. The choice of picture looks or camera profiles in Lightroom and other programs ranges from none (one default) to good (a full basic range similar to Canon settings). However, you can go way beyond the default look your camera will produce from the Autumn colours we are seeing right now (UK) if you profile your camera using the X-Rite Color Checker Passport and the free downloadable software which goes with it. You can also use this software with any standard MacBeth Color Checker card.

You still need to create a .dng file from your original raw, as you also do for Adobe’s free camera profile generator. The X-Rite software creates much smaller profile files but they are no less effective.

Here’s my tip – normally, you calibrate by daylight and the Adobe Camera Profile (.dcp) includes automatic adjustment for tungsten. You can also take two test shots, one under each lighting condition. Experimenting with the X-Rite software, I found that if you only use tungsten to create your profile, all the daylight ‘landscape’ colours (especially green foliage and the sky) really pop out. The greatest change is in the sky blue, which can be very disappointing if you use Adobe Standard as your camera profile for raw conversion.

A7RIIprofiles

The zip file you can download from above contains some .dcp profiles for the A7R II which I’ve produced (the names are more or less self-explanatory). They should be unzipped and placed in the CameraProfiles folder of Camera Raw in Application Support>Adobe. You can find the software, instructions for PC and Mac, at:

http://xritephoto.com/ph_product_overview.aspx?ID=1257&Action=Support&SoftwareID=986

Using the stock Lightroom/ACR A7RII camera profiles you’ll find that the Landscape flavour tends, if anything, to make sky blue lighter. My tungsten-generated profile has most of the overall ‘snap’ of Landscape plus very much richer sky tones.

The second tip with Autumn/Fall colours is, of course, to use a polariser. I’d say this makes the single greatest difference to all Autumn colours even if you can’t see it clearly when composing. The individual leaves reflect light, and the polariser cuts through this to reveal the full colour. Because it also darkens the sky, the often fairly dark colours of Autumn trees come to life better. You don’t need to study the trees, just set the polariser for the best results with the sky. The leaves are at such random angles all positions tend to work equally well. It can however be worth trying a few different rotated positions of the polariser especially if there is also water in the shot. What deepens the sky may also reduce the strength of reflections in water. Experiment!

– David Kilpatrick

If you are considering buying a Color Checker, Color Checker Passport on Amazon can benefit this site.


Low-cost macro for the A7 series

It’s been a while since my last review of Sony products here, and not because I have been inactive. The truth is that I’ve spent so much on Sony kit 24/7 working has been necessary, including a good few reviews and tests of the A7RII and lenses appearing elsewhere. It’s a real issue, I now lose so much value with the lightning-fast depreciation of Sony’s products within a few months of launch that my old tactic of buying, reviewing and selling no longer works. For one thing, no media in the world will readily pay a fee which even matches the amount you might lose on a camera body in the A7 series over its first two months of retail life. Sony have been good enough to lend me a few items for brief periods but you really can’t form any useful opinions on such radical and new hardware on that basis.

However, my A7R II report is shortly on the way, and the extra time spent using the camera and suffering the damage to my credit card does not harm the process. It helps put the gear in context. I’ve resisted the anti-social pricing policies of the UK camera retail environment for some time, even buying one grey import from Panamoz. So it’s appropriate that my first article for a fair while should be intended to help you save money and get great results from any A7 full frame FE mount camera, while also supporting a company whose UK pricing policies are entirely reasonable – Sigma.

The Sigma 60mm f/2.8 ART DN lens

The butterfly above is one example of what this lens can do on uncropped full frame, in this case adding a single 16mm extension tube, which we’ll come to later as the exact type of tube you buy matters a great deal!

The neat, low-cost 60mm f/2.8 is the portrait lens in Sigma’s Art DN lens trio for APS-C and MicroFourThirds mirrorless systems. I’ve used the 19mm f/2.8 and 30mm f/2.8 as well, but the 60mm is my favourite. Originally, I tested it on Olympus MFT and the 50cm close focus with their 2X factor made it almost feel like a macro. It’s actually just 1:7.2X scale, but 1:3.6X relative to full frame on that smaller sensor. That’s a really good working distance and subject scale.

I was curious to see how much of the full frame the 60mm would cover. All these Sigma lenses are just £129.99-£139.99 retail at most UK dealers right now. They are beautifully designed and made, very light, use 46mm filters and have advanced optical design giving high contrast and first-class full aperture sharpness. Well, the answer is easy enough; you’ll get more than APS-C, with a 24 x 24mm square format crop working well, but not anything like full frame at any aperture from the 60mm.

This is the closest focus of the Sigma ART DN 60mm on the A7R II, uncropped.

Sigma call it a telephoto, with its rear nodal point much closer than 60mm to the focal plane. But its design signalled it would probably perform well as a macro lens too.

Meike extension tubes

So, we add extension tubes between the A7-series body and the lens. There’s one prominent make, Meike, and a couple of years ago I bought their very low-cost fully electronically coupled plastic 10 and 16mm twin tube set. 26mm of extension is not much. It won’t even make the E-mount 35mm f/1.8 focus to 1:1, and does even less with a 60mm. However, what it does is worthwhile combined with the lens’s own focusing range.


I found my plastic Meike tubes have a narrow circular throat and cut the image off all round. But, you say, the image was cut off all round already, so what could be done?

When you mount an APS-C lens on tubes, it covers more than APS-C. Put it on tubes adding about 1.4X to its focal length – like using 26mm of tubes on a 60mm lens – and it will cover full frame. You are moving the lens further from the focused plane, and as you do so, its fixed angle field of sharp coverage grows (it more or less follows the inverse square law, as does the effective working aperture of the lens when you use tubes). So a lens made for the NEX sensors, c.16 x 24mm, can cover 24 x 36mm when used on tubes for close-ups. The 60mm on 26mm of tubes would cover 24 x 36mm even with no leeway. Since the lens already has a good image circle, it turns out that it covers 24 x 36mm when used on the 16mm tube alone, and shows just a hint of corner cutoff with the 10mm tube alone. With both, it covers the full frame easily.

This is the result of using a 10mm metal extension tube – not the plastic set. The plastic design cuts off even more than the lens used on its own.

Meike understand this. They have a newer, metal-mount extension tube set costing about twice as much as the original plastic one. To get it, you must search for Meike metal extension tubes – and they are not easy to identify for certain. There’s very little explanation on-line. These tubes have a full width throat with baffles top and bottom, more or less matching the 24 x 36mm frame shape. Some black flock paper is glued in to prevent light reflection at the sides, but none is fitted top and bottom, and this is the main weakness of the design (you can obtain flock paper and fix this yourself).

Twin set, no pearls

Used alone, the metal Meike tubes turn the Sigma 60mm into a very good close-range long standard lens for the A7 series. I found that you can add the plastic tubes next to the lens, not next to the camera, and suffer no cut-off. This combination of four tubes adds 52mm and makes the Sigma 60mm able to do 1:1 with the addition of its own AF range.

You need to understand sensor-based stabilisation before using any manual lens on tubes (which these are equally suitable for, with adaptors). The A7 II series bodies use the focal length and focus distance of the lens as transmitted to the camera to control the Steady Shot Inside function. As far as I can tell from practical tests, the Meike tubes do not transmit any change to the information reaching the CPU, but SS seems to be OK with such relatively minimal extra focus extension.

This shot was taken at 1/15th hand-held with the 16mm tube on the A7R II, ISO 800, 14-bit uncompressed raw, f/8 on the Sigma 60mm lens. There’s no significant corner vignetting with 16mm of extra extension to the lens.

This is a 100% clip from the shot.

When I mount my 50mm Macro SMC Takumar on the A7R II I use either the SSI menu control, or the Lens Compensation App, to tell the SSI system I’m using a lens with an extension in place. It focuses to 1:2 size, and for this I tell the camera I’m using a 75mm lens not a 50mm. If I add 26mm of tubes, it will focus to 1:1 and I need to tell the camera I’m using a 100mm lens. That’s because a 50mm lens extended to 1:1 focus has the same camera shake characteristics as a 100mm lens used on a distant scene. Be careful, as this relationship only holds good for simple lenses (Tessar, Sonnar etc) and not for any zoom lenses, or any macro lens which uses internal focusing. If you mount a Tamron 60mm f/2 macro on your Sony body using a dumb adaptor, just tell the camera it’s got a 60mm attached. The Tamron changes focal length to focus, but the effect for anti-shake purposes is that it remains a 60mm. Its angle of view remains unchanged as you focus, while my 60mm Sigma when used at 1:1 repro covers half the angle of view it does at infinity.

I am not entirely sure whether the Meike tubes work properly with SS Inside, or if the system simply has enough latitude to function with my degree of unsteady hand-holding. Those contacts just seem to make a connection, with no chip to add information. The EXIF data does show the focal length correctly, and the set aperture (which will be a reduced effective aperture at closer range, 26mm of tubes turns 60mm f/2.8 into a working f/4-ish). But the focus distance is shown as whatever the lens focus function chip confirms – a range of 50cm to infinity. That’s obviously incorrect when tubes are added, in contrast to using a dedicated lens like the Sony 90mm f/2.8 FE G OSS Macro, which will show the true focused distance in the viewfinder and also pass correct data to the CPU.

So, a warning – the 60mm plus tubes is not technically perfect but seems to work well enough.

When you use a tripod or flash, or a fast shutter speed, and turn off Steady Shot none of this applies. In practice with shutter speeds fast enough to stop subject action or wind vibration, it all goes well. The Sigma is very sharp even though not designed for macro range work, but that’s typical of this type of lens – even if 8 elements in 6 groups with several low-dispersion elements is not basic.

sigma60mm-26mmtubes-iso800-A7RII

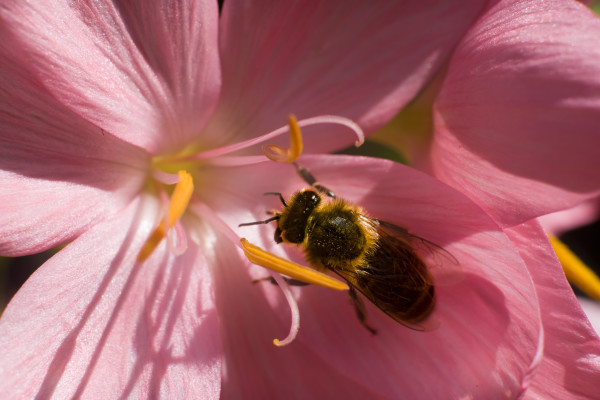
Here’s an example with 26mm of tubes plus some lens focus range. The ISO 800 14-bit uncompressed file has allowed some work on the bee’s back which lacked contrast. Click to open a 2048 pixel wide version.

sigma60mmf9on20mmtube-iso800-A7RII

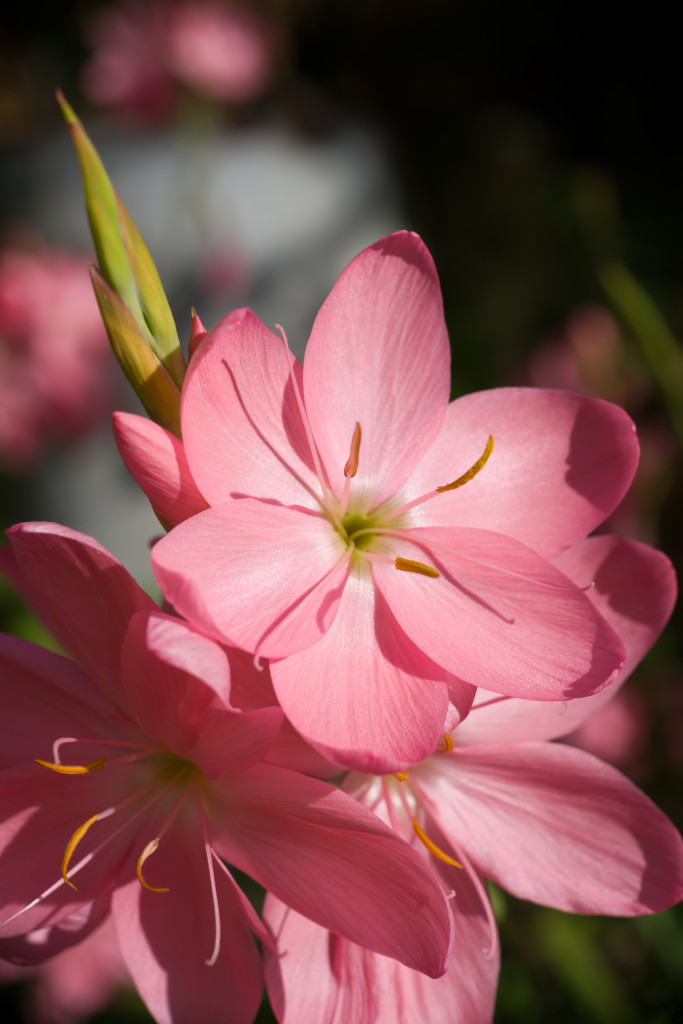
Here’s an example which clicks through to a full size A7R II AdobeRGB JPEG (no doubt much crunched by WordPress image storage) taken at f/9 on the 16mm tube. If any of my image files have 20mm in the filename it was the 16mm tube – I’m so used to the lengths used by regular SLR mounts! The 60mm has a seven-blade aperture and gives pleasantly neutral defocused quality behind the subject. You can call it bokeh if you want to. Thank you, Scottish weather, for keeping a few flowers in this condition and giving me some sunshine just after the 14-bit uncompressed raw upgrade for the A7R II arrived.

The Metal Meike extension tubes have the same essential benefit over the plastic version with all FE and E mount, and legacy, lenses used of the A7 series full frame bodies. You can use them on the 28-70mm, 24-70mm, 55mm f/1.8, 28mm f/2 and most lenses though they have little use with the 70-200mm and I would not recommend hanging a 24-240mm off a tube.

Footnote July 2017: I now have the 50mm f/2.8 FE Sony macro. It’s a very nice lens, indeed, but the internal focusing means it’s really more like a 40 to 35mm as you get the subject bigger, and you end up just millimetres away. I compared using this lens on 26mm of tubes to focus on a target 7.5cm wide with the lens itself set to infinity (and therefore, 50mm). Working distance from the lens rim to subject – 11cm. Then I took the tubes out, and focused the lens using its own range, on the same target. The clear distance was reduced to 7.5cm. Now you know why you need tubes and probably don’t really need a macro lens.

– David Kilpatrick

If you have found this article useful, you can support Photoclubalpha by using affiliate buying links (we are not sponsored or paid in any other way, except by selling subscriptions to f2 Cameracraft).

Sigma 60mm at B&H

Vello metal mount extension tubes at B&H (similar to Meike)

Sigma 60mm F2.8 DN for Sony E – Silver from Amazon UK, no idea why they have none in black

Neewer metal extension tubes – much better price than Vello! on Amazon

Visit Wex Photographic and search for any items (UK)

A7RII versus Pentax 645Z

At a workshop given by John Denton for The Flash Centre, with Elinchrom lighting and Pentax 645Z demonstration. model Laura posed for a comparison pair of shots using the Pentax with 90mm macro lens and the A7RII equipped I regret to say with a much inferior lens, the basic 28-70mm.

To compare the quality bear in mind that the Pentax was ISO 200 at f/5.6 and the Sony was ISO 400 at f/8 as I felt it necessary to stop down – I should not have, as I had forgotten than the 28-70mm is sharper at f/5.6 than f/8, which introduces local unsharpness to the left hand end of the image (landscape) and did with all three samples I have used. This means the model’s face is smeared on the Sony shot, because this lens can’t produce a sharp image under these conditions in that part of the frame. Yes, I’ve had some OK results, but this was the first time I used the 28-70mm on the A7RII. It is OK on the A7II and A7S, as the blur is not so visible at those magnifications. It’s really not good on the A7R or A7RII.

So, please examine everything except the face…

This is the Pentax shot. Despite the matched for theoretical exposure, it is much darker and the ISO 200 is only equal to ISO 100 in Sony terms. Daylight balance set for the flash, Adobe Camera Standard profile since no other is available.

Here is the full resolution link to 146MB (if opened or downloaded) original:

http://www.pbase.com/davidkilpatrick/image/160895282

This is the Sony shot. The Camera Portrait profile in ACR gave much improved skin tones, so I’ve used this. The pBase link appears to have scaled the images proprotionally, so the 42Mp image is correctly smaller than the 50Mp.

Here is the link to the 120MB original:

http://www.pbase.com/davidkilpatrick/image/160895292

Enjoy – John teaches retouching and has set up deliberately harsh lighting to create over-sharp skin and too much detail, which he then expertly ‘fixes’. My shots are un-fixed. His workshops are worth every penny as he delivers an entire set of notes and his Photoshop actions to all delegates.

– David Kilpatrick

A7R II – universal solution, lens challenge

I’m under pressure to take endless pictures with the A7R II which arrived from WEX (Warehouse Express) on Thursday superbly packed. I am also finishing off f2 Freelance Photographer magazine to go to print over the weekend and have many hours of work to do – and despite having the camera, I won’t be removing some other article to rush a scoop into print.

It’s actually pointless to attempt to review any camera until you have used it for a few days at the minimum, with deliberate testing in mind, or several weeks with normal unplanned uses to confront it. Nothing tests a camera (and photographer) quite like real world pictures which are not hunted down as test subjects.

But of course I have gone out and taken a few shots during a brief period of sunshine which has returned after days of rain, and replicated a set-up I shot few weeks ago on the A7R, also to test a new type of combined LED and flash lighting head (Bowens IC12).

First of all, the £2695 UK price has to be compared against the A7S, A7II, or A7R with due accounting for its useful bonus – this camera body comes with the usual USB charger block and a battery, and then a further Sony external battery charger (remember them?) and a second battery. At Sony RRP this is £76 (battery) and unavailable (charger) but surprisingly expensive when it was. It’s definitely £100-worth of extras. There is also a screw in, not clip in, screw clamp grip twin USB/HDMI tethering lock device which could also securely grip mic and headphone leads.

Unboxing should hold no surprises now, but firing up the A7R II was a familiar experience as so many of setting customisations turned out to be factory preset to my own preferences. It still needed the image size and filetype setting up, AdobeRGB, Date Form folders and a few other things I used. And then, at last, the entry of copyright and byline information to be embedded into every image!

The A7R II takes the same GGS screen protector as the A7II and the RX100 series, not the same as the A7. First job was to stick a temporary protector on, and order one of these. All my cameras have GGS glass on them from day 1.

kelsotownhousejul30-16-web

I used the CZ 16-35mm f/4 lens for a few outdoor shots and also for a test or two I will not release (too many tripods, cat trays and empty boxes in shot!) indoors at up to ISO 6400. Basically… you can use Auto 100 to 6400 and as long as you set Luminance NR to 25 from 400 up and increase it gradually to 50 at 6400 (LR/ACR) the images will be smooth and noise free as well as sharp. I also enter NR 10 even at 100, because it helps keep sky blues smooth.

You can view or download and examine, as you wish, a full size 120 megapixel from this from my pBase library – http://www.pbase.com/davidkilpatrick/image/160888201

You can view at ‘large’ which is really small… select ‘Original’ to see the original, of course. Or a tiny corner of it! If you think the 16-35mm is at the edge of its performance at f/9 in this shot, you are right. Anything wider and the corners and ends of the shot become visibly soft at 16mm. This test shows me that where f/9 was fine for 24 megapixels, I’m probably going to go for f/11 or even f/13 as a standard setting with the A7R II.

driedflowers-A7RII-web

This is not a fair test even yet, but it says a few things. It’s taken on a late 1960s Asahi Pentax SMC Macro Takumar 50mm lens (I enter 75mm in the App data on the camera to ensure correct SSS) set to f/11, which is actually around f/14 at this working distance/extension. The camera is hand-held, with a Sony mini flashgun on top bounced to trigger two Bowens IC12 heads set to flash mode, after first doing the lighting and subject adjustments in LED Video mode. With these unique heads, the flash and the video modes are 100% identical in terms of how they cast shadows. The flash was set to 1/1 power at 1/1000th for a bare fresnel spot on the left, and 1/2 power at 1/1000th in a small Apollo softbox above and to the right. Focusing was done using the magnify function by moving the camera (or head and hands, in effect) over the subject.

Again, you can view a 100% 120 megapixel version of this: http://www.pbase.com/davidkilpatrick/image/160888192

Because this is very low power LED burst flash I need to set the ISO to 800, which would never be chosen for detail. NR is at Luminance 25 in Adobe Camera Raw (adjusting only that top slider). There is a full dynamic range with deep shadows and brightly caught surfaces. No adjustments have been made to the raw file in conversion for contrast, colour or exposure. I think it represents a very highly quality for ISO 800 and to see the level of microcontrast and detail, you need to examine the lowest contrast surfaces – the rounded bodies of the poppy heads. Throughout the image you will find areas of sharp focus and softer focus and it’s easy to tell the maximum sharpness zones. I also made an exposure at f/16 and this is significant softened by diffraction as you would expect. At f/8 this macro lens is likely to be sharper but with a file size like this, depth of field rules go out of the window. You need to use the same technique as would be employed when planning to make a 20 x 30″ print from a 35mm negative!

I will have more images soon enough. My initial impression is that the A7II really fixed the ergonomics of this camera type, the A7R II is identical; its functions cover all the functions found on every different A7 series body sufficiently well to make it one camera for all purposes.

– David Kilpatrick

The link to Warehouse Express is an affiliate link and purchases made through this link benefit the publisher


1 2