
Gustav Kiburg has done an extensive test between these two lenses, posted in a Dyxum.com forum thread:
http://www.dyxum.com/dforum/comparision-test-sony-70-400-vsminolta-400mm-f4_topic46212.html
It’s well worth checking out.
– DK
Tag: 400mm
-
Sony 70-400mm vs Minolta 400mm f/4.5
-
Sigma classic 400mm tele quick rechip
There is no need to dismantle the mount of the original series Sigma AF TELE 400mm f/5.6 lens, to bring non-functional versions (old chip) up to speed with later film and current digital SLRs. The whole process takes under five minutes, and requires two tools – a small Philips screwdriver, and a precision end cutter.

The appeal of the original AF TELE and the later, identically sized, AF APO TELE should be obvious. They weigh in at less than 900g in the first non-apochromatic version, which like the later apo (1053g) will only focus to around 4 metres. The cost and weight penalty for the later, much larger, Apo Tele Macro focusing down to 1.5m is considerable.
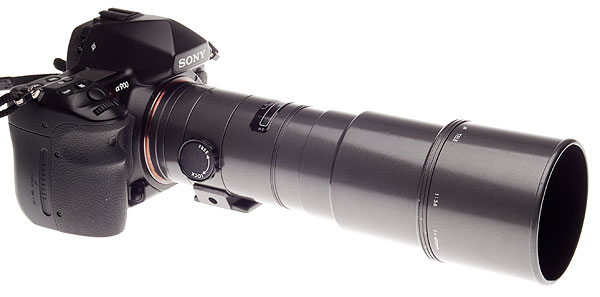
This lens – an original version in gunmetal finish – is impressively solid, a real metal barrel with a precision made extending hood, lined like the rear lens tube with flock anti-reflection black. The mount is well made, the tripod collar is ultra-neat though fitted with only a 1/4 inch thread:

The dilemma is that inside this lens is a chip which means it won’t function at all on digital SLRs and many later film SLRs (almost anything which actually says Dynax or Maxxum on it won’t work, this lens was made for the original 5000-9000 Minolta AF series). It will not even work in a manual focus mode, as the chip reports an error, not just ‘no lens fitted’.
The answer is to rechip the lens using a new contact plate array fitted with a new chip, provided for around $60 including post by James Lao in China:
http://eadpt.cn.webz.datasir.com/eadpen.htm
This service is absolutely reliable, James emails to check the lens type you want to rechip, sends using signed-for post and I had my new chip in just four days to the UK.
Some reports on how to rechip the lens advise dismantling the entire rear mount. This is not needed, nor is any sanding or cutting with a hacksaw. A pair of miniature end cutters as used in the electronics industry for trimming wire exactly will do the job – so will luthier’s fret end cutters, and many pliers with high precision wire cutters.
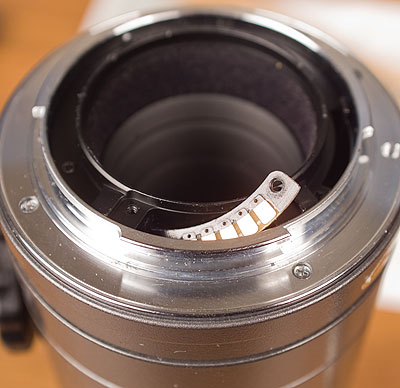
The original contact array looks like this:

Note that the board does allow the countersunk head screws to lie fairly flat. Removing the screws over a suitable tray, with the lens held sideways, requires a No 1 jeweller’s screwdriver – 1mm or 1.5mm will do well. I used a screwdriver set with an illuminator in the handle.
With the old board still attached to its ribbon cable, just ease it up, twist it and push it into the void the left as viewed here. If badly placed, it can inferfere with the aperture mechanism, so after fitting your new chip and testing the lens, I suggest opening up again, pulling the old board out and cutting it off for good. It will never be needed again. Check the aperture lever operation anyway to make sure the board, when pushed into the lens, is not jamming the action.

Here’s the contact side of the James Lao board. Note that it has excess substrate on the ends, which will need shaping down to fit, and that the screw holes are brass lined. This will result in the screws being very slightly raised when it is fitted, but this is not an issue, just a cosmetic difference.

On the back is the new chip, connected by small wires instead of a ribbon cable. It is not as fragile as this shot indicates, nor are you likely to damage it through static unless you groom the cat first then rub a balloon, stick it to your 8ft 6 regulation height ceiling and walk across a nylon shag pile carpet wearing crimplene trousers. But it is not 1975, so no worries there…

This is a pair of fine end cutters (so called because the clipping edge is right at the front, not set back by angled grinding/sharpening). It can be used to clip off the excess, then nibble the correct shape at each end, with minimal effort and no risk. No dust is created but little bits of board do fly off and land in watching eyes, so wear glasses or protective goggles if you do this. I wear off-the-shelf reading glasses, it makes this sort of small work much easier.

The trimmed new board will fit easily and firmly into the space left by the old one.
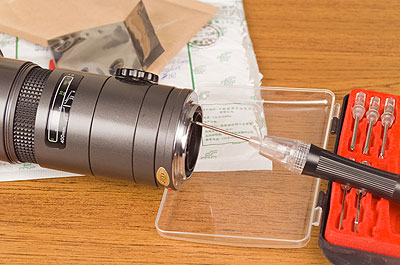
Here’s how I replaced the screws. My screwdriver is a good enough fit to hold the screw and introduce it to the hole with the lens safely over the lid of the screwdriver kit. Do not stand the lens upright and do it from above, you risk losing a screw inside the lens. This way is safe.

Once fitted, it is perfectly functional though the trimmed ends and non-recessed screws make it look a touch agricultural. You could black-pen the ends I guess, but this is not going to affect flare or any other aspect of the final picture quality. Note the flock-lined rear lens tube – these optics were well made, 20 years ago.

Taking the lens out on the A900, not a very good day, ISO 400 and really wide-open are the defaults, I found that it absolutely must be stopped down to f/8 to be useful. This quick snap of a blackbird on the roof actually shows very fine detail:

This is un-sharpened, with some NR, and is at +1.3 plus brightness boost in processing – in other words, really ISO 1600 on the A900, not ISO 400 as set. The tiny hair-like feathers are resolved at f/8. Not all my first attempts to autofocus the lens were as accurate, it’s easily confused and dithers even if it does not hunt. Into the light, it’s pretty awful on anything which shows the serious level of CA present in an original version at f/8, click the image for the full size view:

Colour bokeh? Yup, red and green, your own Christmas decorations provided free for every tree. It can be improved in ACR from raw, but really, this sort of subject (edge of full frame shown) is best avoided.

Here’s another quick snap in the garden, not much sun but not totally dull, again managing f/8 with a reasonable shutter speed (1/200th I think on this one). The 100 per cent clip from the A900 shows a decent level of detail, without adding any sharpening:
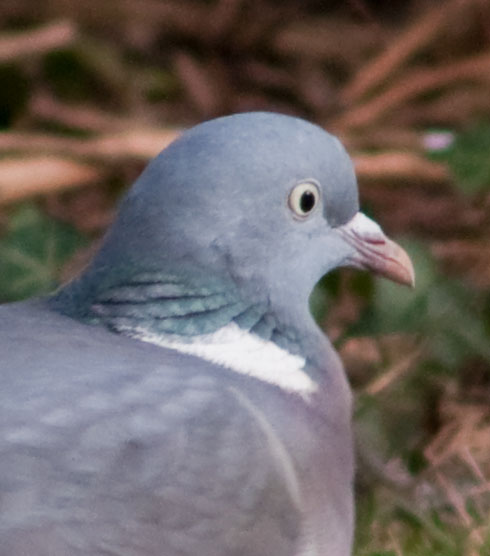
It’s soft but remember this is part of a five to six foot wide image. At f/11, which I may get to try in better weather, and at ISO 100 on the A700 cutting off the rather CA-prone outer field and getting that valuable effective 600mm-angle view – well, it’s probably worth it. I do not get much better than this, and often get worse, from the Minolta 500mm f/8 mirror lens on the A900 at ISO 400.
The rechipping operation is so fast and hassle-free there is no great risk in buying one of these lenses at a bargain price, against the risk it will not work on your digital SLR. You can make it work. For 7D/5D owners where the resolution is less challenging, it would be a great buy. Do not expect fast focus – it is not – but the handling more than makes up for that. Balance and feel are just great, and the sliding collar which covers the moving focusing ring is a great design feature.
– David Kilpatrick