Sony 28-75mm f/2.8 SAM on mirrorless FF

SONY DSC

With the 24-70mm f/2.8 new Sony GM FE lens selling for £1799 (UK) and the A-mount version two 24-70mm f/2.8 for a full £100 more, the cost of a basic mid-range zoom to use with a camera like the A7RII remains very high. There are good arguments to be happy with the 24-70mm f/4 FE zoom, or even the 28-70mm f/3.5-5.6 though that is best limited to use on the A7 (24 megapixel) and A7S (12 megapixel) bodies rather than the A7R (36 megapixel) or A7RII (42 megapixel).

Of course there are good lens adaptors out there and 24-70mm f/2.8 lenses from Canon, Tamron or Sigma with ultrasonic focus drive in Canon EF mount offer one solution. The original 24-70mm f/2.8 for A-mount with its SSM motor of this type can also be found for a fair price. But there’s one lens which I sold after my A7R arrived, mostly because I was parting company with my full-frame A-mount body survivors. It’s the Tamron-based but Sony revised SAL 28-75mm f/2.8 SAM.

Although I did have an LA-EA3 adaptor to use SSM and SAM drive A-mount lenses on the E-mount bodies, the 28-75mm didn’t really work very well on the A7R so it remained on my A99 or A900. I made a few tests and saw that it was certainly OK on 36 megapixels, though even on the 24 megapixel A99 where it played nicely with the AF system it had slightly soft corners when used wide open. They were not any softer than the 24-70mm f/2.8 Carl Zeiss of that time and in some ways the lens was better behaved.

SONY DSC

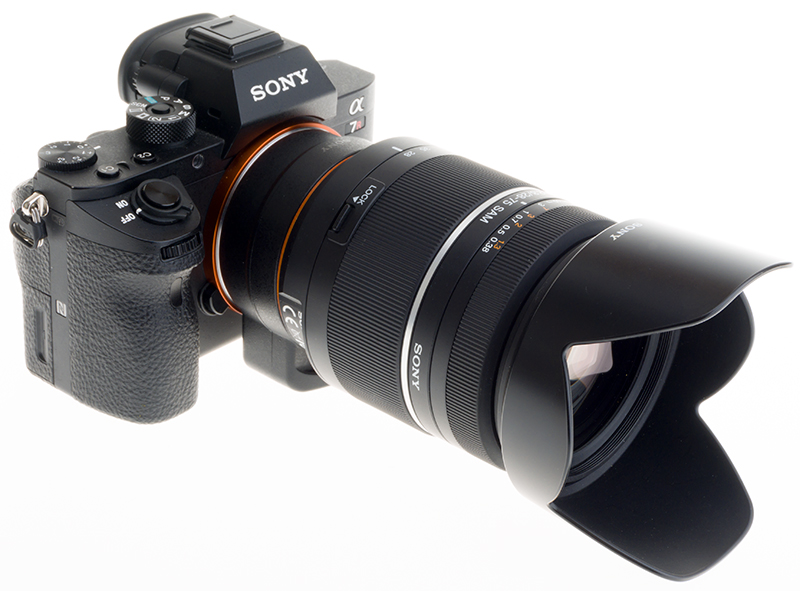
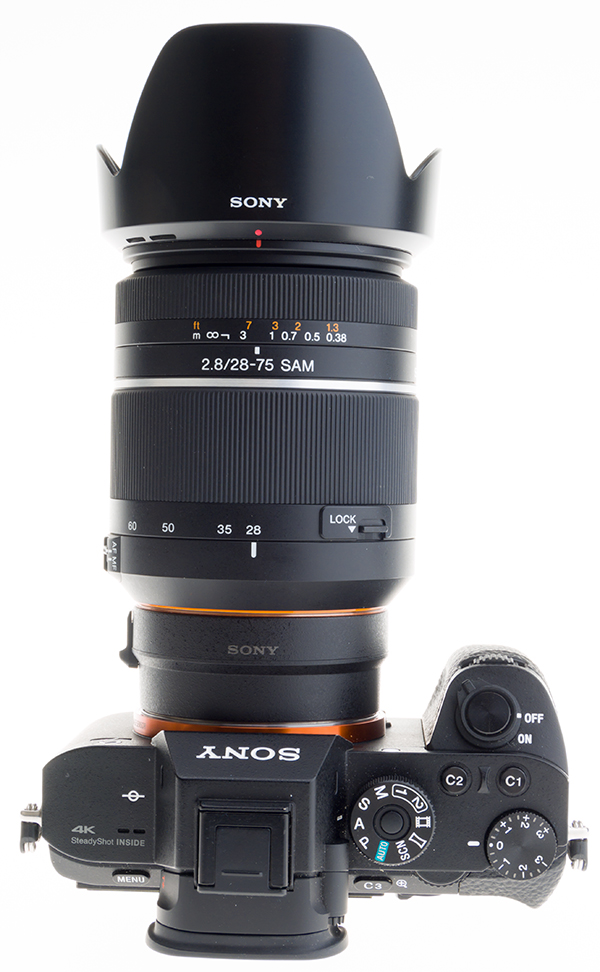
The first thing to do was to fix this lens to the LA-EA3 creating an FE lens unit. Imagine the adaptor is just part of the lens (that’s pretty much how Sony makes many lenses for E-mount anyway). The total unit measures up at 115mm long including the adaptor, and 75mm diameter taking 67mm filters. The lens itself weighs only 565g, the combo weighs 683g with adaptor and lens hood. That compares with the new GM lens at 136mm long and 88mm diameter using 82mm filters and weighing 886g. As I already have a 16-35mm f/4 CZ which covers the 24mm requirement well, the 28-75mm range is just as useful to me as 24-70mm.

While the 28-75mm SAM activates PDAF and multiple AF points, it’s not the full works with tracking and Eye-AF. But it’s also not as noisy as some reviews imply. It’s much quieter than the 85mm f/2.8 SAM, and silent compared to the grinding focus of the 30mm DT SAM macro. Startup is fast, with the lens initialising quicker than FE mount stabilised zooms. The aperture actuation is slicker than with body-drive SAL lenses on the LA-EA4, and quieter. Focus is fast and the only downside is the rotating focus ring which does not support DMF or over-ride on the fly, or auto manual focus magnification. Manual focus requires you to set it on the lens and the body, and whatever you are doing, you need to avoid either turning the focus ring when there is any resistance, or blocking it from turning during AF. It’s a bit vulnerable and the direction of focus is the opposite to normal Sony/Minolta design. The zoom ring which locks at 28mm only operates in the normal direction.

SONY DSC

So, what you get with the LA-EA3+28-75mm SAM is basic but fully controlled and communicating, EXIF accurate with profile correctly invoked. It will track with continuous focus and during movies, though slightly noisy for in-camera sound recording; it seems to do so when some SSM lenses, like the 24mm f/2 CZ, don’t play.

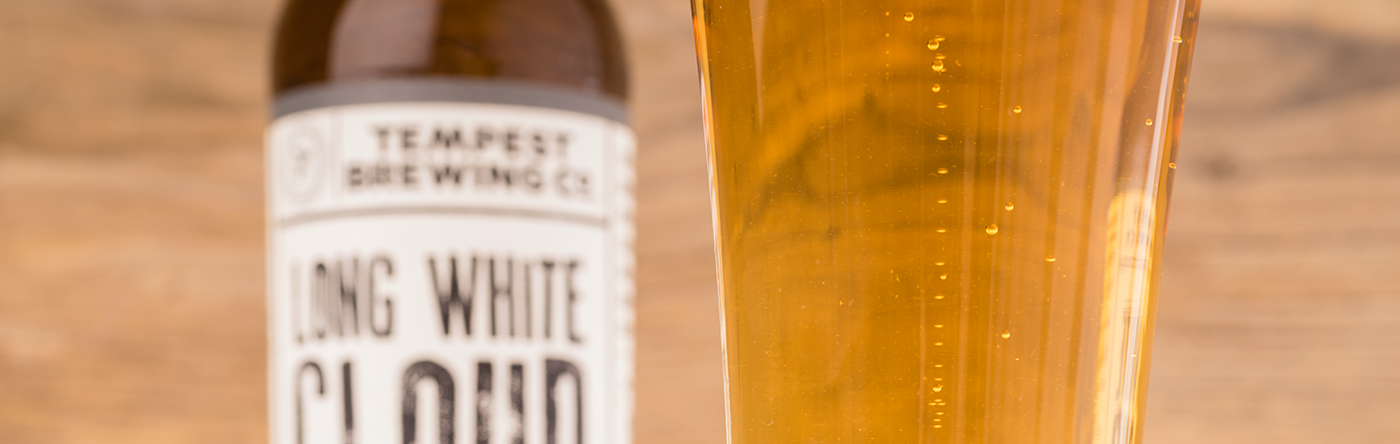
As for optical quality, it’s still a 14-year-old Tamron in disguise, but it can match up to 42 megapixels centrally across its full range. The performance over the APS-C image area is superb, even wide open at all focal lengths, with just a hint of misty aberrations slightly masking a super-sharp result on axis. On full frame, a marked ‘cap shape’ deviation from flat field towards the extremes causes strong softening on flat subjects and landscapes at 28mm and is not entirely removed at longer lengths. You would not want to use this at 50mm and f/2.8 if you had a faster 50mm you could fit and stop down to f/2.8. On real three-dimensional subjects at typical working apertures between f/4 and f/11 it can be extremely sharp. The respectable 38cm close focus and 0.22X subject scale (not as good as the new Sony GM 24-70mm) reveal microscopic detail on the A7RII at f/5.6. The shot below is at the closest AF on the large water drop in the centre, at 75mm and f/5.6 – you can see the bokeh is very acceptable, not complex or ‘nervous’ which it tends to be when used wide open for more distant subjects with a slightly defocused background.

28-75mm@f5p6-75minfoc

A 100% crop from th A7RII file (converted from raw ISO 500 14-bit, without any sharpening for web and with minimal NR) gives an idea how good this lens is and also just how little depth of field you’re ever going to see from a 42 megapixel full frame image used this way!

28-75mm@75-f5p6minfoc

It would hardly be worth buying an LA-EA3 and a new 28-75mm just to save about £1000 over the GM 24-70mm. If you already own an LA-EA3 and you can find a cut price or good used 28-75mm go for it. The way its aperture works means you’ll get very fast low light focus and minimal shutter lag (but you do need a mark II A7 series body to get the best functioning).

The zoom action is a real pleasure to use, very light but positive, and the overall build and feel of the lens will not disappoint. It also seems to get just the right response from the in-body stabilisation of the A7RII. Sure, 67mm filters may be smaller than many midrange zooms require, but I will either have to use a stepping ring or get a couple of new filters – not cheap, for the quality needed to maintain the lens performance. Also, it’s not weatherproofed.

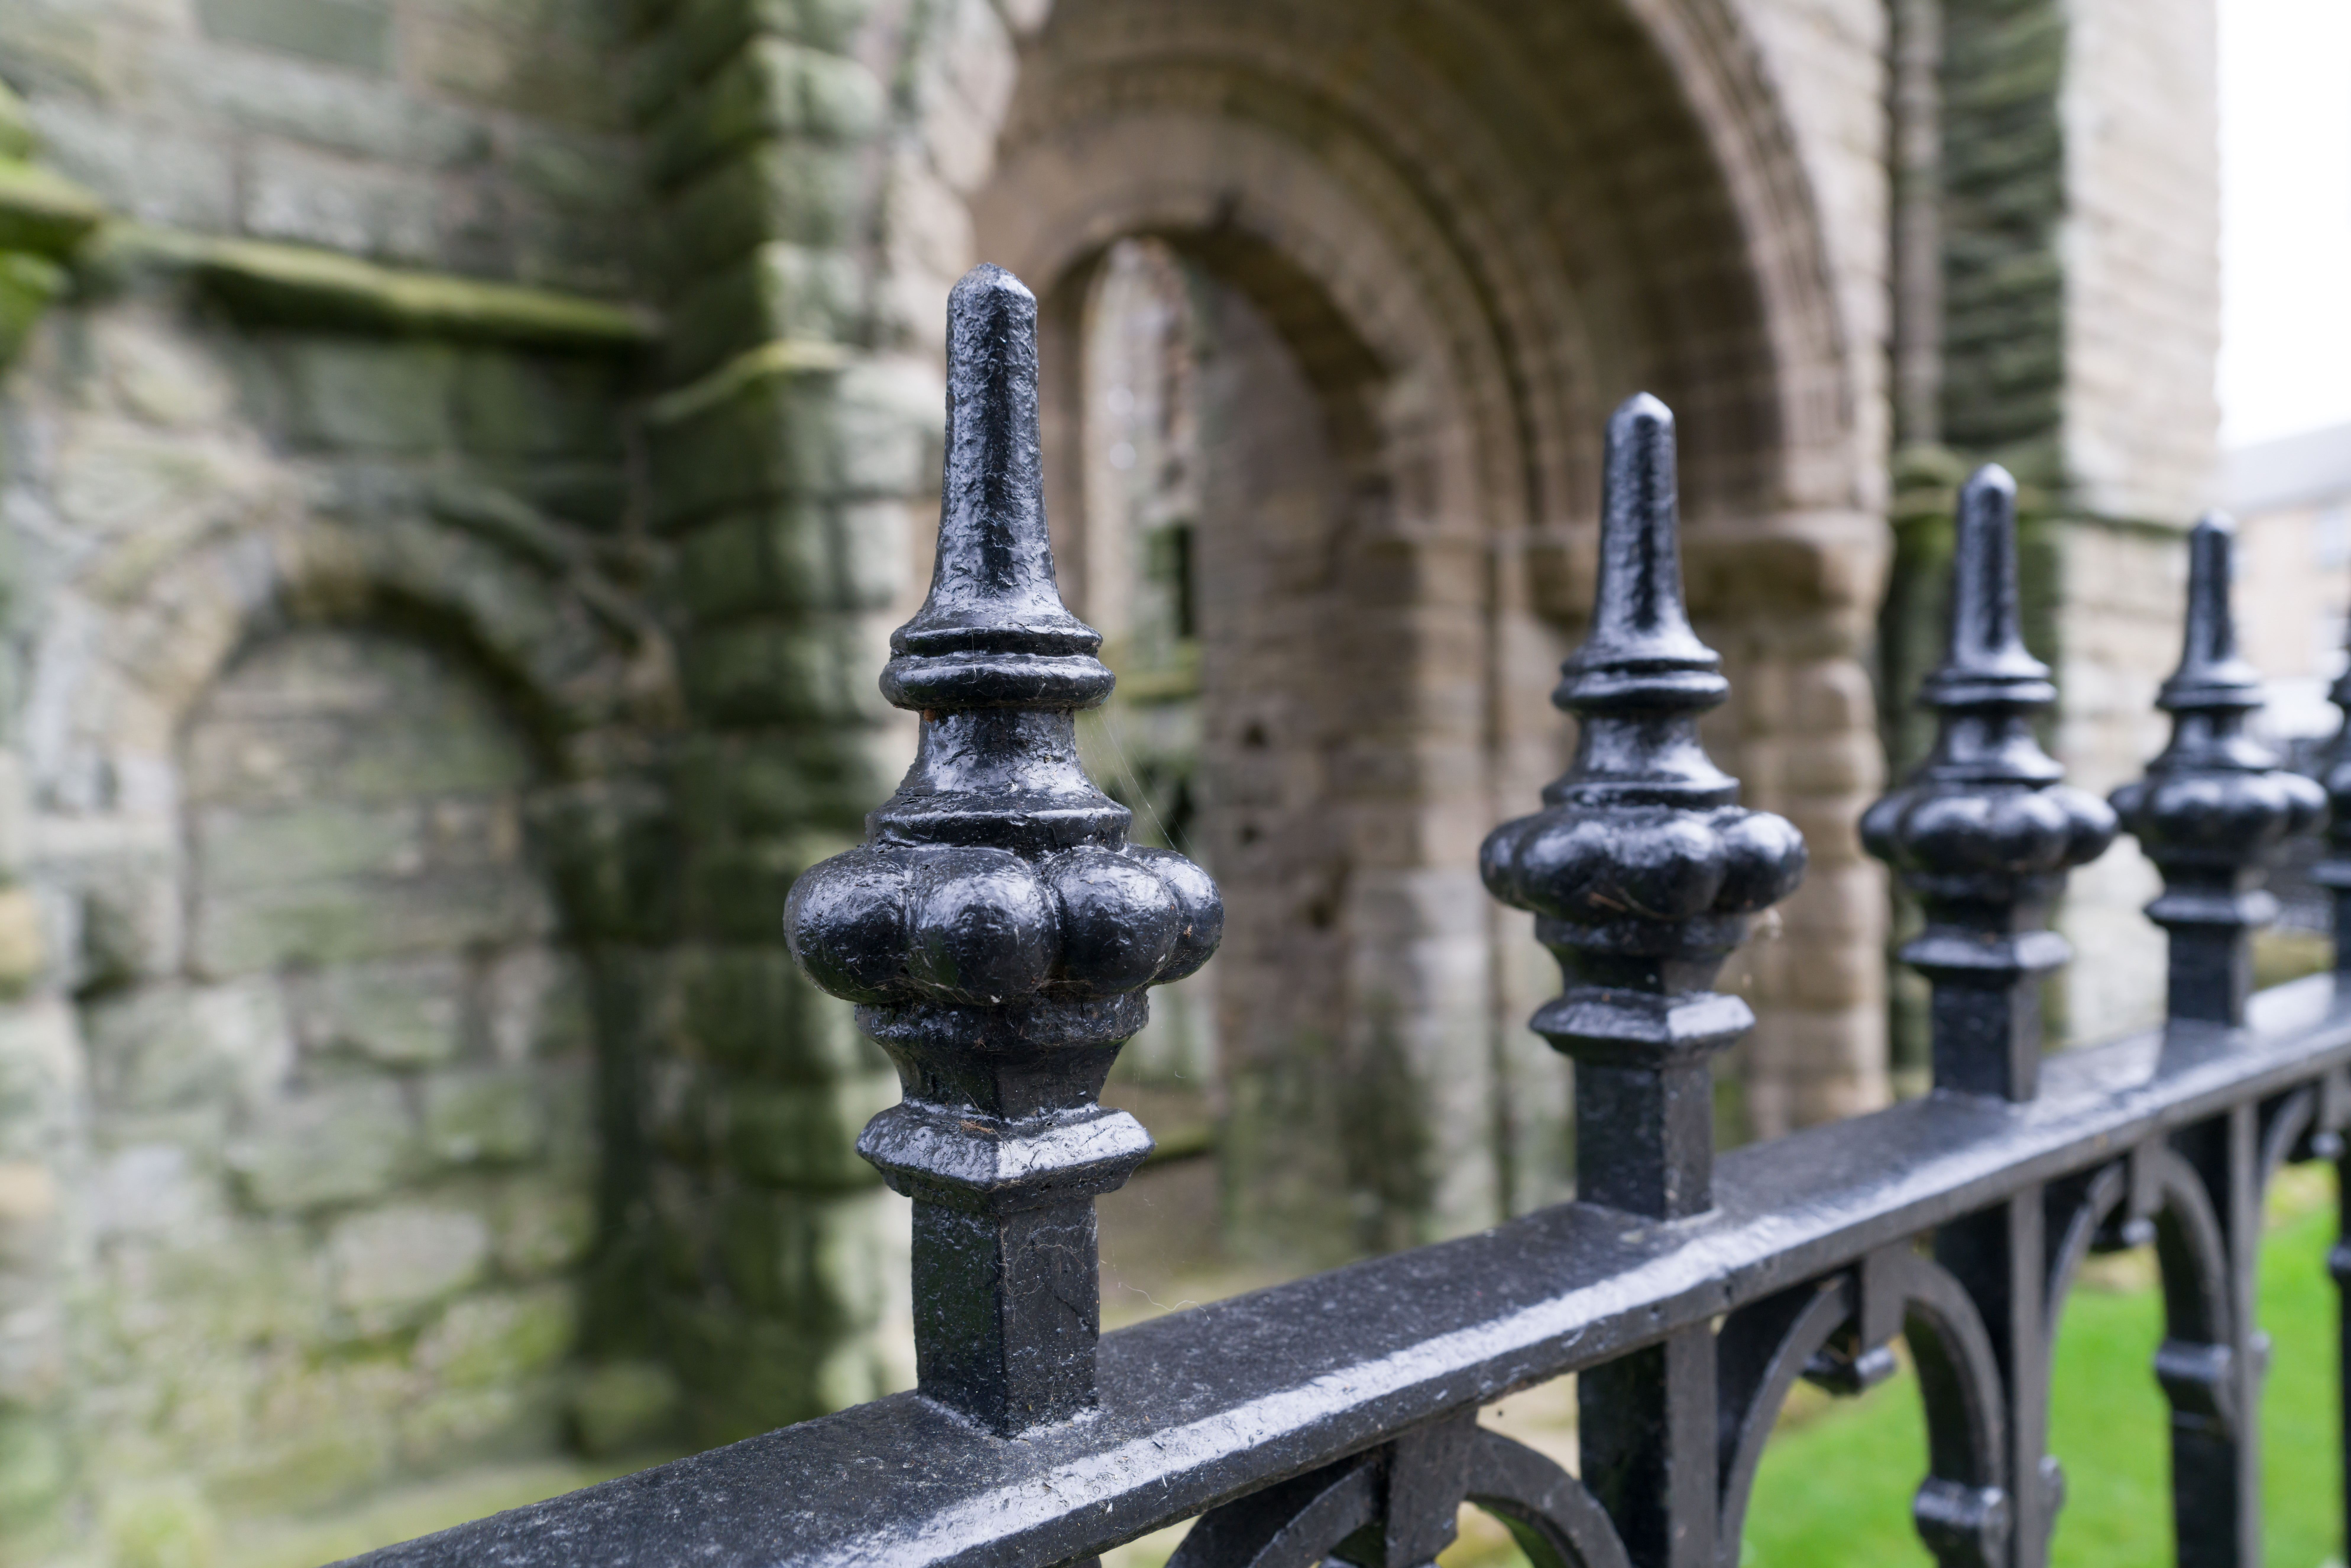
Here’s a quick set of three hand held (with SSI) comparisons at 28mm – f/2.8, f/5.6 and f/9. I’ve loaded these up at full size so they should open the original Level 10 sRGB JPEG when clicked. The focus in on the foreground railing spike and the fine spider web gives the best idea of how the resolution and contrast of the lens improve from wide open. It’s clearly resolved at f/2.8 but with a gentle ‘glow’ at pixel level. First image – f/2.8.

28-75mm28wideopen

Second image – f/5.6. If you download all three images and load them into Photoshop, it’s interesting to switch between tabs and see the depth of field change.

28-75mm28at5p6

The third image is at f/9 and here the ISO is high at 2000. The A7RII can produce great results up to 3200 but I might not choose to have this at 2000. Even so, the sharpness can be judged without problems as the noise doesn’t have much effect on fine detail with current Sony sensors and processing. It always shows more in defocused, smooth areas.

28-75mm28atf9

Because I use other lenses – such as the 24-105mm f/3.5-4.5 Sony and 50mm f/2.8 Macro Sony on LA-EA4, 40mm f/2.8 Canon STM, Sony FE 28mm f/2, 16-35mm CZ f/4 and also the unrivalled 24-240mm FE zoom I have many choices overlapping the range of this lens. I remember that for landscape work on the A900 it was hard to beat. Here’s one of my images from that combination, using a 6 second exposure at 40mm focal length, f/8 and ISO 100 with a variable ND filter. With the restrictions on tripod position given by the location, the zoom range of 28-75mm proved just right for a range of studies.

Roughting Linn, Northumberland - the waterfall.

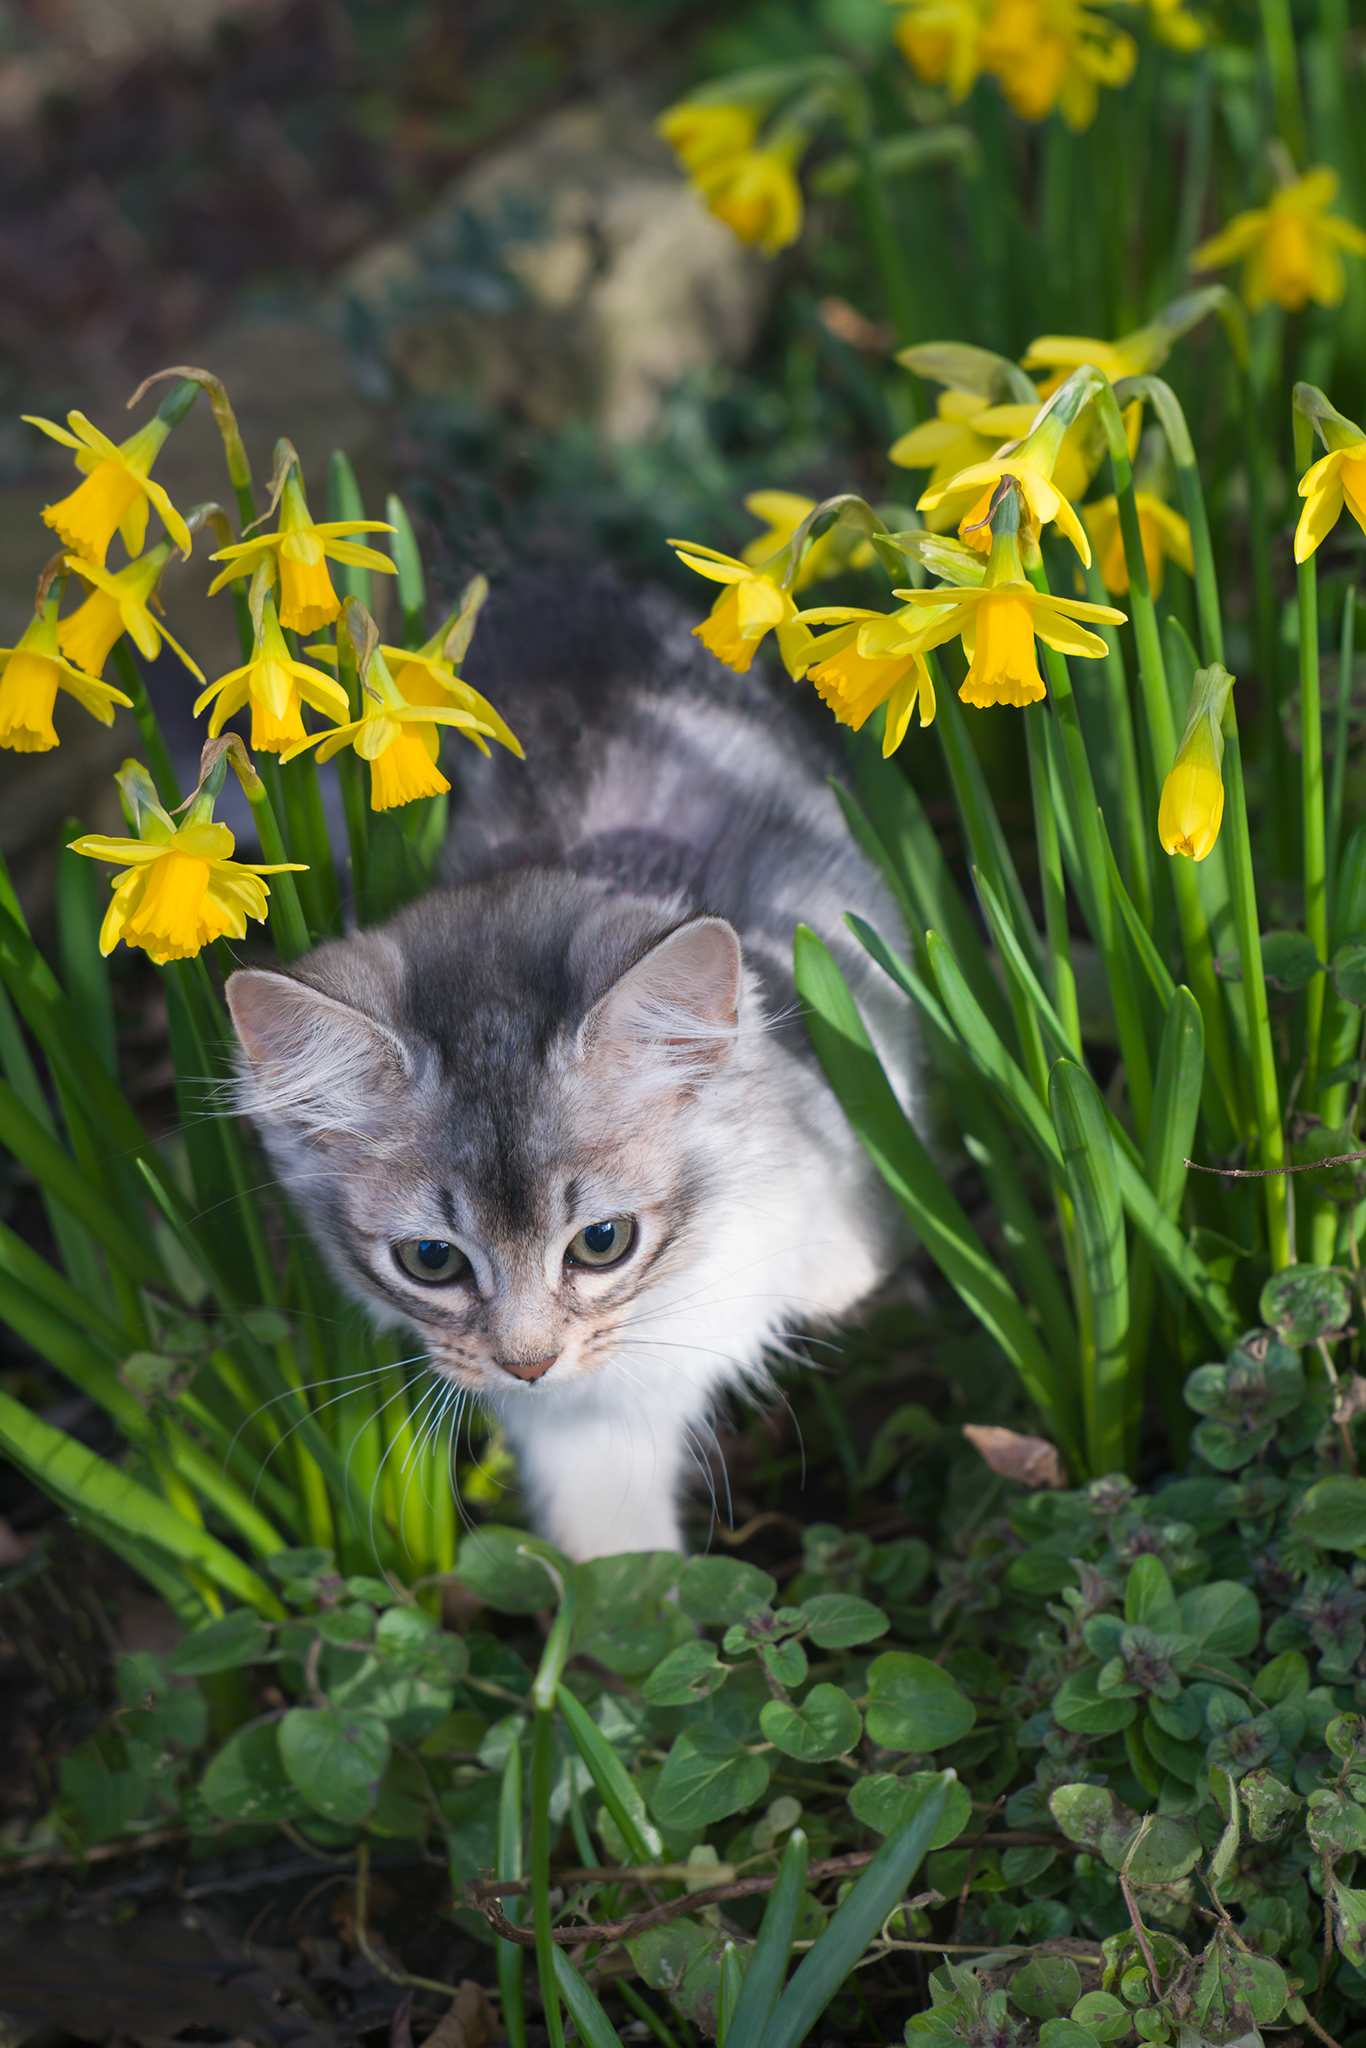
With this lens arriving during a period (for my corner of the UK) of sustained white skies and drizzling rain, it’s not been out and about much. One thing it has done is to focus very well in dim room lighting on my sofa companions –

55mm-2p8-iso3200

And, for those who don’t think f/4 is wide enough and desperately want 55mm f/1.8 or f/0.95 lenses, this is at 55mm f/2.8 and of course when the iris of the eye is sharp the fur around it is not and Willow’s nose is blurred. Once again, despite correction for tungsten light at the extreme limit of Adobe Camera Raw, and using ISO 3200, it’s pretty amazing what the A7RII can do seen at 100% (below).

3200-iso-f2p8-55mm-100pc

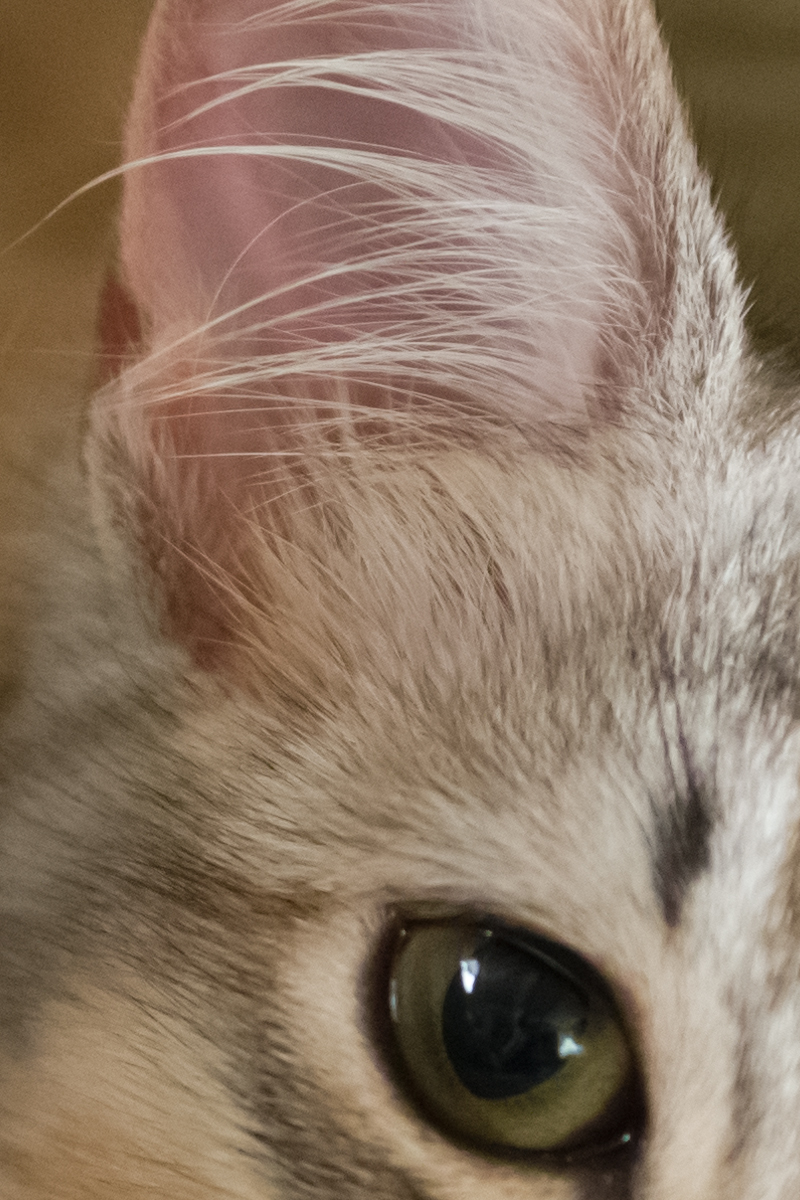
But this super-shallow depth of field is what happens at 42 megapixels. Depth of field used to be worked out based on a 10 x 8″ print held in your hand, not a 6 x 4ft image viewed through the ‘window’ of a screen. Of course for social media you do indeed need very wide apertures because when your pictures are mostly viewed on smartphones, it’s like looking at a contact print from a Vest Pocket Kodak…

To support Photoclubalpha, subscribe to f2 Cameracraft (it’s probably the only photo mag edited by two long-standing Sony system users, myself and Gary Friedman).

– David Kilpatrick

You can find deals for the Sony SAL 28-75mm f/2.8 SAM A-mount lens at B&H Photographic, Wex Photographic for the UK, or Amazon Sony SAL2875 Alpha 28-75mm F2.8 Standard Zoom Lens

My new Sony 85mm…

With extremely expensive Sony-fit 85mm lenses in abundance and beyond my (economically sensible) reach, I’ve done good commercial work last year on the Canon 85mm f/1.8 USM and later the Sony 85mm f/2.8 SAM on A7RII. Some of my work relies on showing close-up details with strong differential focus, and hardly any lenses are free from ‘colour bokeh’ issues, so it’s needed some care to process the files and avoid that typical magenta tinge to the background and greenish hue to foreground blur.

detailshot6

This is a typical example. It’s on the Canon 85mm f/1.8, and although this is a fairly clean lens, the background at f/4 needed some post-process work to avoid a magenta colour shift.

longwhitecloud-glass

In contrast, absolutely no work is ever needed on my Sigma 70mm f/2.8 macro. It shows no chromatic effects in defocused areas. But this is a studio shot at f/10 – and, like many commercial shots, the extreme f/1.4 or f/2 apertures which are so highly valued by the bloggerati simply don’t enter the equation. Differential focus here is precisely balanced against the legibility of the bottle wording at web size (these shots are for a 1440 pixel wide template).

I like to have a choice of wider aperture and macro lenses for this kind of work as they all produce different effects. My 70-210mm f/4 Minolta AF classic, for example, has about the cleanest foreground blur wide open on 0.25X scale 210mm close ups. My 85mm SAM is ‘dirty’ by comparison (but its 60cm 0.20X minimum focus distance still makes it the best 85mm for close work unless you use a macro or a zoom with good close range). Then, we get the Zeiss Batis 85mm f/1.8 popping up followed now by the costly Sony G-Master 85mm f/1.4 FE. In both cases you get 80cm minimum focus and around 0.12X image scale (rather like the 70-200mm f/4 Sony G FE lens used at 190mm and 1m focus).

I really like, on a full-frame camera, to reach one quarter life size on the sensor. One-eighth, the 0.12-0.125X type of scale, means a full A4 magazine page fills the frame. One-quarter, 0.25X, means a quarter of that page or a postcard size fills the frame. There are so many things in the world, from a kitten’s face to a lily in bloom or a perfect cup cake, which are about this size. When I photograph food I often want to avoid including the edges of the plate completely. Those lenses which push me back too far prevent that. I know many users will be puzzled by my preference and see no reason to want to get any closer. Well, that’s just me. I have always done well creatively and commercially from surprisingly tightly cropped, close-up work.

And, being more critical of these new hyper-expensive lenses, we’ve had 80cm focus 85mm lenses for SLR focusing for 70 years now. Really, any new lens in this focal length should focus to 60cm or ideally 50cm without calling itself a macro. That suits the way we live, in our cars, at desks, at home, at tables, in small spaces, giving other people space. I really like to be able to place an item in front of me, or even hold it in my hand, and focus on it. I can’t do that at all with 1m minimum focus (the old rangefinder Leica standard!) and only just with 60cm.

Then I started seeing some work taken on an interesting old lens. It’s small, taking 49mm filters. It is fast, at f/2. It was originally designed by Carl Zeiss and if you were really lucky you might find an 85mm f/2 Sonnar. But for around £100/$150 or a little more for guaranteed condition you can buy the Russian Jupiter 9 85mm f/2 manual preset lens in M42 screw (Pentax/Praktica). And since it’s a screw mount SLR lens, you can add an extra layer of focus extension for very low cost between the E-mount body and the lens.

SONY DSC

Above: my Jupiter-9 with Camdiox helical Pentax screw E-mount adaptor fully extended and with a vital lens hood fitted; top, the mount and lens set for infinity focus, lens hood removed.

So last week I assembled a relatively low-cost eBay rig to enable even closer focus than the 60cm of the SAM . This is partly just experimental, our of curiosity to see how well a 1930s Sonnar type design made in 1980s Russia with 1950s technology and coatings can peform. The 85mm f/2 Jupiter-9 is often used to get an attractive f/2 soft-focus with core sharpness, gradually cleaning up until around f/3.5 the softness is gone. It is also used to get neat circular bubbles from strongly out of focus light sources beyond the subject, or a generally very attractive focus transition at any aperture since the 19-blade mechanical iris forms an almost perfect circle at all settings. It focuses slightly closer than 80cm.

With the well-made Camdiox helical adaptor costing under £28 delivered, this is extended in a continuous range to 35cm from the film plane and 0.51X. Obvously, it takes up no more space than my plain M42 adaptor as it is exactly the same thickness at infinity setting – and it does allow true infinity focus. Being solid metal, the combination is not all that light, a dense 490g in its 88mm long by 63mm maximum diameter, 20g more than the Batis. But it feels good. The aperture mechanism is crude and difficult to see and use, but would normally be set first to a chosen aperture such as f/2.8 for the best sharpness with a shallow depth of field, or f/8 for landscapes. It would not be much fun for anyone who likes taking a range of shots from f/2 to f/16, or for anyone wanting accurate half or third stops.

First of all, is this lens even remotely sharp, and can the Sony A7? bodies use it well? Both answers must be yes. Just set the focal length for normal distances to 85mm and the in-body SSS of the A7SII, A7II and A7RII will give amazingly effective stabilisation. Work between f/4 and f/11 and this simple old lens design outresolves the A7R. I was just checking the focus on some calendar text in very dim room light, using ISO 1600 on my A7RII, when I pressed the shutter with 1/40th hand-held –

85mmJ9-f4-1600-40thA7RII

This was never intended to be seen, just a casual target. These pictures open out to Facebook size, by the way, when clicked – 2048 pixels. Here’s a 100% pixel friendly section from this. I was surprised. The lens was at f/4 and focus was done at max magnification, at the taking aperture.

85mmJ9-f4-1600-40thA7RII-100%

You need to check this JPEG out by clicking to open/view at 100%. It’s like this right across the frame, corner to corner. There’s a pleasant dimensional quality to the rendering this old lens gives, but it has one massive failing – it flares up dramatically if any light at all reaches the front glass. The only solution is a very deep lens hood indeed.

Making more considered tests, I headed for a target I had set up to explore colour bokeh, that unpleasant magenta to green shift in defocused areas. With this set-up, my 85mm SAM is not bad at all and does benefit from a proper lens profile. As you can see, the music doesn’t seem to change much in colour from front to back though in the full size 42 megapixel file, especially without lens CA corrections, some funky colours do appear.

85mmSAMf2p8-corrected

Here’s how the Jupiter-9 worked out – first of all, it’s one of a number of shots at different distances and angles, not identical to the SAM shots, and this one takes advantage of the closer focus combination of adaptor and lens:

fiddlemusicJ9f2p8close-facebook

The colour shifts are different, with a bit of a rainbow including red and cyan fringes as well as magenta and green, and the contrast is lower. However, the detail in the very limited f/2.8 focus zone is very fine and over a range of tests the blurring (from the circular aperture) just looks better. No doubt I need to take many more shots with this lens (once the deep 200mm lens hood I’ve found arrives…) but it seems like a worthwhile creative option alongside a number of older manual lenses.

What really interests me is that this same design, with a few refinements of modern manufacture, would surely be worth having. Tamron’s forthcoming 85mm f/1.8 will focus close – it is the special feature of this new lens series – and maybe along with the 35mm and 45mm f/1.8 designs will one day appear in native E-mount. I’d love to see a half-price Batis, a Sonnar f/2 variant instead of f/1.8, with a decent close focus limit around 50cm. Until then I’ll use the SAM on LA-EA3 or LA-EA4 (works well with either) and my assortment of manual set-ups including this Jupiter-9.

Here’s a revision to the post, got some sunshine this morning (day after writing the original post) and with focus peaking and f/5.6 even a little moving target comes out whisker-sharp!

theexplorer-fb

– David Kilpatrick

Lensmate custom kit for RX100

Lensmate produce an ultra lightweight filter adapter for the Sony Cyber-shot RX100, as well as selling some related accessories. We ordered from them a filter adapter kit including the 49mm threaded filter ring ($32.95) and to this order added Richard Franiec’s beautiful CNC machined aluminium custom body grip ($34.95) and a JJC Polycarbonate screen protector ($5.95).

lensmateorder

The filter holder was the main purchase, but in the end least likely to be used – the grip, on the other hand (the right hand…) will be used for ever. Here’s the content of the filter package:

lensmatekitcontents

From the left: 49mm lens cap with retaining lanyard; white box for whole kit; thread for use if the adaptor needs to be removed, together with alcohol wipe for cleaning before fixing; the 49mm adaptor; the lens-mounted adaptor ring (with yellow tape); a circular template, used to position this perfectly. As an alternative or an extra, you can choose a 52mm filter ring.

lensmateattach

To do it perfectly the tape should actually be parallel to the camera body. It’s not that important but looks a little neater when fixed. The adhesive is uncovered on the back of the adaptor, it is placed in the centre of the positioning guide, and pressed home. To extend the lens and keep it firm, the camera is switched on, and the battery removed; this leaves the lens in this position. Only light pressure is needed. The yellow tape and the positioning ring are then removed.

lensmateattached

The marks visible on the lens were left by the alcohol wipe, and cleaned off afterwards with a lens cleaning wipe. In this shot, the 49mm filter ring is bayonet fitted into place (a little less than a half-turn). The fit is very positive and the action is light but firm. The whole item weighs such a small amount it adds no strain and can be left fitted permanently.

filters49mm

Here are two filters – a 49mm Minolta polariser and a 49mm No 1 Minolta close-up (not a 1 dioptre, but stronger, and a double element achromat with coating – one of the best close-up lenses you can still find around on the used market).

polfilterattached

The polariser is flared to allow wide-angle coverage. This makes it ideal for lenses like the NEX SEL 16mm f/2.8. But you can’t fit a lens cap of standard size (it widens out to accept a 57mm push-on, similar to a 55mm screw-in in size).

capstring

Lensmate provide a centre pinch fit lens cap with a retaining lanyard. It is not needed as the camera has its own lens cover shutter, but if you fit a filter, you may want to add the cap to protect the filter.

minhood

This is a Minolta lens hood for the old MC 45mm f/2 Rokkor. It’s very light and is ideal for the RX1 (we’ve sold a good few of these on eBay for exactly that purpose). There’s no great benefit on the RX100, as the lens flare this camera suffers from is rarely to do with stray light, nearly always with light sources within the frame.

The overall thickness of the adapter for filters is less than 3mm. It does not affect operation. Once fitted you forget it, and it becomes part of the camera, but it must also add some protection.

closeupno1min

Here is the closest at wide-angle using the Minolta CU lens.

closeuplongest

And this is at the longest focal length (where close focusing is most restricted with the RX100). More powerful close up lenses – this one is about 1.5 dioptre – will produce a more dramatic result.

In the photos above, you’ll see the body shape is rather enhanced. The workout to add this muscle is brief and easy.

plainrx100

Start with a cleaned RX100 body.

gripstick

Take the Franiec precision grip, and remove the two 3M permanent adhesive release papers.

grip1

Position on the camera and firmly press into place. It isn’t going to shift after you do this.

grip2

And that’s it. A great product, a perfect finish, and it really does make the RX100 much easier to hold securely. It also tends to position your thumb correctly on the back and your index finger over the shutter. It is perfectly designed and manufactured.

Finally, here is the JJC Polycarbonate (not Gorilla Glass) LCD screen protector.

jjcpolycarbonate

This is simple enough to fit and one fitted is invisible. The tab for the release paper didn’t work all that well and nor did the tab to remove the protective layer, but a bit of fingernail prising helped peel both off. The adhesive is only round the edge, and the protector can be removed easily.

The website for Lensmate products is: http://www.lensmateonline.com

Fitting a Vectis 80-240mm to the NEX

OVER the past few days I’ve been looking at the NEX-5 and a range of lenses and optical systems. I’ve got adaptors for C-mount (16mm/TV/CCTV) lenses, Leica 39mm screw, Minolta MD and the LA-EA1 for Alpha A-mount. The NEX-5 has proved able to provide a surprisingly bright focusing image through a classic German microscope:

It also proved very competent with the Sigma 70-300mm f/4-5.6 OS lens, the adaptor providing power for the OS which is fully functional, and also for auto exposure, leaving only manual magnified focusing to tackle. Continue reading »

Alpha Live View in the studio – solved!

One of the problems with the Alpha 350/300 is that the Live View is linked to the settings when you use Manual exposure. It provides a form of metering, a relatively accurate preview of under or over exposure. This makes it impossible to use Manual with studio flash (AC mains strobe) setups. Currently, there is no menu setting to turn off ‘exposure preview with manual’ and enable ‘auto LV gain with manual’. But there is a solution.
Continue reading »