
Photo techniques
-

Bluebells, bokeh and OM-1 macro
Get out now, even without a macro lens. Do not just look for subjects. Look for interesting light, which can mean staying out until sunset. Photography is all about light, the subject or scene is not enough on its own!
Reviews
- Fujfilm GFX100RF – 102MP medium format with fixed lens
 Anyone remember the Fujfilm GS645W, that robust go-anywhere 120 rollfilm leaf shutter viewfinder (focus by estimation) model with a 45mm f/5.6 wide-angle lens, or its electronic… Read more: Fujfilm GFX100RF – 102MP medium format with fixed lens
 - AI cuts reflections in glasses
 This is a follow-up to our last post about PortraitPro. Using a self-portrait taken for the purpose with bad reflections in uncoated reading specs, I went… Read more: AI cuts reflections in glasses
 - Tamron’s 150-500mm in practice on the Fujifilm X system
 How does the Fuji X-System 100-400 with 1.4x teleconverter bundle stack up against Tamron’s newcomer for X-Mount – the 150-500mm Di III VC VXD
 - Tamron 35-150mm f/2.0-2.8 Di III VXD review
 The first magazine test of the new Tamron reached Cameracraft readers in our March/April 2022 edition. Now that other magazines have reviewed the lens, it’s time… Read more: Tamron 35-150mm f/2.0-2.8 Di III VXD review
 - Elinchrom ELC500 TTL studio flash
 In the ELC TTL heads, Elinchrom has combined most of the key features of mains studio flash with the functions of the ELB 500 TTL portable kit.
 - Sony E 70-350mm f/4.5-6.3 G OSS
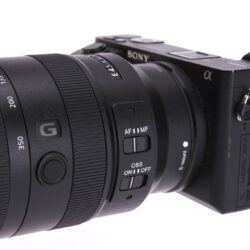 The neatest solution for sharp long tele shots on Sony A6000 series APS-C Excellent full aperture performance from 70 to 350mm OSS stabilisation works with every… Read more: Sony E 70-350mm f/4.5-6.3 G OSS
 - Sony FE 90mm f/2.8 G OSS Macro lens reviewIn the last few weeks I’ve found myself replying to Facebook Sony user group posts where new owners building their systems have asked about the Sony… Read more: Sony FE 90mm f/2.8 G OSS Macro lens review
- Larmor 5th Generation glass screen protector with SunshadeWe’ve fitted GGS or similar toughened laminated glass screen protectors to our Sony bodies ever since way back in 2011, we were the first Alpha web… Read more: Larmor 5th Generation glass screen protector with Sunshade
- Sony A7RIII review in CameracraftRead David Kilpatrick’s review of the Sony A7RIII Cameracraft January/February started the A7RIII test report, and March/April 2018 continued it. Both are free to read here.… Read more: Sony A7RIII review in Cameracraft
News
-
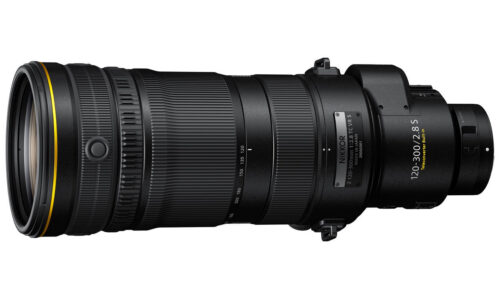
Coming soon: Nikon Z 120-300mm F2.8 TC VR S
Nikon confirms that a new 120-300mm F2.8 sports lens is under development for the Z system, albeit one with a…
More news
-
Sony A7RVI and 100-400mm f/4.5 GM lens
5% boost in resolution, 300% boost to EVF brightness, 15% more battery life
-
Photoworld 2008-2011 Book
You can now order the 316-page compendium of the final 12 editions of Photoworld, the magazine of the Minolta Club…
-
Godox USA goes professional
Distributors MACgroup and MPEX join forces to create Godox USA, an official full-range sales and service group that firmly establishes…
-
In the B O X X: Alfie cameras’ latest development
Showcased at The Photography Show in Birmingham, the new [ B O X X ] camera from Alfie Cameras is…
-
Sony fights back! 400-800mm G and 16mm f/1.8
Well, a couple of days after Sigma announced their new 300-600mm f/4 to much acclaim Sony has pulled the rug…
-
Panasonic Lumix S1R II – 44MP full frame
The Panasonic Lumix S1R II, announced Feb 25 2025, features a new 44.3MP sensor offering high-resolution imaging with a wide…
-
Sigma 300-600mm f/4 arriving soon
The first chance to see the new 300-600mm DG OS Sports f/4 Sigma in E-mount and L-mount was at The…
-
Sigma launch world first 28-45mm f/1.8 full frame zoom
New Sigma 24-70mm f/2.8 available from June 20th
Cameracraft
-

Cameracraft Magazine July/August 2026
Cuba just before severe impositions kicked in, brilliant underwater Caribbean, wildlife on a British farm and subtle infrared colour
Subscribe to Cameracraft
Subscriptions cost just £15 ($20) per year and support our mission to avoid disruptive ads, AI and paywalls.
Download high resolution issues to keep PLUS bonuses:
- A full year of six high resolution back issues
- Membership of our e-mail list
- Unlocked PDF – print or copy text
- Read on all compatible devices
- Educational and library multi seat licence
Pocketmags
Read digital versions of Cameracraft on a range of different platforms with Pocketmags.
View in high quality page-turn format, optimised for your device: Android and Apple smartphones, tablets including Kindle Fire, and macOS or Windows computers are supported.
Latest articles
- Nikon 70-180mm f/2.8 is 2X converter compatibleWhat does this mean? Well, it means that unless Tamron – the undoubted OEM of this lens just as they are the OEM of the Nikon Z 28-75mm f/2.8 –… Read more: Nikon 70-180mm f/2.8 is 2X converter compatible
- The lost box of prophecy from 1975 – do only photographs survive?A true story for the Millennium Forgive me, Ron, wherever you are, for breaking my word and letting the world know about this story. I found the negatives by chance,… Read more: The lost box of prophecy from 1975 – do only photographs survive?
- Sony A7RIII pixel shift with a vintage lensWe’ve got one from the first Sony ILCE-A7R3 delivery in the UK, and with a first review of two pages appearing in Cameracraft January/February 2018 from tests in early December,… Read more: Sony A7RIII pixel shift with a vintage lens
- A7RII versus Pentax 645ZAt a workshop given by John Denton for The Flash Centre, with Elinchrom lighting and Pentax 645Z demonstration. model Laura posed for a comparison pair of shots using the Pentax… Read more: A7RII versus Pentax 645Z
- Colour and power benefits of Sony 20MP APS-C sensorSony has now released full details of the Alpha 58. Although I don’t think the camera is a game-changer or a vital upgrade for owners of Alpha 55 and 57… Read more: Colour and power benefits of Sony 20MP APS-C sensor
- Mapping the planesSamsung has a patent and a plan for using two lenses with triangulation (image offset) depth detection between two images in what is roughly a stereo pair. Here’s a link:… Read more: Mapping the planes