AI cuts reflections in glasses

This is a follow-up to our last post about PortraitPro. Using a self-portrait taken for the purpose with bad reflections in uncoated reading specs, I went through the options of the reflection removal process. Mid-May a 15% discount was authorised for code CC524 at www.anthropics.com which applies to all 50% discounted program downloads.

It was taken on the Sony A7IV with 85mm f/1.8, tripod, ISO 400, lens at to f/8 and control through iPhone 15 Pro Max using Sony Creators’ App remote viewing and control. The screen on the A7IV was vertical and facing me, so I could also look at the camera and see the reflections move as I changed my head angle. Setting this up showed me some problems with the A7IV articulated screen design I had not realised – it can only face the self-portrait subject when folded out at the left-hand end of the camera, which with a Arca-Swiss L-plate means hanging down… obscured by the tripod head! So no L-plate but standard Arca small plate, and camera upside down compared to normal hand holding.

This is the result using PortraitPro V24. Read on to learn more, and don’t forget if you decide to get this program use Cameracraft’s additional 10% discount code, CCV245.

PortraitPro has come a long way in a few years. At the top end, the Studio Max version is a £308 program which costs £154 with the 50% download discount that Anthropics have offered ever since the days of CDs in packaging. Since no-one now buys a CD, the real price is £154 (with 10% off for Cameracraft’s code, CV245 in the latest May/June issue).

You may not need Studio Max with its 48-bit file capability, workflow from raw to exported finals, multiple image batch processing intended to auto retouch complete portrait sessions, handling of wedding groups and granular control fine-tuning its effects. The basic V24 includes this function and costs £99 less 50% download only less our 10% – so £44.55.

It is now very fast indeed on Apple Silicon and integrates with Adobe’s photo programs. Under the hood it uses some of Adobe’s functions, without venturing into Generative Fill AI to change a digital capture beyond the scope of many competitions. It uses AI, but does not rely on on stolen images or ones licensed for almost nothing in bulk from the big picture libraries. Anthropics built their platform on measurements of the human face and body, research into what people like or dislike, and many years of coding. When it uses image-based AI it draws that from your photo and its bank of facial features modelling data.

The Reflections in Glasses problem

Recently we came across a question in a professional photo organisation Facebook group asking how it was possible to remove reflections from glasses. It’s very difficult, and when it happens in a set of pictures where the photographer is unable to prevent it, it can ruin groups and presentation shots. Many battery studio-location flash heads now have very low power modelling and it’s all too easy to light your subject and fail to spot that your octa-box is reflecting in specs.

PortraitPro’s specimen example might just be good luck, so I decided to test Version 24. My studio room has shutters when blackout is needed. Two pure white plain blinds 110 x 220cm cover the tall south facing windows to prevent furniture, fabrics, art and photographs fading or warping in direct heat. They make a wonderful giant dual light source in daytime sun even in midwinter but reflect in glasses when the camera angle is not just right.

Removing reflections from specs does not come under the Eye menu – it’s under the “Inpainting menu” along with Mouth & Teeth and Remove Stray Hairs.

This is a crop from the original file.
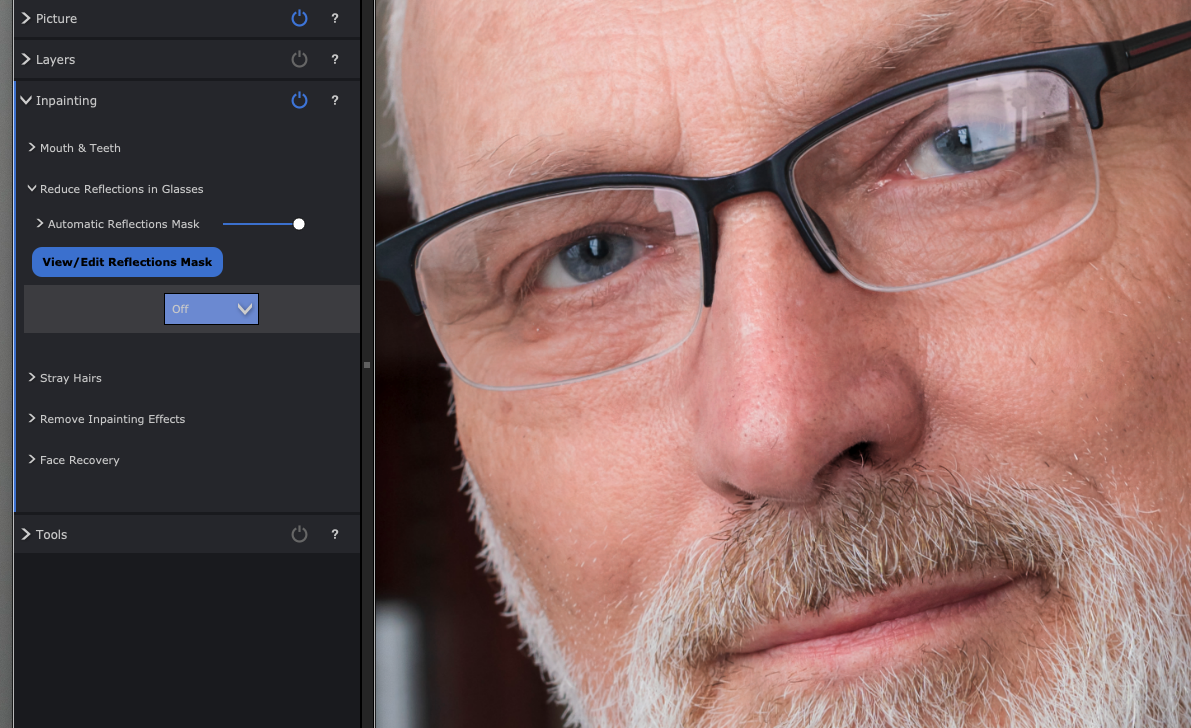
The Reduce Reflections in Glasses view above shows other retouching functions too (notice some reductions in skin blemishes and wrinkles) but has the reflections reduction set to Off. When you select Remove Reflections in Glasses, you see choices for Off (the start position) then Options 1 to 5. Each is a different AI generated restructuring of what should be visible through the reduced reflection. My eyes are old enough to be slightly difficult and it was interesting to see the five choices.
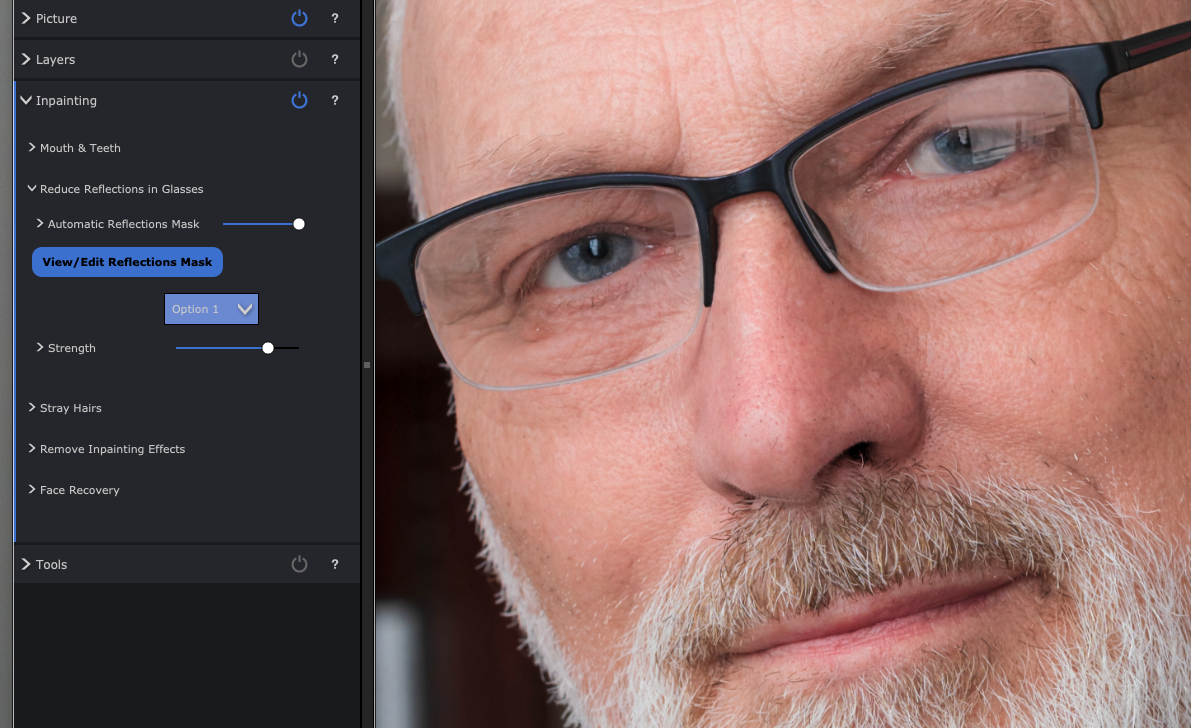
Option 1
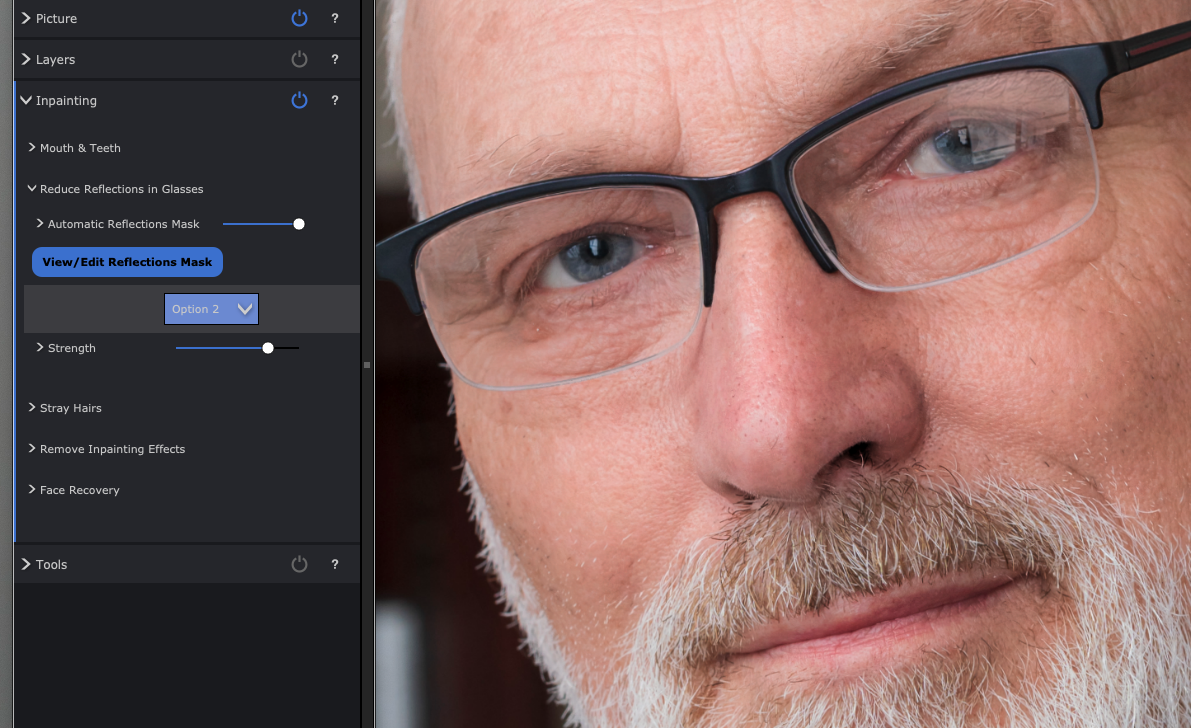
Option 2 (note the left eye eyelid in all these and how it changes).
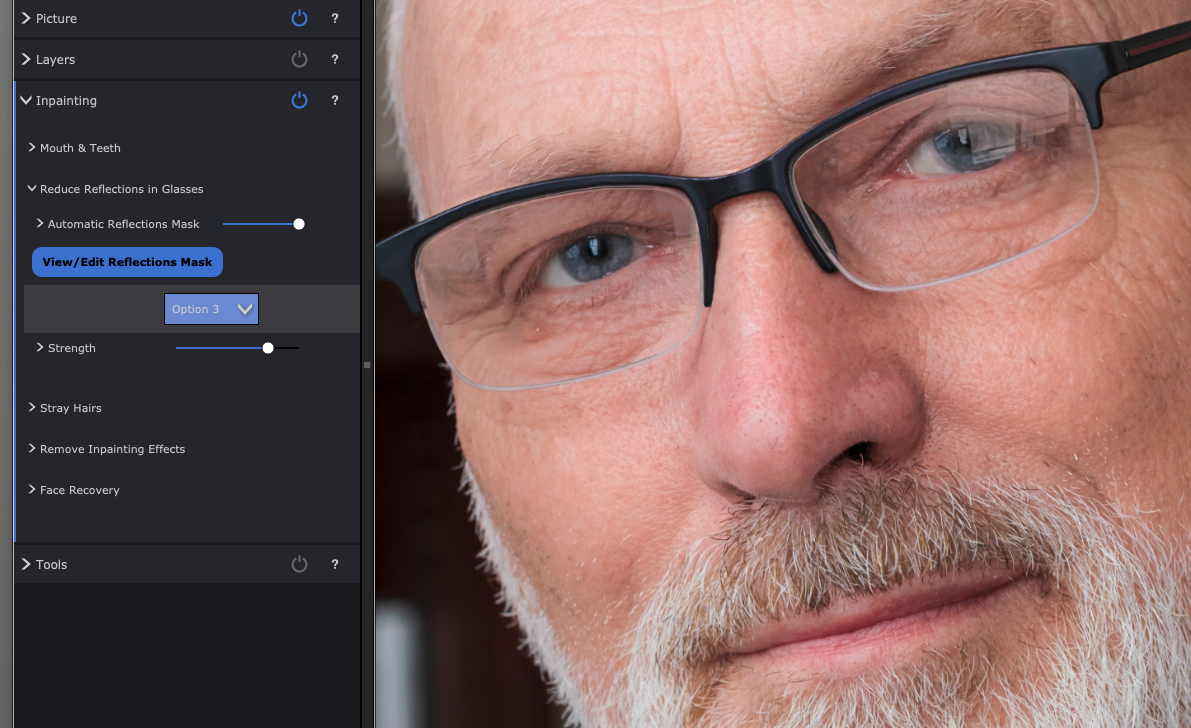
Option 3 which I felt got the eye almost right, though further retouching would be needed for a portrait. It would be good enough for a PR or informal shot.
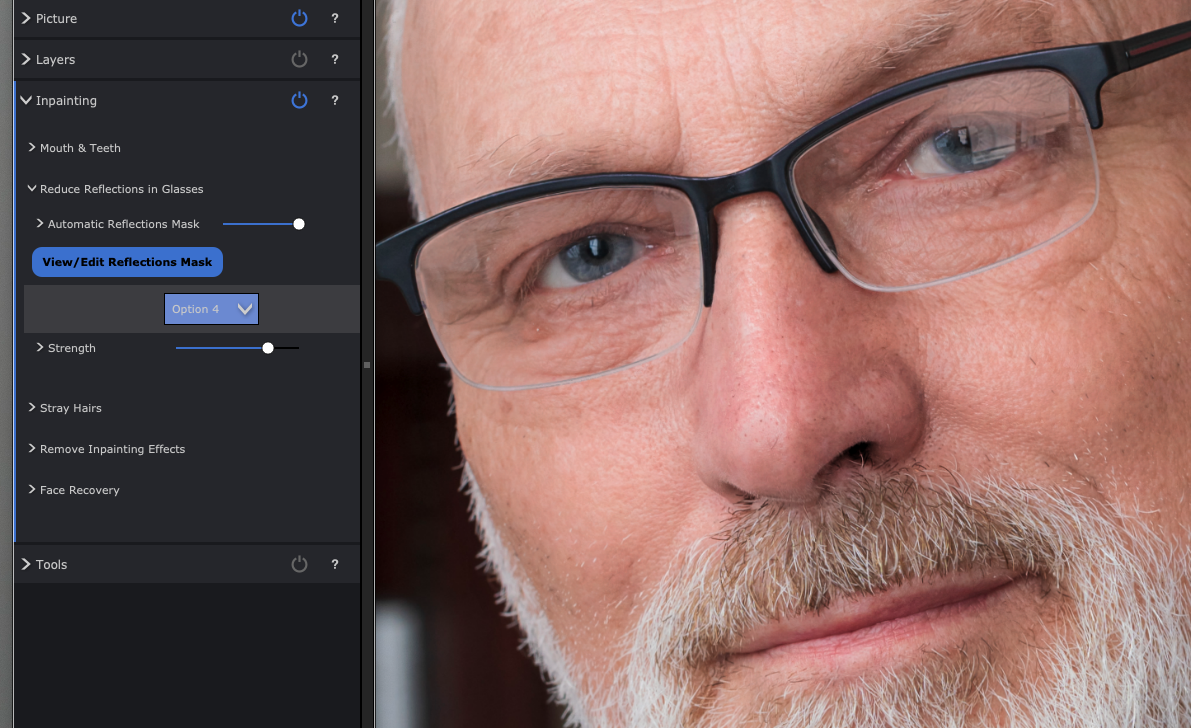
Option 4 rather odd mismatched detail.
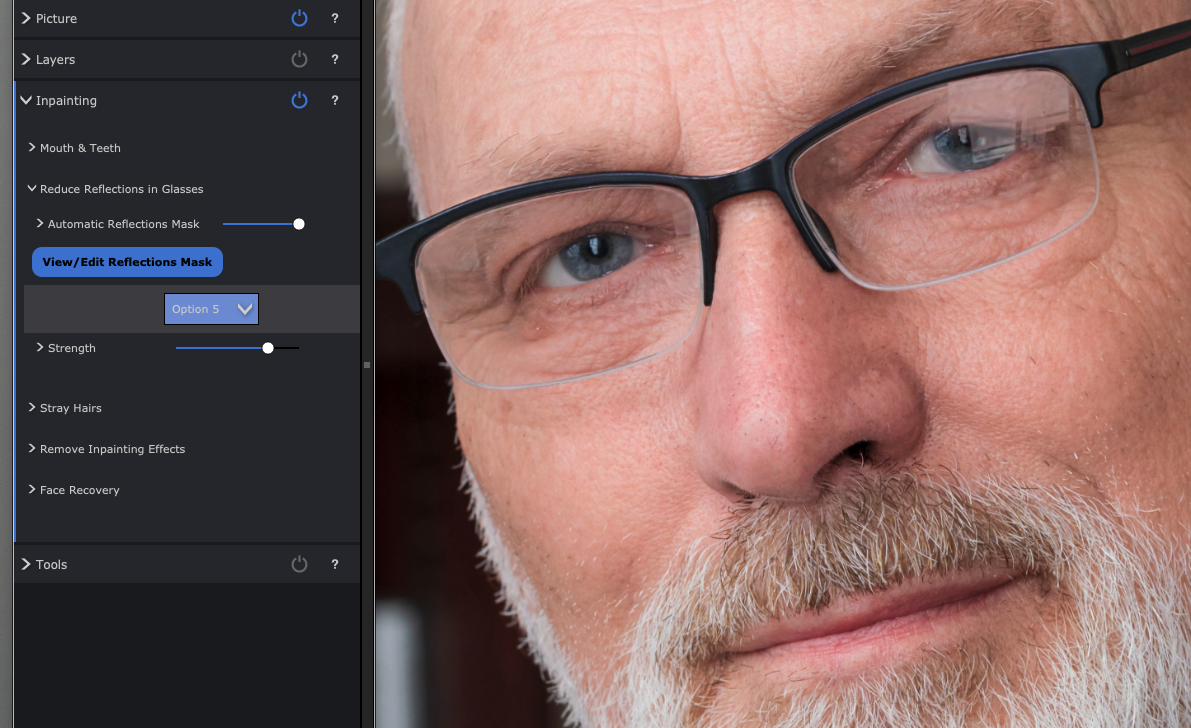
Option 5 eyelid droop…
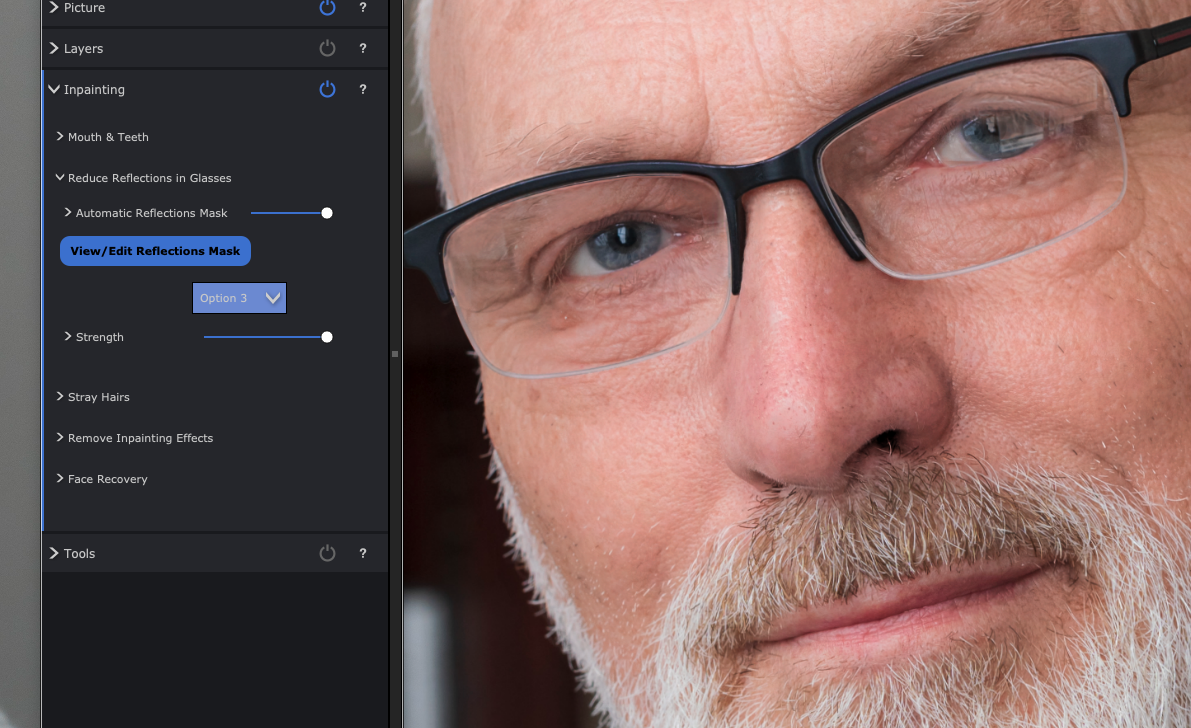
Option 3 got the upper eyelid almost perfect (not quite but acceptable) and the Strength slider did allow the reflection to be eliminated to the degree shown above. However, it looked better with 85% effect or even the 50% of the earlier example, a faint reflection remaining without obscuring the eye.

The time taken on my Mac M2 Studio Max was next to nothing, I didn’t bother to time it as everything happens in real time include the export from the starting 33MP JPEG to a same size with all PortraitPro’s very subtle modification of the portrait. The defaults were just right but I increased fine wrinkle reduction out of vanity!

After saving a copy of processed result I also saved a .ppx file (the Project) which is a bit like an Adobe .XML sidecar file, and re-opens your original with all the edits at the point you saved this snapshot, reversible and adjustable as needed.

A tougher test

Here’s a worse example than anything you should end up with, so I set maximum strength on this. Option 4 worked best, and despite my eyes being almost entirely obscured by double reflections in my computer reading specs, it was not a bad fix at all. My ‘proper’ specs are coated of course and don’t reflect as badly.

I’m sure I could ask Adobe AI to do something the Generative Fill after masking the reflection area, but in the time it would take me to brush a mask in place, the entire PortraitPro glasses reflection removal would be done and dusted. Is it worth £139 (after our code CCV245 discount)? That depends on what your time is valued at and whether you ever encounter an error in shooting which leaves reflections ruining a shot.

– David Kilpatrick

To see Anthropics PortraitPro Studio Max, and the other versions which start from £49.95 (right now there’s a 15% CC524 discount, update May 23rd 2024) – all include this reflection removal function alongside stacks of other tools – go to https://www.anthropics.com/portraitpro/

LandscapePro – changing your world

If they want to fake a Mars colony story, a video version of British software developer Anthropics’ LandscapePro could be useful. It’s from the same team who created PortraitPro, and it allows you to change almost any landscape beyond recognition. It also allows subtle and careful modifications, or essential commercial fixes like a better sky in place of blank white.

One September weekend, a visit to a local restored mansion and park (The Haining, Selkirk, in the Scottish Borders) was rewarding because the Moving Image Makers’ Collective had video art installations running in the house.

Above is a film with dual projectors using the corner of a room (by Jason Moyes, with power making its way from hydro-electric dams to lonely wires and pylons).

Outside things were not as inspiring.

Of course the components of a closer shot, using the ‘quay’ as a foreground, perhaps in black and white, are there. But from this view as I walked past, not really photogenic.

Here’s where LandscapePro can perform any number of tricks, some familiar from sets of actions or presets like a sepia vignetted contrast-boosted vintage look. But it’s the tools which let you mask off different areas, named in the control menus, that give the program (whether plug-in or stand alone studio edition) its power.

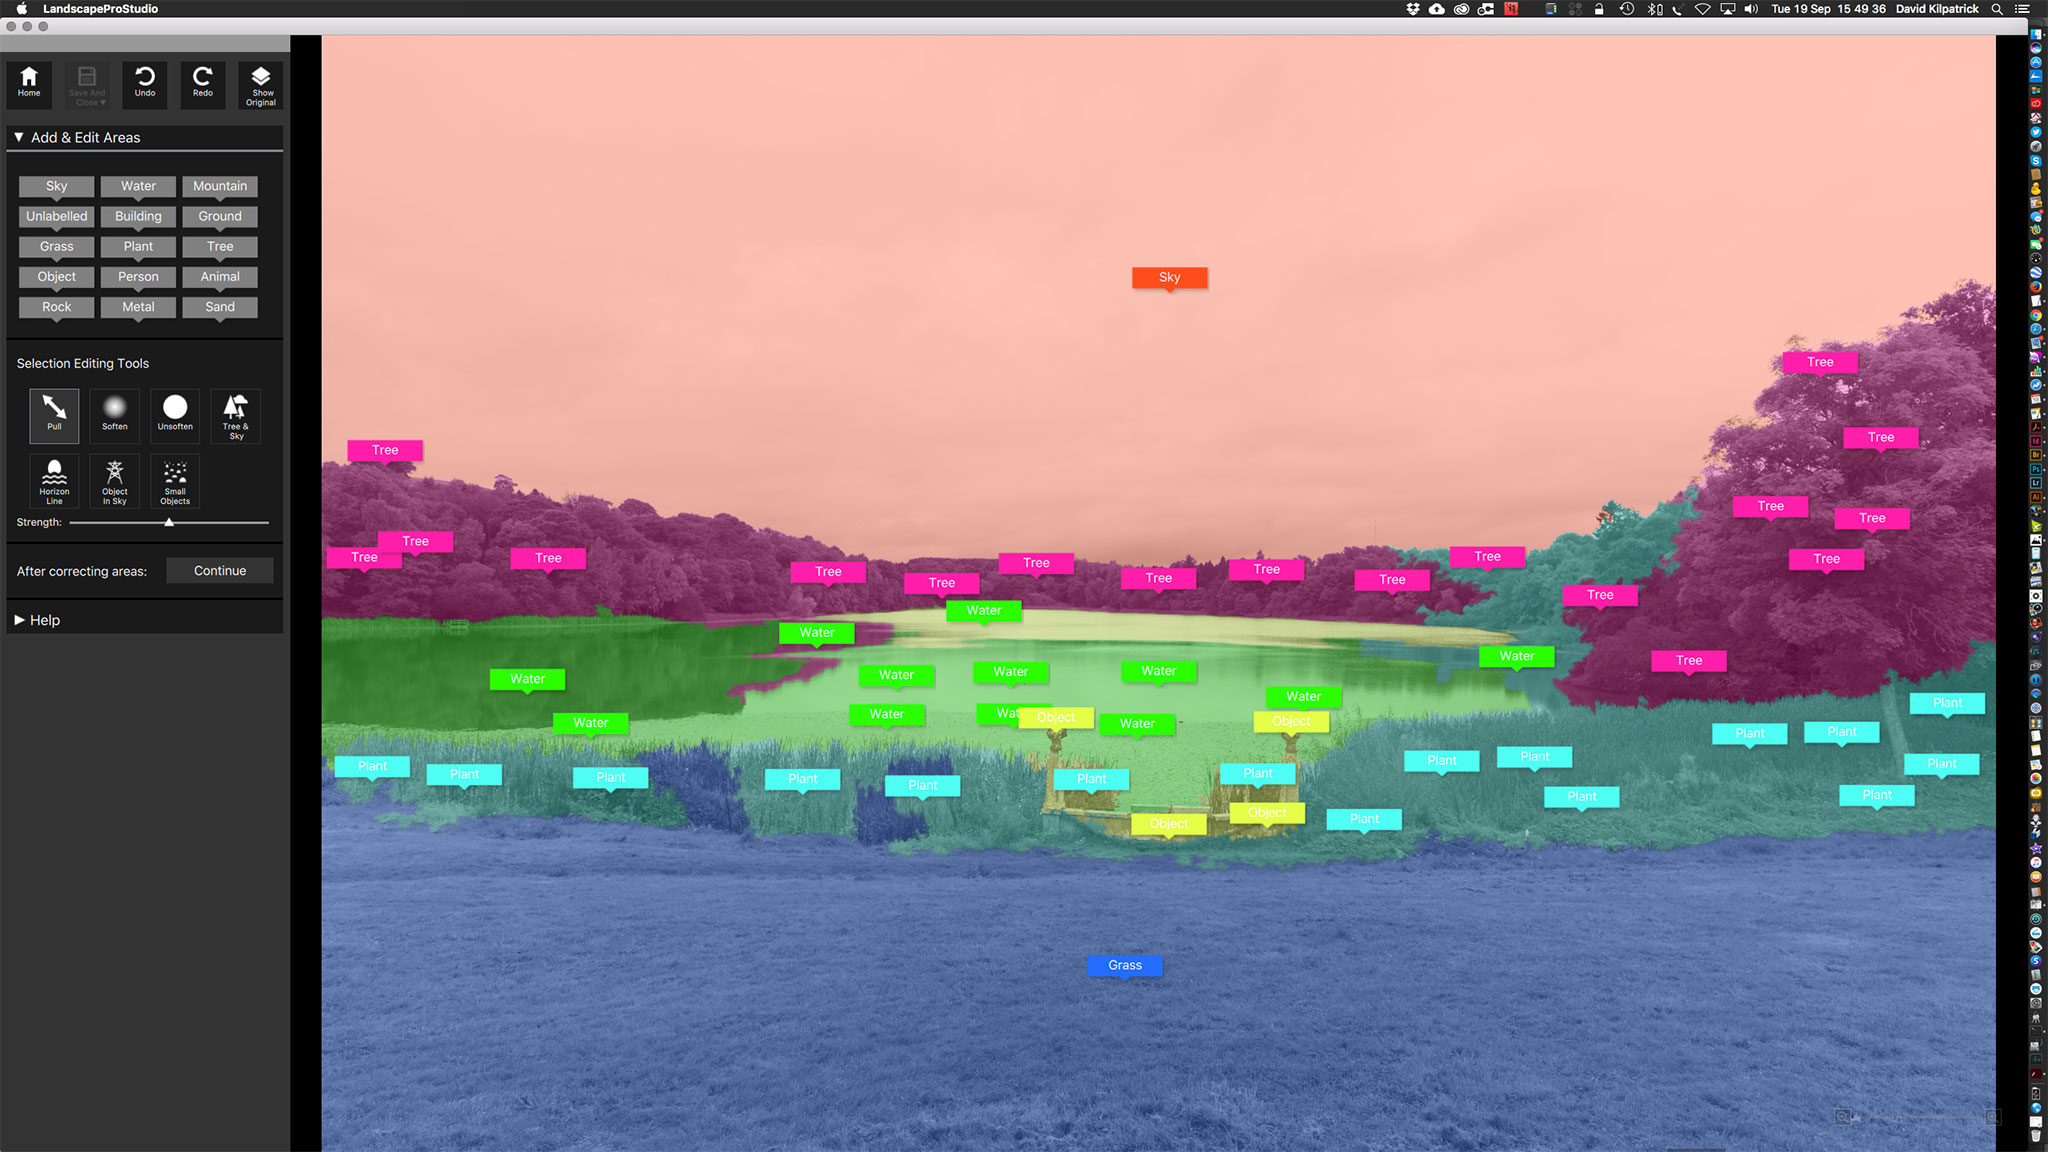
This is a screen shot during progress of auto-painting the masks by dragging the named tags on to various parts of the image. You can then refine them by expanding any part. It’s pretty difficult to mask complex tree horizons as on the right, and some post-process work in Photoshop may be needed. My not-serious rework here is a quick job. You could spend an hour or two setting up the masks for an important image. Even so, the program handles a Sony A7RII 42 megapixel JPEG well enough and most actions are as fast as you can shift the cursor

My idea here was make the scene look like a frosty morning sunrise. The sky is one of my other shots, not a LandscapePro stock sky (the program comes with a good selection but I prefer to keep all parts of an image my own work). The post-pro includes a method for getting rid of a white outline on the woods – you use the Healing Brush tool in Photoshop, set it to Darken, choose a source point in the sky above the horizon, and paint. A similar technique using the Brush tool set to darken with a sampled colour from the lake fixes original tones showing between the reeds. I find the Clone, Brush and Healing Brush tools very useful when combined with Darken or Lighten and controlled flow; I don’t retouch using Layers but have always worked ‘fast and clever’ on the background (single layer), after doing most of the image control and adjustments in Adobe Camera Raw which gives me an .XML sidecar saved non-destructive edit as complex as I need. Mostly, I don’t have to retouch at all in Photoshop. Both PortraitPro and LandscapePro suit me well as they are very fast to use and non-destructive; generally, you can’t see they have been used, especially PortraitPro, because I only use it when needed and then pick specific controls. It is easy to go over the top with these programs as this example shows, but this does not detract from their serious value for careful work.

For this image I also copied the sunset/rise area, flipped it vertically, and used the Clone tool to overpaint from the flipped version down into the lake to give a reflected sun glow. Colour changes have also been made to the trees.

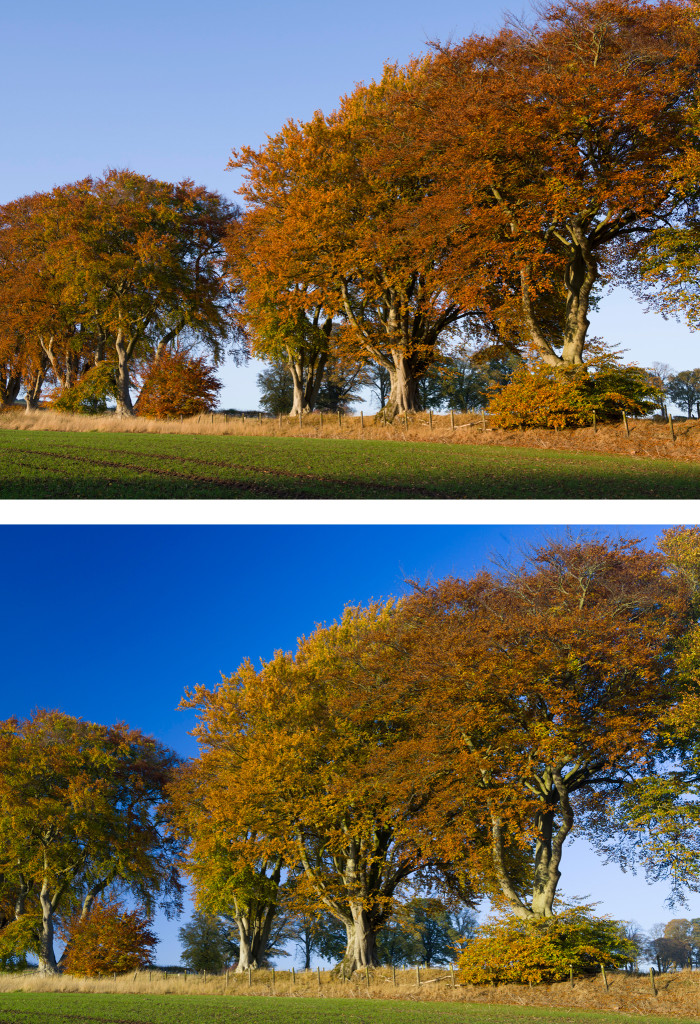
Above you can see, close up, a detailed section with the original top and the processed version bottom. This should demonstrate that the program is not just a gimmick. I used to work with UltiMatte, Mask Pro and other programs which allow painted masking but the multiple different mask zones of LandscapePro take this a step further. Needless to say it’s a godsend for architectural photographers as the clean edges in most architectural shots allow rapid perfect masking and then each face of a building, ground area, sky and landscaping can be adjusted separately. You can work from raw files or from open images in Photoshop (as I did here – it’s not really a JPEG until saved).

You can try LandscapePro at www.landscapepro.pics, and get a 10% discount by using the coupon code F278. If you want to try Anthropics’ PortraitPro visit www.portraitprofessional.com, again we have a discount code – F2910.

UPDATE: August 2020 – until August 17th, use code CC8B on current 50% off deals to get a further 20% off any edition or upgrade of both programs. Visit this link.

– David Kilpatrick


Capturing Autumn colour better

nopolariser-vs-polariserandprofile-web

Upper: unprofiled (Standard) raw conversion. Lower: using a tunsgten-light generated custom camera profile, combined with a polarising filter, gives a more vivid impression.

Most Alpha system users know that some – not all – cameras have a special JPEG mode for Autumn Colours. They’ll also know that if you shoot raw, with no JPEG in camera, only Sony software replicates this. The choice of picture looks or camera profiles in Lightroom and other programs ranges from none (one default) to good (a full basic range similar to Canon settings). However, you can go way beyond the default look your camera will produce from the Autumn colours we are seeing right now (UK) if you profile your camera using the X-Rite Color Checker Passport and the free downloadable software which goes with it. You can also use this software with any standard MacBeth Color Checker card.

You still need to create a .dng file from your original raw, as you also do for Adobe’s free camera profile generator. The X-Rite software creates much smaller profile files but they are no less effective.

Here’s my tip – normally, you calibrate by daylight and the Adobe Camera Profile (.dcp) includes automatic adjustment for tungsten. You can also take two test shots, one under each lighting condition. Experimenting with the X-Rite software, I found that if you only use tungsten to create your profile, all the daylight ‘landscape’ colours (especially green foliage and the sky) really pop out. The greatest change is in the sky blue, which can be very disappointing if you use Adobe Standard as your camera profile for raw conversion.

A7RIIprofiles

The zip file you can download from above contains some .dcp profiles for the A7R II which I’ve produced (the names are more or less self-explanatory). They should be unzipped and placed in the CameraProfiles folder of Camera Raw in Application Support>Adobe. You can find the software, instructions for PC and Mac, at:

http://xritephoto.com/ph_product_overview.aspx?ID=1257&Action=Support&SoftwareID=986

Using the stock Lightroom/ACR A7RII camera profiles you’ll find that the Landscape flavour tends, if anything, to make sky blue lighter. My tungsten-generated profile has most of the overall ‘snap’ of Landscape plus very much richer sky tones.

The second tip with Autumn/Fall colours is, of course, to use a polariser. I’d say this makes the single greatest difference to all Autumn colours even if you can’t see it clearly when composing. The individual leaves reflect light, and the polariser cuts through this to reveal the full colour. Because it also darkens the sky, the often fairly dark colours of Autumn trees come to life better. You don’t need to study the trees, just set the polariser for the best results with the sky. The leaves are at such random angles all positions tend to work equally well. It can however be worth trying a few different rotated positions of the polariser especially if there is also water in the shot. What deepens the sky may also reduce the strength of reflections in water. Experiment!

– David Kilpatrick

If you are considering buying a Color Checker, Color Checker Passport on Amazon can benefit this site.


Capture One Express bundled for Sony raw handling

Capture One Express (for Sony) RAW converter and image editing software will be bundled with Alpha and Cyber-shot cameras in future.

The ‘Capture One’ RAW converter and image editing software from Phase One has been newly adapted for Sony. ‘Capture One Express (for Sony)’ will be provided at no extra charge to users who purchase an α interchangeable-lens camera or Cyber-shot RX digital still camera. This image processing tool incorporates an advanced RAW image processing engine to enable delicate images to be finessed to deliver a high-quality finish.

Refer to the following website for details: www.phaseone.com/en/Imaging-Software/Capture-One-for-Sony.aspx

This website will go live at 10:00 Central European Time on 16/09/14

Free software and a cut-price lens

You have until November 3rd to grab a free download of a truly excellent utility for Mac OSX, created by DxO Optics Pro software team – DxO Perspective. It normally costs $19.95 (or local equivalent) as an Apple App store download, but they have made it free for a few days. It’s a fully working, standard version with no time limit.

Download link for DxO Perspective from Apple iTunes, free until November 3rd

Here’s what they say:

“DxO Perspective corrects all kinds of perspective problems, even the most complex. Using its Rectangle tool, when a photo contains two perspective flaws, DxO Perspective’s Rectangle tool immediately reestablishes a full-frontal view of the object — essential when shooting a photo of a poster or painting! In 8-point correction mode, DxO Perspective handles even more complex perspectives: the independent placing of horizontal and vertical guidelines provides highly precise corrections on multiple planes.”

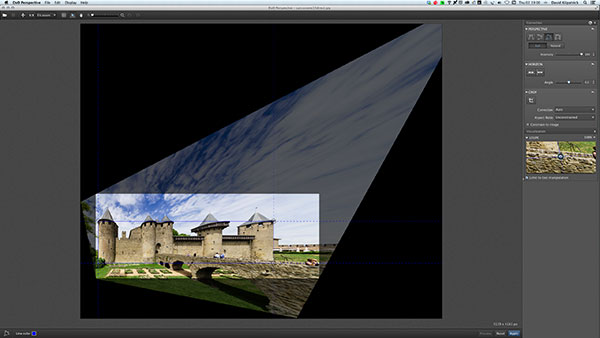
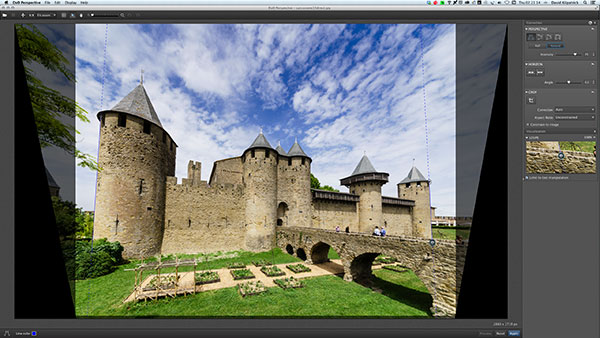
We can vouch for that. Here’s the software window with a straight shot, uncorrected, Sigma 12-24mm zoom on Alpha 99 at 12mm.

perspective-addpoints

Now on this example, you have a choice of adding points to correct both vertical and horizontal perspective (four indexes clicked/moved) which I have done if you examine the faint blue lines, and this will produce an extreme result:

perspective-extreme

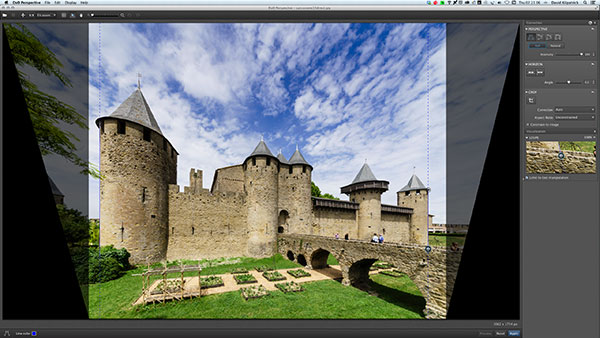
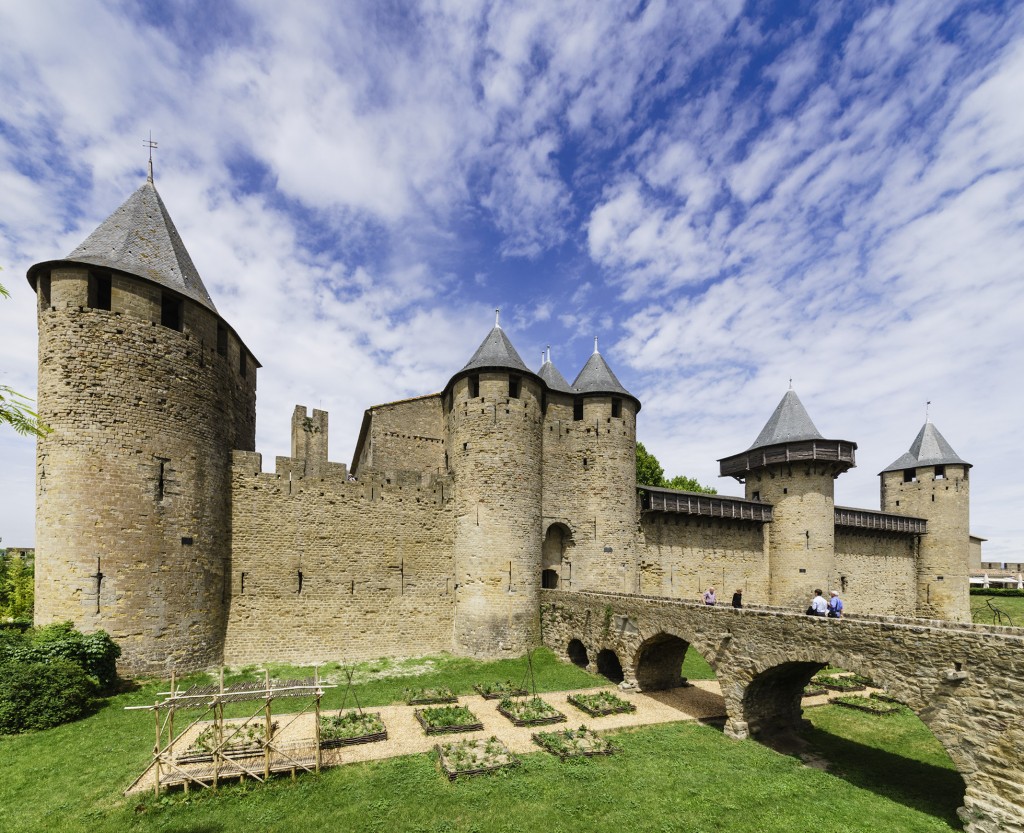
However, for this example, you would normally onle correct the verticals and omit the four-square connections. This produces a natural result relative to any other correction method:

perspective-final

This is a 100% correction. DxO Perspective lets you reduce the degree of correction. Here is what they describe as a ‘natural’ look, 75% strength:

perspective-natural75percent

I preferred the result between 90 and 95% correction.

Midi-Pyrenees

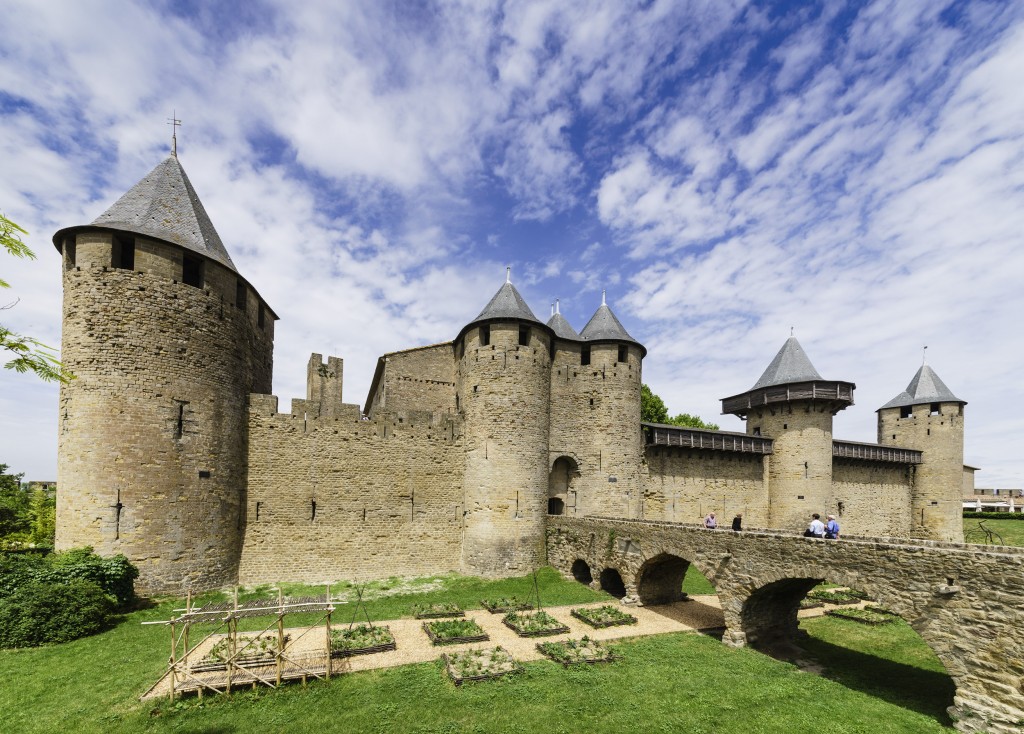
You may ask how this differs from Adobe Camera Raw lens correction perspective control, or similar functions within Photoshop (without using special plug-ins). First, DxO Perspective is a stand alone program and does not need Photoshop, it only requires a JPEG to select and work on. Secondly, here’s the result from ACR/LR type correction, kept slightly on the ‘natural’ side of :

Midi-Pyrenees

The greatest difference is that DxO Perspective makes automatic corrections to the vertical aspect and retains the sense of height, at the same time ensuring that the sky is not compressed.

So, enjoy this free download until November 3rd 2013.

At the same time, from 12.00 midnight Eastern Standard Time on October 31st, B&H in New York announced a drop in the price of the Bower (aka Samyang) 8mm f/3.5 fisheye lens for NEX, MicroFourThirds, Samsung NX, Nikon, Canon EOS, Pentax and Alpha mounts – down to as little as $209 for Alpha or NEX:

Bower 8mm fisheye for NEX – but see below!

Bower 8mm f/3.5 lenses from $209

Buy through this link and you support Photoclubalpha in a small way without paying anything extra yourself (indeed, buy any other B&H item after following this link and it will help us).

Here is some advice. The NEX model is basically an Alpha mount optical assembly with a permanently built in extension tube. We advise you to buy the Alpha version, as this is a manual focus manual aperture unchipped lens – use a NEX to Alpha adaptor, doesn’t have to be the expensive official LA-EA1 as this lens uses none of the connections. Then you have a lens which can be used on two systems.

DxO Perspective does not offer a de-fishing function but we’d make a guess that this would be a likely upgrade to the program in the near future and that’s why they are giving it away. DxO Optics Pro software itself is, after all, famous for the inclusion of lens profiles before any of the other programs (or cameras) got this facility.

– David Kilpatrick


New apps for NEX 5R and 6

Light Shaft and Motion Shot are two new apps for the NEX-5R and NEX-6 – one of which looks almost unacceptable (sure way to get your images disqualified from competitions, however much fun) and the other really innovative, bringing a motion clip function to the NEX range which it was lacking before.

There is also a new version of PlayMemories Online mobile app with Photo Book feature now available

Available to buy from www.sony.net/pmca, both apps let you instantly create a huge range of in-camera picture effects, with no special PC software or image editing skills needed.

Light Shaft adds a ‘dramatic ray of light, like sunshine bursting through cloudy skies’. Position your light source and choose from Ray, Star, Flare or Beam effects then tweak the angle, intensity, length and number of rays. The original photo is automatically saved as a copy alongside the amended version. Now you can say you have been shafted by Sony 🙂

Motion Shot ‘identifies your moving subject in a high-speed burst of frames, capturing each moment of the subject’s motion into a single image. Press the shutter button and track the split-second action of that wild snowboarding trick or pole-vault. Freeze the beauty of wild birds landing on a lake or just have fun capturing friends, family and pets on the move. Fine-tune each shot by choosing your sequence length, start/end frames and fade-in or out.’ Alongside the composite image (?), your original frames will be recorded in continuous shooting mode and remain untouched.

New PlayMemories Camera Apps™ for the NEX-5R and NEX-6 are available now in the UK.

PlayMemories Online: New Android app and Photo Book feature

A new Android app* adds fresh features to PlayMemories Online, the photo and video cloud service from Sony. There’s also a new Photo Book feature that lets you have fun creating beautiful online photo books in a few simple steps.

The new app automatically selects memorable shots from all your uploaded photos, organising them by date. Each day you launch the app on your mobile device, you’ll see different photos from the past to rekindle those priceless memories.

Photo Book lets you organise and enjoy all the photos you’ve uploaded to PlayMemories. Just pick the photos that you want to be included into your photo book, select from a choice of eight themes and personalise your photo book with text and decorations. Once your book is ready you can view it at any time on your smartphone, tablet or PC; better still, share all those memories with friends and family by Facebook or e-mail.

New Lightroom and ACR release candidates

Beta (release candidate) versions of new Lightroom and Adobe Camera Raw can be downloaded free now from Adobe Labs. You won’t get these updates using the normal search for updates in Adobe apps, as they are not the final release and can not be found on Adobe.com Downloads yet.

Links:

http://labs.adobe.com/technologies/cameraraw7-4/

http://labs.adobe.com/downloads/lightroom4-4.html

These updates will work until April 30th by which time there will be a full release version. For Sony users, the updates provide better lens correction for the RX-1, support for the Hasselbad Lunar (NEX-7 based luxury camera), and lens profiles for the new type Sigma 18-250mm HSM Macro and 180mm prime macro lenses. There are also some improvements to the conversion and controls.

Adobe gives away legacy Photoshop/Suite (CS2)

If you don’t like using Elements, and can’t afford the latest Photoshop, and have something like a Mac G4 or early Intel series, or a Windows XP machine, Adobe has an unbeatable price for you to download and use Creative Suite CS2.

Free.

The link you need is:

https://www.adobe.com/cfusion/entitlement/index.cfm?pid=4485850&e=cs2_downloads

Be warned that since this link was made public, the server has been down occasionally and the site temporarily unavailable. It has been restored but you may have to retry for a quieter period. This is a popular move from Adobe.

The important element of CS2 for the photographer, Photoshop, is only part of the deal as you also get InDesign, Illustrator and Premiere (pre-HD video).

You can use CS2 for a wide range of photo editing tasks, and although it does not support new Alpha and NEX raw files, it is easy enough to convert these to .DNG (Adobe Digital Negative) format using the DNG Converter. This is also a free download:

http://www.adobe.com/support/downloads/detail.jsp?ftpID=5519 (Windows)

http://www.adobe.com/support/downloads/detail.jsp?ftpID=5518 (Macintosh)

DxO Optics Pro support for Alpha 99

DxO Labs, announces the immediate availability DxO Optics Pro v8.1.1 for Mac and Windows, the latest version of its image processing software of reference for all serious photographers. This upgrade allows DxO Optics Pro 8 to support the Sony SLT-A99, the Pentax K-5 II and K-5 IIs, and the Canon EOS M.

DxO Optics Pro v8.1.1 also benefits from the continuous addition of DxO Optics Modules. Nearly 300 new camera/lens combinations have been added to the library, thus providing support for additional Canon, Panasonic, Samyang and Sigma lenses for Canon, Nikon, Olympus, Panasonic, Pentax, and Sony cameras.

Developed in the laboratory using an exclusive calibration process, DxO Optics Modules contain tens of thousands of data points about the intrinsic characteristics and flaws of each camera and lens. This database, unique in the entire world, allows DxO Optics Pro to automatically correct all the optical flaws in RAW and JPEG images – distortion, vignetting, chromatic aberrations, and lens softness – with an unrivaled level of quality.

Availability and special end-of-year discount

The Standard and Elite editions of DxO Optics Pro v8.1.1 for Mac and Windows are available in the DxO Labs online store (shop.dxo.com) and at photo resellers at a special discount price from now through December 25, 2012:

USD:

  • DxO Optics Pro 8 Standard Edition: $99 instead of $169
  • DxO Optics Pro 8 Elite Edition: $199 instead of $299

EUR:

  • DxO Optics Pro 8 Standard Edition: 99€ instead of 149€
  • DxO Optics Pro 8 Elite Edition: 199€ instead of 299€
  • (Suggested retail prices, including VAT)

GBP:

  • DxO Optics Pro 8 Standard Edition: £89 instead of £135
  • DxO Optics Pro 8 Elite Edition: £179 instead of £269
  • (Suggested retail prices, including VAT)

This upgrade is free for all owners of DxO Optics Pro 8, as well as for photographers who purchased a DxO Optics Pro 7 license on or after September 1, 2012. Other users can take advantage of a special discount on this upgrade through December 25, 2012, by going directly through their customer account.

A complete, fully-functional trial version of DxO Optics Pro 8, good for one month, is available on the DxO Labs website (http://www.dxo.com/intl/photo/free_trial_version).

Go wider than wide with Photomerge

In the latest incarnation of Photoshop, CS6, the Photomerge function is faster than ever before and leverages all the context-aware, pixel matching math of the previous versions enhanced to a degree you’ll find hard to believe.

Sony NEX and Alpha cameras have the same technology built-in for their sweep panorama mode, but anyone who’s used this frequently will know that failures happen, like stepped sea horizons and double imaged or squished-flat people.

Photoshop has the menu item Photomerge under ‘Automate’ in the File Menu. It is a panoramic stitching function, but it does not need you to shoot with a tripod or even shoot with care. You can stick a wide angle lens on your camera, take two pictures with radically different vanishing points, and still end up with a neatly stitched perspective.

What you need to know is how to NAME your images or what order to shoot them in. Contrary to what you might expect, Photomerge inherits its geometry from the LAST image in your sequence. So, if you have these three images:

This is the order you need to name them. I shot these with the bottom one first, of course – my level horizon straight-on shot. Then I aimed up, and then up again, overlapping three shots. If I then select these for Photomerge, Photoshop will correctly realise I want a vertical panorama stitch but it will not use the straight-on shot to set the image angle and geometry. It always picks the LAST shot, so I must rename my JPEG conversions 1, 2 and 3 as they appear above.

If your open tabs, or the stacked order of open windows, does not place the target perspective LAST you’ll get the wrong result. Here is what happens if the first shot (the bottom one above) is placed as the first tab in a multi-tab PS window, or the top window in a stack of separate windows, before adding OPEN FILES to the Photomerge window:

I used the NEX-7 with the 16mm f/2.8 SEL wide angle for these three shots. The composite, before cropping, measures a substantial 130MB. This technique enables you to use almost any wide-angle lens to create impossible wide views.

Here is the result when you stack the shots in the right order, so the program takes its perspective cues from the vertically-correct frame (the last one shown at the top):

You have no manual control over the perspective rendering. It’s all down to feeding Photomerge the right images, in the right order. Here is the fine tuned and cropped result:

This is an unretouched merge of the three frames. I’ve been trying this on various subjects, some rather silly, and Photoshop CS6 simply nails the merging even with focus, exposure or tilted camera errors. There are much lower cost programs which stitch images and do it well, but this takes a matter of a few seconds to create a final image equal to 40 or more megapixels. Not bad for a tiny 16mm lens!

Tip: instead of adding Open Images, browse and add one at a time, making sure the perspective-key shot is the last one added.

If you shoot architectural or landscape images, this function’s enhanced performance allows you to leave behind your 8mm. Except, of course, you don’t have one. If you do have an 8mm, welcome to the world of 5mm…

Added example – the next day…

I returned to the building (the other end of it) the day after posting this article because I wanted to add something far more complex, still shot by hand, using the NEX-7 and 16mm, showing just how amazing Photomerge has become. I wanted foreground and background elements, complex geometry and a matrix of shots not just a row of them.

Here is my matrix of shots – every one of these is an 85° diagonal view, 16mm on APS-C:

Here is the result of the Photomerge window before final adjustment and cropping:

This is a 400MB+ Photoshop document and over 200MB in flattened data size. Below is the final crop, with a small rotation and correction of vertical perspective:

This is a 119MB JPEG 6919 x 6013 pixels in size, no retouching has been used and the raw conversions are default with the 16mm E lens profile. Some fringes remain visible, the image could be downsized and corrected further. Remember.. this is the often-criticised 16mm which I find to be an excellent little lens. You can download the full size sRGB JPEG saved to Level 10 quality (14MB file) from the link below if you are Photoclubalpha subscriber. It will not appear if you are not a subscriber.

[private]

Subscriber Link

[/private]

– David Kilpatrick

1 2 3 7