Machined from brass and chrome-plated, in the tradition of lens mounts from 50 years ago and not necessarily the best solution for precision or lifetime wear, Fotodiox’s TOUGH E-mount is a replacement body mount bayonet which you can fit to your existing A7R, A7, NEX-7, A6000 or any other metal-mount E-mount body in a few minutes. You need a clean well lit work table, a small engineer’s or large jeweller’s crosshead screwdriver, and a similar flathead screwdriver or old credit card.
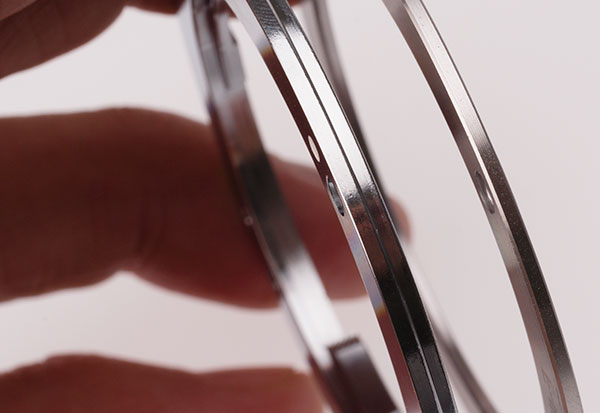
The NEX/A bodies are fitted with a three-part lens mount. Here’s what a bonded, single piece, original Alpha lens mount looks like when removed from an old Minolta 7000 –

This mount is stainless steel, which would be prohibitively expensive for a small shop engineering replacement on the E-mount. It’s in two parts, a front surface and the inside with a bonded bayonet spring pressure action, a thin shim with bent ‘arms’ forming three pressure points to hold the lens tight to the mount.
From Fotodiox comes this neat box taking 10 days to the UK from USA –

Since I also ordered a focusing Leica M to E adaptor, my overall value was marked as $80 and I had an £8 admin charge and a little over £7 in VAT to pay.
Inside, the TOUGH E-Mount is boxed and bagged without instructions. For these, you visit the Fotodiox site and watch a video:
http://www.fotodioxpro.com/tough-emount-from-fotodiox-pro-replacement-lens-mount-for-sony-nex-emount-camera.html
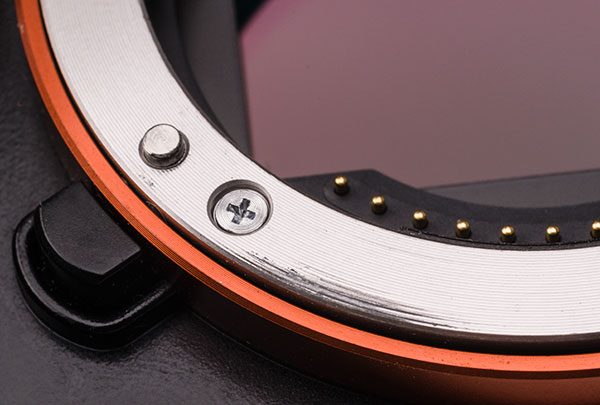
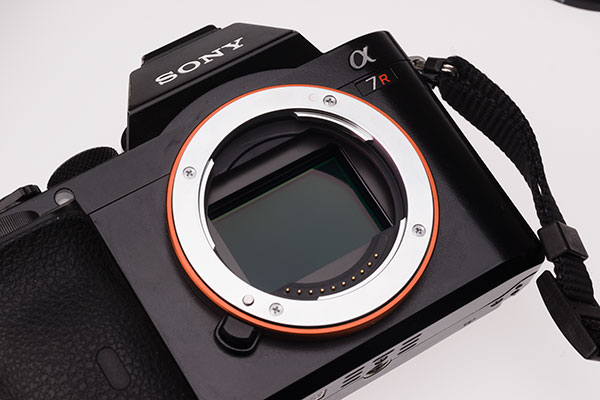
Here’s the rear face of the Fotodiox mount, which does not have any second layer of spring metal to grip the lens:

However, as we will see, this component (fixed to the mount for the A-mount design) is a separate loose item which sits in the camera body mount recess on the E-mount, and performs exactly the same function. You could probably remove it and bond it to the new mount.
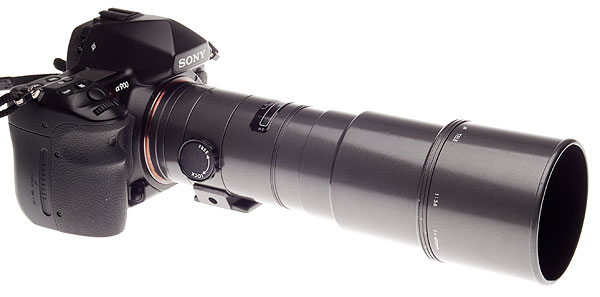
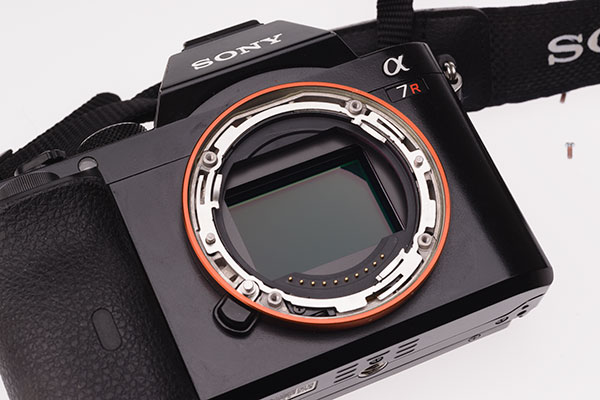
So, why replace the E-mount on a £1200+ camera body like the A7R, which has a magnesium body casting into which the lens mount is anchored by four screws? The reason given by Fotodiox is that an intermediate plastic moulding is used behind a simple unprofiled mount face, so two parts make up the overall thickness. The tensioning ring sits behind the plastic ring, forming a three-part sandwich to make up the mount. The front mount is a relatively soft, crudely CNC lathed alloy.
Here’s my camera after 10 months of use. This camera has shown signs of light leaks, and has not been sent back for a fix. The mount flange is a completely flat item, relatively thin, and the leaks may be partly down to slight distortion of the front plane face, as shown by uneven wear from lens mounting.
Here’s a detail. You can see the lathe circles on the mount face, and you can see where the metal has abraded and either collected plastic from a plastic lens mount (most likely my MEIKE extension tubes) or paint from a cheap adaptor (my Novoflex and Fotodiox adaptors don’t use paint, they are anodised).
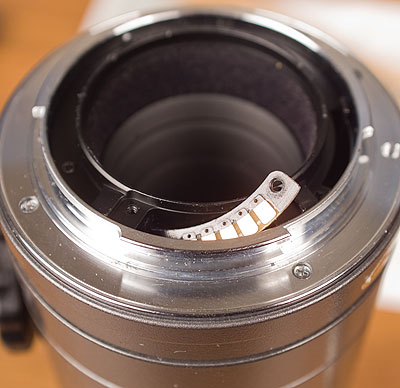
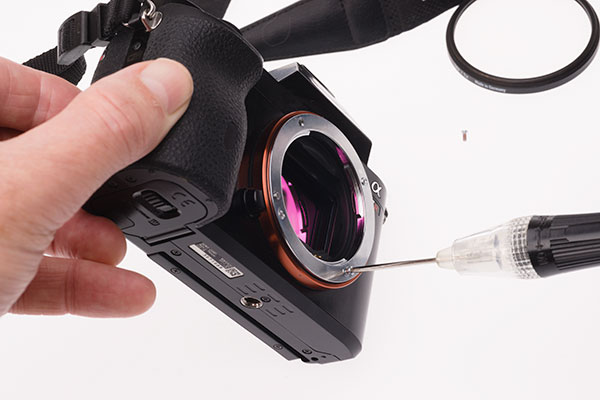
The mount is very simple indeed. It can be removed from all the cameras without disturbing the electronic contacts or the lens release mechanism.

Fotodiox video shows the camera on its back and warns about dropped screws etc. I just prefer to unscrew each screw in turn with the camera held vertically on my table, so that if the screw drops it won’t go inside the camera. Care is taken not to allow the spring loaded lens changing pin to disassemble itself, but that’s really very easy.
One removed, you can compare the Sony ‘washer’ (which is really more or less is!) with the Fotodiox mount – a much thicker unit, stepped to fit the recess on the camera body. A point worth noting is that the original mount has no recesses at all to fit over the four threaded posts on the camera body. Its position is maintained by two pins (at 9 and 3 o’clock) which engage in two holes on the otherwise plain flat rear face of the mount. The Fotodiox mount not only engages with these pins, as it replaces the plastic secondary mount shown below, but also has holes into which the threaded posts fit. It is better proofed against rotation.

You now see the plastic middle part of the sandwich. This is secured by a very thin double-sided tape in places. A flat blade screwdriver or a suitable cut piece of old credit card (or indeed a guitar pick!) pushed gently under the plastic at various point all round will free it. It lifts out easily. Unless you are amazingly clumsy you are not going to go anywhere near the sensor but if you have a clean 40.5mm filter or lens cap around, you can pop it in to cover the sensor safely. I used a 62mm filter to place over the whole mount when checking instructions and looking at the parts, as I don’t want to risk hairs and dust covering the upturned unit.
Underneath the plastic component you’ll find the third part of the mount, the thin flexible stainless steel tensioning ring which acts to pull the lens tight against the front face of the mount. You may note that if your lenses ever begin to seem slack, it would be easy to re-tension this ring by a gentle bend to the three arms. The four screw holes are in metal posts mounted directly into the magnesium body. The plastic ring can be argued to have no effect on precision, as the original mount rests on these posts, leaving the plastic and the stainless tension ring more as a ‘lubricated’ assembly with a little ‘give’, affecting only the tightness of the lens to the body. The plastic has no sacrificial role, as it does in many lenses (Sigma, Tamron, Nikon, and Canon all use plastic to create weak points where the lens will break on hard impact rather than having it shear the body mount off the camera – not sure about Sony).
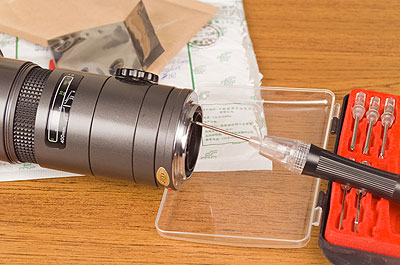
The final step is to place the new mount, aligned with its white dot and cut-outs and screw holes, in the only position it will fit. Please note that the TOUGH wording goes inside and is not shown on the camera front! Again, I don’t place the camera on its back, and prefer the control given by holding both the camera and the screwdriver (which if properly chosen will support the screw). No pressure is needed to locate the screws for a few turns. I rotated the camera so that the screw hole being worked on was always below the sensor. Finally, when tightening up each screw in turn to a firm fit, the camera was laid on its back and my 62mm filter was placed to cover the mount opening, held firmly. You can also just place a finger against the screwdriver on the ‘inside’ while tightening up, so that if for any reason it slips, you block it from entering camera.
Once fitted, there’s little more to say. It looks a touch classier than the cheaply machined soft metal Sony original, it is a snug and perfect fit, and lens mounting has a slightly more solid feel without resistance or any scraping sensation. Fotodiox may be taking the mickey by suggeting you give the old mount to the cat to play with, of course you should keep it carefully. While doing this I discovered that the original old Minolta SR bayonet shares the screwhole locations and almost perfectly matches the overall size of the E-mount. I could actually take a Minolta SR bayonet off the front of some old extension tubes and fit an E-mount in place. This would serve no purpose but it’s a fascinating hint at the pedigree of the new system – it has a three-flange bayonet so similar to the SR mount, introduced 52 years after Minolta’s SLR debut!
Everything worked perfectly as expected once fitted (see notes below). Cost – $39.95 plus shipping. I consider it a good upgrade.
Notes on infinity focus, fit, and light leak issues
While Sony native E mount lenses seem fine, some of my third party adaptors are not fitting well, and very short focal length lenses show that the infinity focus may be affected. If you use lenses 12mm to 20mm on adaptors, proceed with caution. I am not able to get the Kipon tilt shift adaptor to mount without a forceful twist, though a similar age Kipon shift-only adaptor is happy enough (just no longer able to hit infinity with my chosen 20mm lens).
Infinity collimation after tests and measurements – I’ve now checked infinity focus using stars. I’m just OK on all but one lens and adaptor combination, and all Sony E or FE lenses are fine, as they have loads of spare adjustment (no hard infinity stop – they will all focus way beyond infinity and can handle big differences in camera assembly accuracy). Same with LA-EA3 and LA-EA4 adaptors and Min/Sony A lenses, the worst case lenses hit infinity at exactly infinity, most focus just past.
Kipon Nikon Tilt-Shift – extremely tight fit, so tight it has to pulled off the camera physically. Here I’m thinking that some very gently polishing or ultra fine emery (the sort I use for polishing guitar frets) might ease the adaptor.
Novoflex Leica M adaptor – will not bayonet-lock with the new mount, can’t work out if the flanges are obstructing the full turn or the locking pin hole is slightly off position. Fotodiox helical M adaptor locks perfectly. All other adaptors fit and lock comfortably.
Checked my Kipon shift adaptor for Canon and it’s 21.34mm from rear to front flange, and the lens won’t focus on infinity. My plain cheap Canon FD adaptor is 21.16mm and the lens will hit infinity perfectly. On the original mount, the shift adaptor was just OK to infinity – not for stars, but for landscape. So maybe 0.1mm actual difference in front face register to sensor on the Fotodiox Tough mount, compared to the Sony original.
Light leak issue – a day later I had bright full sunshine and was able to position the camera with the mount getting direct sun, and give exposures of 30 seconds to 1 minute with the lens completely stopped down and blocked off, and the ISO set to 1600. The results proved that it’s not the camera mount assembly which has most effect –

The pure black exposure above is from the 28-70mm kit zoom set to 40mm, at f/25, with the lens cap on.

This result is from a Voigtlander 40mm f/1.4 mounted using a Novoflex Leica M adaptor, at f/22, with the lens cap on. Simply swapping the Voigtlander adaptor for a Fotodiox helical focusing Leica M adaptor, which has a far wider flange and double the ‘bearing surface’ on the mount and it also a much firmer overall fit, produced the same solid black as the 28-70mm. The 10-18mm also produced a solid black though it was clear that the lens cap lets in a bit of light at the spring clip positions.
To double check, I fitted a disc of Rosco Black Cinéfoil (totally lightproof heavy metal foil you can cut with scissors) into another mount so it sat behind the back of a 50mm lens. This was a Ukrainian shift mount and Zenitar lens. This mount also has a large, black anodised rear surface. No light was admitted. I found that most of my third party adaptors let in light, usually the small angled line/crescent top right, and so did the Sony LA-EA3 and 4. The Novoflex has me surprised and baffled as it let light in over a wider pattern, and it seems to be the best engineered adaptor I have, but the well for the bayonet locking pin is shallow and perhaps too precise as the pin does now not engage (you can feel it just begin to hit the lock position).
(don’t read beyond this point if you don’t like seeing measurements…)
This adaptor works perfectly on other NEX/E bodies and worked perfectly before changing the mount. Relaxing and re-tightening the mount fitting screws, to be doubly sure of correct seating, did not solve the problem. The pin recess in the Novoflex adaptor is 2.30mm wide, and in all the other adaptors measured and also on Sony lenses, from 2.36mm to 2.5mm. The slight wiggle present on Sony lenses when fitted seems to be down to approx 0.07mm tolerance allowed for the locking pin to engage, as this is the part of the mount which limits or fixed the position of the mounted lens. Lenses and adaptors tested, when mounted with the locking pin depressed, can move around 0.5 to 1mm beyond the optimal mounting position.
It looks as if the locking pin mechanism is one area identified as a source of light leaks, and that if the pin is not allowed to engage fully (recess too shallow or not accepting the pin) more light will be admitted. All my manual adaptors varied in the depth and exact design of the locking pin well – 1.1mm deep on Kipon, 0.69mm deep on Fotodiox, 1.23mm on Novoflex, 1.1mm on Sony G 10-18mm, 1.18mm on Sony 16-50mm PZ. The 28-70mm which had perfect light sealing also has an unusual locking pin hole, almost perfectly circular not an elongated oval like all the other lenses. This was 1.2mm deep and with a 2.5mm radius. It is obviously perfectly placed and very precise despite this being a non-G, non-CZ, cheap Sony kit lens.
Anyway, 10 seconds with a Dremel and the Novoflex adaptor is now a perfect locking fit ready for another test if the sun comes out again this year.
Sony did say, back in 2010, they would make the E-mount specifications public for all to use. If anyone has information on what tolerances were specified, please let us know!
Update 30/10/14: using a high intensity single LED torch, the Novoflex adaptor problem was eventually narrowed down to light leaking through the mount between high-grade Leica mounts (Cosina Voigtlander, and Carl Zeiss) and the adaptor. Tightening the flange pressure did not cure the fault. No leak is present when using a low-cost Chinese M adaptor on a screw thread lens, which is a firmer fit. The Nokton and Tele-Tessar lenses also show no leak with the Fotodiox adaptor. It’s just an issue with these mounts – probably from the same source, as Cosina assembles CZ Leica mount lenses – and the Novoflex.
Absolutely no light leak can be identified on the A7R body with the new mount fitted. All leaks turn out to have been down to third party adaptors. The LA-EA3 and LA-EA4 give no light leaks, same for all E/FE mount Sony lenses. The Kipon Tilt-Shift (Nikon, $200+) has so many light leaks I can’t map them – every stage of the unit from the lens mount to the body mount, and all the moving parts, admit light; unit dangerously tight on Tought-E mount. Kipon Shift adaptor (Canon FD) admits light freely, especially when shifted. Canon FD plain adaptor, low cost – leaks at body mount. Cheap Minolta MD adaptor – no leaks. Cheap Nikon adaptor – OK at the body mount, lens release catch admits light freely (repaired using black putty compound but ineffective, still leaks light). Cheap tilt MD to Nex adaptor – one strong light leak in mount between some lenses (chrome flanges) and the adaptor, but otherwise light-tight to the body and in its tilt mechanism. Low-cost L39 to NEX adaptor – no problems at all. Ukraine/Kiev/Zenitar 50mm tilt combo – perfect, no leaks in any position. Samyang 12mm f/2 – small local leak at mount (top right crescent issue). 28-70mm FE – absolutely light-tight, no issues. 10-18mm Sony G – ditto, no light leak at all. 16-50mm Sony PZ – no light leak. Tamron 18-200mm – top right crescent issue. Fotodiox Leica M helical, with any lens, no problems. Focus brand Canon EF to FE mount AF adaptor – no leaks. Original 1st gen Kipon 42mm tilt device – no leaks at all.
– David Kilpatrick