No FE or A mount for new Sigma 24-35mm f/2

We’ve had news of the new Sigma Art HSM high speed wide angle full frame zoom – 24-35mm f/2.

Sigma24-35f2

It will be available in Nikon, Canon and Sigma mounts only (release date not yet confirmed) according to Sigma in the UK.

Note that this will be a bit of monster with its 82mm filter thread, 117mm long barrel and substantial petal lens hood.

Sigma does not make a full frame DSLR. Sony is now a major market for high end full frame lenses. What’s going on here? We’ll just have to wait and see. Maybe Sigma just reckon every FF Sony mirrorless owner will have a Canon AF adaptor and maybe their HSM – which works pretty well on the A7II – will even allow fast AF on the new A7R II.

– David

Sharp vintage glass – and subject

Twenty years ago I was operating one of the first full service digital photo studios in the world. I had already published, back in 1986, the world’s first desktop published commercial periodicals and won the UK Printing Industries Research Association inaugural DTP Awards, in 1987, for this. We’d bought the first Apple laser printer in provincial Britain and when Letraset’s ReadySetGo layout package failed to produce usable output for our first such magazine, Aldus stepped in and provide a pre-release beta of PageMaker. In 48 hours, I had to re-create the entire magazine – and it worked.

From then on we progressed, through having the first separation-capable film imagesetting in Scotland to reproducing the first magazine cover from Kodak Photo-CD and soon after the first full colour page from a Kodak DCS camera. By the beginning of 1995 we had Photon, the first major photo-mag style website, in by the end of that year we had a Leaf Lumina based studio with Scandles lighting. There’s an article about this in our repository of past articles, https://cameracraft.online/2007/08/06/the-leaf-lumina-scanning-camera-1995/

That year, Shirley had planted an entire bed of flowers specifically for drying. They make good photographic subjects. The (now relocated) university college of St Margaret’s in Edinburgh asked me to give a lecture about the new technology – and so the Leaf Lumina (a scanner on a tripod with a  Micro Nikkor up front, and an Apple Mac Powerbook on the end of a SCSI-2 cable) went along with the fluorescent studio light heads and a tray of the dried flowers. We also took our Kodak dye-sub printer, which had made hundreds of prints alongside other printers during that year, when Shirley completed her M.Sc.Colour Science and created pre-ICC colour tables to reproduce fabric colours accurately. With this carload of gear, we were able to shoot and produce a print on the spot.

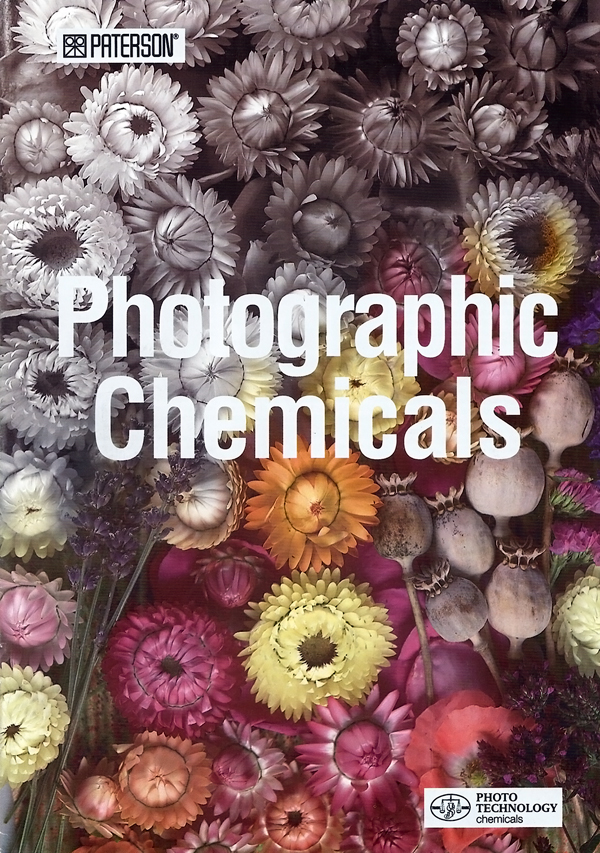
The picture remained on file – a 25MB TIFF, roughly 8 megapixels, but equal to 8 megapixels in the Sigma Foveon sense as every pixel was true RGB with no Bayer filter involved. The exposures took over a minute, limiting it to still life, but the quality was not exceeded until 12 megapixel Bayer cameras like the Sony A700 appeared. And a few months later, we were producing Paterson’s catalogues and price lists and needed a cover. One list covered black and white and colour chemicals, the former mostly from Paterson and the latter from Photo Technology. Photoshop offered an easy way to take the image, and divide it accordingly. So that’s what we proposed, and what was used for the cover.

Paterson1996-web

It was intended to show the gamut from plain monochrome through toning to colour and it did look very good in print, because relatively low overall contrast combined with high detail contrast is easily handled by litho.

Now, forward two decades, and I’m looking for subjects to test out the latest Elinchrom ELB400 portable li-ion powered two head flash kit. This has LED modelling lights over twice as bright as its predecessor and they now really show how the light is falling even when using light shapers. I wanted to show texture using my optical Mini Spot attachment, which works very well with these new heads and their cool-running LEDs.

On top of a wardrobe, in a basket, were the dried flowers. They are called everlasting and apart from gathering loads of dust, they are. The most difficult job was holding each flower against the nozzle of a handheld vacuum cleaner to remove 19 years of dust.

The first shot I took was with the Sony A7II, 24 megapixels, using my Pentax SMC Macro Takumar 50mm f/4. Like the flowers, this is also everlasting. It’s not yet 50 years old even though the lens design, a simple Tessar-type corrected for magnifications from 1:2 (50%) to 1:10, is well over 100 years old. It’s also a tolerable lens for general scenes, though the extreme resolution it achieves centrally only covers the full frame when you focus close. With Pentax’s original multicoating in every way a match for the latest Zeiss T* as found on new Sony Zeiss lenses, and a deeply recessed very small optical unit, it has a contrast and colour saturation you just don’t find from lenses using hybrid or moulded aspherics or many more air to glass surfaces.

This picture appears, fairly small, in my review of the ELB40 in f2 Freelance Photographer magazine July/August 2015. When editing it, I was struck by the extreme resolution. Within the planes of sharp focus, it was exceptional.

So, I decided I’d shoot a new shot, and improve on the use of the spotlight attachment on the Quadra head to cast the shadows and create a sunlight-like effect – and this time, use the A7R with its 36 megapixel resolution. Although the A7R has no AA filter and is sharper in theory, the larger pixel count calls for a smaller aperture to secure a little more depth of field for the larger viewing scale, and this when using any macro lens always risks diffraction limits on fine detail contrast. For example, at half life size a setting of f/12.5 (between f/11 and f/16) which I found desirable for best sharpness distribution gives an actual f-stop of c.f/19 and this does cause some sharpness loss. If the lens was extended on a tube to give 1:1, a setting of f/16 as nearly always needed for depth of field is really a true f/32 for diffraction calculations and light readings alike.

Fortunately, our brains are sensitive to perceived scale, and we ‘see’ close ups as sharper than distant subjects even when they are not. The A7R and the Pentax macro lens also combine to produce an extreme level of textural detail, the information our eyes and brains use to see 3D solidness, shape and form in a flat photograph. So in practice you can shoot macro and use whatever aperture the subject depth demands, without resorting to focus stacking techniques.

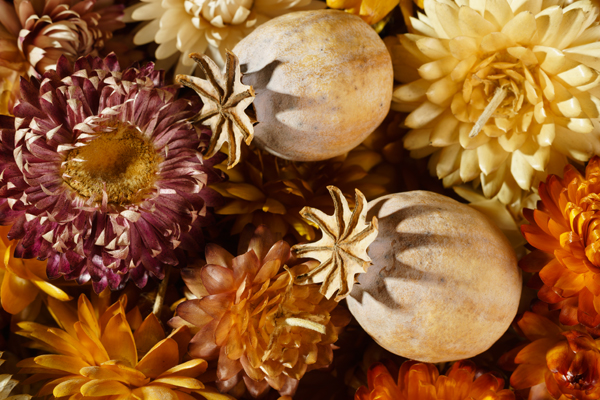
And here, anyway, is the result. You can click on this image and it will take you to a pBase hosted full size, JPEG compression level 12 version (this is over 24MB of image data, and it is not compressed like Facebook or indeed a WordPress image – though it’s still not ‘virgin’ data).

driedflowermacro-cleaned-srgb-web600

In a couple of days, I have another SMC Takumar of the same era arriving. It’s a 35mm f/3.5, which was the cheapest of the line back in 1970 when Shirley bought me my very first brand new, marque brand lens for Christmas! We were both only 18 and that represented an entire month of her basic salary working behind the counter at Dixons in Sheffield… helped by a staff discount. It was my first Super-Multi-Coated lens and I can remember still how the high contrast and bright colours could even be seen through the viewfinder – and how amazing the first box of slides looked, midwinter close-ups of fallen leaves rimmed by frost and frozen puddles.

These lenses have never lost the edge they had, if they have been looked after, but the truth is we never knew how good they really were. We can now focus them within a fraction of a millimetre. I’ll probably never compare the 50mm f/4 SMC Macro Takumar with the 55mm f/1.8 CZ (I’ve used it, but only for low light high ISO tests on the A7S) or the 35mm f/3.5 with the CZ 35mm f/2.8 because it’s unlikely I’ll ever buy the new lenses with their inflated prices and reliance, however marginal, on software correction to be ‘good’.

I know I have not written much about the A7R, or the A7II I’m using, or about any of the new lenses I can not manage to borrow from Sony and can’t afford to buy. I have an amazing set of lenses from 12mm to 500mm for full frame, including tilt-shift, wide aperture and mirror but just one single Sony FE lens for convenience (the 28-70mm FE kit lens). In contrast, my A6000 kit is all Sony plus the Samyang 12mm f/2 because it is just so good it had to have a place.

So, please do take a look at the full size file. The critical plane for focus crosses the smooth surfaces of the two poppy seed heads and it’s in this relatively low contrast zone that the quality of the lens shows up. Elsewhere in the image the defocused quality is very pleasant (there was no CA to correct and there’s no bad colour bokeh) and the plane of sharpness passes through a few other more interesting flower details.

Finally, a word for A7II users. If you use a manual macro lens, as I do, remember that when you program in the focal length for Steady Shot you should only enter the actual focal length for distant views. For my 1:2 macro Pentax, most often used in the range from quarter to half life size, I program in 70mm as the focal length because this represents the view angle. Using a macro at 1:1, you should enter double the focal length to get the correct Steady Shot compensation. Sony and Minolta macro lenses with the D chip (eight contacts) convey accurate extension information, so the auto Steady Shot works perfectly with them. But manual, or Canon lenses on adaptors which may or may or not pass the right information through, are best used with the Steady Shot focal length entered via the menu screen and adjusted to allow for the actual lens extension.

– David Kilpatrick

Check out B&H prices for all full frame lenses for the Sony FE (A7) system here

Check out B&H Secondhand Department for all ‘film camera’ manual and vintage lenses

Check out B&H Secondhand for Sony E-mount adaptors to allow you to fit your vintage/legacy lenses

Check out the huge list of new adaptors for almost every lens ever made!

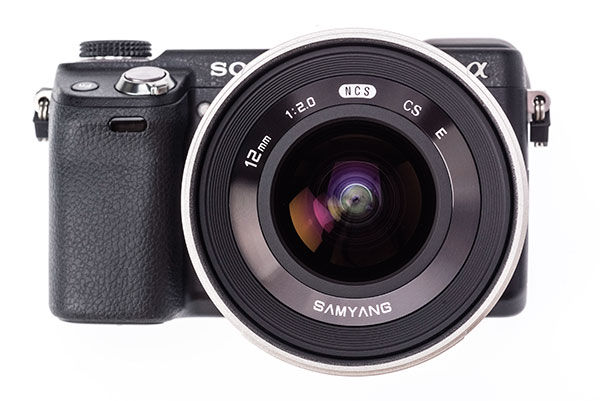
Samyang 12mm f/2 NCS CS lens

samyang12-front-web

Sometimes you find a chunk of glass which just works. One of the problems with lenses is that you can never have too many. They overlap, they duplicate each other, and yet they can be so different that you need every single one. The new Samyang 12mm f/2 for mirrorless APS-C systems is one of these. It’s the budget alternative the Carl Zeiss Touit Distagon 12mm f/2.8 T*, and so far everyone I’ve found who has used both lenses – including me – rates it as better optically. This isn’t what you expect from a lens with twice the maximum aperture at half the price.

samyangfromtop-web

I have good reasons for not owning a Touit 12mm. I already have a Sony 10-18mm f/4 OSS E, and rather like the Fujinon XR OIS 10-24mm f/4 this lens offers nearly perfect performance as a working ultra-wide zoom and adds the benefit of stabilisation for video or tripod-free interior shots.

The Sony appears to have very fine detail sharpness wide open, little sign of fall off in illumination or sharpness, and good geometry.

wideopen-archdig-fullweb

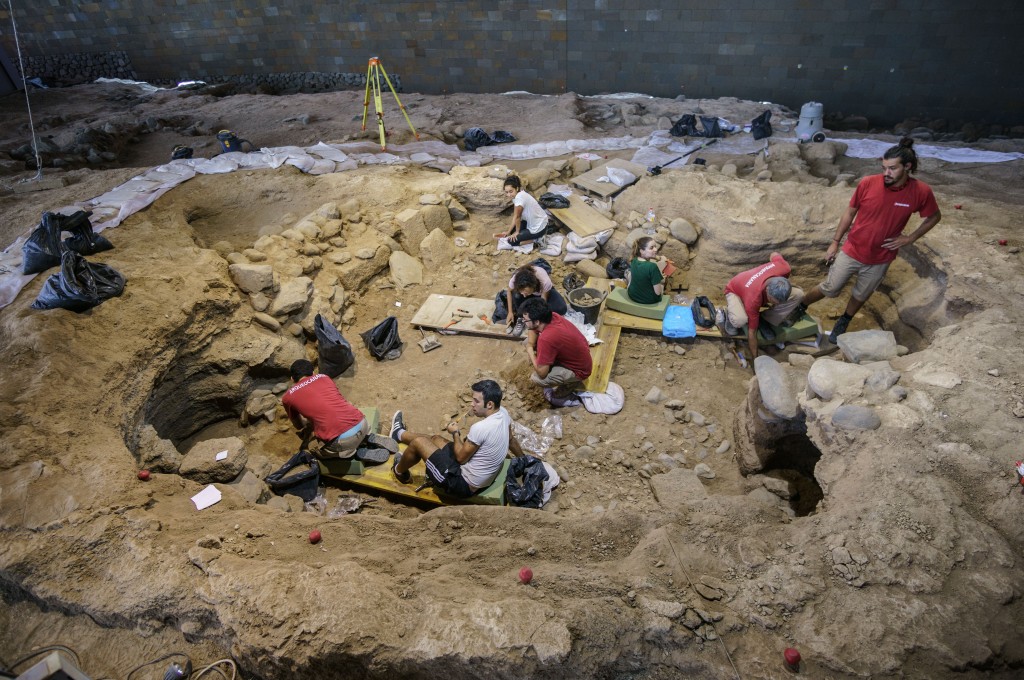
Click this image for a full size, f/2 available light shot taken in a covered archaelogical dig

However, the Samyang when used on the same Sony NEX-6 16 megapixel camera forced a reappraisal. It offers sharpness on a different level and manages to do so even at f/2, with corners far more detailed and clean than any lens with a 99° angle of view should manage.

samyangwithbag-web

It is equivalent to an 18mm on full frame, and this is around my favourite angle for an architectural, street and general lens. Where the 24mm angle is a common feature of consumer zooms and easy enough to use, lenses in the 17-21mm equivalent range produce a distinctive result but need careful composition and an understanding of perspective and lens geometric projection. Lenses like this separate the experienced user from the unskilled masses.

f16-deeplandscape-12mm-webfull

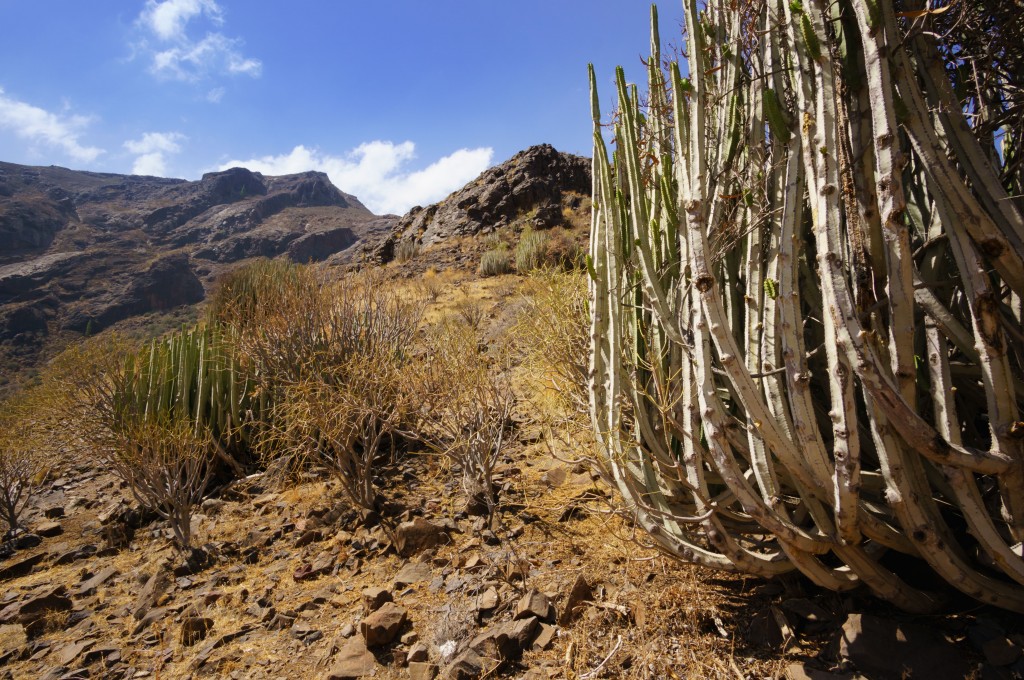
Stopping down to f/16 secures great depth of field (the Canarian cacti are not huge, bush sized and very close not tree size!) with just a hint of sharpness loss. Click image for a full 16 megapixel file

Weighing only 245g, it’s not a big lens though it has a generous 67mm filter thread round a much smaller front element which does not protrude. The bayonet lens hood is removable and reversible for storage, with a soft pouch supplied to hold everything. You can use circular filters without cut-off provided they are reasonably slim-line, and filter systems from 75mm rectangular upwards. Our sample was in a matt silver finish, with conventional black as an alternative. The focusing down to 20cm is very smooth, with a travel of 135°, and the aperture is click stopped gently but positively in half steps all the way to f/22. The mount is metal, as is the barrel skin, though plastic components are used internally. It is an advanced design with 14 elements in 10 groups using both low dispersion and compound aspheric glass, nano-coated with Samyang’s water and dirt resistant hard NCS multiple layers.

abbey12mmf11-1018mmhoriz-web

Above: Auto White Balance and auto exposure with the Sony 10-18mm at 12mm, on NEX-6

abbey12mmSamyangf11-uncorrhoriz-web


Above: AWB and AE with the Samyang 12mm set to f/11 like the Sony (darker, and much colder colour)

abbey12mmSamyang-corrected-web

Above: Samyang raw shot after colour correction to taste

Though this lens had to be manually focused and lacks any electronic connections, it rapidly proved to be a reliable companion. Auto exposure tended to be slightly under, and auto white balance was nearly always too cold. On the NEX-6 manual exposure and a fixed daylight or custom set white balance proved better than relying on auto setting.

abbey12mmSamyangf11-fullweb

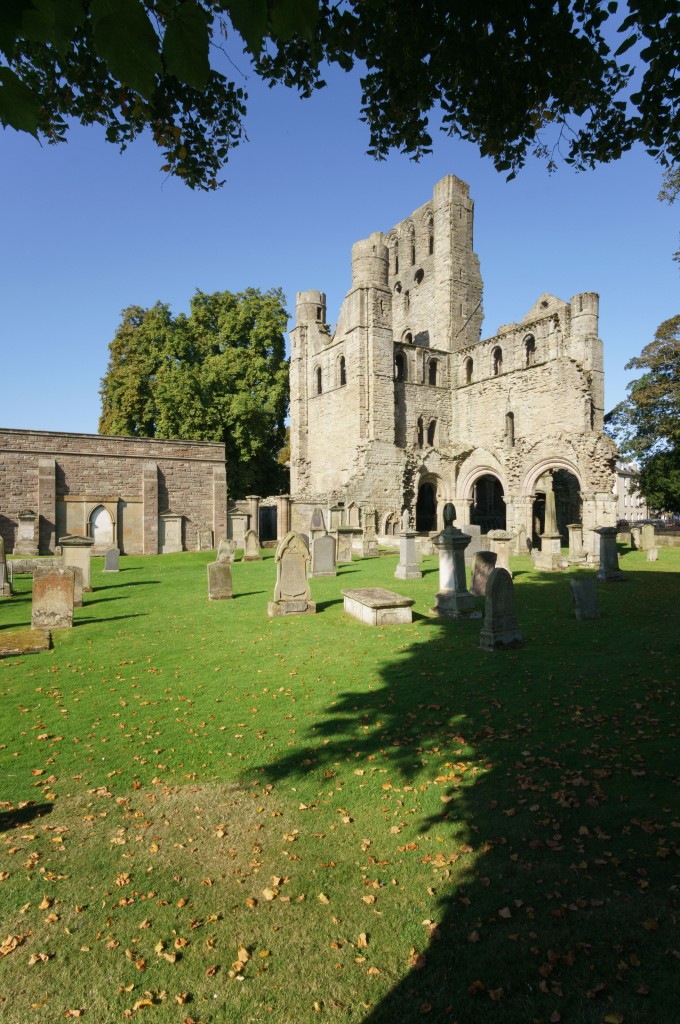
The results are the reward. For its aperture and angle, it defies the laws of trade-off. The geometry, even without creating a profile or applying the slight barrel correction sometimes needed, is so good that uncorrected raw conversions worked perfectly. The example above is a full frame, with no correction at all (you can click the image to open the full size file, though remember it has strong compression for storage and display here).

abbey12mm-1018OSSf11-web

Here is the same view taken with the Sony 10-18mm, at 12mm, and at f/11, exactly the same compression

For some subjects, a two-pixel blue chromatic aberration correction removed a barely visible tendency to purple fringes, more likely to affect high contrast patterns than high contrast edges. The lens has such high resolution that moiré patterns appear from many subjects.

Compared to the Sony 16mm f/2.8 fitted with a 12mm ultra-wide converter – the original Sony solution from 2010 – it’s like moving from small to medium format.

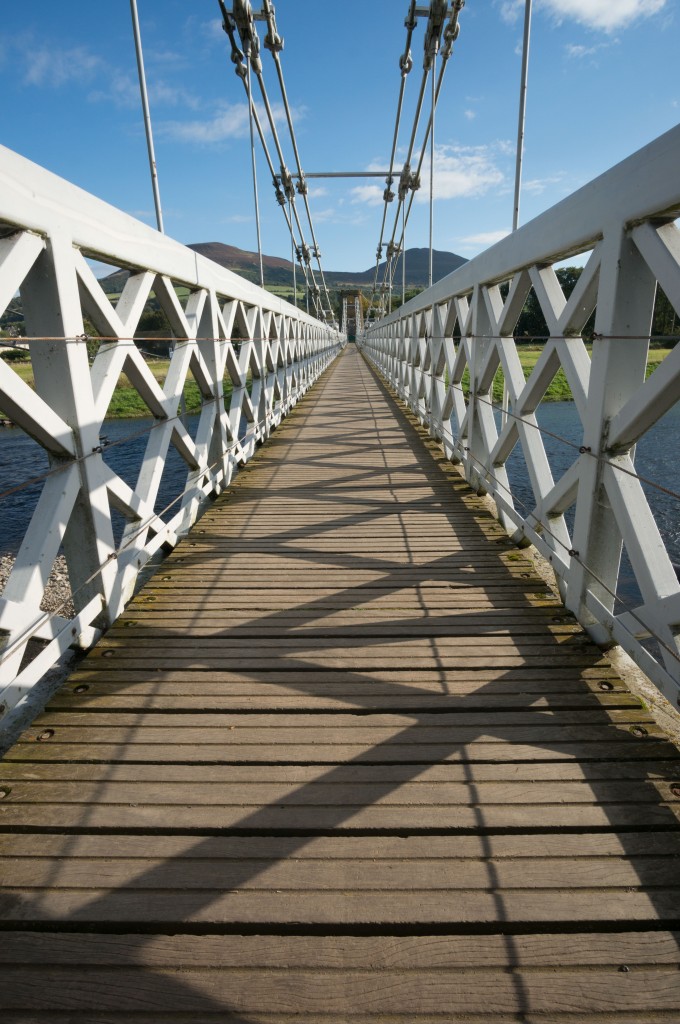
melrosebridge-f11-fullweb

Here’s an example which shows the geometry of the lens pretty well (click for full size)

bridgeentry-web

And here’s the same historic suspensioon bridge, again at f/11 to get the necessary depth of field. But the sharpness is not destroyed and a 100% clip shows the spiders have been busy (compression almost loses the strands of the webs which are easily seen in the original file):

notice-detail100percent

It does not have enough circle of coverage in reserve to make it valuable on full frame, but a near-24mm square can be cropped on the A7 series.

This lens would be a dream to use if it incorporated a chip to convey EXIF data including the aperture. AF really doesn’t matter, after a few days I learned to preset the focus manually and only check the most critical wide-open subjects using magnified manual focus view. At under £300, it’s so tempting just to have it for the sheer sharpness right into the extreme corners and the straight-line rendering. Much though I like my £700 10-18mm it has had less use since the Samyang arrived – and that says it all. My main reason for sticking with the 10-18mm is its ability to work well on the A7R for 15mm shots, and its full recording of EXIF data along with full control from the body. Much though I like my boxful of manual lenses, after a year and more using them, I am missing the vital data – as going back a year to look at original files shows. Unless I made a special note at the time, I often have no idea what lens was used let alone what aperture. For these shots, of course, I noted the details.

This article original appeared in a slightly shorter form in f2 Freelance Photographer, our six times a year super-quality professional and enthusiast magazine, Nov/Dec 2014 issue published in early October 2014. In 2017, f2 was merged with Cameracraft and we now use the Cameracraft name. You can subscribe to this magazine, which supports my work here, at www.iconpublications.com

You can find the Rokinon (Samyang rebranded) at B&H for worldwide sales – //www.bhphotovideo.com or at Amazon (UK) – //amzn.to/2oySu1b

or in the UK, the Samyang at WEX Photographic (these links benefit Photoclubalpha if you buy there, without costing you anything)

– David Kilpatrick

Using the 10-18mm OSS zoom on full frame

The Sony E-mount (not FE) 10-18mm f/5 OSS lens can be used effectively on full frame for creative work and within limits for technically more demanding shots. Below, an uncropped A7R shot of the concourse at Abu Dhabi Airport, taken at 13mm setting, f/6.3 with my lens profile as provided below. Check the straight lines in the floor tiling, if you doubt that this lens would be of any use for architecture.

However, you don’t get this without a lens profile, and without due care to limit the focal length to a range of 13 to 16mm – not the full 10 to 18mm. Below, you could get this if you try 12mm straight out of camera…

uncorrected12mm

This is a pretty awful case of vignetting and distortion – as you would expect. It’s from an APS-C format wide angle zoom, the 10-18mm f/4 SEL OSS lens for NEX, used on the Alpha 7R full frame mirrorless body. Early in the launch period of this camera, various far more attractive images appeared on-line using subjects like roads, rail lines, beaches and even shop counters where the lines look straight – rather like that drainpipe – because of where they fall in the shot. As you can see, anything with a horizon near the long edge of the framewould have given a very different impression.

However, Adobe offers a free utility which enables you to make lens profiles to correct vignetting and distortion.

I created a lens profile for ACR/LR using full frame and the 10-18mm on the A7R. The vignetting is such that the profile creator really can’t handle it, and overcorrects the extreme corners as a result. I’ve done f/4, f/8, f/16 at 12, 14, 16 and 18mm focal lengths using an A2 chart; for a lens like this, a much greater working distance and an A0 chart would really be desirable. The link below is to a zip file of the Adobe Lens Profiles I produced – for A7 and A7R, with .lcpp files for final use, and .lcp files for different settings of the 10 18mm I found useful.

10-18AdobeLensProfiles

corrected-customprofile12mm

At 12mm you can probably see the vignetting artefacts in the corners, the magenta corner shift and incomplete correction of the horizon line. You’ll also be quick to spot that the 12mm coverage has been reduced to something much less, lens profiles always reduce the field of view (they can not do otherwise).

The profiler simply can’t handle the degree of sudden fall-off in illumination given by the 10-18mm used on full frame. Manual distortion corrections can actually do a better job. At other focal lengths, the profile I’ve made works well enough, and if the frame is cropped slightly (still exceeding the APS-C area the lens is designed for) it’s possible to get good results and wider angles.

I have sold my Sigma 12-24mm HSM II which was used with the A99, and also sold a Voigltander 15mm f/4.5 I bought to test (zero cost fortunately, as it made a small profit between Gumtree source and eBay destination). The Sigma was not only very difficult to focus using CD, its HSM motor won’t play with Sony CD.

My .lcp full-frame file can be downloaded from:

//www.photoclubalpha.com/AdobeCameraProfiles/ILCE-7R FF (E 10-18mm F4 OSS) – RAW.lcp.zip

Just for good measure, here is an uncropped A7R 13mm focal length shot of the church of Maila Dumpara in Kerala taken to use dramatic converging verticals – which fail terribly unless the lines are properly corrected, the last thing you want in a strong upward angle is lens distortion. It’s very stiff test of any lens to do this. I have left the vignetting uncorrected. I rather like it. Click either this or the Abu Dhabi photo and you’ll get a larger image, about 1000 x 1500 pixels.

Samples produced for a dPreview forum question

There’s been a lot of discussion on dPreview forums of which lenses work on full frame E-mount, as Sony saw fit to put a Disable APS-C crop option in the menus of the A7 and A7R (almost as if they wanted owners to experiment). They have made other welcome changes of a similar kind which I’ll cover in a full review of the camera – which I can not do yet as I have no FE mount lenses for it, and with the current choice and prices, I can see I may never use FE mount lenses on this camera.

So, to answer some questions on dPreview’s E-mount forum, I posted these images and comments.

Here is a ‘native’ uncorrected shot of a local building taken on the 10-14mm on A7R at 11mm, f/10, ISO 100:

View: original size

Here is the result of using the profile, doing a crop and some straighten of slight rotated tilt, and pulling the scale down (with the profile applied, the roof apex is clipped off at the top as the lens has so much distortion its 11mm probably becomes more like 15mm when corrected):

View: original size

I’ve used some clarity and local burn adjustments on the sky to treat the image more or less as I would (except that I wouldn’t actually photograph this building at this time of day, with blinds drawn, etc).

For me, the 10-18mm on A7R with our without the profile correction offers the same options as using assorted lenses on 5 x 4 sheet film. It never mattered whether a 47mm didn’t cover the entire film, you got an image circle and could use whatever part of it you want. At 10mm the image, with the profile used, has strong corner cut-off but the overall circle of usable image greatly exceeds APS-C provided you stop down (f7.1 seems just OK, f/10 is maybe optimum, I’d certainly try f/16 despite fears of detail loss).

View: original size

The red crop mark is square – my ‘Hasselblad SWC killer’, as the classic SWC had just a 38mm wide angle lens. You needed to get an Arcbody with 35mm Rodenstock to go any wider on 56 x 56mm film (6 x 6). With the A7R and 10-18mm at 10mm, you get the equivalent of a 24mm lens. Not a 24mm fisheye on 6 x 4.5 like the widest ever offered by Mamiya… a 24mm rectilinear on 6 x 6.

The yellow crop mark represents a significantly larger area than APS-C (which is actually just a little under the 24 x 24mm square in width). It is shifted vertically, as if the lens was being used as a shift lens. If only the APS-C area is considered, its approximately 16 x 24mm area can be positioned right to the top of the frame, equalling a 4mm rise, or the equivalent of using a 6mm rise on a full-frame PC lens (most actually go to 11 or 12mm rise). There is only one lens made which can compete with this, and that’s the Canon 17mm f/4 TS. Admittedly this is a superb lens and when stopped down to f/11 and used on the 6D (Canon’s most shift-friendly sensor) will blow this result away for clean rendering of detail toward the frame edges.

And then, you can still use the 10-18mm in APS-C crop mode as a snapshot wide angle with pretty much perfect correction (Adobe’s own Sony profile for APS-C), for videos too.

– David Kilpatrick

1 2 3 4