
True detail vs. fake sharpness
It’s the same on every web forum – if you post a digital picture which would be acceptable to a photo library or professional buyer, half a dozen grumpy one-liners will come out saying ‘That don’t look sharp to me’ or ‘there must be something wrong with your XXX’ (fill in D300, A700, E-3, D3, 40D as required). Then someone posts a hugely messed up image and people say ‘Wow! What sharpness!’…
What is happening here? Why do some people know how to see fine detail rendering in an unprocessed image, while others do not see something as sharp until you can count the jaggies on every hair and see a halo round every white to black edge transition? There are several factors. One may simply be the type of screen used to view the image. We use Apple Mac Cinema screens throughout – two 24 inch, three 20 inch. They have the same technology as the LG branded screens used by Alamy to check image submissions. They are very neutral, adding no sharpening of their own, and very crisp with no anti-aliasing of images. The Mac system permits anti-aliasing of text and offers four levels of softening, which you can pick to suit various types of LCD and CRT screen. But some graphics cards also anti-alias images, and some screens – especially CRT monitors – are inherently very soft. When we used CRT monitors, we always specified Mitsubishi Diamondtron because they gave the most accurate pixel for pixel view of digital images.
A second issue may be eyesight. Even with the right specs, most people don’t have 20/20 vision. Although they do not know it, they see the world at slightly lower resolution. I’m lucky to have better than 20/20, and from my viewing distance of about 20 inches, I can see each pixel on my 106dpi monitor clearly. If I want to examine closely, I move to about a foot away. I have very bad accommodation and can’t focus any further or closer (I can not read the date on my watch, with or without specs, or use the top LCD on many DSLRs). Send me outdoors for a day without specs, and my vision will move to around ten feet focus, but many years of sitting in front of computer monitors have pretty much locked it at arm’s length. But when I’m focused, my vision is critically sharp, and this is something which always helped me in photography whether using enlarger focus-finders, viewing a 5 x 4 groundglass or just assessing trannies with Schneider 8X loupe. Today, it still helps me by giving me a pixel sharp view of my computer screen.
The Sony Alpha 700 has been criticised by some for not being sharp enough. The JPEGs produced by firmware version 1 at ISO 100-400 were, indeed, more softened than normal. Firmware v2 has corrected this (wrong application of noise reduction to low ISOs). The sharpest results are always produced by working from the raw .ARW image, and one of the sharpest (finest detail extraction) raw converters is Adobe CS3 Camera Raw (ACR 4.3.1 is the latest version as I write).
Here is a studio shot taken for a musician. No, it’s not a female eye – this eye belongs to Andrew Scott Viglione, a songwriter and keyboard player from the Scottish Borders.
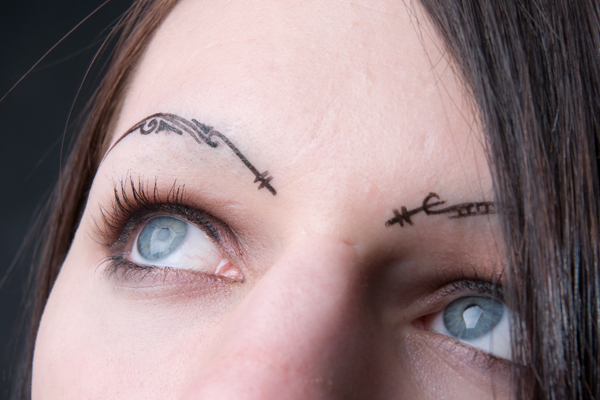
First of all, it’s not as sharp as the Carl Zeiss 16-80mm can achieve at 80mm. Why? Because some depth of field is needed, and at this distance, that means stopping down. On the Alpha 700 12 megapixel sensor, the lens offers its best resolution (sharpness) at f/8. Diffraction, caused by the edges of the iris diaphragm (aperture blades) scattering light, begins to soften the image at f/11 and its gets progressively worse at f/16 and f/22. This shot is taken at f/13 by studio flash. It is a difficult decision. At f/8, the eye iris and the eyebrow tattoo are both unsharp if the lashes are sharp. By f/13 there is just enough depth of field to get the entire depth of the eye and its orbit and brow in focus, but a slight ‘edge’ has been taken off the result.
However, this ‘edge’ can be restored by sharpening when exporting the raw file, and for the image above, the default settings of ACR were used – Sharpness 25 (on a scale of 0 to 100), Radius 1.0 (on a scale of 0 to 3), Detail 25 (on a scale of 0 to 100), and Masking 0 (you guessed, I still have to find a shot where masking is needed or has an apparent effect!).
Even this default sharpening actually can not add detail to an image. Here is the screen showing true zero settings, with the eye enlarged. I have set ACR to export the 12 megapixel file to 17.5 megapixels, or a file size of 50MB, with a final file 5120 pixels wide. It does this by enlarging the 12 megapixel image 120%, interpolating pixels from the raw file. Images of this size are required by picture libraries and I also use them for making 13 x 19 inch prints on A2+ paper, or double page spreads in magazines. It is the ideal size to store all my images. In this case, it enlarges the effects of zero sharpening and excessive sharpening, as you will see.

If you click on the image, you can download or open a full size (1.3MB) screen shot from the ACR 4.3.1 window as seen on a 24 inch iMac. You can see the settings which are all at zero, and the image size export (below the picture). This is what a proper sharp digital image looks like – sharp in camera and lens terms, not in enhanced edge-effect digital ‘sharpened’ terms. ACR applies sufficient default sharpening in the deBayer process, even with the controls all set to zero, to render a defogged and normalised RGB.
You will notice that coarse contrast transitions look ‘sharp’ but are not always distinct, including the eyelashes. These are on the edge of the depth of field. The detail on the eyeball (which deserves retouching carefully on a final image) is precisely focused, and having lower contrast but higher frequency (fineness of detail) gives a more accurate indicator of a properly sharp digital image.
Now let’s look at a seriously oversharpened image – this goes well beyond the examples which are often praised on forums for being ‘Wow! Sharp!’, because I am taking the controls to the extreme of 100 Sharpness, 100 Detail while reducing the Radius setting to zero still (this effectively sharpens individual pixels into jagged squares, but you will also see the appearance of a grainy noise from ISO 100).

But – you are saying – that is ‘Wow! Sharp!’. It’s better, surely, than the unprocessed example? Well, seen at a reduced size it might look that way. Printed, it might look better on some types of printer such as non-sharpened photo printers (Fuji Frontier is an example of a powerfully sharpened printer which is incompatible with presharpened images), or dye-sub. It might look fine on a 6 x 4 inch inkjet. However, it is a wrecked image. Detail has been irrevocably lost in the full size export. Click the picture to download the full size example to see.
You may not want to download the full images, so here are clips from the files:
First, without sharpening:
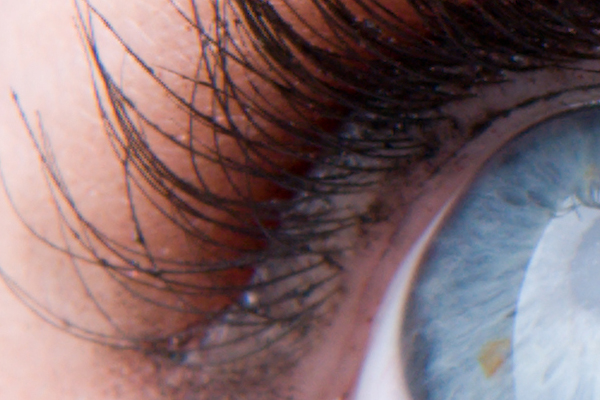
You may notice a hint of jaggies on a couple of eyelashes. How can that happen on a non-sharpened image? Although it may look sharp to you, the jaggies show that the camera has exceeded the resolution of the sensor at this particular point, and the AA filter in the camera has not been strong enough to avoid aliasing. This sort of detail sharpness produces moiré patterns or other artefacts in different situations. No full tone digital image can avoid having soft edges to diagonal edges or lines. If the edges are not softened over at least a span of five pixels, the line will appear jagged and stepped. Too many images which are claimed to be stunningly sharp are taken beyond this stage.
Now see a section of the oversharpened version:
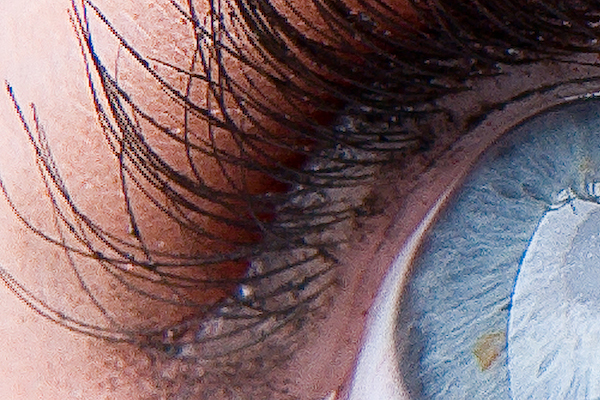
This exaggerates the kind of result which many DSLR users veer towards when processing their images. It shows it magnified, and at maximum strength. Programs like RawShooterPro were praised for their ‘detail extraction’ and all too often did this with the file when viewed at 100 per cent. Yet this is a detail of precisely the same screen shot which looks so sharp above. If you send a picture library anything which remotely resembles this, you will get a rejection, and be upset by comments about excessive sharpening, artefacts and noise. Remember this is a clip from a 5120 pixel wide image.
How is a ‘proper’ soft, unprocessed image to be prepared for printing? Answer – unsharp mask, USM. Below, the ‘clean’ image has been USM processed in Photoshop using 250% strength, 2.5 pixels radius, and Threshold of 4. I have used 2.5 pixels radius here because the image is enlarged. Settings of 1.2, 1.5 or 2 pixels are better for straight 12 megapixel images out of the camera. The smaller you make the print, the larger the radius you can use. For a 6 x 4 inch print try 2.5 or even 3; for a 13 x 19″, 1.2 or 1.5. Do not apply this to camera JPEGs with anything higher than +1 sharpness, or you may get double sharpening effects which produce some twin lines round contours.
Sharpening like this prints well but would be quite wrong for web display, but generally, 100% view or enlarged export files are wrong for web display too! Once the image is reduced to a normal web resolution, the effect of sharpening the larger original disappears. It is better to take the resized original, and apply a finer USM – something like 100% strength,0.8 pixels radius, Level 0. The strength side is easy to understand. The Radius setting determines how coarse the acutance line effect looks, and how contrasts are altered. Level decides the difference in brightness between pixels which is ignored for sharpening. Setting something like 16 or 32 in Levels will result in plastic-like skin and soft grass, foliage, sand and similar textures. Setting 0 in Level will result in noise being sharpened, right down to tiny differences between single pixels. Useful settings for digital camera files at low ISO are between 0 and 8.
Remember, this image if printed would be about 1.5 inches wide. If you plan to copy these image clips and print them out, don’t do them the same size as they appear on screen. Change the 72dpi resolution setting to 240dpi for typical home inkjet printer, or 300dpi for best quality (2880dpi res type printing) without changing the file size (Do Not Resize, in Photoshop).
Advanced sharpening using Photoshop Smart Sharpen is a topic of its own, because this process uses very large USM radius settings with protection of shadows and highlights to improve local contrast, rather than emphasise detail and edges. Smart Sharpen will remember one setting, and Unsharp Mask will remember another, after you have used them. Best possible DSLR image processing will often use both, a first pass with Smart Sharpen to ‘defog’ the image and clarify local contrast (ACR 4.x has a ‘Clarity’ control which does this at raw export stage); and a final pass, only when the image is resized for its intended printing or display use, with Unsharp Mask at a setting appropriate for the process.
Finally, sharpness is very subjective. Certain things – including eyelashes – always look sharper than they are. Others, such as foliage on trees, always look softer. That’s why Sigma always uses a close up big eye mascara portrait to show off the Foveon sensor, and why very few digital camera makers print green landscapes in their brochures. Any time you see one of those sharp rocks surrounded by swirling time exposure sea, or a sunset with crisply outlined fir trees, or a lamp post in the mist, you’re going to see a preternaturally sharp image because of perception.
If you shoot small furry animals, people with big hair, feathered friends or wild moorlands you can ignore the shooter who jumps in with some web-res, edge enhanced set piece and says ‘my pictures are much sharper than yours, you must be doing something wrong…’ – if you applied the same processes which can enhance a seascape to a highly detailed subject, that detail would be destroyed.
All your ‘master’ copies of digital images are best saved without any post-process sharpening. The file for the screen shot of the natural, un-messed with image is 1.3MB. The file for the oversharpened one is 2.6MB. Why? It’s all pure noise which JPEG Level 12 preserves. It is not extra detail making the filesize bigger. Save your images neutrally, without sharpening, and you will save half your HD space (the same applies to losslessly compressed TIFFs). They will be purer in terms of real detail, and better suited to further post-processing and output sharpening as needed.
– David Kilpatrick
David,
Thanks for this, I can see I’ve been over sharpening my images. I can see I’m going to have to spend time learning more about this. Fortunately, being a computer programmer by trade, I only ever work with copies!
Thanks
Mark
I can not tell you just how timely this is! I have been troubled this last few weeks with trying to learn how to filter noise without loosing detail in my images. It appears to me that the so called grain has some of my detail as well and really do not like loosing any. I’ll have to reread your whole listing here because there are so many variables you discuss that I have run into.
One thing I have always believed is that any image made for the web is at best a compromise of the original. Taking 50mb down to 1.2mb 1024x685x72dpi is going to require many details to be managed for a best possible representation of the original. . .
Thanks,
Paul
Nice that someone is trying to shed a little light on the subject of sharpening. I get so sick of seeing artifacts and perceived “great sharpness” over at forums like DPR. Maybe a few people will back off a bit and start talking about other things that make up true image quality. Heck, a few may even learn a few proper sharpening techniques!
Happy shooting!
-Sonolta
http://www.sonolta.com