
Studio light-table technique
YOU MAY want to learn exactly how I shoot the product photographs which appear in my own articles here at Photoclubalpha. I use a studio light table with an opal plexiglass transilluminated scoop. This is the method I have used now for over 25 years and it’s saved me a lot of time, and earned me a lot of money.
My current light table is the smallest, and not quite the cheapest, I’ve owned. My first table was 1.2 metres wide, and was constructed to fit a standard large sheet of opal Perspex, gloss one side, matt the other. This was obtained by special order through a sign-making firm. To build the table, I bought Dexion modular storage construction battens cut to length to my order by the Dexion supplier, with their own corner joints, feet and castor wheels. Additional pieces were bought to allow changing the leg height, and creating a low glass table a bit like a coffee-table but with a 1.2 metre square heavy plate glass sheet. This was given ground edges by the glass supplier to allow safe handling.
This table served me for seven years in a commercial studio. It cost about £200 overall in 1981. We built a second one in 1982 for our satellite studio, and continued to use Dexion for constructing many sets and props. Eventually we had colour glossy sheets, about two dozen graduated and rainbow flexible sheets, and many accessories for the tables which were sold with our studio on moving to Scotland in 1988.
At that time, a FOBA or Manfrotto studio table cost about £500 so the D-I-Y approach was well worthwhile. With its heavy plate glass under the ICI Perspex, my table was also capable of supporting products like large valves made locally for the North Sea oil industry, which no commercial table could handle.
In Scotland, space was at more of a premium and we bought an Elinchrom Light Table. This was only 80cm wide and cost nearly £1,000 but it tilted and adjusted in such a way that the entire unit could be turned into an almost vertical configuration for storage, and wheeled into a corner of the studio. It used a 5mm thick clear Perspex sheet as well as an acrylic opal scoop, and could support moderate weights. In 1995, we switched to digital studio capture using the Leaf Lumina, sold our electronic flash and installed Systems Scandles ballasted daylight fluorescent lighting on ceiling tracks. The Lumina was a scanning camera, taking from 10 seconds to 3 minutes to capture each still life shot.
When the Minolta RD3000 digital SLR arrived, we compared its 2.9 megapixel images with the 27 megabyte true coincident RGB files of the Lumina and – amazingly – decided we could switch to the RD3000. The Elinchrom table was sold with the entire digital studio – lights, tracking, Lumina, massive studio stand used to keep the Lumina rock solid, and so on. For some time we survived without a studio light table, using the alternative method of placing products on a glass sheet and lighting a white paper drop underneath them. This does avoid lightspill on to the product from adjacent illuminated acrylic, but it’s time consuming.
To match the clean look of today’s publications and websites and ensure rapid, top quality small product and packaging shots you need a texture free background which can be lit from behind or below. Another inexpensive solution is a plate glass table and sheet of mylar-type tracing foil (opal inkjet roll for backlit prints is suitable – your lab may be able to sell you a plain length to use).
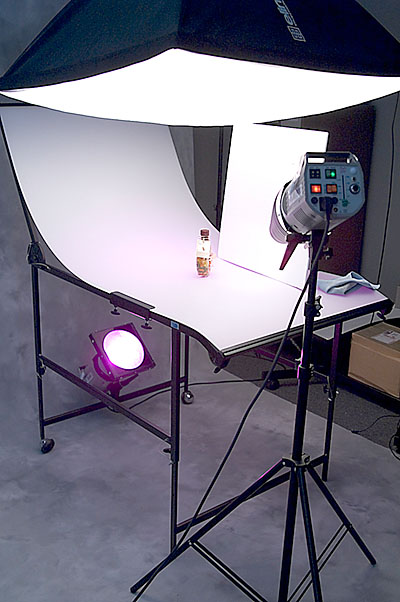
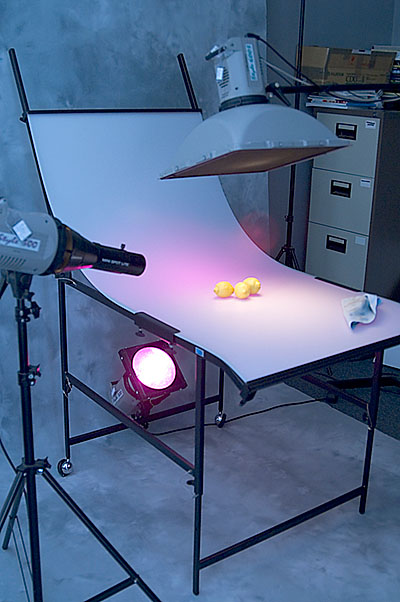
Our current table is a Tre-D which has a 75 x 150cm acrylic sheet, adjustable height frame, castors, adjustable back angle and movable backlight spigot. The bend applied to the opal sheet gives it enough rigidity to support most small product groups as long as the edge clamps are firmly tightened. However, there is no supporting glass or thick acrylic sheet. A heavy camera and lens – like the 70-200mm SSM on a body – can ‘pop’ the table’s tensioned scoop unless you are careful.
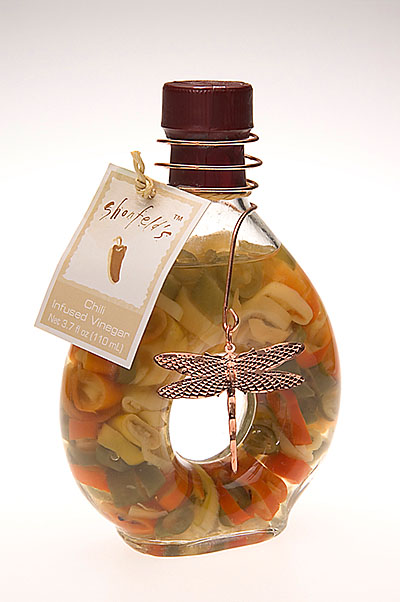
The basic use is with white light, using a softbox – anything from 60cm to 1m square will illuminate the entire table width. The backlight provides a smooth graded grey to the top of the shot or can be set to ‘white out’. Check your DSLR exposure warning display, or use proportional modelling lights very carefully to avoid excess transillumination. The brightest white should just record a hint of tone. The shot above on Dynax 7D (our normal studio camera, as it has a PC flash sync socket) has no filters on the trans-illuminating light. In this’white’ bottle example the backlight, snooted accent light and softbox were at 18Ws/18Ws/37Ws. The snooted head is aimed to miss the label, and hit the copper butterfly to pick it its texture.
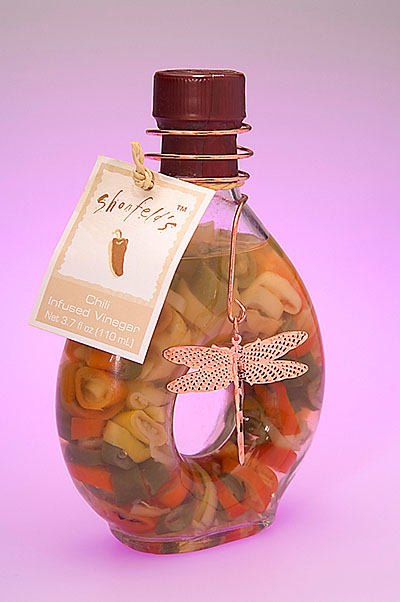
In the ‘mauve’ bottle example, a deep purple gel is fitted to the backlight, and its power increased to 75Ws, while a white reflector panel (see set-up shot, top) is positioned to alter the rendering of the butterfly. You can not ‘light’ reflective objects with a direct source; instead, you should light a white reflector or use another softbox. The butterfly would not show without the use of the large white polystyrene ceiling tile as a reflector. The large softbox dilutes the background light colour, which is why a strong gel must be used on the backlight.
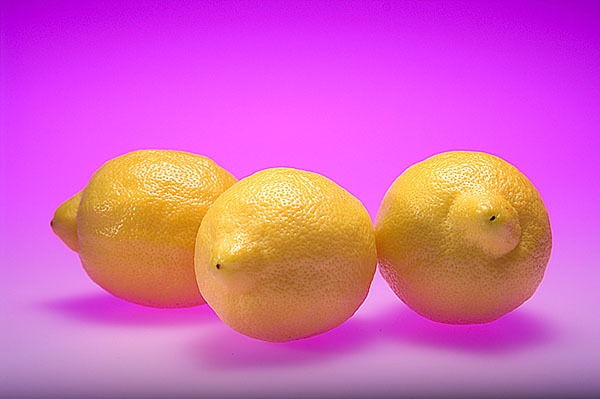
To make the rather vile and tasteless lemon example above, the top light was changed to a 44cm rigid softbox with honeycomb, angled back to keep the white light off the opal sheet behind the fruit. A highly focused optical spot skims across low down to prevent the underside of the lemons going orange, except for a small rim. Note that the shadows are now the backlight colour.
These examples took literally a few minutes. Studio still life table work is profitable, efficient and easily added to a social studio without eating workspace. Our studio here is a room only 10 x 12 feet but there is plenty of space for the 9ft wide Lastolite canvas roll you can see on the floor and behind the table. Note the lint-free cloth lying on the table; it’s essential to keep dust and spots away all the time.
The lemons shot is again on Dynax 7D, which does a great job with over-the-top yellows (not many DSLRs are good with yellows). You can also use the tungsten modelling lights of your flash heads, when you have a system such as the Elinchrom kit used here (Style 300 x2 heads, Style 600S x1 head). One disadvantage of such set-ups with professional studio flash is that even at minimum power, the heads are so close that exposures are around f/11 to f/22.
My Dynax 7D has Memory 1 (the 1 position on the top right-hand control dial) programmed for 1/160th second, f/14, ISO 100, Daylight White balance, Manual exposure. This is a great feature of the camera. To shoot in the studio with the table, I just turn the dial to 1 and the memory function sets me up instantly for a typical product shot. Update: I’m still using the same basic settings on Memory 1 slot of the Alpha 900 in 2012.
Here, for once deviating from the Alpha system, are two examples produced to show how you can use flash and tungsten. The camera used is the Fuji S3, fitted with the Sigma EX DG 150mm f/2.8 Macro 1:1 lens. This is a superb lens. The S3 was not so ideal in the studio, as these images required extensive dust-spot cleaning. The 7D white background shots I take of all my product shots never need cleaning, as the sensor is clean, and 7Ds just don’t pick up dust the way some cameras seem to.
The Fuji also could not be turned down to ISO 100, and the smallest possible aperture was f/22. Results were acceptable but f/22 is hardly ever truly sharp, due to diffraction effects. Ideally, it should be possible to use moderate apertures like f/8 for any studio product where depth of field is not needed. My purpose here was to contrast an f/22 shot with the very fast full aperture of the Sigma lens, and to do this, a tripod exposure with tungsten modelling lighting and no flash was used.
There is a little added warmth. I feel that the wide aperture creates a shot more in line with today’s visual aesthetic – we are increasingly used to seeing very shallow zones of focus. Minimal depth of field is very popular in product, food, jewellery and other fields. If you work commercially, make a comparative pair of images like this, to show to clients. Or just shoot the job two ways!
The Tre-D 75 x 150cm studio light table as shown, with adjustable height legs, adjustable tilt scoop and rear castor wheels for moving costs under £300 including VAT and delivery in the UK from Studio Lighting Services Ltd. A smaller version is made for £88+VAT and delivery, 50 x 90cm. There are many alternatives now including Kenro, Hama, Jobo and small table-top mountable versions which work with wireless or other battery powered flash are sold for shooting eBay items. You can still make your own but Dexion seems to have become impossible to find now. There’s no reason why good plain carpentry should not create a workable studio table at minimal cost!
Light table work is not as straightforward is this article may imply. Some products require supporting free of the illuminated surface, and may need boxing in with black ‘flags’ to reduce reflections. Black panels, as well as white reflectors, create the shaping present in difficult objects like perfume and drinks bottles. For 95 per cent of the small items I shoot to illustrate articles on photography, direct work on the plain white table with one softbox overhead and two underlights (one front as well as one rear) create exactly the grading and plain fields I need.
The professional angle
As for the value of a light table – when I started in commercial studio photography in 1979 (Lister Kilpatrick Associates, in partnership with Steve Lister) our price for a single product packshot was around £50 ($100) for a rollfilm E6 transparency shot on a monorail 5 x 4 with RF back. My house was worth £23,500 when I sold it to buy a large propery and create my own studio. That same house is today worth over £300,00 – about twelve to fifteen times as much, allowing for improvements.
The price you can expect to get these days for single product shots on a white background is about £25 ($50) for a digital capture 6 megapixels or up. In bulk, it can reduce to as low as £10 ($20). Times have changed! In the world of 1979, a couple of packshots had the same value as one week’s staff wages. Some days we would shoot 30 or more. One job we had was to photograph every single type of brick made by a brickworks. It took longer to change the film than change the bricks…
In the late 1990s, with the new RD3000 kit in place, we were approached to quote for routine capture of all ColourBox gift items (these were little ceramic bears of the type commonly known as ‘collectible’). The rate on offer was a mere £2 per website shot – we didn’t even consider it. That was matching the company’s existing deal elsewhere. ColourBox went into liquidation. They were clearly spending too much on their photography.
Even with today’s fatally eroded work rates for routine commercial photography, a light table can boost productivity to dozens or even hundreds of shots a day. The entire shooting process for something like my Lensbaby 3G review took less than 15 minutes including careful visual arrangement of the aperture discs using a straight-edge, and air-puffer cleaning of the items once positioned. No retouching of any kind was needed on any of the shots and only a single .MRW raw file was taken on the Dynax 7D for each one. If you can photograph 100 items in a working day at £10 or even £5 a capture, it’s as good an overall rate as many bylined photographers working on national magazine and newspaper supplement commissions make.
The real problem today is that the ‘white background cut out’ shot is so universal that its simplicity and speed has undermined the value of images which take half a day to set up. By our 1979 standards, when a typical day’s still life work might result in two or three variants of a commissioned product shot and bill out around £500, a competent regionally based GP-commercial studio should be able to bill out the same at £5,000-7,500. Since it just ain’t gonna happen, the simple studio table shot is about all today’s typical client can expect.
– David Kilpatrick FBIPP AMPA (since this is about an aspect of professional photography, for once you might as well have my professional quals after the name!)
Pingback: Studio light table technique Photoclub Alpha | Wood TV Stand