Luminar Neo’s new portrait background removal

Luminar Neo has gained a new tool – Portrait Background Removal, enabling the background behind a subject to be made transparent in one click. Careful hair-by-hair selections are done by trained neural networks.

Portrait Background Removal tool can be found in the Luminar Neo Layer masking options. 

It offfers:

  • Remove Background without Layering. Just open Luminar Neo, load an image, and select Portrait Background Removal.
  • Get clean assets for composing. Any portrait you edit can be exported as a PNG with a transparent background, a great base for seamless photo composing.
  • Create realistic portraits with AI that’s precisely trained on people. AI scans the image to find and select human figures as accurately as possible. Luminar Neo has an option to edit several images in a click with custom saved Presets, so editing event portraits becomes faster.
  • Achieve precise selections without extreme effort. The portrait and the background are highlighted in different colours. A Transition Brush refines the edges by removing unnecessary elements where the portrait and background touch. The Object Brush revives portrait details that may have been eliminated by the neural network, while the Background Brush helps to additionally remove parts that aren’t detected by the AI. 

Luminar Neo is available as a one-time purchase or as a subscription. The new architecture is flexible, so it can be easily updated in the future. Luminar Neo is available in both the Microsoft Store and the macOS App Store. Luminar Neo works as a plugin, so you can keep your images in your preferred photo editor while still benefiting from its powerful AI tools.

Additionally, the brand-new Luminar Share mobile app allows you to quickly and seamlessly transfer images from your phone to your computer. Take a photo, edit it, and post it to social media without third-party programs that reduce quality. Luminar Share is available on the Google Play Store and the macOS App Store.​​

To learn more about Luminar Neo and sign up for updates, visit http://skylum.com/luminar-neo

LandscapePro – changing your world

If they want to fake a Mars colony story, a video version of British software developer Anthropics’ LandscapePro could be useful. It’s from the same team who created PortraitPro, and it allows you to change almost any landscape beyond recognition. It also allows subtle and careful modifications, or essential commercial fixes like a better sky in place of blank white.

One September weekend, a visit to a local restored mansion and park (The Haining, Selkirk, in the Scottish Borders) was rewarding because the Moving Image Makers’ Collective had video art installations running in the house.

Above is a film with dual projectors using the corner of a room (by Jason Moyes, with power making its way from hydro-electric dams to lonely wires and pylons).

Outside things were not as inspiring.

Of course the components of a closer shot, using the ‘quay’ as a foreground, perhaps in black and white, are there. But from this view as I walked past, not really photogenic.

Here’s where LandscapePro can perform any number of tricks, some familiar from sets of actions or presets like a sepia vignetted contrast-boosted vintage look. But it’s the tools which let you mask off different areas, named in the control menus, that give the program (whether plug-in or stand alone studio edition) its power.
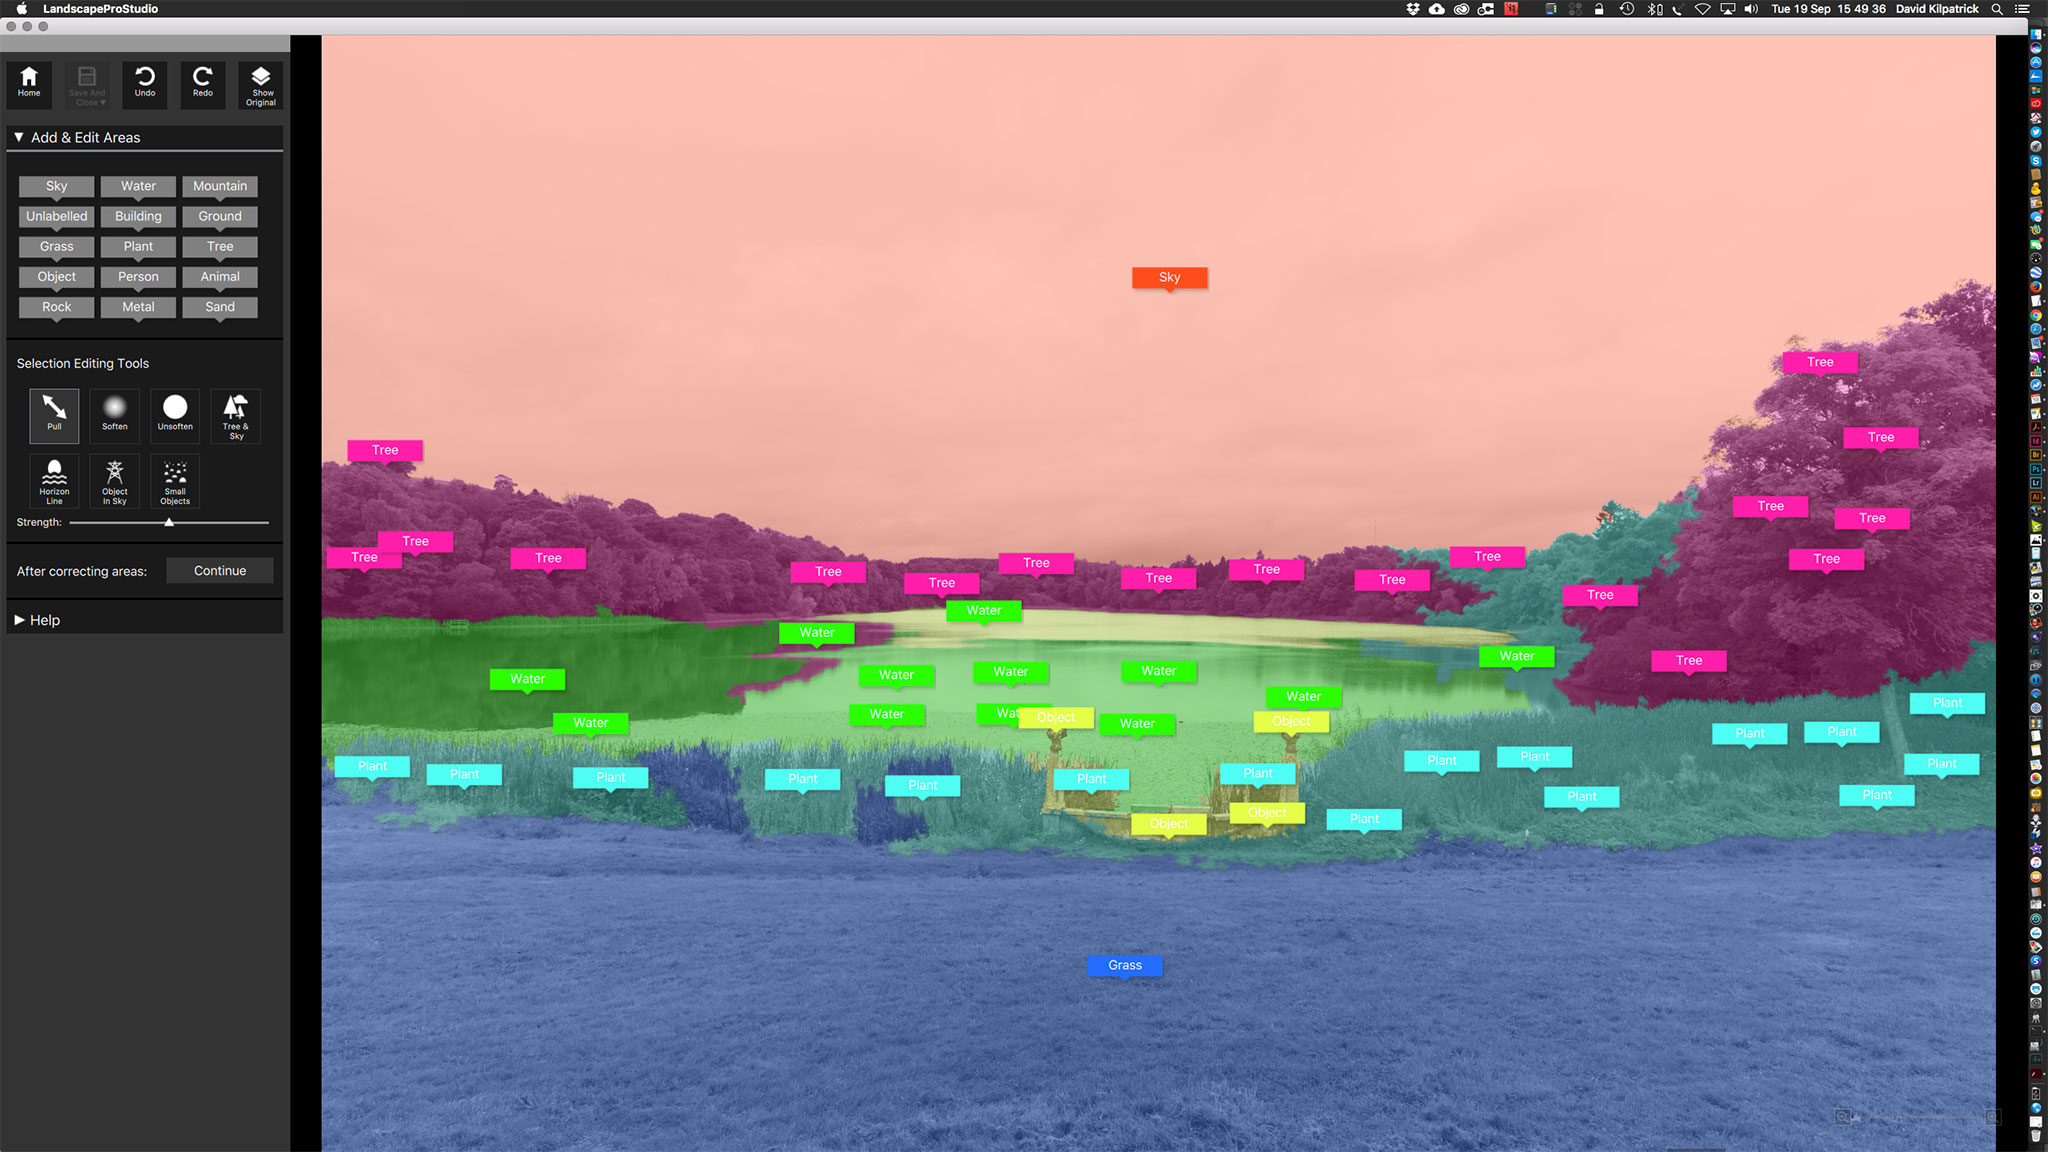
This is a screen shot during progress of auto-painting the masks by dragging the named tags on to various parts of the image. You can then refine them by expanding any part. It’s pretty difficult to mask complex tree horizons as on the right, and some post-process work in Photoshop may be needed. My not-serious rework here is a quick job. You could spend an hour or two setting up the masks for an important image. Even so, the program handles a Sony A7RII 42 megapixel JPEG well enough and most actions are as fast as you can shift the cursor

My idea here was make the scene look like a frosty morning sunrise. The sky is one of my other shots, not a LandscapePro stock sky (the program comes with a good selection but I prefer to keep all parts of an image my own work). The post-pro includes a method for getting rid of a white outline on the woods – you use the Healing Brush tool in Photoshop, set it to Darken, choose a source point in the sky above the horizon, and paint. A similar technique using the Brush tool set to darken with a sampled colour from the lake fixes original tones showing between the reeds. I find the Clone, Brush and Healing Brush tools very useful when combined with Darken or Lighten and controlled flow; I don’t retouch using Layers but have always worked ‘fast and clever’ on the background (single layer), after doing most of the image control and adjustments in Adobe Camera Raw which gives me an .XML sidecar saved non-destructive edit as complex as I need. Mostly, I don’t have to retouch at all in Photoshop. Both PortraitPro and LandscapePro suit me well as they are very fast to use and non-destructive; generally, you can’t see they have been used, especially PortraitPro, because I only use it when needed and then pick specific controls. It is easy to go over the top with these programs as this example shows, but this does not detract from their serious value for careful work.

For this image I also copied the sunset/rise area, flipped it vertically, and used the Clone tool to overpaint from the flipped version down into the lake to give a reflected sun glow. Colour changes have also been made to the trees.

Above you can see, close up, a detailed section with the original top and the processed version bottom. This should demonstrate that the program is not just a gimmick. I used to work with UltiMatte, Mask Pro and other programs which allow painted masking but the multiple different mask zones of LandscapePro take this a step further. Needless to say it’s a godsend for architectural photographers as the clean edges in most architectural shots allow rapid perfect masking and then each face of a building, ground area, sky and landscaping can be adjusted separately. You can work from raw files or from open images in Photoshop (as I did here – it’s not really a JPEG until saved).

You can try LandscapePro at www.landscapepro.pics, and get a 10% discount by using the coupon code F278. If you want to try Anthropics’ PortraitPro visit www.portraitprofessional.com, again we have a discount code – F2910.

UPDATE: August 2020 – until August 17th, use code CC8B on current 50% off deals to get a further 20% off any edition or upgrade of both programs. Visit this link.

– David Kilpatrick

 

Mapping the planes

Samsung has a patent and a plan for using two lenses with triangulation (image offset) depth detection between two images in what is roughly a stereo pair. Here’s a link:

http://www.photographybay.com/2011/07/19/samsung-working-on-dslr-like-bokeh-for-compact-cameras/

Pentax also have a system on the new Q range which takes more than one exposure, changes the focus point between them, and uses this to evaluate the focus map and create bokeh-like effects. Or so the pre-launch claims for this system indicate, though the process is not described. It’s almost certain to be a rapid multishot method, and it could equally well involve blending a sharp image with a defocused one.

In theory, the sweep panorama function of Sony and some other cameras can be used to do exactly the same thing – instead of creating a 3D 16:9 shot it could create a depth mapped focus effect in a single shot. 3D is possible with sweep pans by simply taking two frames from the multi-shot pan separated by a certain amount, so the lens positions for the frames are separated enough to be stereographic. 3D ‘moving’ pans (scrolling on the TV screen) can be compared to delaying the playback of the left eye view and shifting the position of subject detail to match the right. But like 16:9 pans, they are just two JPEGs.

All these methods including the Samsung concept can do something else which is not yet common – they can alter any other parameter, not just focus blur. They could for example change the colour balance or saturation so that the focused subject stands out against a monochrome scene, or so the background to a shot is made darker or lighter than the focused plane, or warmer in tone or cooler – etc. Blur is just a filter, in digital image terms. Think of all the filters available from watercolour or scraperboard effects to noise reduction, sharpening, blurring, tone mapping, masking – digital camera makers have already shown that the processors in their tiny cameras can handle such things pretty well.

Once a depth map exists there’s almost no limit to the manipulation possible. Samsung only scratches the surface by proposing this is used for the esoteric and popular bokeh enhancement (a peculiarly Japanese obsession which ended up going viral and infecting the entire world of images). I can easily image a distance-mapped filter turning your background scene into a Monet or a van Gogh, while applying a portrait skin smoothing process to your subjects.

Any camera with two lenses in stereo configuration should also, in theory, be able to focus using a completely different method to existing off-sensor AF – using the two lenses exactly like a rangefinder with two windows. So far this has not been implemented.

Way back – 40 years ago – I devised a rangefinder optical design under which you can see nothing at all at the focus point unless the lens was correctly focused. It works well enough for a single spot, the image detail being the usual double coincident effect when widely out of focus, but blacking out when nearly in focus and suddenly becoming visible only when focus is perfect. I had the idea of making a chequerboard pattern covering an entire image, so that the viewfinder would reveal the focused subject and blank out the rest of the scene, but a little work with a pencil and paper quickly shows why it wouldn’t work like that. The subject plane would have integrity, other planes would not all black out, they’d create an interestingly chaotic mess with phase-related black holes.

Samsung’s concept, in contrast, could isolate the subject entirely – almost as effectively as green screen techniques. It would be able to map the outline of a foreground subject like a newsreader by distance, instead of relying on the colour matte effect of green or blue screen technology. This would free film makers and TV studios from the restraints of chroma-keyed matting (not that you really want the newsreader wearing a green tie).

The sensitivity of the masking could be controlled by detecting the degree of matched image detail offset and its direction (the basic principle of stereographic 3D) – or perhaps more easily by detecting exactly coincident detail, in the focused plane. Photoshop’s snap-to for layers works by detecting a match and so do the stitching functions used for sweep and multi shot in-camera panorama assembly. Snap-to alignment of image data is a very mature function.

Just when you think digital photography has rung all the bells and blown all the whistles, the tones of an approaching caliope can be heard rolling down the river…

– David Kilpatrick