Sony new RF wireless flash system

Sony today announced the availability of a new radio-controlled lighting system to meet the growing demands of professional and advanced amateur Sony photographers.Designed for compatibility with Sony’s α interchangeable lens cameras[i] and external flash units[ii], the new lighting system will include the FA-WRC1M wireless radio commander as well as the FA-WRR1 wireless radio receiver.

(Editor’s comment – this is a press release text, we realise that absolutely no-one calls RF wireless flash ‘radio controlled’ but there you are…)

The flexibility of the system means that it can be a totally portable solution, benefitting people like wedding photographers who are often working at locations where it is cumbersome to transport studio lighting but the results need to be perfect first time.

With a maximum range of 30m (approx. 98.4 feet), the new radio controlled system will allow for an extremely adaptable wireless flash shooting experience with exceptional performance in all types of shooting conditions using TTL, Manual or Group modes. In total, the system can control a maximum of 15 separate flash units[iii] in up to 5 groups of flashes which gives the photographer a huge amount of creative freedom to experiment with different settings to accurately capture their vision for the project.

Whilst using the system, shooting mode, flash ratio and exposure compensation on remotely located flashes can be controlled via the local commander which is equipped with a large, easy-to-see control panel on which the communication status with each receiver can be confirmed, thus making it convenient for one-man or small-crew shooting. The system also offers the added benefit of enabling remote release of multiple cameras[iv] which is particularly useful for sports and wildlife photographers as the system can work at up to 30 metres, enabling them to capture a wide range of views at the crucial moment.

The new lighting control system will be capable of flash sync speeds of up to 1/250th[v] of a second with high speed sync (HSS) available as well. Flash level can be controlled over 25 steps (1/1, 1/2, 1/4, 1/8, 1/16, 1/32, 1/64, 1/128, 1/256) in 1/3 EV step increments.[vi]

The new system is designed for photographers who are creating specific set-ups necessitating multiple light sources, controllable at each flash station for dynamic lighting effects. By delivering a fully radio controlled system, the user does not have to worry about the limitations of IR triggering where strong sunlight or physical barriers may cause problems. It is dust and moisture resistant for use in a variety of conditions.[vii]

The new system will start to ship in September 2016 with the Remote Commander priced at approximately €420 and the Remote Receiver priced at approximately €240.

[i]α7 II / α7R II / α7S II via planned software update. Software updates currently scheduled to start in August 2016, as of press release timing

[ii]Multi Interface Shoe Flashes: HVL-F60M/F43M/F32M. Auto-lock Accessory Shoe Flashes HVL-F58AM / HVL-F43AM / HVL-F42AM in Manual mode only. Optional shoe adaptor ADP-MAA is required.

[iii]Max 5 groups in GROUP mode, 3 groups in TTL or MANUAL mode

[iv]Multi Terminal Connecting Cable is required. Sold separately

[v]Depending on camera specification

[vi]When using HVL-F32M, up to 1/128flash level is selectable. When shooting in High Speed Sync., flash level of a group including HVL-F32M must be set to 1/16 or higher

[vii]Although the design is dust and moisture resistant, absolute protection is not guaranteed in adverse weather conditions

Sharp vintage glass – and subject

Twenty years ago I was operating one of the first full service digital photo studios in the world. I had already published, back in 1986, the world’s first desktop published commercial periodicals and won the UK Printing Industries Research Association inaugural DTP Awards, in 1987, for this. We’d bought the first Apple laser printer in provincial Britain and when Letraset’s ReadySetGo layout package failed to produce usable output for our first such magazine, Aldus stepped in and provide a pre-release beta of PageMaker. In 48 hours, I had to re-create the entire magazine – and it worked.

From then on we progressed, through having the first separation-capable film imagesetting in Scotland to reproducing the first magazine cover from Kodak Photo-CD and soon after the first full colour page from a Kodak DCS camera. By the beginning of 1995 we had Photon, the first major photo-mag style website, in by the end of that year we had a Leaf Lumina based studio with Scandles lighting. There’s an article about this in our repository of past articles, https://cameracraft.online/2007/08/06/the-leaf-lumina-scanning-camera-1995/

That year, Shirley had planted an entire bed of flowers specifically for drying. They make good photographic subjects. The (now relocated) university college of St Margaret’s in Edinburgh asked me to give a lecture about the new technology – and so the Leaf Lumina (a scanner on a tripod with a  Micro Nikkor up front, and an Apple Mac Powerbook on the end of a SCSI-2 cable) went along with the fluorescent studio light heads and a tray of the dried flowers. We also took our Kodak dye-sub printer, which had made hundreds of prints alongside other printers during that year, when Shirley completed her M.Sc.Colour Science and created pre-ICC colour tables to reproduce fabric colours accurately. With this carload of gear, we were able to shoot and produce a print on the spot.

The picture remained on file – a 25MB TIFF, roughly 8 megapixels, but equal to 8 megapixels in the Sigma Foveon sense as every pixel was true RGB with no Bayer filter involved. The exposures took over a minute, limiting it to still life, but the quality was not exceeded until 12 megapixel Bayer cameras like the Sony A700 appeared. And a few months later, we were producing Paterson’s catalogues and price lists and needed a cover. One list covered black and white and colour chemicals, the former mostly from Paterson and the latter from Photo Technology. Photoshop offered an easy way to take the image, and divide it accordingly. So that’s what we proposed, and what was used for the cover.

Paterson1996-web

It was intended to show the gamut from plain monochrome through toning to colour and it did look very good in print, because relatively low overall contrast combined with high detail contrast is easily handled by litho.

Now, forward two decades, and I’m looking for subjects to test out the latest Elinchrom ELB400 portable li-ion powered two head flash kit. This has LED modelling lights over twice as bright as its predecessor and they now really show how the light is falling even when using light shapers. I wanted to show texture using my optical Mini Spot attachment, which works very well with these new heads and their cool-running LEDs.

On top of a wardrobe, in a basket, were the dried flowers. They are called everlasting and apart from gathering loads of dust, they are. The most difficult job was holding each flower against the nozzle of a handheld vacuum cleaner to remove 19 years of dust.

The first shot I took was with the Sony A7II, 24 megapixels, using my Pentax SMC Macro Takumar 50mm f/4. Like the flowers, this is also everlasting. It’s not yet 50 years old even though the lens design, a simple Tessar-type corrected for magnifications from 1:2 (50%) to 1:10, is well over 100 years old. It’s also a tolerable lens for general scenes, though the extreme resolution it achieves centrally only covers the full frame when you focus close. With Pentax’s original multicoating in every way a match for the latest Zeiss T* as found on new Sony Zeiss lenses, and a deeply recessed very small optical unit, it has a contrast and colour saturation you just don’t find from lenses using hybrid or moulded aspherics or many more air to glass surfaces.

This picture appears, fairly small, in my review of the ELB40 in f2 Freelance Photographer magazine July/August 2015. When editing it, I was struck by the extreme resolution. Within the planes of sharp focus, it was exceptional.

So, I decided I’d shoot a new shot, and improve on the use of the spotlight attachment on the Quadra head to cast the shadows and create a sunlight-like effect – and this time, use the A7R with its 36 megapixel resolution. Although the A7R has no AA filter and is sharper in theory, the larger pixel count calls for a smaller aperture to secure a little more depth of field for the larger viewing scale, and this when using any macro lens always risks diffraction limits on fine detail contrast. For example, at half life size a setting of f/12.5 (between f/11 and f/16) which I found desirable for best sharpness distribution gives an actual f-stop of c.f/19 and this does cause some sharpness loss. If the lens was extended on a tube to give 1:1, a setting of f/16 as nearly always needed for depth of field is really a true f/32 for diffraction calculations and light readings alike.

Fortunately, our brains are sensitive to perceived scale, and we ‘see’ close ups as sharper than distant subjects even when they are not. The A7R and the Pentax macro lens also combine to produce an extreme level of textural detail, the information our eyes and brains use to see 3D solidness, shape and form in a flat photograph. So in practice you can shoot macro and use whatever aperture the subject depth demands, without resorting to focus stacking techniques.

And here, anyway, is the result. You can click on this image and it will take you to a pBase hosted full size, JPEG compression level 12 version (this is over 24MB of image data, and it is not compressed like Facebook or indeed a WordPress image – though it’s still not ‘virgin’ data).

driedflowermacro-cleaned-srgb-web600

In a couple of days, I have another SMC Takumar of the same era arriving. It’s a 35mm f/3.5, which was the cheapest of the line back in 1970 when Shirley bought me my very first brand new, marque brand lens for Christmas! We were both only 18 and that represented an entire month of her basic salary working behind the counter at Dixons in Sheffield… helped by a staff discount. It was my first Super-Multi-Coated lens and I can remember still how the high contrast and bright colours could even be seen through the viewfinder – and how amazing the first box of slides looked, midwinter close-ups of fallen leaves rimmed by frost and frozen puddles.

These lenses have never lost the edge they had, if they have been looked after, but the truth is we never knew how good they really were. We can now focus them within a fraction of a millimetre. I’ll probably never compare the 50mm f/4 SMC Macro Takumar with the 55mm f/1.8 CZ (I’ve used it, but only for low light high ISO tests on the A7S) or the 35mm f/3.5 with the CZ 35mm f/2.8 because it’s unlikely I’ll ever buy the new lenses with their inflated prices and reliance, however marginal, on software correction to be ‘good’.

I know I have not written much about the A7R, or the A7II I’m using, or about any of the new lenses I can not manage to borrow from Sony and can’t afford to buy. I have an amazing set of lenses from 12mm to 500mm for full frame, including tilt-shift, wide aperture and mirror but just one single Sony FE lens for convenience (the 28-70mm FE kit lens). In contrast, my A6000 kit is all Sony plus the Samyang 12mm f/2 because it is just so good it had to have a place.

So, please do take a look at the full size file. The critical plane for focus crosses the smooth surfaces of the two poppy seed heads and it’s in this relatively low contrast zone that the quality of the lens shows up. Elsewhere in the image the defocused quality is very pleasant (there was no CA to correct and there’s no bad colour bokeh) and the plane of sharpness passes through a few other more interesting flower details.

Finally, a word for A7II users. If you use a manual macro lens, as I do, remember that when you program in the focal length for Steady Shot you should only enter the actual focal length for distant views. For my 1:2 macro Pentax, most often used in the range from quarter to half life size, I program in 70mm as the focal length because this represents the view angle. Using a macro at 1:1, you should enter double the focal length to get the correct Steady Shot compensation. Sony and Minolta macro lenses with the D chip (eight contacts) convey accurate extension information, so the auto Steady Shot works perfectly with them. But manual, or Canon lenses on adaptors which may or may or not pass the right information through, are best used with the Steady Shot focal length entered via the menu screen and adjusted to allow for the actual lens extension.

– David Kilpatrick

Check out B&H prices for all full frame lenses for the Sony FE (A7) system here

Check out B&H Secondhand Department for all ‘film camera’ manual and vintage lenses

Check out B&H Secondhand for Sony E-mount adaptors to allow you to fit your vintage/legacy lenses

Check out the huge list of new adaptors for almost every lens ever made!

Frank’s a definite Alpha Male

We shall be sending Frank Doorhof one of our original and rare Alpha Male T-shirts, in black, though I’m not sure we have anything quite large enough to fit him – which goes for his personality too. He’s a great workshop presenter, overcoming technical problems by just cracking on with whatever will work best. At Edinburgh for The Flash Centre’s full day fashion seminar with Frank on May 24th, the last thing I expected was to be using the same camera as Frank. All workshop leaders use Canon, right?

Frank now uses Sony Alpha 99, and he had a lot to say about it. Since we already know the benefits of the Alpha system and the current Sony full frame 24MP sensor with its extreme 14-bit dynamic range, most of what he said was not new, but it’s rare to hear a course leader extol the virtues of a system which not one of his delegates (apart from me) was using. He did rather talk down the value of CZ lenses (while using a 24-70mm CZ) and praised the quality of his vintage Minolta 85mm f/1.4 and 35-200mm xi, but I can’t argue with that as I’ve made similar decisions. Indeed, the 35-200mm owes much of its reputation to results we published seven years ago. I was beating him at his own game by using my SAM 28-75mm f/2.8 – cheaper by half than the CZ 24-70mm, and extremely sharp.

doorhof-church

We had a rare sunny clear day in a run of mixed weather, though it was cold and windy on the roof terrace of the Glasshouse Hotel in central Edinburgh. The location provided strong backgrounds and details. Simon Burfoot and Chris Whittle from The Flash Centre brought along the Ranger (battery location) and Ranger Quadra (lightweight version) flash systems with Elinchrom Skyport wireless triggers. Of course, in the past if you turned up to a workshop with an Alpha body, you were unable to use the wireless flash connection unless you also remembered to bring a standard hotshoe adaptor. With the A99 (and NEX-6, RX1 and future models) the new Alpha multi function accessory shoe works directly with triggers.

Frank put everything into using just one light source, and used no reflectors, aiming instead for dramatic lighting by underexposing the main scene but lifting his model subject Nadine by local flash. This was achieved with the 44cm rigid square softbox, newly re-introduced to the Elinchrom system (I have used the original grey one for over 20 years – you only need to buy these expensive accessories once in a lifetime). Fitted with a honeycomb but no diffusing scrim, the single lighting head with this light shaper put a tightly controlled pool of light on to his subject. Though it’s easy to use digital SLRs as a pre-test light metering and flash balancing method, Frank works with a Sekonic flash and ambient light meter able to take incident, reflected and partial spot readings. It is very similar to the discontinued classic Minolta Flashmeter IV/V, with the same 1/10th stop accuracy and display of contrast and memorised values. If I was doing this type of work, I would use my Flashmeter IV, but I would also use its calibration function to match it to specific ISO settings on the A99.

doorhof-setup2

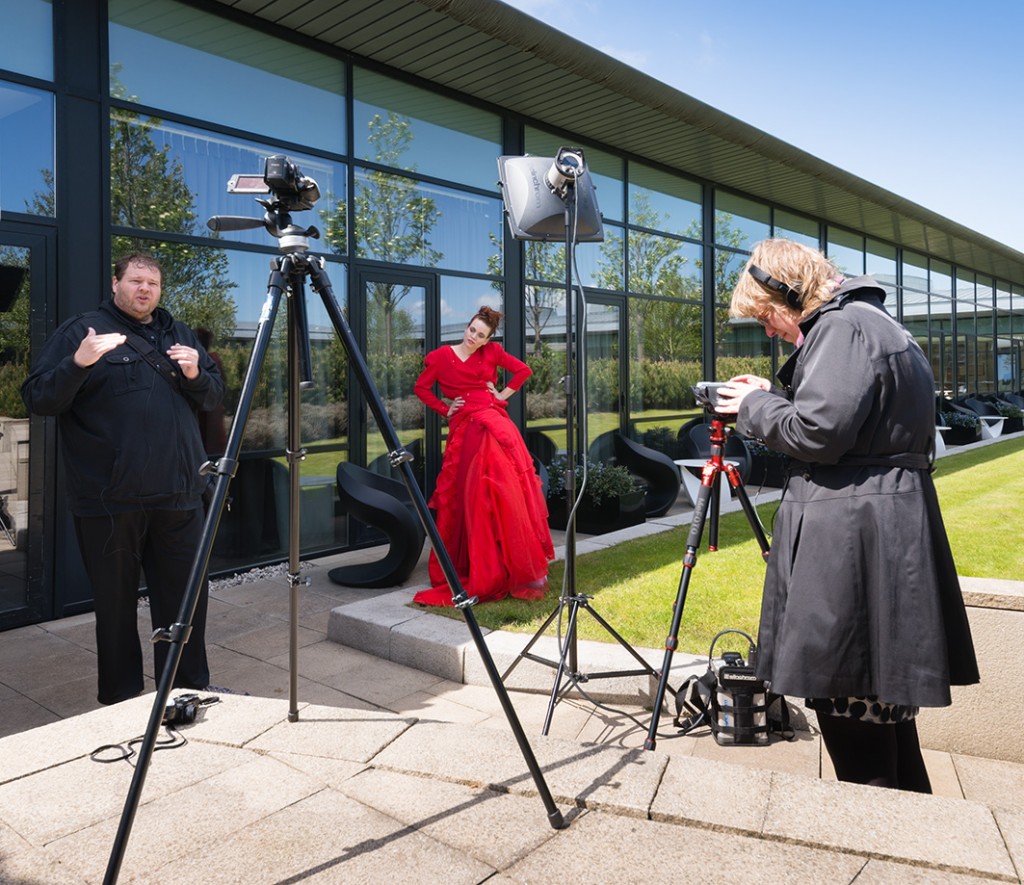
Frank’s wife Annewiek used multiple video cameras to film the workshop, as Frank provides his on-line tutorial material through Scott Kelby’s training site. Here you can see one set-up as he explains how he’s seeing the location, addressing the used of the glass window wall, avoiding unwanted reflections, placing Nadine in the shade then adding the flash to match an underexposed daylight scene. To achieve the required settings, he used ISO 100 at apertures around f/16 to f/22, with a 1/160th shutter speed, and mechanical first curtain shutter. I also followed these settings, which are not kind to sensor dust spots. Anyone using a Nikon D600 would have been in serious trouble! Even my ‘clean’ A99 which never needs any spot removal at my regular optimum working apertures between f/8 and f/13 showed a few visible spots at f/18. I would have used ISO 50, which I consider to be an advantage of the A99, and trusted shutter speeds to 1/250th with this camera for flash sync. But Frank was dealing with photographers some of whom had cameras incapable of shooting at less than ISO 200 or synchronising with studio flash at 1/250th without a slight second curtain crop to the frame. It would not have been fair to demonstrate using the advantages of the Alpha 99…

I did have in my bag, and normally carry, a 4X ND filter. With the Alpha 99, fitting an ND filter has absolutely zero effect on the viewfinder brightness, or the quality of view in sunlight. After all, sunshine with a 4X ND is just like a cloudy day in brightness, and you have no problems on a cloudy day. You can work with an ND just as ‘transparently’ as you can use an UV filter. An alternative would have been to use a polarising filter, which can also enhance the dramatic ‘dark sky – bright subject’ mix. However, Frank wisely kept clear of this. Polarisers have some pretty horrible effects on fabrics, skin and hair. Use them on portrait or fashion shots only with great care. Digital sensors are usually able to do deep blue skies without help.

doorhof-elinchrom44-web

Here’s the Elinchrom Ranger head as used. Frank asked delegates to restrict themselves to three shots per situation, a request generally ignored. I took some before the flash had recycled, to show the effect of the scene without flash, and with flash.

doorhof-set2-shot-web

This was my ‘take’ on this setup and it’s probably different from most as I used a 12-24mm Sigma HSM lens at 12mm. Now Frank did not explain to the photographers how he was using his electronic viewfinder, and I didn’t ask, but I’m sure he had it set to over-ride manual setting gain, as he was shooting on manual (M) with a degree of underexposure that would have made the finder extremely dark. I didn’t change my setting and though for all the other situations I was able to compose well enough, for this set-up my EVF showed nothing but solid black where the model was. As a result, I did not see what an ungainly shape was made by the extreme angle of the 12mm lens for a couple of poses.

alpha99-noview

The left hand side is very much how my finder looked. I don’t like this result, but I could not tell until after it was taken. Nadine was changing poses rapidly. This is one case where the optical viewfinder of my Alpha 900 would have been a better choice.

If you have a Sony/Minolta wireless flash set-up, you can overcome this whole problem. Your remote flash would perhaps need a softbox, or more realistically a small umbrella to match Frank’s localised soft flash and also receive the control signal from the on-camera flash. You would simply set the remote flash to Manual power not TTL, set the A99 (or other EVF DSLR) to Aperture Priority (A), set f/20, and rely on the flash’s auto communication with the camera body to set 1/160th flash sync and ignore the ambient light. You can also do the same with a slave cell triggered by a small camera top unit converted to invisible IR using a gel filter or old transparency unexposed film-end. You can not do this with the sync cable (PC socket) or flash triggers, as these connections do not tell the camera there is a charged flash fitted, and set the shutter speed.

Elinchrom! We need, for Sony and other EVF or LCD screen-only cameras, a flash trigger designed to provide a signal to the pin which the camera’s own flash system uses to auto-set flash sync speed when using Aperture priority. When this is live, the viewfinder brightness is set to auto gain regardless of the exposure mode (PASM) used.

For his first set-up, Frank was actually shooting full lengths from a distance with Nadine making a small element in a large view. I liked the structure she was posing under, and prefer in general to get pictures which are not a copy of the course leader’s work. Although this was also slightly underexposed for the background, I had no problem with the EVF when the subject was in a normally lit area.

doorhof-set1-shot-web

You may say, the subject was in sunlight anyway, so why use flash? The dual lighting gives a filmic look, like a movie set lit in Californian sunshine (and Scotland’s legendary blue skies complete the illusion). This essentially sidelight from the sun, with a frontal fill you can see most clearly on the fingers of the left hand glove.

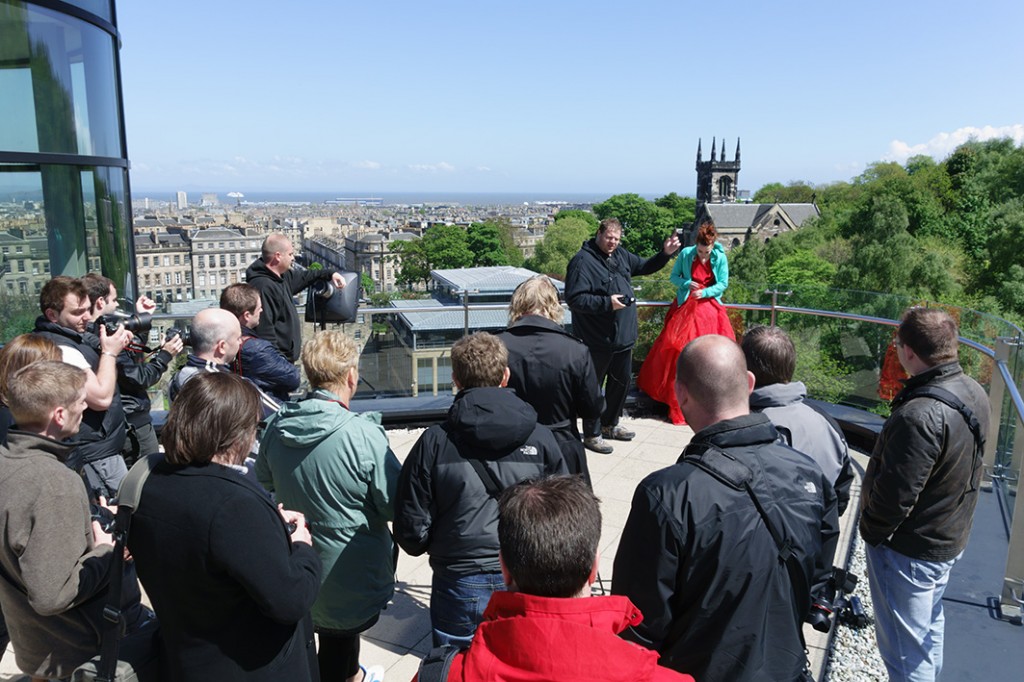
For a further set-up, Frank moved to the roof terrace view over the north of Edinburgh towards Leith and the Forth (first image on this page). He had demonstrated sets suitable for normal to wide angle lenses, using the 24-70mm, and switched to the 70-200mm f/2.8 Sony SSM G for a different relationship between the model and the background.

doorhof-churchview-noflash-web

This was the view without flash – not a bad set-up as it stands. When processing my images, I found that the in-camera standard JPEGs of the A99 handled the red of the dress better than almost any setting or camera profile using Adobe Camera Raw. Colours like this are a good case for trying alternative raw converters, such as DxO Optics Pro or Capture One Pro. Their camera profiles are generally closer to the in-camera conversions than Adobe’s. Frank demonstrated how to use the MacBeth ColorChecker Passport colour patch target and its camera profiling software to create an on-the-spot profile for better ACR/LR conversions.

doorhof-churchview-flash-web

This is the shot with flash, again, in-camera JPEG sRGB. AdobeRGB would retain more potential detail in the red, raw conversion to 16-bit using ProPhotoRGB the maximum. But for that you also need something like a Eizo 10-bit monitor with a matching video driver, and no Apple Mac made comes with that. Build yourself a tower system and it’s just about possible to get 10-bit colour… but not using Mac OSX! My monitor is a regular old 27 inch iMac and if it’s 8-bit it’s having a good day. The colour looks lovely, but accurate it certainly is not. I don’t mind as 99% of all the screens any of my images will ever be seen on are no better, and the printed page is far inferior. Putting the above pictures into print would almost guarantee the differences you see here are lost.

smallscreeneducation

Because the Glasshouse’s rooftop function suite has a white translucent fabric roof, the overhead projector could not be used. So, Frank sat down with his laptop and the photographers. Later on in the day, the group moved to an inside room, and he demonstrated a series of processing steps in Lightroom with special attention to the use of plugins producing Clarity, pseudo-HDR and ‘image look’ and to fashion and beauty retouching.

To read more about Frank’s work, visit his own website www.frankdoorhof.com or follow him via Kelby Training. He regularly does workshop tours. I’ll be reporting on some of his views and hints for professional photographers, specifically, in the June 2013 edition of Master Photography magazine (you can subscribe here for this 10X a year magazine which we also produce).

For more information on the Elinchrom flash system, Skyport wireless triggering and battery powered Ranger/Ranger Quadra location flash, see The Flash Centre website.

– David Kilpatrick

Alpha in the cathouse….

It was a photo-call too good to be missed. Shirley Kilpatrick reported for duty at Europe’s biggest brothel where fashion photographer Steve Thornton was staging a publicity stunt for California Sunbounce. Welcome to the House of the Rising Sunbounce, also known as Pascha.

The first person we saw in the empty corridors of the photokina 2010 halls, the day before the show opened, was Steve Thornton. You can’t really miss a six-foot-something figure with an extra six inches of hat, cowboy boots and everything except the spurs and chaps, even from behind.

“That’s Steve Thornton”, said David. “He’s the guy you are going to the brothel with on Thursday…”

Cologne has always been known for its robust seamy side. When David went to one of his first photokinas with John Battison and David Shaw from Japanese Cameras Ltd – importers of Minolta in the 1970s – he was courteously treated. “After you”, said Messrs Shaw and Battison as they hit yet another hostelry. Gay bars were not common in Britain in 1976, and it was a minute before he realised they had stayed outside the revolving door…

But this location, Pascha, had to be seen. It is Europe’s largest legal brothel, a multi-storey block just outside the inner city limits of Cologne (it would be illegal within them). It is claimed to have 120 working girls, and one thousand customers a day. Thursday mornings must be quiet, as they seemed able to close down the main cabaret and lapdancing bar to allow German lighting and accessory makers California Sunbounce to stage their model shoot with invited press and TV crews.

Because of its location, Pascha was a taxi fare away – half the taxis in Cologne seem to carry advertising for it, and unless a visitor already knew the true identity of the business you’d assume it was a nightclub. Indeed, it does stage music gigs and many will visit it just for the floorshow.

In the cocktail-cabaret bar, with Thornton’s halogen video lights positioned on stands or waved on poles by assistants, the grubby state of the decor was only too clear. The floor carpet stuck to my sandals and the beige curtain behind the first model to ‘take the stage’ had threadbare patches. The furnishings felt as if you really wouldn’t want to touch them without rubber gloves on, let alone lounge around posing in undies. Pascha may be the biggest cathouse in the west, but it didn’t smell wonderful and looked about as tired and well-used as its statistics suggest. Our models, of course, were unconnected with the venue and along with make-up and stylist Davina took the occasional wry look at their location.

As for Steve Thornton, we had stopped by one stand during photokina where he was holding forth with a lecture. He was animated, gesturing, extrovert and kept his audience attentive.

At Pascha, he did less to explain what he was doing with the lighting, or how he was using the large California Sunbounce reflector panels  which were the key to controlling such small, hard light sources. His instructions to his crew were not aimed at the posse of journalists and press photographers assembled to witness the event. I had thought he would be conducting the shoot more as a masterclass or demonstration, but it was very much a working session with one exception, permission for the invited media to take their own pictures and publish them as we are doing here.

This is unusual, but our models knew the score and posed for all of the press gang in turn. The second girl, working in front of a not-quite-good-enough Turkish bath wall painting, had more direct communication but from my angle the lighting cast a strong face profile shadow. When this worked with a flattering face silhouette and visible shadows from her eyelashes, it was good; when it cast the wrong shaped shadow from her profile, much less so.

Thornton worked hard and his crew moved the halogen lights and Sunbounce panels round while dodging both the still cameras and the video crew. I was shooting with my Sigma 18-250mm ƒ3.5-6.3 OS stabilised zoom, which proved more than useful  at the long end. Originally, I planned to use just a 28mm ƒ/2 Minolta RS on my Alpha 700, but this would not have got me either the overall scenes or the close-up final shots.

The A700 was set to use auto ISO all the way to 1600, as we have found that Adobe Camera Raw 6.2 (or Lightroom 3.2) makes such excellent noise-free conversions it is safe to use even 1600 for model shots. At this setting, typical exposures were around 1/80th wide open at ƒ6.3. The slight hint of softness in lens at full apertures was flattering; a few shots stopped down in stronger direct light were cruel to skin, to say the least.

Well, it may be the first and last time I will be able to claim I went to work in a brothel. German social morals accept this place in a way which I think real Californians might not. The brand name makes you think it’s an American product, but California Sunbounce was developed in Germany and all their early publicity shots were taken on the sunny shores of the Baltic!

They also make the SunSniper camera sling (used by Thornton) and they are imported to the UK by The Flash Centre.

– Shirley Kilpatrick

All photographs are © Shirley Kilpatrick and use is reserved in connection with media coverage of this event. You can view and download full size (as cropped for repro) images from the full set of shots as a 13MB zip file from our Subscriber Pages.