Sony’s precision aspherics

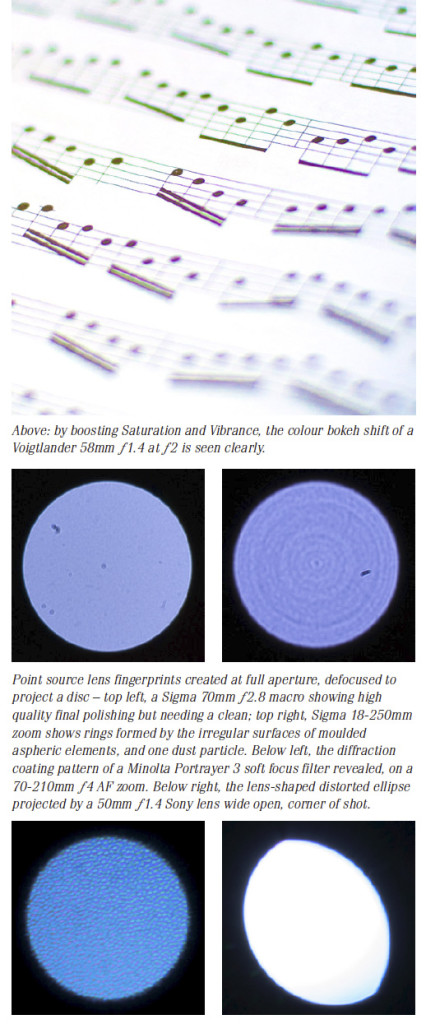
In interviews about the new micron-accurate aspheric lens element moulding process used to increase the resolution of the latest Sony G Master lenses, a visual has appeared which shows the ‘onion ring’ effect that coarser mould machining causes in lens elements.

Working independently, I’ve been aware of this for years – and I have used a point-source photography technique to study lenses. I’m not an optical engineer or scientist, indeed I don’t even have a degree in anything. I came into photography through Victorian books and teenage years experimenting with lenses, developer formulae, building my own equipment and using observation, corollary and deduction to understand how things work. It’s helped me explain difficult technical stuff to many thousands of readers through books and magazines, without using maths or formulae, and very few diagrams.

In the Cameracraft back in 2013 I published a home-brewed rendering of aspheric moulding visual analysis.

Here’s Sony’s visual showing the difference between traditional aspheric moulding (pressed glass aspheric, as pioneered by Leica and Sigma) and their new refined pressing with better engineering.

onion

And here is my home-brewed visual from Cameracraft when I explained the bokeh and resolution issues created by pressed elements (and also, some other aspects of bokeh, which I’ll refer to below the image):

onion-ours

This is the clip from a 2013 article in Cameracraft dealing with broader aspects of bokeh, depth of field, aberrations and how images are rendered. You can download the two-page article here. Nine years after we launched Cameracraft the magazine is going strong, it’s a bit thicker and does have the occasional advert unlike our original, but it is still one of the best ‘never knew that before’ reads a photographer can have drop through the letterbox. You can arrange that easily enough here!

Here is the full article as a downloadable PDF.

Sony’s new superlens was not any better than the Sigma 70mm f/2.8 macro which I still use. My reasons for choosing this macro are simple – it is optically excellent and traditionally made without any aspheric or other special elements, and it uses simple focal extension for focusing, not rear or internal group movement. This means it’s a true 70mm lens even when used at 1:1 and gives the maximum lens to subject distance, for its focal length.

However, it’s MUCH better than the Voigtländer 50mm f/1.4 used for the colour bokeh shift example at the top. Sony’s information makes it clear that the new more precise aspheric moulding allows new surface profiles and the elimination of chromatic aberrations which cause this magenta-green foreground to background shift in so many otherwise excellent lenses. I’ve said that to do so, the new lenses must be what would once have been called Apochromatic, though that term has only ever meant that all wavelengths focused to the same plane and at the same scale. Even past Apo lenses can show poor colour bokeh. It’s interesting that Sigma, after years of plugging the APO (capitals not actually needed, folks!) label chose not to label some new lenses this way even through their performance matched or exceeded earlier APO models. Sony seems to be taking the same view – G Master will be sufficient label to imply very high resolution, elimination of bad colour bokeh shifts, and by implication an apochromatic performance on RGB sensors.

So will I be buying these amazingly expensive, large, E-mount dedicated lenses? Probably not. My unscientific observations tell me there are smaller, lighter, far less expensive lenses which will serve me better. Mirrorless digital camera bodies with high quality EVF and high magnification focusing allow me to  do things I could never have done over 40 years ago when I took my first position as a Technical Editor (of the UK monthly Photography published by Fountain Press and edited by John Sanders). Geoffrey Crawley, editor of the British Journal of Photography, showed me how to evaluate any lens quickly with the help of a light bulb, a darkened studio, a roll of background paper and a sharp pencil. Back then you had to expose film, now you can just look through the finder. In a photo store, any LED spotlight will do for a quick check. Focus centre, magnified to max, at full aperture. Move to all corners in turn without refocusing, magnify each time. Refocus each corner in turn when magnified, examine change in rendering of point source. Buy the lens which shows symmetrical, balanced results and the best sharpness of the corners when the centre is correctly focused. Do this with a light source at least 3m/10ft away and if you can, even further. Repeat one stop down, two stops down, with zooms repeat at three or four focal lengths across the range. Never do it at close distance (hint: lens test chart results are only good for the distance you photograph the chart from, which is why Imatest, DxO and other labs have test targets the size of a wall and industrial sized space to work in).

And, if you have a single LED bulb or miniature LED torch, you can examine any of your lenses in a darkened room and produce a ‘bump map’ which will reveal its moulding defects, scratches or fungus, blemishes, and population of dust and microfauna.

– David Kilpatrick

dk-cameracraft-bokeh

For our PDF and App editions, go to Pocketmags where you’ll find Apple iOS, Android and all the usual choices to subscribe or buy individual editions.

And if you really want a trip back in time – there were huge changes between 2012 and 2015. Cameracraft documents the rise of mirrorless, the growth of hipster retro, and the discovery of older manual lenses as it happened. You can read a full set of the 12 issues via this one-off YUDU subscription:

Click to view the full digital publication online
Read Cameracraft 2012-15
Self Publishing with YUDU

Nikon’s DF finally recaptures the spirit of Dynax 7D

Sony said, as they took over the Konica Minolta camera division in 2006, that the day of mechanical controls and switches was gone. Economies of production and efficiencies of design meant that from now on, cameras would be controlled by buttons and menus. Anyone who remembers the original Alphas, the 7000 and 5000 from the mid-1980s, will also remember that this is not an original idea.

Minolta started to return to mechanical dials and visible controls after ten years of experiment with buttons, programs, and automatic functions. The Dynax (Alpha, or Maxxum) 800si and above all the 600si Classic restored traditional camera controls. The acclaimed 9 and 7 models followed, featuring physical switch or dial controls for exposure compensation (separate ambient and flash) and drive modes along with a shutter-dial style mode setting including the vital 1, 2 and 3. The triple custom memory setting enabling users to switch instantly between (say) outdoor action, studio flash and tungsten theatre lighting has survived as a Minolta gene all the way to the latest Sony generation.

Now Nikon has arrived with the DF, a very much standard autofocus DSLR using the D4’s 16 megapixel full frame sensor and a D610-derived AF and shutter specification, in a moderately compact retro-styled body with about the same number of mechanically switched visible controls as the Dynax 7D. It’s over ten years since the 2002 design of that camera (which finally appeared in 2004 after a change of imager from a planned Foveon sensor to the 6 megapixel Bayer Sony, rumoured to be a decision helped by Sony’s pressure on Konica Minolta as their main supplier for compact digital sensors).

nikdf-slant Dynax-7D-slant

Top, you see the Nikon DF in the black finish which very few sites are choosing to highlight – the silver and black looks SO much more retro – with 18-35mm Nikkor lens, 2013; below it, you see the Konica Minolta Dynax 7D with Konica Minolta (aka Tamron) 17-35mm. Note the strap lugs; KM moved one forward for better balance, but carefully kept the right-hand strap behind the shutter finger. Nikon has rather peculiarly chosen to place this strap lug forward as well, putting the strap physically between the index finger and the rest of the fingers.

The Nikon is hiding a flip-out aperture coupling pin to allow the use of original Nikon F (Photomic metering) or Nikkormat generation F-mount lenses, which have an external non-self-indexing meter coupler on their aperture control. Minolta’s full aperture metering used a self-indexing coupler which, unlike Nikon, did not required a back and forth rotation of the ring to tell the camera the relationship between the full aperture and any stopped down setting. In the 1960s, Minolta’s method enabled the fastest lens changes and also enabled ‘blind’ changing as there was no need to look down at the lens or engage a pin when doing so.

Nikon kept faith with their old mount when they introduced their AF system, despite the deep body register and narrow throat creating many problems with lens design. Minolta designed a brand new wider throat. At the time it made sense. Who then was to know that precisely the same constraints on lens design imposed by the narrow Nikon mount and deep mount to film register would make Nikon lenses much better, 20 years later, in the age of digital sensors with their need for telecentric designs and small rear exit pupils?

You’ll see that the old KM has a switched White Balance at the right hand end, more or less where Nikon has put a small PASM selector dial on the DF. Imagine it – a switch to get AWB, your most recent Preset, a Custom reading or to set in Kelvins. Where the D7D has a PASM plus 123 custom memory selector (locking) and hiding below it a mechanical switch for self-timer and sequence drive modes (3fps from the 6.1 megapixel sensor), Nikon has a very granular T (for time) to 1/4,000th shutter speed dial cramming those intervals in.

nikdf-top

The actual shutter inside the camera despite being full-frame in the Nikon is really much the same as that of the D7D, a 30 second to 1/4,000th unit with X at 1/200th. And below the Nikon’s dial at the front (the KM has it at the back) is the drive mode selector, which does include the Mirror Up position that the D7D was lacking. There’s a mini LCD display on top to allow the use of the 1/3rd step control-wheel set shutter speeds, and to display the aperture on G type lenses which don’t have a physical setting and must be set from the body.

On the left end of the Nikon there’s a two-tier wedding cake for ±3EV 1/3rd stop exposure compensation, and below this an ISO control from L1 (50) to H4 (51,200).

d7dback

I don’t seem to have a picture of the D7D left hand dial from above, but it offered something unusual – turn the dials a full 180° and the 1/3rd step EV compensation adjustments were exchanged for 1/2 step adjustments. The D7D also had a stack of controls on the back, like the lockable AF point selector control round the four-way selector, an ISO button (bearing in mind this camera was derived from the Dynax/Alpha 7, which used DX coding to read filmspeeds and an LCD menu entry to adjust them), Memory Set and other stuff which now seems rather clever and useful. The AS anti-shake physical switch, last seen on the Alpha 900, is one which would be welcomed back again. And of course this camera had AS. It was the first, and everyone apart from Nikon and Canon has followed the lead.

nikdf-back

Where the back of the D7D was criticised for being a bit complex for the everyday user, the Nikon DF in all fairness bears a remarkable similarity right down to five left hand buttons and the metering selector switch, AE and AF buttons. The DF has more stuff on the front, including a control wheel which looks a bit like the battery cover off an early Mamiya SLR and two buttons down to the right of the lens escutcheon which vaguely resemble an ancient two-pin flash connector. Since there can be no actual need for the bulges they are placed on, this is probably deliberate. Same goes for the mechanical cable release screw thread in the shutter button, fun feature, but actually electrical releases can have many more functions and don’t transmit hand movement the same way. The DF has a pretty skinny right hand grip but exceptional battery life at up to 1500 exposures, where the D7D has a lovely big grip partly to accommodate a similar size of battery which rarely managed 400.

KM’s pioneering DSLR weighs almost 200g more than the Nikon, though both are made from magnesium alloy, despite the smaller format. That’s perhaps because the prism in the Minolta design was not downsized and the actual eyepiece magnification of the 95% view was 0.9X, where the Nikon dealing with a full frame is reduced to 0.7X (and still, of course, looks larger – 0.7X versus 0.9X 0.66X 0.95X, or a cumulative 0.56X scale).

As for size and fit, the Nikon is said be based on an F2, or maybe they meant an FM2 – but it’s not in any way, the prism can look vaguely FM2-like in the chrome version with leather panels, but the body is a completely different shape some 15mm shorter than an F2 but much fatter and taller. It’s a dumpy sort of chunk, is also shorter fatter and higher than the D7D despite having no built-in flash. D7D = 150mm x 106mm x 65mm (specifications misprinted as 77.5mm in many reviews, no idea why); Nikon DF = 144mm x 110mm x 67mm.

Now there’s one other way in which Nikon has copied the KM D7D – the DF has no video! It does have live view, and that means you can overcome the shortcomings of the D600-like 39 point AF module (limited to the DX crop area and in my experience with very small AF point areas making it ‘twitchy’). Live view has magnification and focus peaking.

The new Nikon shoots 16 megapixels not 6 – that’s what a decade of progress has done – and it shoots 5.5fps not an actual 2.8fps like the ‘3fps’ D7D managed. But it’s got just a fixed rear screen, 3.2 inches verses 2.5 (the D7D was ahead of the field in 2004). The Nikon also shoots superb ISO 6400, equal to the old sensor’s 1600 at a pixel level before you consider the benefits of the larger file as well.

And the pricing is borrowed from KM 2004 too – the D7D came in as a $1599 body only which made it a premium product against competition like the Canon EOS 300D, the Nikon DF arrives at $2749 body only and it’s a comparable level considering the full format, technology and cost changes, and a near ten year interval.

We’re sure the Nikon will be a success and this article is not trying to knock the concept or the execution. It’s just here to point out that a decade earlier, Minolta had designed and Konica Minolta eventually produced a DSLR with a general philosophy of physical, external, mechanical-feeling controls. As the pictures show, the Nikon DF could almost be a tribute to that design rather than something based on historic Nikon film bodies – which it quite simply isn’t!

– David Kilpatrick

Smoke and Mirrors – an idea for Sony

With the latest Alpha 77, Sony has introduced SLT version II, the new upgraded ‘Translucent’ mirror. This is in an attempt to reduce the ghosting effects created by having an angled mirror between the lens and sensor, the image forming rays passing through a semi-silvered (pellicle) surface, through a thickness of polymer film, and then to the sensor. Having tried it out (update, September 8th) we can confirm that it works. You honestly would never know there was anything between the lens and the sensor.

But Sony, like all makers, has continued to think in terms of SLR design and the old world of film negatives and slides, where the image always had to be a certain way up on the film, or it would end up being printed and projected reversed left to right.

In the past a simple reflex mirror for a TLR viewing screen – like the Rolleiflex – did a useful job of turning an inverted image the right way up for viewing. On film at the back of the camera, the image was both inverted and left-to-right. But that did not matter, as the film was viewed through its reverse (back) side to see or print the image.

Somehow, this old design has been continued to new cameras – but today we use digital sensors. The upside-down or left-to-rightness of the image does not matter as we view the image on a screen or using an EVF. No matter how the image ends up on the sensor, it can always be the right way up and the right way round for us to view.

So, Sony, when you make you that full-frame Alpha 99 camera change the entire approach. Position the SLT mirror so it reflects the image sideways, upways or downways! And put the SENSOR where it receives the image from the REFLECTED lightpath. Make the mirror reflect 70% of the light and transmit 30%, instead of the other way round.

There will be no double imaging, no flare patches, no ghosting and not even an extra substrate or layer for the image forming rays to pass through, if the sensor receives the reflected image not the transmitted one. The AF sensor, in the meantime, can be positioned in direct line to the lens where the imaging sensor has been in the past, measuring the image through the SLT mirror.

This arrangement (©David Kilpatrick, Friday morning, August 26th 2011, scrambled eggs with smoked salmon for breakfast) will in a single stroke remove all the complaints about image degradation as the mirror will provide a perfect image.

But – would it? Slight lack of plane perfection in the SLT mirror used to transmit the image-forming light, and reflect the AF-measuring light, does not have much effect on the image. Anything less than an optically perfect mirror would fail to create a quality image. It would be like sticking a cheap filter on your lens, or worse. And of course it would never fit into a normally shaped camera body with a full frame sensor and shutter.

Solid solution

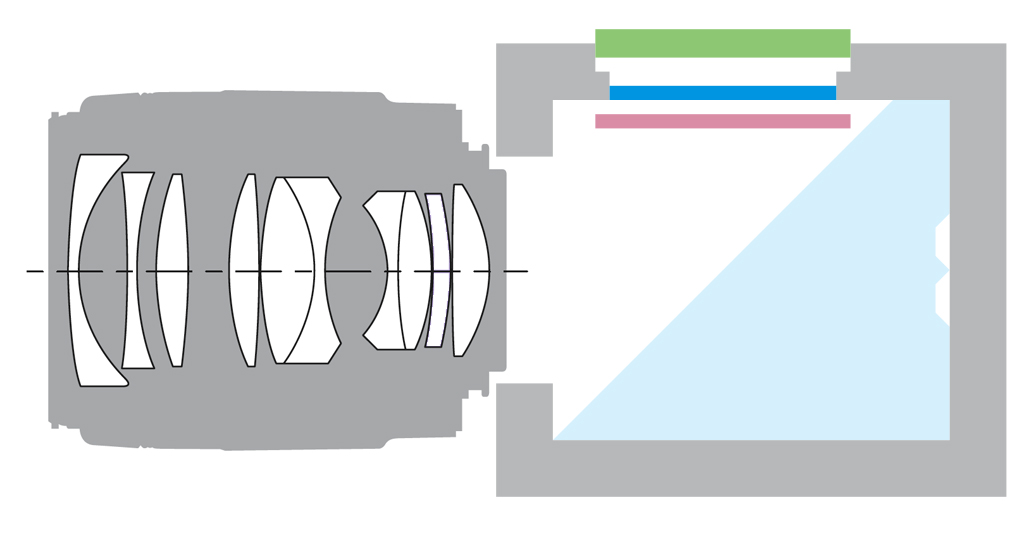
Ah – the AF sensor, unlike the imaging sensor, does not need cleaning to remove dust spots. So the mirror would not have to be movable. Actually, it would not have to be a pellicle mirror. It could be a lovely big lump of pure glass prism moulded straight on to the AF module itself, even including the condensor-collimator lenses of the AF system. It could be solid glass all the way from mirror surface to AF receptor, and the 45° front face could be to the same optical perfection as the best Sony G lens. Or even the best Carl Zeiss lens. Hell, it could be a Carl Zeiss prism and then the camera could have the CZ logo!

Diagram above: light blue = solid glass optical prism with 45 degree semisilvered front face; the two white indents at the right hand side indicate AF modules set into the prism rear face. Pink = shutter (optional, ideal system would have electronic shutter only). Dark blue = sensor. Green = top mounted waist level viewing screen, also articulated. A secondary eye-level EVF would or could be used. Design ©DK with a bit of nicked Sony lens cross-section.

Design? Rollei 6000 all the way! A professional, Hasselbox-shaped thingy to cradle in your hand. With a rotating 24 x 36mm sensor too, so that you change the format aspect by pressing a button not maneouvring the camera body. A 3 inch square OLED on the top like a giant waist-level finder, showing the image vertically or horizontally as you turn the sensor. A waist-level viewing hood for a giant magnified view. Maybe even a monster top prism for the biggest EVF you could imagine!

Mor realistically, an eye-level EVF in addition to a top plate OLED or LCD panel designed to be hinged up/rotated/twisted – rather like the LCD of the Sony Cyber-Shot DCS R-1, one of the best ever ‘waist level finder’ options fitted to a digital camera to date. In fact something like s giant updated R-1 full framer might do well.

As for the image sensor, that could be in the well of the camera (mirror aiming down) but maybe having it in the top of the camera, below the viewing screen (mirror facing up) would help gravity reduce the dust issue.

The point is – it does not matter where the image sensor is placed, it does not have be where the film once was. It does not matter whether the image reaching it is inverted or reflected, as unlike film it does not have an emulsion side or a film-base side, the electronic viewfinder is independent of the orientation of the optical image.

Future ‘SLT’ EVF cameras – especially a future Alpha 900 replacement – do not need even to resemble today’s DSLRs and can be made better by abandoning ideas fixed in designers’ minds since the era of film cameras.

– DK

Technical note: angled partial mirrors, whether prism surface or semi silvered, create polarisation effects, colour shifts and a varying efficiency of reflection depending on the angle of incidence of the ray. This is one barrier to the use of pellicle mirror design for a full-frame model, as the back focus or telecentricity of lenses relative to the format would mean a greater range of incident angles across the mirror surface. Sony appears to have overcome any such problems in the existing APS-C SLT design, and the slightly forward tilt of the mirror (not a true 45°) helps in this respect. I propose the above design in full awareness of related optical and technical issues. I’m not assuming they do not exist – they would need solving.