On Tuesday, February 2nd 2016, Sony UK held a press event to which I was invited. Well, I’m in a different country and about 400 miles from their Weybridge offices, so as usual my trusted English office editor at large (and son) Richard made the still substantial journey from Leicester. The result was a completely wasted day, his time and our company’s money, looking at a mixed bag of TVs, camcorders, headphones and all the Alpha and RX gear we already had seen long before.
Then on February 3rd, mid-afternoon, the same PR agency which had extended this generous invitation to come and gather ZERO editorial content for our magazines announced the new G-Master series 24-70mm f/2.8 FE, 70-200mm f/2.8 FE and 85mm f/1.4 FE, 1.4X and2X extenders, and upgraded A6000 successor A6300.
I was attending an excellent event with Graphistudio on the road in Edinburgh (they do try to cover the whole of our surprisingly large and still united kingdom) and returned to see the news. Talk about mixed emotions! I was furious that they should cost me a very real £300 or so (that’s what it costs, whether I do it, or Richard, or a hired freelance) to cover yet another of their red herring events just 24 hours before a major announcement like this. We get nothing free from Sony, they don’t advertise in our magazines, and unlike Minolta they don’t offer pre-launch access to pre-production samples.
And that’s why I should not even be writing this. In the past, I would never – as a responsible journalist and technical editor – have made any comment on equipment I had not been allowed to handle and preferably use if only for an hour or two. But these days a thousand bloggers try to drive traffic to their sites by doing exactly that.
Here are my thoughts, anyway.
Click to open full size official images!
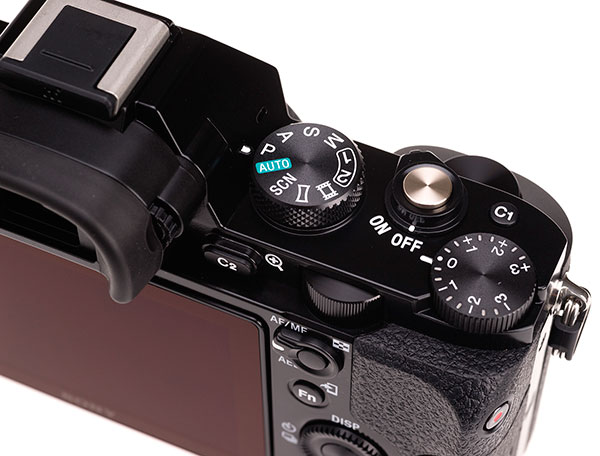
The A6300
It’s 24 megapixels like the A6000 and does claim a slightly faster and wider zone AF. But the A6000 is already close to perfect and I normally shoot with centre point focus, not any of the wide zone modes. I really don’t want the collar on a dog sharp and its face out of focus just because the collar is the more contrasty target which the wide area focus finds first. It’s also twice as much as I paid for my A6000, which happens to have been selling for a market-beating price. I have a great set of lenses – 10-18mm, 16-50mm, 35mm f/1.8, 50mm f/1.8 and 55-210mm. All except the 10-18mm cost about half the official retail because Sony did some great deals. Basically anyone like me who has invested in a decent A6000 (or NEX-6, even) kit and already own an A7S, SII, or RII can take the A6300 or leave it. In fact my now-outdated RX10 and RX100 MkIII do pretty neat silent shooting, one of the main upgrades over the A6000.
If you need the very fast (120fps) refresh of the new EVF, 4K video and the improved audio functions (whether using jack plug mic or the MFAccessory shoe mic choices) then it’s easy – it will cost you less to get these than any other comparable route. Even the RX10 MkII no longer looks so attractive. As others have commented, it’s partly a matter of waiting for the body price to fall by the end of the year. In the meantime my A7RII actually does all the movie stuff I need (its APS-C 4K is superior to its full frame, and makes full use of line-up of lenses above).
However, if they manage to lend me a test sample and the new sensor turns out to kill the already wonderful noise/ISO ratio of the 6000 I could be won over early at a high price. Had this been a 36 megapixel body I would be thinking very differently, and perhaps even considering a switch from full frame to APS-C.
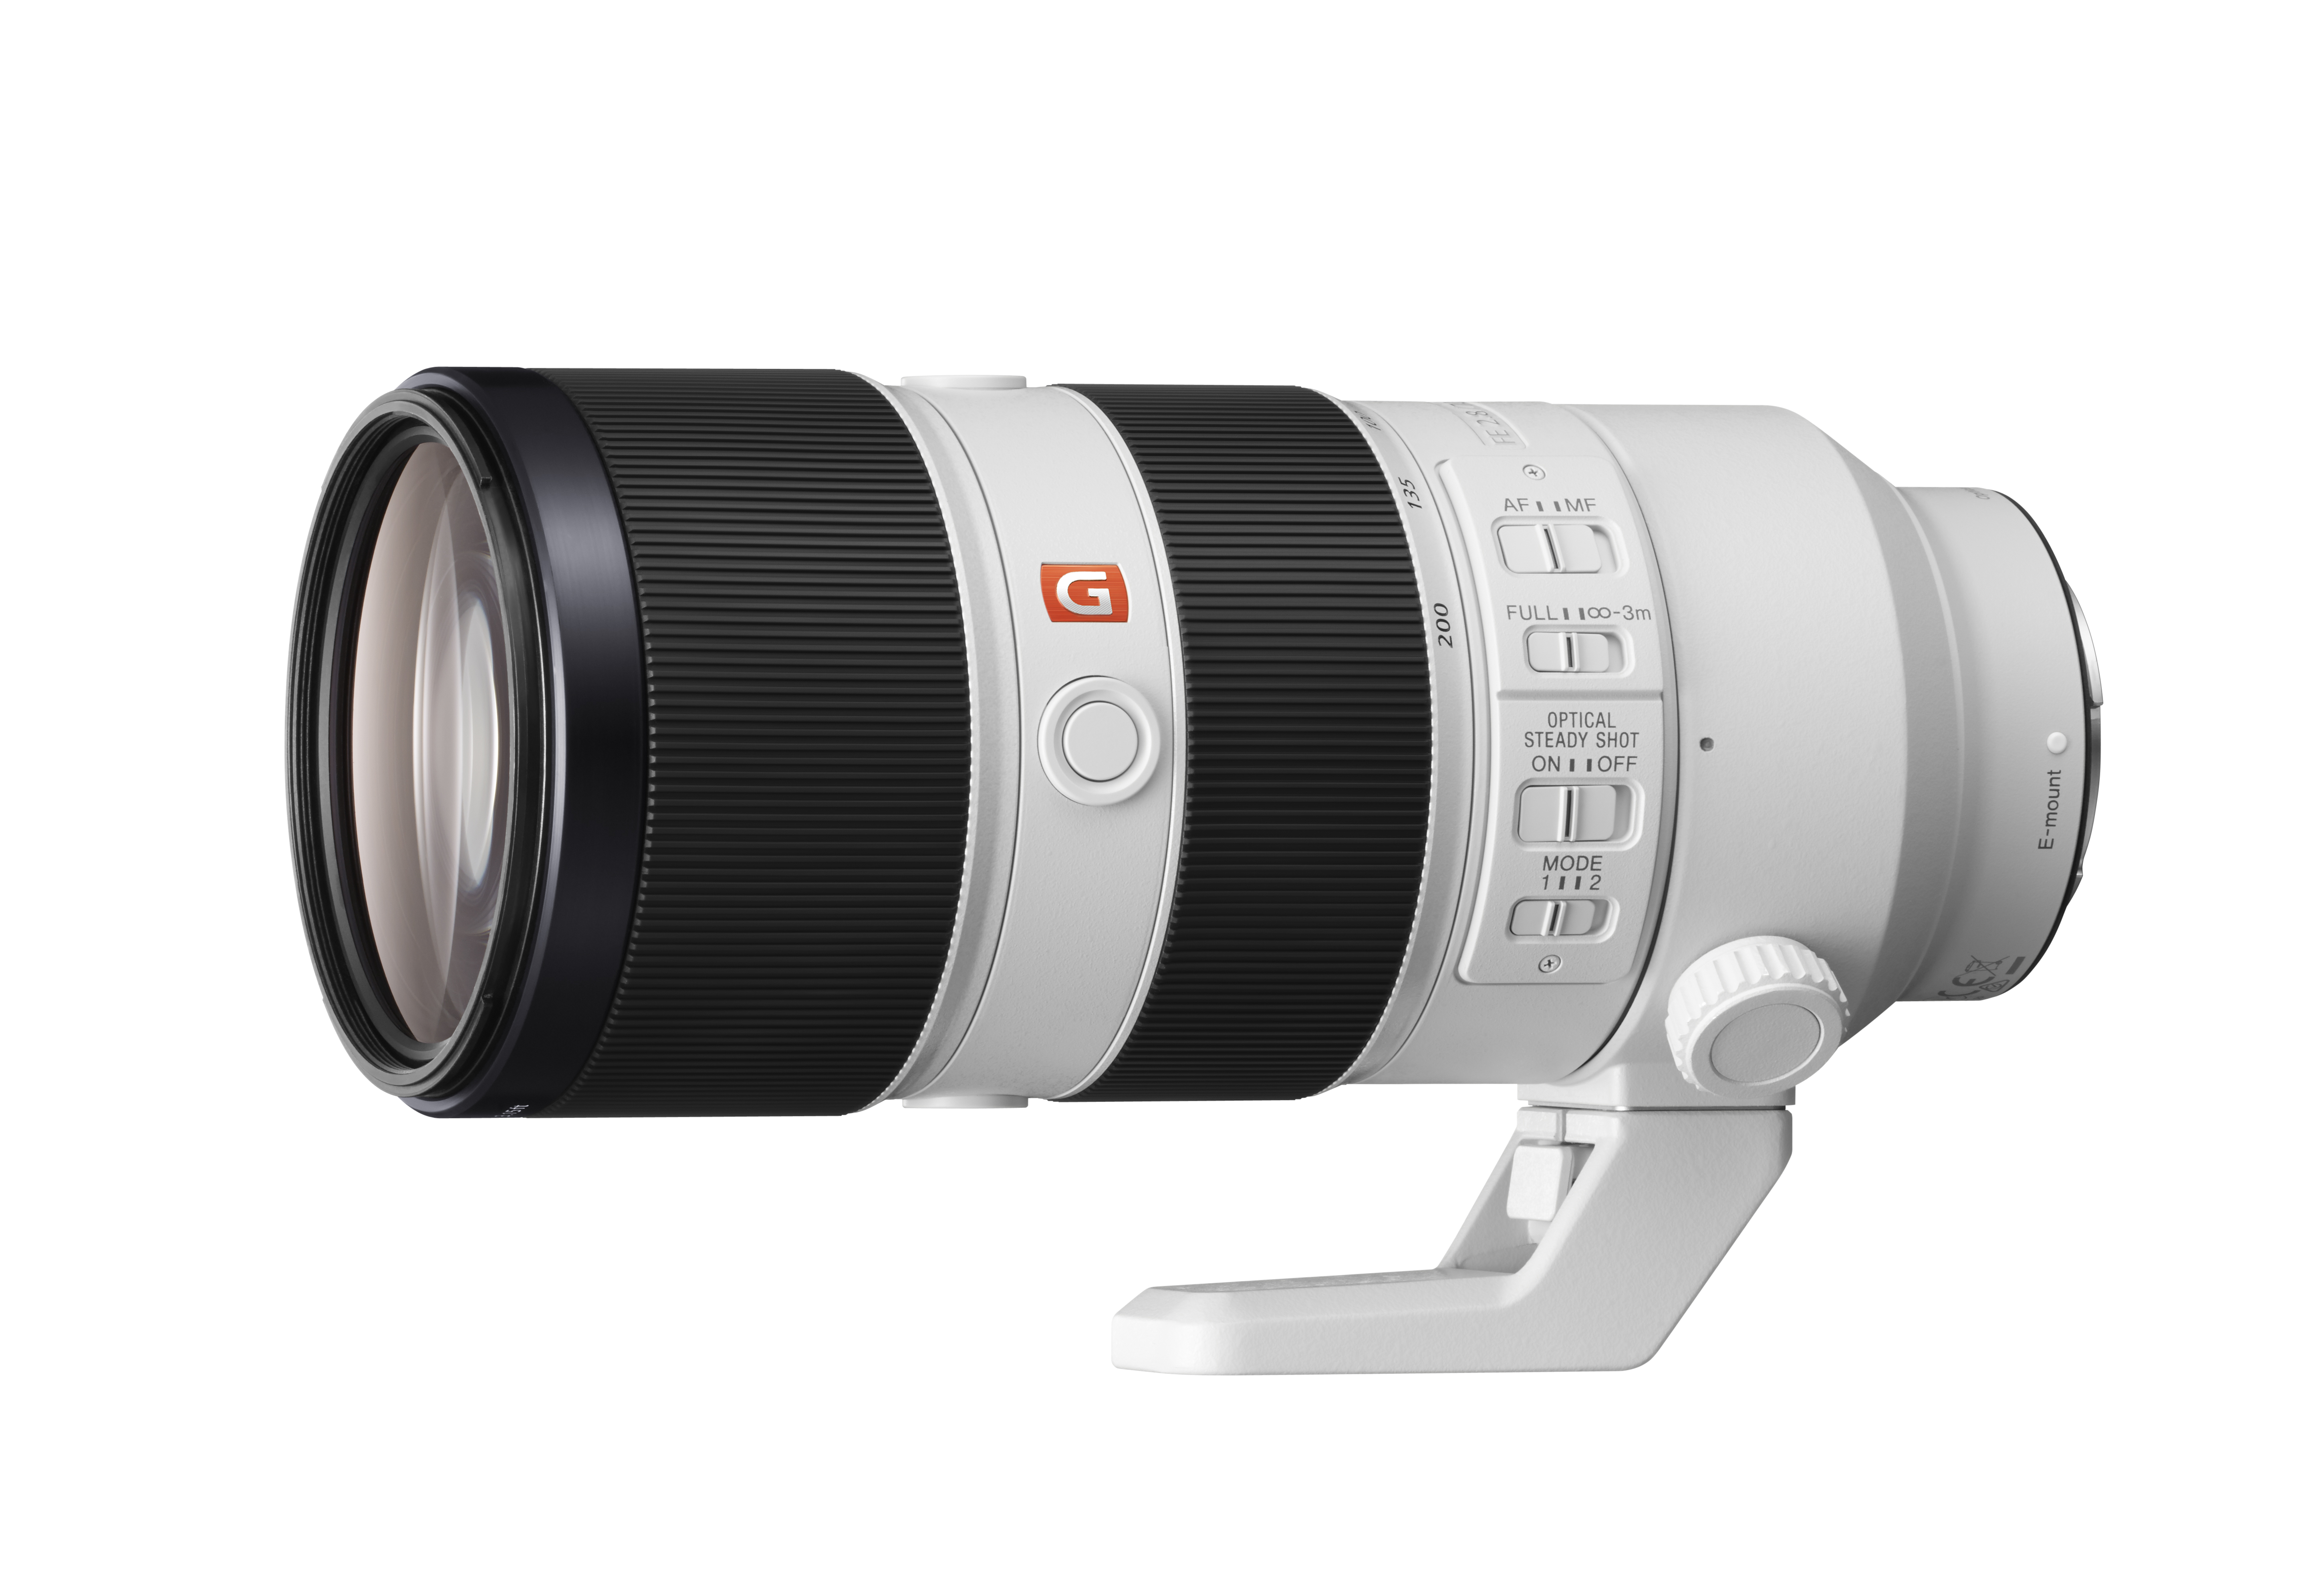
The 24-70mm f/2.8 and 70-200mm f/2.8 G-Master FE
With a 77mm thread and an overall size not far removed from the A-mount equivalents, the weatherproofing and generally improved design of the AF system will win buyers. The longer lens has the 0.96m close focus I’ve been campaigning for now for several years, and it’s disarmingly simple. If you study lenses, you’ll have realised that SSM, stepper or linear motor type AF (silent, no gears) has caused the increased and restrictive focus distances I’ve covered in Cameracraft and elsewhere. It has just been unable to provide enough movement. As an example, compare the old screw-drive 28-75mm Konica Minolta with the ‘identical’ Sony 28-75mm SAM. The 24-70mm f/2.8 A-mount models are actually amongst the better in this respect, managing the magic quarter life-size to important for many subjects. The 24-70mm f/4 FE is not as good though you would have though it easier to make close focusing with a simpler, slower lens – only 0.20X. At least the 24-70mm f/2.8 FE matches up to its A-mount equivalent.
In these new fast FE zooms Sony has improved performance by using more accurate asphericals, designated as XA (extra aspherical, presumably meaning a curve which was out of reach before). Combined with expensive glass types (low and extra-low dispersion) and complex design (23 elements in 18 groups for the 70-200mm) this enables apochromatic correction although they do not use the term. This removes ugly colour bokeh effects. A ‘floating’ internal focus action for the rear unit gives a wider fully corrected focus range, affecting both the focused distance and the flatness of field. An SSM (ring) motor drives the heavy, larger forward group focusing and a linear (rail) movement shifts the rear assembly but the whole focus action is internal.
I welcome the 96cm close focus (I trust it applies across the whole zoom range and with AF all the way). This lens achieves 0.25X scale at 96cm. Compare that to the Tamron Di VC USD 70-200mm which can only manage 0.125X, half the subject size, at 1.3m and that’s by switching to manual focus – it forces you back to 1.4m from the subject if you use AF.
It’s also worth comparing size; most new 70-200mm DSLR lenses are around 185mm long, the Sony is 200mm long. But it’s really ‘smaller’ than the original Sony A-mount 70-200mm’s 197mm. That 15mm extra length is almost entirely dead space, a kind of extension to the barrel in order to handle the 18mm register of the E-mount, and also enable the use of the 1.4X and 2X extenders. This extension falls behind a fixed, not removable, rotating tripod mount collar which has a removable foot instead.
I’m sure that the dual focusing will be fast, with two simultaneous actions combined, and ideal for contrast detection as well as on-sensor PDAF. My reservations are simple enough though – these are lenses for one-system users, dedicated to mirrorless. There really is no saving over the latest A-mount versions in weight and size, and many photographers (like me) may want to use both A and E mount bodies. I’ve been considering investing in another A99 even though I sold mine. That’s because it is so much more comfortable and complete with my longer lenses than the A7RII with LA-EA4 or 3, both of which I have. If I did so the 24-70mm and 70-200mm A mount would be on the shopping list, and what reason would I have for buying even more expensive new FE versions which could never, ever be used on a A-mount body?
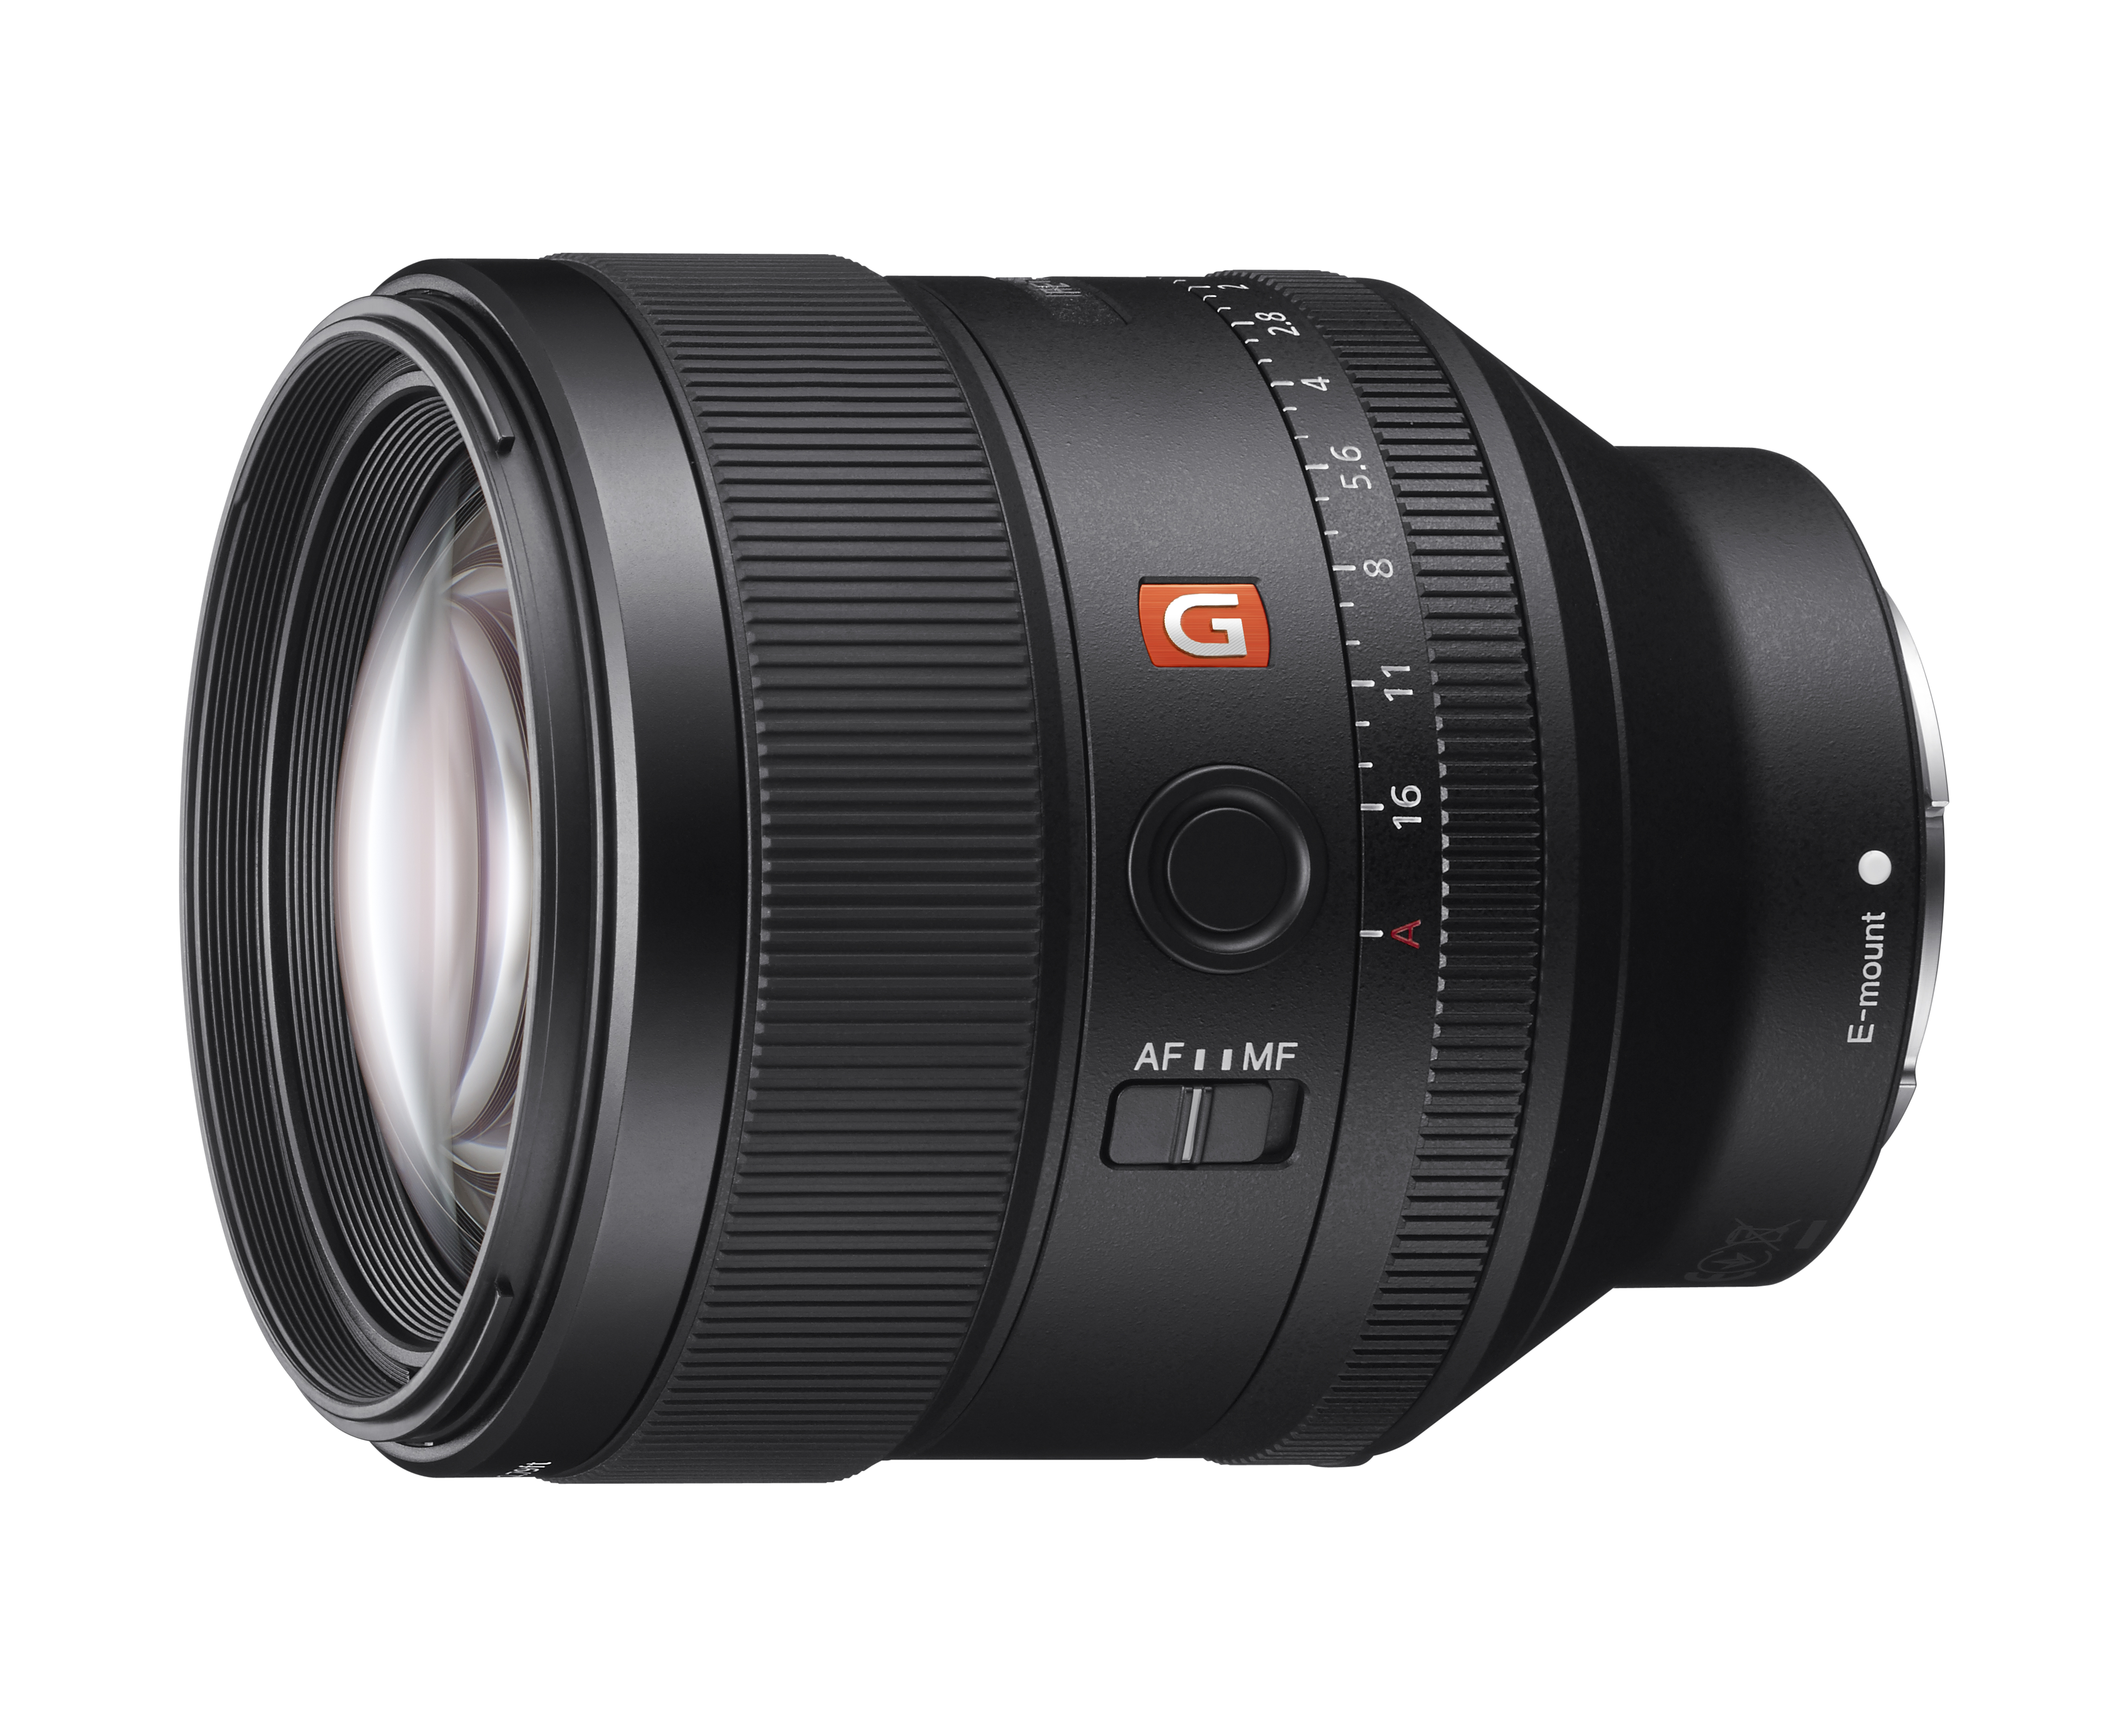
The 85mm f/1.4 G-Master FE
One guide to acceptable minimum focus distance is the simplest formula imaginable. A lens should be able to focus – at the least – to the same centimetre distance as its millimetre focal length. So, a 50mm lens should manage 50cm, a 100mm lens 1m, a 200mm lens 2m or closer. But that’s the least you need. The ideal is HALF the mm in cm. A 50mm focusing to 25cm is brilliant, a 200mm focusing to 1m is amazing (Vivitar once made one, with a bright f/3 maximum aperture too).
So, for me the 85mm f/1.4 with its substantial 82mm filter thread, 850g weight and focusing down to 80cm (some data tables say 85cm) with 0.12X image scale is just acceptable. A Samyang 85mm won’t go so close and most 85mms don’t break the 1m barrier. But an ideal new, modern 85mm would focus to 50cm. It’s just pretty hard to enable this using SSM or linear AF drive. Even the Carl Zeiss Batis 85mm f/1.8 is the familiar 80cm, 0.126X scale.
What I actually use right now is an 85mm f/2.8 SAM lens on LA-EA3. It’s not 100% free from CA and colour bokeh issues, but it is exceptionally sharp and it focuses right down to 60cm with 0.20X scale. Above all it is very small and light, and for me that is most of the point of the A7RII and all the A7 series bodies. It focuses perfectly on my LA-EA3. I can use it with A-mount extension tubes or my Meike metal full frame FE extension tubes, but that’s a bit of a crude solution.
Results from the MG 85mm so far seen, disregarding some fairly cheesy portraits, show that its 11-blade iris and apochromatic XA correction do deliver more than you will ever get from an 85mm f/1.2 Canon or a Samyang or a Sony 85mm f/1.4 ZA. The manual 1/3rd stop clicked or click-free aperture ring combined with the absence of magenta-green bokeh shift mean this lens will be massive for vids, whether creative porno or music promo. It should be on the same level as Zeiss/Arri ciné lenses if the claims stand up, and I would not be surprised to see a dedicated cinema version.
It’s a long way from the 85mm SLR lenses of Minolta’s past – six iris blades!
The extenders
Sorry, but most FE and E lenses can never (ever) use a a tele extender. That’s why you have not seen any. It’s also why I use that 85mm SAM… it makes a neat 170mm f/5.6 wth my Teleplus 2X MC-7. Way back, one of my favourite travel outfits including the Minolta XD-7 with 85mm f/2 and a 2X converter, 170mm f/4 was a sweet spot in every respect.
These two converters can only be used with the new 70-200mm f/2.8 G-Master FE. When you look at how far the converter unit extends into the lens barrel, you’ll see that this is a combination designed from the start. The rear element of the FE lens is deeply recessed, midway between a typical E-mount design (18mm register) and an A-mount (rear element no closer than 42mm to the sensor).
The extenders add less length than an A-mount variant would, and the back focus of the FE lens is shorter. But it’s a mid-way compromise. Extenders are easy to make for DSLR back focus register, they are difficult or impossible to design for 18mm register mirrorless like Sony or Fuji unless the host lens is matched exactly to the extender. And the 70-200mm f/4, for example, is not…
The compromise
And, having mentioned compromise, I should explain the great compromise which has made the entire Sony E/FE system much larger than it needs to be.
It’s all down to the A7R 36 megapixel sensor. This sensor, more so than the 24 megapixel full frame, requires a very telecentric lens design. That is, more like a DSLR lens, despite the slim A7 series body. In order to perform acceptably with this sensor, the FE lens range could not be designed to be as small as a rangefinder system equivalent, or to take full advantage of the 18mm mount to sensor distance. Brian Smith, whose images are great (not cheesy portraits) but whose technical info clearly comes via Sony PR, says this: “Mirrorless camera design has allowed Sony’s lens designers to place larger than normal lens element close to the body”. Actually, they don’t, as the design of the extenders will tell you. They’ve used a stronger degree of telephoto construction in the long zoom, allowing a smaller than normal rear element and they have taken measures to move it further away from the body – and this is a general trend. If you want to see what a properly small 85mm f/1.4 looks like try a Carl Zeiss Planar 85mm f/1.4 ZE in Canon mount – 72mm filters not 82mm, 570g versus 850g and really solid all-metal manual focus. The mirrorless bodies do provide a zone from around 16mm to 42mm from the sensor surface which can accommodate the rear of the lens, and can’t ever be used on a DSLR. But Sony does not make full use of that and can not do so because of the microlens, filter layer and structural characteristics of the A7R sensor.
All Sony FE lenses and all CZ independent FE lenses have been designed to work well with the A7R. The 28-70mm kit lens was not, but most owners find it acceptable. They could have made some of the lenses a fair amount smaller and lighter if the A7R had never existed. The A7RII is so tolerant towards short back focus, oblique ray angle imaging, that a whole different range of lenses could be designed for it… but never will be.
The system has to remain compatible with its earlier components, especially the first ‘flagship’ body A7R. And that is going to constrain design and increase costs for ever into the future. In contrast, see the Fujfilm X system. We have yet to find whether the new 24 megapixel Fujifilm sensor disagrees with any older lenses, but all new lenses no matter how fast, small or clever have full compatibility with all the earlier bodies and don’t seem to have any compromises in design.
Here’s my view, after doing a lot of digging around over the last two days (Sony PR does not supply any of the technical data for the released lenses – all that had to be found, and cross-checked, from Sony corporate and various dealer sites). I have found some interesting historic lenses like the 50mm f/1.5 and 85mm f/1.5 Zeiss Biotar. They are simple and perform poorly by today’s standards but they are very small. I am familiar with many excellent lenses I’ve used in the past like the Minolta MC/D 45mm f/2, the MD 85mm f/2 and of course the ‘beercan’ 70-210mm f/4 AF. I loved my first serious freelancing kit, Pentax Spotmatics with 20mm f/4.5, 35mm f/3.5, 50mm f/1.4 and 105mm f/2.8. I’ve used some good lenses which have been perfect with all A7 series bodies, such as the Voigtlander 21mm f/1.8, the Canon 40mm f/2.8 STM, and several rangefinder 35mm f/2 or f/1.4 lenses. All of these have been small and perfectly in keeping with the A7 series mirrorless bodies. I think Sony’s inspiration for new lenses should have come from classic rangefinder and compact pre-digital SLR glass, rather than from the bloated f/2.8 zooms of professional digital SLRs.
In 1999, with a multi-state road trip in the USA to enjoy, I left the SLR kit at home because I was using two Minolta CLE bodies, a 20mm Russar, 28/40/90mm Minolta set and a Leitz Elmar 135mm f/4.5. SLRs in the AF era had started to became big, plastic and clumsy with fairly poor zoom lenses. I opted for the NEX/A/A7 system because I thought we were heading back to light, elegant, unobtrusive little jewels of lenses. Ah well, not so. We’re going to be sold lenses built like a Kardashian ass and learn to live with it!
– David Kilpatrick
A zoom specification comparison
Sony Carl Zeiss 24-70mm f/2.8 ZA SSM II – focuses to 34cm, 0.25X, 77mm filters, 975g
Sony Carl Zeiss 24-70mm f/2.8 ZA SSM – 34cm, 0.25X, 77mm filters, 955g
Sony Carl Zeiss 24-70mm f/4 ZA FE SSM OSS – 40cm, 0.20X, 67mm filters, 430g
Sony GM 24-70mm f/2.8 FE SSM OSS – 38cm, 0.24X, 82mm filters, 885g
Sony G 70-200mm f/2.8 SSM II – focuses to 1.2m, 0.21X, 77mm filters, 188mm long, 1300g
Sony G 70-200mm f/2.8 SSM – 1.2m, 0.21X, 77mm filters, 197mm long, 1500g
Sony G 70-200mm f/4 FE SSM OSS – 1-1.3m*, 0.13X, 72mm filters, 175mm long, 840g
Sony GM 70-200mm f/2.8 FE SSM OSS – 0.96m, 0.25X, 77mm filters, 1480g, 200mm long, 11-blade aperture
*Focus to 1.3m at 200mm, 1m when set to 190mm or shorter focal length. 0.13X at 1m and 190mm.
All the pictures used here have, linked to them, the full sized unwatermarked official Sony PR images except the first image which we have cropped a load of useless white space from – Sony likes useless white space, as the others show. Web and magazine editors hate it and constantly have to crop product shots…
In 1996 I was operating one of the first full service digital photo studios in the world. I had already published, back in 1986, the world’s first desktop published commercial periodicals and our company won the UK Printing Industries Research Association inaugural DTP Awards for this in 1987. We’d bought the first Apple laser printer in provincial Britain and when Letraset’s ReadySetGo layout package failed to produce usable output for our first such magazine, Aldus stepped in and provide a pre-release beta of PageMaker. In 48 hours, I had to re-create the entire magazine – and it worked.
From then on we progressed, through having the first separation-capable film imagesetting in Scotland to reproducing the first magazine cover from Kodak Photo-CD and soon after that the first full colour page from a Kodak DCS camera. By the beginning of 1995 we had Photon, the first major photo-mag style website, in by the end of that year we had a Leaf Lumina based studio with Scandles lighting. There’s an article about this in our repository of past articles, https://cameracraft.online/2007/08/06/the-leaf-lumina-scanning-camera-1995/
That year, Shirley had planted an entire bed of flowers specifically for drying. They make good photographic subjects. The (now relocated) university college of St Margaret’s in Edinburgh asked me to give a lecture about the new technology – and so the Leaf Lumina (a scanner on a tripod with a Micro Nikkor up front, and an Apple Mac Powerbook on the end of a SCSI-2 cable) went along with the fluorescent studio light heads and a tray of the dried flowers. We also took our Kodak dye-sub printer, which had made hundreds of prints alongside other printers during that year, when Shirley completed her M.Sc.Colour Science and created pre-ICC colour tables to reproduce fabric colours accurately. With this carload of gear, we were able to shoot and produce a print on the spot.
The picture remained on file – a 25MB TIFF, roughly 8 megapixels, but equal to 8 megapixels in the Sigma Foveon sense as every pixel was true RGB with no Bayer filter involved. The exposures took over a minute, limiting it to still life, but the quality was not exceeded until 12 megapixel Bayer cameras like the Sony A700 appeared. And a few months later, we were producing Paterson’s catalogues and price lists and needed a cover. One list covered black and white and colour chemicals, the former mostly from Paterson and the latter from Photo Technology. Photoshop offered an easy way to take the image, and divide it accordingly. So that’s what we proposed, and what was used for the cover.
It was intended to show the gamut from plain monochrome through toning to colour and it did look very good in print, because relatively low overall contrast combined with high detail contrast is easily handled by litho.
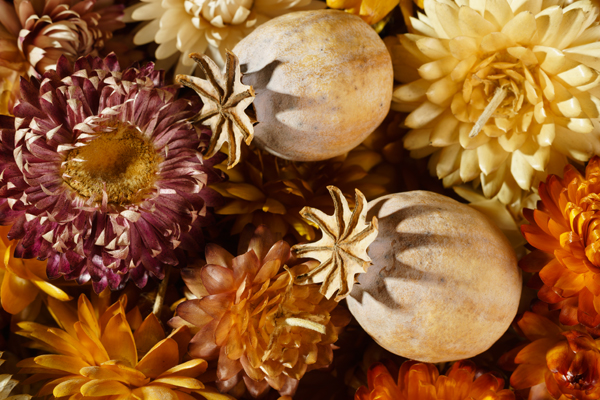
Now, forward two decades, and I’m looking for subjects to test out the latest Elinchrom ELB400 portable li-ion powered two head flash kit. This has LED modelling lights over twice as bright as its predecessor and they now really show how the light is falling even when using light shapers. I wanted to show texture using my optical Mini Spot attachment, which works very well with these new heads and their cool-running LEDs.
On top of a wardrobe, in a basket, were the dried flowers. They are called everlasting and apart from gathering loads of dust, they are. The most difficult job was holding each flower against the nozzle of a handheld vacuum cleaner to remove 19 years of dust.
The first shot I took was with the Sony A7II, 24 megapixels, using my Pentax SMC Macro Takumar 50mm f/4. Like the flowers, this is also everlasting. It’s not yet 50 years old even though the lens design, a simple Tessar-type corrected for magnifications from 1:2 (50%) to 1:10, is well over 100 years old. It’s also a tolerable lens for general scenes, though the extreme resolution it achieves centrally only covers the full frame when you focus close. With Pentax’s original multicoating in every way a match for the latest Zeiss T* as found on new Sony Zeiss lenses, and a deeply recessed very small optical unit, it has a contrast and colour saturation you just don’t find from lenses using hybrid or moulded aspherics or many more air to glass surfaces.
This picture appears, fairly small, in my review of the ELB40 in f2 Freelance Photographer magazine July/August 2015. When editing it, I was struck by the extreme resolution. Within the planes of sharp focus, it was exceptional.
So, I decided I’d shoot a new shot, and improve on the use of the spotlight attachment on the Quadra head to cast the shadows and create a sunlight-like effect – and this time, use the A7R with its 36 megapixel resolution. Although the A7R has no AA filter and is sharper in theory, the larger pixel count calls for a smaller aperture to secure a little more depth of field for the larger viewing scale, and this when using any macro lens always risks diffraction limits on fine detail contrast. For example, at half life size a setting of f/12.5 (between f/11 and f/16) which I found desirable for best sharpness distribution gives an actual f-stop of c.f/19 and this does cause some sharpness loss. If the lens was extended on a tube to give 1:1, a setting of f/16 as nearly always needed for depth of field is really a true f/32 for diffraction calculations and light readings alike.
Fortunately, our brains are sensitive to perceived scale, and we ‘see’ close ups as sharper than distant subjects even when they are not. The A7R and the Pentax macro lens also combine to produce an extreme level of textural detail, the information our eyes and brains use to see 3D solidness, shape and form in a flat photograph. So in practice you can shoot macro and use whatever aperture the subject depth demands, without resorting to focus stacking techniques.
And here, anyway, is the result. You can click on this image and it will take you to a pBase hosted full size, JPEG compression level 12 version (this is over 24MB of image data, and it is not compressed like Facebook or indeed a WordPress image – though it’s still not ‘virgin’ data).
In a couple of days, I have another SMC Takumar of the same era arriving. It’s a 35mm f/3.5, which was the cheapest of the line back in 1970 when Shirley bought me my very first brand new, marque brand lens for Christmas! We were both only 18 and that represented an entire month of her basic salary working behind the counter at Dixons in Sheffield… helped by a staff discount. It was my first Super-Multi-Coated lens and I can remember still how the high contrast and bright colours could even be seen through the viewfinder – and how amazing the first box of slides looked, midwinter close-ups of fallen leaves rimmed by frost and frozen puddles.
These lenses have never lost the edge they had, if they have been looked after, but the truth is we never knew how good they really were. We can now focus them within a fraction of a millimetre. I’ll probably never compare the 50mm f/4 SMC Macro Takumar with the 55mm f/1.8 CZ (I’ve used it, but only for low light high ISO tests on the A7S) or the 35mm f/3.5 with the CZ 35mm f/2.8 because it’s unlikely I’ll ever buy the new lenses with their inflated prices and reliance, however marginal, on software correction to be ‘good’.
I know I have not written much about the A7R, or the A7II I’m using, or about any of the new lenses I can not manage to borrow from Sony and can’t afford to buy. I have an amazing set of lenses from 12mm to 500mm for full frame, including tilt-shift, wide aperture and mirror but just one single Sony FE lens for convenience (the 28-70mm FE kit lens). In contrast, my A6000 kit is all Sony plus the Samyang 12mm f/2 because it is just so good it had to have a place.
So, please do take a look at the full size file. The critical plane for focus crosses the smooth surfaces of the two poppy seed heads and it’s in this relatively low contrast zone that the quality of the lens shows up. Elsewhere in the image the defocused quality is very pleasant (there was no CA to correct and there’s no bad colour bokeh) and the plane of sharpness passes through a few other more interesting flower details.
Finally, a word for A7II users. If you use a manual macro lens, as I do, remember that when you program in the focal length for Steady Shot you should only enter the actual focal length for distant views. For my 1:2 macro Pentax, most often used in the range from quarter to half life size, I program in 70mm as the focal length because this represents the view angle. Using a macro at 1:1, you should enter double the focal length to get the correct Steady Shot compensation. Sony and Minolta macro lenses with the D chip (eight contacts) convey accurate extension information, so the auto Steady Shot works perfectly with them. But manual, or Canon lenses on adaptors which may or may or not pass the right information through, are best used with the Steady Shot focal length entered via the menu screen and adjusted to allow for the actual lens extension.
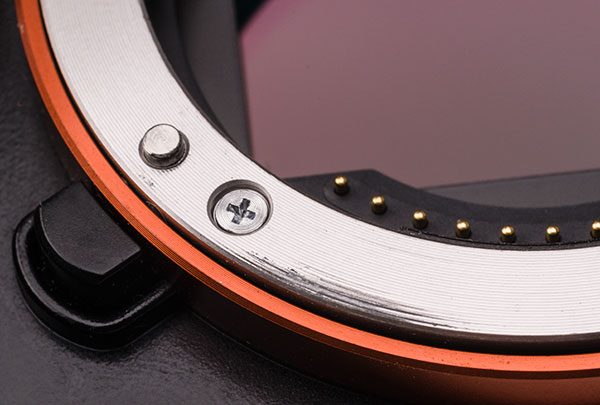
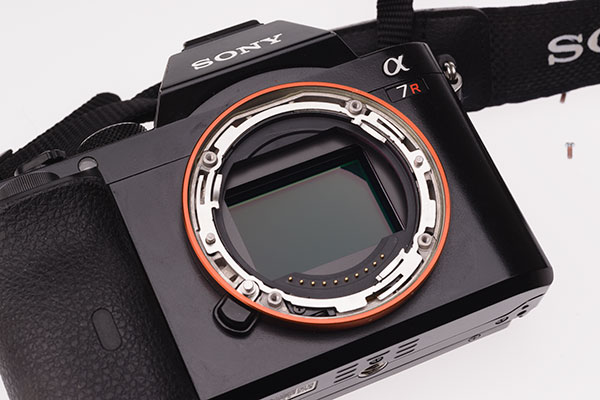
Machined from brass and chrome-plated, in the tradition of lens mounts from 50 years ago and not necessarily the best solution for precision or lifetime wear, Fotodiox’s TOUGH E-mount is a replacement body mount bayonet which you can fit to your existing A7R, A7, NEX-7, A6000 or any other metal-mount E-mount body in a few minutes. You need a clean well lit work table, a small engineer’s or large jeweller’s crosshead screwdriver, and a similar flathead screwdriver or old credit card.
The NEX/A bodies are fitted with a three-part lens mount. Here’s what a bonded, single piece, original Alpha lens mount looks like when removed from an old Minolta 7000 –
This mount is stainless steel, which would be prohibitively expensive for a small shop engineering replacement on the E-mount. It’s in two parts, a front surface and the inside with a bonded bayonet spring pressure action, a thin shim with bent ‘arms’ forming three pressure points to hold the lens tight to the mount.
From Fotodiox comes this neat box taking 10 days to the UK from USA –
Since I also ordered a focusing Leica M to E adaptor, my overall value was marked as $80 and I had an £8 admin charge and a little over £7 in VAT to pay.
Inside, the TOUGH E-Mount is boxed and bagged without instructions. For these, you visit the Fotodiox site and watch a video:
Here’s the rear face of the Fotodiox mount, which does not have any second layer of spring metal to grip the lens:
However, as we will see, this component (fixed to the mount for the A-mount design) is a separate loose item which sits in the camera body mount recess on the E-mount, and performs exactly the same function. You could probably remove it and bond it to the new mount.
So, why replace the E-mount on a £1200+ camera body like the A7R, which has a magnesium body casting into which the lens mount is anchored by four screws? The reason given by Fotodiox is that an intermediate plastic moulding is used behind a simple unprofiled mount face, so two parts make up the overall thickness. The tensioning ring sits behind the plastic ring, forming a three-part sandwich to make up the mount. The front mount is a relatively soft, crudely CNC lathed alloy.
Here’s my camera after 10 months of use. This camera has shown signs of light leaks, and has not been sent back for a fix. The mount flange is a completely flat item, relatively thin, and the leaks may be partly down to slight distortion of the front plane face, as shown by uneven wear from lens mounting.
Here’s a detail. You can see the lathe circles on the mount face, and you can see where the metal has abraded and either collected plastic from a plastic lens mount (most likely my MEIKE extension tubes) or paint from a cheap adaptor (my Novoflex and Fotodiox adaptors don’t use paint, they are anodised).
The mount is very simple indeed. It can be removed from all the cameras without disturbing the electronic contacts or the lens release mechanism.
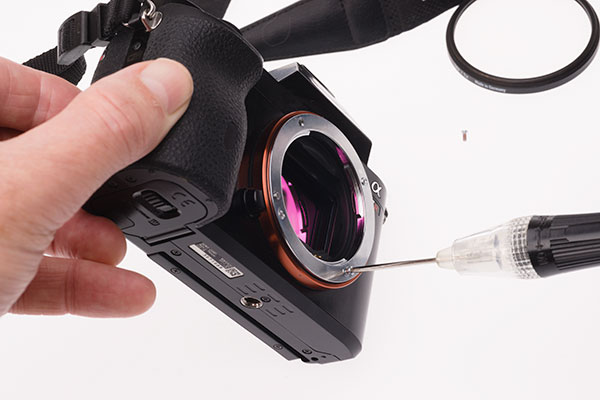
Fotodiox video shows the camera on its back and warns about dropped screws etc. I just prefer to unscrew each screw in turn with the camera held vertically on my table, so that if the screw drops it won’t go inside the camera. Care is taken not to allow the spring loaded lens changing pin to disassemble itself, but that’s really very easy.
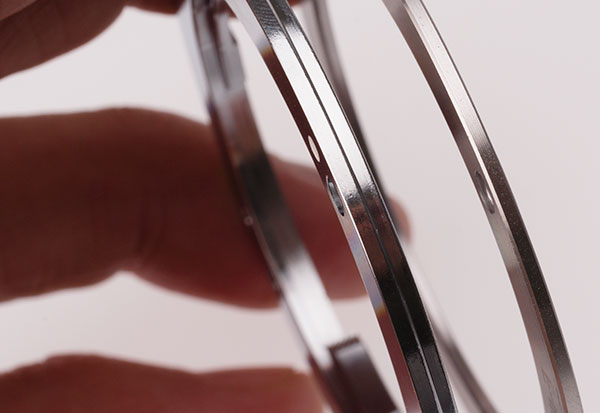
One removed, you can compare the Sony ‘washer’ (which is really more or less is!) with the Fotodiox mount – a much thicker unit, stepped to fit the recess on the camera body. A point worth noting is that the original mount has no recesses at all to fit over the four threaded posts on the camera body. Its position is maintained by two pins (at 9 and 3 o’clock) which engage in two holes on the otherwise plain flat rear face of the mount. The Fotodiox mount not only engages with these pins, as it replaces the plastic secondary mount shown below, but also has holes into which the threaded posts fit. It is better proofed against rotation.
You now see the plastic middle part of the sandwich. This is secured by a very thin double-sided tape in places. A flat blade screwdriver or a suitable cut piece of old credit card (or indeed a guitar pick!) pushed gently under the plastic at various point all round will free it. It lifts out easily. Unless you are amazingly clumsy you are not going to go anywhere near the sensor but if you have a clean 40.5mm filter or lens cap around, you can pop it in to cover the sensor safely. I used a 62mm filter to place over the whole mount when checking instructions and looking at the parts, as I don’t want to risk hairs and dust covering the upturned unit.
Underneath the plastic component you’ll find the third part of the mount, the thin flexible stainless steel tensioning ring which acts to pull the lens tight against the front face of the mount. You may note that if your lenses ever begin to seem slack, it would be easy to re-tension this ring by a gentle bend to the three arms. The four screw holes are in metal posts mounted directly into the magnesium body. The plastic ring can be argued to have no effect on precision, as the original mount rests on these posts, leaving the plastic and the stainless tension ring more as a ‘lubricated’ assembly with a little ‘give’, affecting only the tightness of the lens to the body. The plastic has no sacrificial role, as it does in many lenses (Sigma, Tamron, Nikon, and Canon all use plastic to create weak points where the lens will break on hard impact rather than having it shear the body mount off the camera – not sure about Sony).
The final step is to place the new mount, aligned with its white dot and cut-outs and screw holes, in the only position it will fit. Please note that the TOUGH wording goes inside and is not shown on the camera front! Again, I don’t place the camera on its back, and prefer the control given by holding both the camera and the screwdriver (which if properly chosen will support the screw). No pressure is needed to locate the screws for a few turns. I rotated the camera so that the screw hole being worked on was always below the sensor. Finally, when tightening up each screw in turn to a firm fit, the camera was laid on its back and my 62mm filter was placed to cover the mount opening, held firmly. You can also just place a finger against the screwdriver on the ‘inside’ while tightening up, so that if for any reason it slips, you block it from entering camera.
Once fitted, there’s little more to say. It looks a touch classier than the cheaply machined soft metal Sony original, it is a snug and perfect fit, and lens mounting has a slightly more solid feel without resistance or any scraping sensation. Fotodiox may be taking the mickey by suggeting you give the old mount to the cat to play with, of course you should keep it carefully. While doing this I discovered that the original old Minolta SR bayonet shares the screwhole locations and almost perfectly matches the overall size of the E-mount. I could actually take a Minolta SR bayonet off the front of some old extension tubes and fit an E-mount in place. This would serve no purpose but it’s a fascinating hint at the pedigree of the new system – it has a three-flange bayonet so similar to the SR mount, introduced 52 years after Minolta’s SLR debut!
Everything worked perfectly as expected once fitted (see notes below). Cost – $39.95 plus shipping. I consider it a good upgrade.
Notes on infinity focus, fit, and light leak issues
While Sony native E mount lenses seem fine, some of my third party adaptors are not fitting well, and very short focal length lenses show that the infinity focus may be affected. If you use lenses 12mm to 20mm on adaptors, proceed with caution. I am not able to get the Kipon tilt shift adaptor to mount without a forceful twist, though a similar age Kipon shift-only adaptor is happy enough (just no longer able to hit infinity with my chosen 20mm lens).
Infinity collimation after tests and measurements – I’ve now checked infinity focus using stars. I’m just OK on all but one lens and adaptor combination, and all Sony E or FE lenses are fine, as they have loads of spare adjustment (no hard infinity stop – they will all focus way beyond infinity and can handle big differences in camera assembly accuracy). Same with LA-EA3 and LA-EA4 adaptors and Min/Sony A lenses, the worst case lenses hit infinity at exactly infinity, most focus just past.
Kipon Nikon Tilt-Shift – extremely tight fit, so tight it has to pulled off the camera physically. Here I’m thinking that some very gently polishing or ultra fine emery (the sort I use for polishing guitar frets) might ease the adaptor.
Novoflex Leica M adaptor – will not bayonet-lock with the new mount, can’t work out if the flanges are obstructing the full turn or the locking pin hole is slightly off position. Fotodiox helical M adaptor locks perfectly. All other adaptors fit and lock comfortably.
Checked my Kipon shift adaptor for Canon and it’s 21.34mm from rear to front flange, and the lens won’t focus on infinity. My plain cheap Canon FD adaptor is 21.16mm and the lens will hit infinity perfectly. On the original mount, the shift adaptor was just OK to infinity – not for stars, but for landscape. So maybe 0.1mm actual difference in front face register to sensor on the Fotodiox Tough mount, compared to the Sony original.
Light leak issue – a day later I had bright full sunshine and was able to position the camera with the mount getting direct sun, and give exposures of 30 seconds to 1 minute with the lens completely stopped down and blocked off, and the ISO set to 1600. The results proved that it’s not the camera mount assembly which has most effect –
The pure black exposure above is from the 28-70mm kit zoom set to 40mm, at f/25, with the lens cap on.
This result is from a Voigtlander 40mm f/1.4 mounted using a Novoflex Leica M adaptor, at f/22, with the lens cap on. Simply swapping the Voigtlander adaptor for a Fotodiox helical focusing Leica M adaptor, which has a far wider flange and double the ‘bearing surface’ on the mount and it also a much firmer overall fit, produced the same solid black as the 28-70mm. The 10-18mm also produced a solid black though it was clear that the lens cap lets in a bit of light at the spring clip positions.
To double check, I fitted a disc of Rosco Black Cinéfoil (totally lightproof heavy metal foil you can cut with scissors) into another mount so it sat behind the back of a 50mm lens. This was a Ukrainian shift mount and Zenitar lens. This mount also has a large, black anodised rear surface. No light was admitted. I found that most of my third party adaptors let in light, usually the small angled line/crescent top right, and so did the Sony LA-EA3 and 4. The Novoflex has me surprised and baffled as it let light in over a wider pattern, and it seems to be the best engineered adaptor I have, but the well for the bayonet locking pin is shallow and perhaps too precise as the pin does now not engage (you can feel it just begin to hit the lock position).
(don’t read beyond this point if you don’t like seeing measurements…)
This adaptor works perfectly on other NEX/E bodies and worked perfectly before changing the mount. Relaxing and re-tightening the mount fitting screws, to be doubly sure of correct seating, did not solve the problem. The pin recess in the Novoflex adaptor is 2.30mm wide, and in all the other adaptors measured and also on Sony lenses, from 2.36mm to 2.5mm. The slight wiggle present on Sony lenses when fitted seems to be down to approx 0.07mm tolerance allowed for the locking pin to engage, as this is the part of the mount which limits or fixed the position of the mounted lens. Lenses and adaptors tested, when mounted with the locking pin depressed, can move around 0.5 to 1mm beyond the optimal mounting position.
It looks as if the locking pin mechanism is one area identified as a source of light leaks, and that if the pin is not allowed to engage fully (recess too shallow or not accepting the pin) more light will be admitted. All my manual adaptors varied in the depth and exact design of the locking pin well – 1.1mm deep on Kipon, 0.69mm deep on Fotodiox, 1.23mm on Novoflex, 1.1mm on Sony G 10-18mm, 1.18mm on Sony 16-50mm PZ. The 28-70mm which had perfect light sealing also has an unusual locking pin hole, almost perfectly circular not an elongated oval like all the other lenses. This was 1.2mm deep and with a 2.5mm radius. It is obviously perfectly placed and very precise despite this being a non-G, non-CZ, cheap Sony kit lens.
Anyway, 10 seconds with a Dremel and the Novoflex adaptor is now a perfect locking fit ready for another test if the sun comes out again this year.
Sony did say, back in 2010, they would make the E-mount specifications public for all to use. If anyone has information on what tolerances were specified, please let us know!
Update 30/10/14: using a high intensity single LED torch, the Novoflex adaptor problem was eventually narrowed down to light leaking through the mount between high-grade Leica mounts (Cosina Voigtlander, and Carl Zeiss) and the adaptor. Tightening the flange pressure did not cure the fault. No leak is present when using a low-cost Chinese M adaptor on a screw thread lens, which is a firmer fit. The Nokton and Tele-Tessar lenses also show no leak with the Fotodiox adaptor. It’s just an issue with these mounts – probably from the same source, as Cosina assembles CZ Leica mount lenses – and the Novoflex.
Absolutely no light leak can be identified on the A7R body with the new mount fitted. All leaks turn out to have been down to third party adaptors. The LA-EA3 and LA-EA4 give no light leaks, same for all E/FE mount Sony lenses. The Kipon Tilt-Shift (Nikon, $200+) has so many light leaks I can’t map them – every stage of the unit from the lens mount to the body mount, and all the moving parts, admit light; unit dangerously tight on Tought-E mount. Kipon Shift adaptor (Canon FD) admits light freely, especially when shifted. Canon FD plain adaptor, low cost – leaks at body mount. Cheap Minolta MD adaptor – no leaks. Cheap Nikon adaptor – OK at the body mount, lens release catch admits light freely (repaired using black putty compound but ineffective, still leaks light). Cheap tilt MD to Nex adaptor – one strong light leak in mount between some lenses (chrome flanges) and the adaptor, but otherwise light-tight to the body and in its tilt mechanism. Low-cost L39 to NEX adaptor – no problems at all. Ukraine/Kiev/Zenitar 50mm tilt combo – perfect, no leaks in any position. Samyang 12mm f/2 – small local leak at mount (top right crescent issue). 28-70mm FE – absolutely light-tight, no issues. 10-18mm Sony G – ditto, no light leak at all. 16-50mm Sony PZ – no light leak. Tamron 18-200mm – top right crescent issue. Fotodiox Leica M helical, with any lens, no problems. Focus brand Canon EF to FE mount AF adaptor – no leaks. Original 1st gen Kipon 42mm tilt device – no leaks at all.
I guess it’s time to publish another field test review of the Alpha 7R despite rarely having used the camera in anger, or in any state other than anger. It arrived in late November and caught me at a time when I was not going anywhere or doing anything, nothing was happening and the weather was just plain ordinary. We didn’t have floods, or snow, or anything else like the rest of the country. It also came with a set of problems to be solved some of which turned out to frustrate any affordable solution.
I started writing this page in February 2014. It may give you some idea of my issues with the whole current Sony system that I’ve taken almost until May to publish it. Additions have been made on December 2nd 2014.
When you’ve got a wonderful new tool to work with, it doesn’t help to have no work to do which requires that tool. This really is the Swiss Army Knife camera, a strapline I used on the first issue of the new-look f2 Freelance Photographer magazine which I took back into ownership at the end of January. The A7R has the potential to fit in my pocket and replace every single other camera I own, to use all the lenses I have bought for all other systems and formats, and to remove stones from horses’ hooves.
But, and here’s the problem, it also replaces nothing at all as well as it could. There are maybe no more than half a dozen reasons why, but they are critical reasons and any one of these reasons will limit the use of the A7R.
No in-body stabilisation and not all lenses are stabilised
No electronic first curtain means the shutter cycle is noisy and causes vibration see later comments
The sensor design prevents optimum use of rangefinder type lenses under 35mm focal length
No native full frame wide-angle lens under 24mm is likely to be available before September 2014
Any Sony FE-mount lens with a performance matched to the sensor is going to cost double its true value
No on-board GPS and (to date) no multi-function shoe GPS module to add
Single card slot only and consumer size lith-ion battery
Very slow start-up and wake up from sleep especially when not using Program, Manual or intelligent fully auto modes
Slow laminar shutter blade transit speed and flash synchronisation limit
Firmware compatibility problems with some existing E-mount OSS lenses
No provision for IPTC copyright information entry
Custom lens app can be used with manual adapted lenses but does not embed metadata in EXIF
User memory settings don’t cover functions from some menus
Apps are charged at additional cost for functions which would reasonably be free or included in a camera body with a price-tag of £1,800
No battery charger is supplied and default charging method is by micro USB cable
The rear LCD screen can only be tilted and is not reversible to face the body
The EVF even at its brightest is not up to tropical or desert viewing conditions
Auto switching EVF to rear screen is unreliable
As I have now found after five months’ use, not as durable as it looks (I have repaired the worn metal showing through the sharp edges on the ‘prism’ and body with a black Sharpie pen, but I’m tempted to use a guitar fret polishing sheet to make all the sharp edges into bright silver… just rub that thin black coating off!)
In case you’re thinking this is a completely unfair list of negative points to start a review with, well, you may be right. It’s here to make up for the usual lists of star features which *end* reviews. I’m also going to need to explain all these points. Here, to balance the negatives, are the positives.
The highest resolution full-frame sensor (24 x 36mm) currently made
The smallest full-frame system camera body
No moving mirror, no SLT mirror, and no optical low-pass (anti-aliasing) filter
18mm lens mount register allows the use with adaptors of all current and past lenses from all systems designed to cover 24 x 36mm except those which used fixed rear assemblies and front groups
Custom lens app allows corrections for any lens, while built-in function auto corrects E and FE mount lenses
WiFi and Nearfield Connection transfer file to mobile devices or other hosts with automatic small JPEG creation even when full size JPEG or RAW is the selected shooting format
Sony PlayMemories Mobile Apps downloadable to camera and devices add functions such as remote control and intervalometer, lens corrections, sensor shading and colour shift compensation
The shutter is a professional specification speeded to 1/8,000th with motorized actuation
The body is reasonably rugged, very light magnesium with some composite surface panels and is sealed against everyday dust and moisture ingress
Although you can’t hear any sound, it has an Olympus-style ultrasonic vibration dust removal process and it is stunningly effective – no big buzz, no vibrational you can feel, but it really works
A full set of buttons can be customised for functions, and there are three adjustment controllers plus a dedicated exposure compensation dial
The electronic viewfinder with 2.3 million pixels and a 0.70X virtual view is only beaten by Fuji’s X-T1
Triggered or manual magnified manual focus allows exceptional focusing accuracy when needed
The high cost of Sony dedicated lenses is offset by the quality of many low-cost, older manual lenses and the option of two adaptors for Sony A-mount lenses, SLT mirror type or mirrorless
The interface allows manual selection of most functions, including APS-C format crop or using full frame with non-FF lenses, movie audio gain, finder/screen exposure simulation, and lens corrections
This last point may seem a bit vague but it’s actually what makes the A7R usable at all in many circumstances. The APS-C crop on/off has saved the camera from having zero real wide-angle choice during its first three months of release, as our December 2013 article on the use of the Sony E 10-18mm lens showed.
Although electronic viewfinder cameras are not ideal for studio work, the high resolution of the A7R makes it an alternative to medium format for the highest quality. It can be set to ISO 50 or 100, with 14-bit raw files using a compression method which is comparable to Nikon’s lossless option. If ‘Setting Effect Off’ is selected, the EVF or screen will always show a bright auto white balanced image allowing modelling lights to be used for composing and focusing even when the actual shot will be taken by flash with a fixed preset WB. The professional or advanced user will want to have all the settings for such work stored as a custom memory preset, but Sony puts the ‘Setting Effect’ outside the saved functions. This is most frustrating as getting to it requires menu-diving.
The same applies to stabilisation, which is a function of the lenses not the camera. It is turned on or off through a menu setting or by assigning a Custom button for direct access, making occasional tripod work need an excursion into the menus before and after, unless you are to end up with OSS enabled or disabled inappropriately. The E/FE lenses have no OSS switch, the body has no switch, and there’s no one-press shortcut. Sony’s decision to omit M/AF and OSS on-off switches from the FE lenses makes the system just that little bit harder to work with. Buy a Canon or Nikon and even the cheapest lens has a stabilisation switch you can use easily every time you mount the camera on a tripod, work with flash, or use a fast shutter speed and want the optimum lens performance (achieved, almost invariably, with stabilisation off).
No in-body stabilisation is going to handle this anyway – luck, flash, a tripod or a very fast shutter speed provide the answers
Working speed
How much does ANY of this matter, if you simply fit the appropriate kit lens or prime, and just get out and use the camera? Not a great deal if you use the camera like a point-and-shoot and your objective is a small print or posting on Facebook. Given the remarks I’ve seen on-line from people buying an A7R with a view to catching their ‘toddler running around’, plenty of new owners fall into this category. They are lucky because no matter what camera they buy, from a £50 supermarket offer to a Canon EOS 1DX, they will be happy with the results and only criticise them when the family pet outpaces the autofocus in the ideal photographic conditions of their living room.
The main issue which will hit any user of the A7R is its overall operating response and speed. Acquiring focus, by contrast detection, normally seems to take around 1/4 second with an FE or E lens, but can take half to one second in low light or with a low contrast subject. It can also fail but confirm positive occasionally, and this is a little frustrating as we are not used to getting defocused snaps today. Even one fail in a hundred is a surprise. If you try the LA-EA3 adaptor, which provides a mirror-free light path and supports AF with SAM and SSM lenses, half to one second is normal in good light. You may find it worth disabling the ‘AF with shutter’ option and using only the AF button to set the focus, so the shutter release does not keep resetting it with each shot. However, after doing this I found it more than inconvenient NOT to have the familiar AF on half-pressure.
The shutter cycle
Having acquired focus, you complete the shutter release action. The A7R then executes a pre-exposure shutter action which involves closing the shutter with a movement of both blinds. This takes 250ms, or one-quarter of a second. That is longer than the mirror lift timing of a DSLR. After the exposure is made (a minimum period of about 6ms) there is short blackout dwell and the shutter re-opens to restore live view. The complete cycle is between 375 and 385ms as timed using audio and video recording and analysis.
This is not so very much worse overall than the Alpha 99 full frame SLT used with mechanical first curtain, but more of the cycle happens before the exposure, creating a surprisingly long shutter release lag. The A99, like the A77 and NEX-7, NEX-6, A6000 and indeed most other new Sony models including the A7, can use Electronic First Curtain. This means no mechanical action happens before the exposure at all. By the time you see any blackout or hear any noise, the image has already been captured, silently; the second shutter curtain closes to end the exposure and allow electronic readout. The shutter lag with an Alpha 99 or A7 in this mode is 20ms, or 1/50th. The shutter lag with the A7R can not be reduced to less than 1/4 in single shot mode.
This is also why the regular continuous shooting offers only 1.5fps, with AF and AE supported for each individual frame and 14-bit raw data. If you set Speed Priority mode, you can get between 4 and 5fps at the most with the exposure locked but AF active – however, you don’t get a real time viewfinder display, and you also get 12-bit recording instead of 14. This lowers JPEG quality in-camera as well as the headroom and dynamic range of the raw file. You’ll only get this performance by using the best SD cards. Some which claim 90-95Mbps speed only write are half or less, and are quoting their read speed.
The A7R will often remain in a card-writing state for several seconds (as long as 16 seconds if a raw sequence has been shot and buffering is queuing the images). Playback or review is not always possible without a brief wait. Since turning off auto review (which is not subject to this wait) greatly improves EVF performance for rapid fire shooting, you may have no clear idea of your shots until well after they are captured.
The simple fact is that where many competitors including Sony’s own A7 have fast responses, the A7R has an operating speed closer to a 1970s film SLR with ‘auto winder’ (the slow alternative to a motor drive), or being more charitable, to a Mamiya 645 with a power winder. It’s essentially medium format operating speed. This is in contrast to the Nikon D800/E, which offers the same file quality without a speed penalty.
Sensor shading and lenses
The A7R sensor microlens and coating structure produces not only a strong magenta-purple shading towards the frame ends with short rear focus wide angle rangefinder lenses, it also throws up a yellow-orange discolouration at the top of the (horizontal) frame. It shows some degree of this effect with nearly all lenses under 40mm focal length made for Leica M, screw, Contax G or similar mounts.
A month after releasing the camera, Sony issued a PlayMemories App which can be loaded up and invoked to record and re-use manually adjusted corrections for named lenses. These include distortion (barrel or pincushion), vignetting, and colour shading. The app does not allow the creation of a reference image or mapping mask. You can do this for Lightroom (shading only, saved as data) or Capture One Pro (shading and colour, dust and defects saved as an image). Consequently it actually won’t correct properly as it ignores the yellow-orange patch. Its limits are insufficient to correct full fisheye to normal (as found in the onboard correction which Nikon use for their 10.5mm lens) or handle typical shading from lenses like the Voigtlander 12mm, 15mm and 21mm.
This is typical of a non-retrofocus wide angle shading map produced from the A7R. The slightly magenta vignetting can be cured easily. The piss-yellow patch can not and it’s there, to one degree or another, with more lenses than you would imagine.
A different aspect of the sensor construction produces smearing. I noticed that this was minimal with the 15mm Voigtlander and strong with the 21mm. It seems to depend on the rear group geometry relative to the sensor. I ended up selling both these lenses.
Since then, I have given up on the idea of a super-compact Leica style outfit though I still have a 40mm f/1.4 Voigtlander and an 85mm f/4 Zeiss. Sony’s FE lenses are not very small and not all that attractive in specification. They do little more than return me to the kind of lens choices I had thirty years with the launch of the Minolta AF system – a slight step backwards at the time, losing the 17mm f/4 option, 24mm VFC, 35mm VFC Shift, Varisoft and many other unique bits of glass. I’m using a bunch of vintage Pentax, Minolta, Canon and other lenses in the 17mm to 85mm range. They don’t suffer from sensor shading or smearing problems and have generally proved far better than modern zooms.
My gripe with these solutions is that even if I enter a lens identity in the App, my images show no focal length data in the EXIF info, and certainly no aperture data. At the end of a long day, I have not made notes on every change of lenses. I have no idea what lens or settings may have produced a good or bad result. What I need is for every lens to be a properly dedicated FE mount one whether AF or manual focus. And I don’t want to pay Carl Zeiss a thousand pounds to get a sharp result from the type of lens and aperture specification which has been easy to make to an outstanding performance level, at modest cost, for the last half-century.
There are three lenses made by Sigma – 19mm, 30mm and 60mm f/2.8 designs in E-mount – which prove it is possible to make low cost, lightweight lenses which deliver results almost beyond criticism. Just making the direct translation of these lenses to 28mm, 45mm and 90mm f/2.8 for (say) 50% extra cost would give the A7R exactly the kind of glass it needed from the launch day. Sony’s Carl Zeiss 35mm f/2.8 and 55mm f/1.8 may be wonderful in their own right but they appeal to me as much as 35mm f/2.8 lenses and 55mm f/1.8 lenses did back in the 1970s. Not at all. They are the focal lengths and apertures you used to find on twin-lens film compacts and they’re what you still find in the scruffiest old bag of 1960s worn-out SLR kit at a junk sale. They are what my father’s Pentax kit had (plus the inevitable 135mm).
Fuji’s launch of the X-series with a fast 28mm pancake equivalent (18mm f/2), very fast 50mm equivalent (35mm f/1.4), and good 90mm equivalent macro (60mm f/2.4) paid off well and they followed up with a 14mm f/2.8 (21mm equivalent) and pro portrait 56mm f/1.2. Though not cheap, these lenses are all affordable and have been supplemented by further excellent kit, tele and wide-angle zooms. What the A7/R needs most is a direct counterpart to this Fuji system and it simply doesn’t have it.
As for the long end, I see almost no point in buying any lens made for the FE mount longer than something like 100mm. The 70-200mm f/4 may be attractive, but it’s forever limited to the FE mount while being as long as a regular Alpha lens. Had Sony made a clever two-part SSM lens for FE and Alpha, with a detachable rear tube like a dedicated LA-EA3, they would have had a winner. Instead they have the lens which Alpha A-mount owners have been waiting for – pressing for ever since the digital system arrived – made in the new mirrorless mount only. After seeing the final prices of the CZ 24-70mm f/4 and the Sony 70-200mm f/4 G, I’ve bought an LE-EA4 Alpha SLT adaptor as well as an LE-EA3 mirror-free adaptor.
But longer lenses are still much better on the Alpha mount, with its sensor based stabilisation and the larger bodies with true phase detection AF ideally suited to the wildlife, action, news and sports for which lenses over 200mm are destined. You can add an LA-EA4 SLT type adaptor to the A7/R, but these are still full-frame cameras one of which (the A7) has extremely low resolution for tele work compared to the ultimate telephoto capture machine, the neglected Alpha 77 (or its lesser spec 24 megapixel siblings).
From my point of view I’ve got an amazing camera body with a few limitations, but a menagerie of odd lenses all with even greater limitations or lack of connectivity. If someone came out with a Canon FD lens adaptor with a chip able to tell the camera I was using a 20mm and what aperture was set, that would be great.
What does work is any LA-EA adaptor with Alpha lenses. You get all the EXIF data, and aperture control from the body. What you don’t get is the smooth focusing of a manual lens, or contrast detect AF, though you do have AF calibration to fix the inevitable inaccuracy of phase detect systems. It’s just a pity the 20mm Minolta/Sony AF design isn’t as good as the 1980s Canon last version manual focus FDn.
Timing and shake
The A7R shutter is a full size mechanism. A shutter like this running at 1/8,000th maximum speed should be achieving flash synchronisation at 1/250th. The fact that this camera is restricted to 1/160th shows that the transit speed of the shutter blinds is slower than normal. There must be a reason, and the discovery (by me, and others, despite vehement denials in some quarters) that a shock-induced form of camera shake happens could be it. Sony has also disabled OSS support for many E-mount lenses. I believe this is connected to the typical shake pattern in the hands of the average user. Update: because it occurs less with unstabilised lenses, for example my 70-210mm f/4 Minolta AF used on LA-EA4 shows none of the typical patterns, I now think this is not a ‘shutter shock’ or ‘user shake’ issue but is due either to mistimed communication between the camera and most stabilised lenes, or more likely, to a brief loss of the power needed to maintain moving lens groups or elements in position whether stabilisation is active or not. A need to moderate the drain on the battery is indicated by the slow transit of the curtains (slow motor speed to operate the shutter). Otherwise the A7R would surely have had a full speed 1/8000th shutter with X at 1/250th.
I made recordings using video, audio and motion sensing methods and observed the typical results from repeated exposures with different lenses. I found that shutter speeds from 1/30th to 1/160th could be affected by a shake or double image which occurs 1/250th after the shutter has opened, looking like a reflected or transmitted shock. At speeds longer than 1/60th this jolt occupies less than a quarter of the overall exposure and is not so clearly visible as a double image. It can look worse at 1/160th than 1/80th, because at 1/160th about half the exposure can be in one position and half with the image shifted a tiny degree. A distinct double image is often shown and it’s always in the vertical direction when the camera is held horizontally.
FE 28-70mm handheld 1/80th, OSS switched on (100% detail click to enlarge). Pre-update firmware. It’s very hard to be sure, but I think the April firmware update has made the 28-70mm (originally NOT recommended for the A7R or sold with the body) perform better.
FE 28-70mm handheld 1/80th, OSS switched off.
Sigma 70-300mm OS switched on, on LA-EA3 adaptor. One problem with using any non-Sony lenses is that firmware updates have no effect on them at all. Sony don’t make a stabilised lens going as long as 300mm, yet.
Sigma 70-300mm OS switched off. All images at 70mm (many tests made, these are accurate representations of the results and tend to show that stabilisation is likely to produce no benefit).
Since some stabilised lenses including my Tamron 18-200mm Di III VC also produced this distinctive double exposure, I believe that Sony’s disabling of OSS in the 55-210mm E lens for example was done because their engineers identified the problem before the camera went on sale. I also think it can be fixed by firmware updates to Sony E lenses, but probably not for others. Update: they did not update the new black 55-210mm OSS. I think it just imposes too much battery load without an entirely redesigned OSS mechanism, or perhaps a combination of OSS and focus. Fuji has overcome this problem using very carefully balance triple linear motors in their new large lens for the X-system, the 50-140mm f/2.8 – it’s a stabilised, fast focusing lens with minimum power consumption.
In response to those who say oh, it’s a super-high resolution camera, your technique needs to be (bla bla bla!) it’s actually slightly lower resolution than my NEX-5n and far lower than my Alpha 77 or the NEX-7 I no longer have. It’s also lower than the A3000 I owned briefly, and the NEX-6 I have used as a second camera since early March. 36 megapixels full frame is 15 megapixels APS-C and that’s a lower resolution than any E-mount camera made except the original NEX-5 and NEX-3 14 megapixel bodies. I can enable mechanical first shutter curtain on any other NEX or Alpha SLT body and never see the same ‘jolted exposure’ effect with the same lenses. I can also shoot with our Alpha 700, 900 and 580 bodies and never see this shake fingerprint despite their mirror mechanism and mechanical first curtain combined.
Of course I may get shake with disabled or absent stabilisation, hand-held, with almost any digital body. I use many different cameras through the year and sometimes I get very poor stabilisation, as when using certain Nikon lenses with the earlier VR zooms on their 24 megapixel DX format bodies. This shake is random and variable, and reflects my own instability, body sway, wind chill and so on. It’s not one type of shake visible too often in shots which should not normally be affected.
Reviewers have been incredibly cautious to observe this effect. I don’t know why. I’d spotted it within a few hours of trying the camera out. Others have been fast to defend the A7R and suggest that you just need to avoid that critical shutter speed range of 1/60th-1/160th. If this was not such an extremely useful speed range that would be fine. It’s actually the precise range you most want to be perfectly stabilised and least want to have to avoid. It’s also favoured by Sony when program mode and auto ISO are used.
One way to minimise this shake seems to be to use manual focus, mechanical lenses and to favour short focal lengths. The A7R never feels or handles better than when you’ve got a rangefinder lens in the range from 12mm to 28mm fitted. It becomes like the Leica that never was, the eye-level camera which doesn’t need a separate viewfinder to handle a 12mm, 15mm, 18mm, 21mm or 24mm lens. Leica may have a good rear screen to help with this issue now but no EVF. So the next point has been a big issue for buyers.
For the latest firmware updates, and new Apps and software, see:
While I do miss the dual card slots of most of the Alpha cameras I’m using, I know the NEX and E-mount models have never had this, and with a 32GB card installed I have adapted to using the USB cable to read off new images and let the A7R charge. I do not miss the separate battery charger as I have one, and spare batteries. Nearly all the time, the camera is kept fully charged by its time spent overnight attached to the Mac. Since my RX100, RX10 and NEX-6 all work the same way using the same cable life has been simplified.
My favourite designs remain the A55, A77 and A99 all of which have had GPS on board and rear screens which enable self-filming for video demonstrations, or folding away to face the camera (how I normaly use EVF cameras now). The shared battery across the A55, A7R, NEX and A3000 models and RX10 makes it likely I might travel using a combination of these. I don’t have much use yet for the WiFi functions but I understand their importance to others, and they will really come in useful for remote camera operation in future. That can include skypole or kite work, or having a camera tripod mounted 10 metres away from the main shooting position for a different viewpoint of an event, operated from a phone or tablet.
GPS identified this as a church at Mailadumpara on the highway to Munnar – the 10-18mm lens used on full frame enabled this uncropped 36 megapixel shot at 14mm, f/11 (the shading is due to natural sky polarisation and the vignetting of the lens which I have not corrected).
I found a solution to my GPS problems in the form of a £40 igotU device from Maplin. It’s tiny (I am tempted to put a hot shoe mount on it but so far have just popped it in my shirt pocket). Free igotU2gpx file reading and low-cost PhotoLinker (buggy and unreliable in the extreme with 36 megapixel raw files) let me write GPS data into full day shoots on all cameras used. It’s not as accurate as built-in GPS and the process is tedious; the GPS data also exists in sidecar files until MediaPro is used to embed it into finished JPEGs. I’ll still buy the GPS module for the multi function shoe just as soon as Sony release it.
Top quality files
The appeal for me of the A7R is the sheer quality of the image. Even at ISO 3200, it is completely acceptable when processed carefully with Adobe software from raw. The JPEGs are mediocre with the exception of multi-shot modes and I don’t use them except for panoramas and night shots. The raw file has been criticised but compared directly with competitors, I find it has what I need – excellent highlight recovery from normal exposure levels, very low noise across a wide range of ISO, an ISO 50 setting ideal for studio lit subjects, and extreme pixel level sharpness.
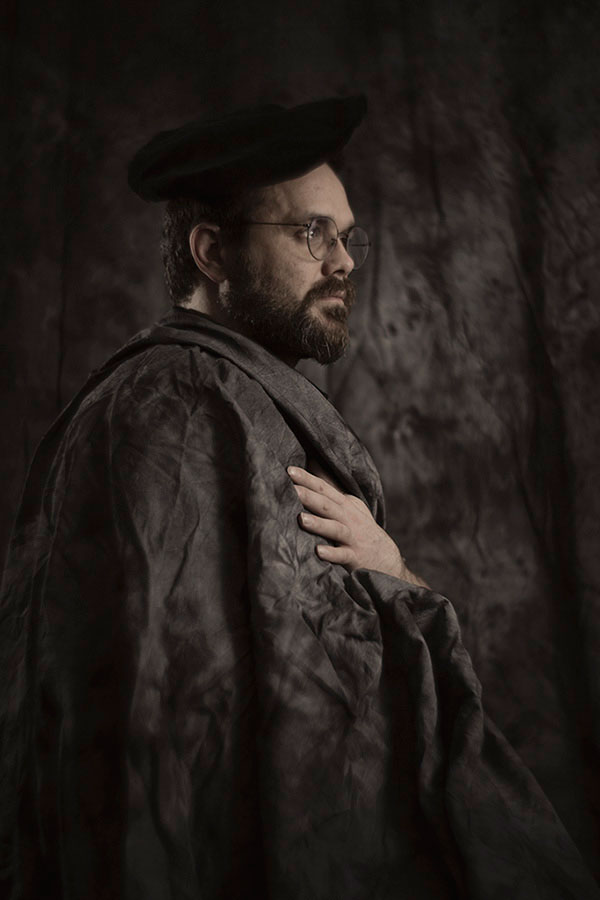
The Lomography Petzval lens used on the A7R with Nikon adaptor. This reproduction lens from an 1840s design is a wonderful tool for portraits.
Richard Kilpatrick as a Victorian portrait subject with our Interfit background as a drape – A7R, ISO 50, Petzval lens at f/5.6 (Waterhouse stop) manually focused, Elinchrom Ranger Quadra RX flash.
Manual focusing with peaking and magnification combined tells you a lot about your lenses. Find a good lens, and the peaking will be present even at Low setting, with a very narrow band of activation. A poor lens (or aperture setting) usually fails to show a peaking line at Low setting, then shows one at Medium or High which has little discrimination. I’ve been able to identify my best manual and A-mount lenses by using the 14.4X magnification and the peaking function to examine targets.
Having done this, the extra performance squeezed out of almost lenses by super-accurate focusing makes AF seem inadequate. The contrast detection AF of the A7R is good, but just invoking magnified manual after it has locked on proves that it rarely hits the perfect mark. It gets to ‘good enough’. Like many new A7R owners, I find myself often using manual focusing without noticing that it is any slower than AF used to be. It’s a quantum leap ahead of any optical finder accuracy.
I find the body shape and size ideal, and have no complaints about the position of anything except the shutter release, which could have been 3mm or so further forward, and also would have been improved by the addition of a manual cable release thread (found on the RX10). I don’t plan to get a vertical grip, as the whole point of the A7R is small size and light weight. The external finish feels secure, the battery and other doors are adequately sealed and I don’t tend to overwork them.
The small body size causes a few problems with tripod mounting. Even the smallest monopod head can restrict the rear screen movement making it impossible to angle the screen down if you want to hold the camera above head height. It doesn’t angle down much to start with. The position of the Menu button, needed to access some adjustments like OSS and Finder Setting Effect, isn’t ideal as the only button on the left end of the camera. The exposure compensation dial is unusual as a solus function using up an entire large mechanical control, and has no lock, so it can be turned a little easily.
The A7/R is so customisable that after a couple of months getting used to it and changing things you’ll have a camera as far removed from its out of the box settings as a typical Canon ends up. Mine, for example, has the AF/MF and AE Lock button/switch control set up to act as Focus when set to AF/MF (with pre-Focus and tracking lock and eye-start focus all disabled), and to act as Focus Magnifier when set to AE; while the shutter release is set not to activate AF, but to lock AE on first pressure (when using the camera in a controlled environment – when travelling, I soon reverted to AF with shutter). This makes the camera anything but point and shoot, as out of focus shots are guaranteed without a separate focus action.
In practice
Like far too many A7R users, I’ve spent half my time testing and experimenting, and not enough time shooting. I’ve had the RX10 as a companion at the same time, and needed to shoot with new flash systems, where that camera’s exceptional high speed sync makes it more versatile – there’s not much point having flash heads which manage 1/5000th duration when your sync speed is 1/160th, unlike the RX10 which can manage between 1/1600th and 1/3200th depending on aperture. I had a concert venue opening to shoot, with video, and once again the silent RX10 with its superb video quality was the obvious choice.
Then, at Easter, we had a nine-day tour of Kerala, an exceptional offer from Citrus Holidays providing us with a private driver and a packed itinerary covering 1000km and five locations. This was our first visit to India for 28 years, and would provide the first library images of India apart from a few scanned transparencies of subjects which do not date. Equipment mattered. Shirley always uses her Alpha 580 with Sigma 18-250mm OS original version; it’s heavy and the lens has been through one factory service already, but it’s been very reliable and survived a short period where a Nikon D600 kit was tried as a replacement (and sold pretty sharply, in favour of returning to the more reliable AF, AE and clean sensor of 580).
Logically, my A77 and A55 would have come along. They share the same battery type, and my basic lens set 8-16mm, 16-80mm and 70-300mm gives both exceptional wide angle and a good tele performance (300mm plus APS-C plus 24 megapixels) for wildlife. It is however a very heavy kit and we wanted to travel light and work light, in high temperature and humidity.
So, the A7R had to be my choice. Apart from anything else, this camera at £1800 had not so far proved ‘better’ for any given job – it was barely used. In the studio our A900 and A700 optical finders just work far better than any EVF camera, and for general PR and social photography the last thing you need is 36 megapixel full frame. It just creates oversized files and tends to have too little depth of field. The A7R had been used for tests, for some winter landscapes, and some architectural shots. We had not travelled at all since early November.
This decision also led me to leave the RX10 behind, and this was a big mistake. I took the RX100 instead because the RX10 is fairly large. Its zoom range and silent operation would both have been valuable. With the A7R and its 28-70mm OSS lens I took the 10-18mm OSS, my Tamron 18-200mm VC DiIII, NEX-6 body and 16-50mm OSS collapsible kit lens. This was really a backup in case any fault developed. In practice the A7R makes a better APS-C camera. I only used the 28-70mm lens once, and used the wide zoom and the Tamron fairly often on the A7R with APS-C crop, occasionally with crop disabled. While it’s possible to get a bit more wide-angle from the 10-18mm by shooting full fame, the 15 megapixel crop is a 100% perfect frame every time with this lens.
Despite the phase-detect focus of the NEX-6, this camera proved less accurate and slower in all conditions. Its main benefit was better timing for shots once the finder image is focused and stable, along with quieter operation. It may be a smaller body nominally but there’s little practical difference. Also, I was wearing a baseball cap, the minimum headgear needed in the sun. The left-end viewfinder eye position prevented a right hand ‘on top’ vertical grip on the NEX-6 while the central eyepiece of the A7R allowed a choice of grip style without having to remove the peaked cap.
The most significant loss my choice involved was telephoto power. Shirley’s 250mm f/6.3 reach on APS-C would have demanded a huge lens, a true 375mm or in practice a 400mm, to get the full benefit of 36 megapixels on full frame. It would also have demanded at least one f-stop more stopping down to match the critical long lens depth of field. I didn’t have an E-mount 24 megapixel body, but if I had one my 18-200mm would have slightly outreached Shirley’s 250mm as used on 16 megapixels.
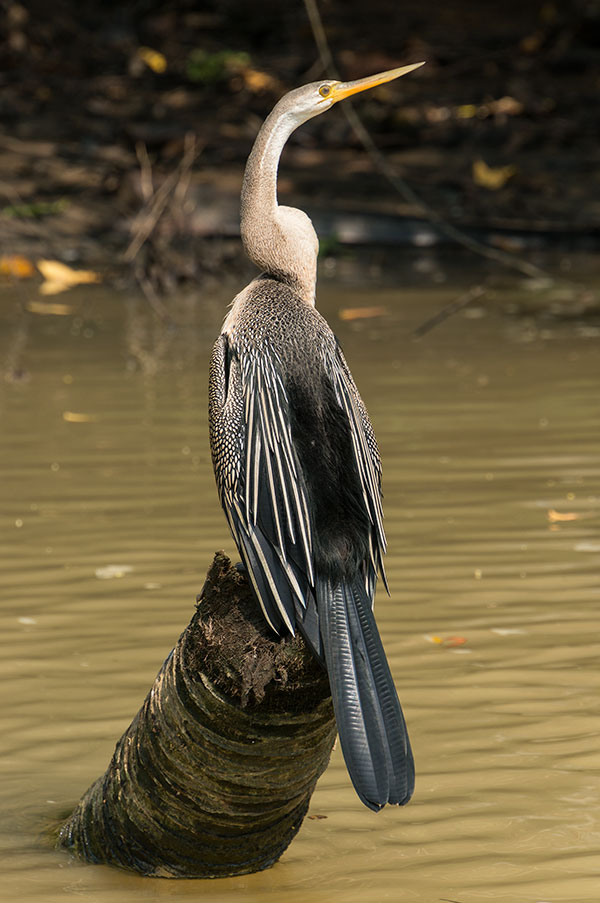
This snake bird (anhinga) was photographed using the NEX-6 and 18-200mm (162mm and f/8), from a moving boat. There is no trace of shake at 1/250th, indicating the VC stabilisation works on this body. I got excellent results from the NEX-6, which I picked up at The Photography Show on March 4th with its 16-50mm collapsible motorized zoom on a special deal. However that deal was not as good as the current B+H of $524 with free accessories.
There are no lenses yet made longer than 200mm for the FE mount. If there are any made other than an obligatory zoom to 300mm they will be expensive and limited to the E-mount system for ever. In contrast a Canon, Nikon or Alpha SSM long lens will always be usable on SLR-form bodies and also on mirrorless – possibly on various mirrorless systems. Canon EF lenses for example can be used on almost all mirrorless bodies, and Nikon teles have the possibility of fitting to their 1 system 2.7X factor bodies with totally successful functions and focusing. I’ve tried this and it works – an 800mm equivalent with outstanding image quality, from a 300mm.
It’s for these reasons I have succumbed to ordering an LA-EA4. I value the LA-EA3 because it allows me to use some lenses with contrast detect focus and a pure image path, but my favourite 70-300mm Sigma OS will not CD focus. Buy the EA4, and I can use all my screw drive Minolta and Sony glass.
This is why I sill feel the A7R can be described as the Swiss Army Knife! It can do APS-C as well as its 16 megapixel APS-C siblings, but switch to use full frame to squeeze extra angle from many lenses. My Tamron 18-200mm is only just compatible with the A7R – its VC stabilisation and general performance indicate that a firmware fix might be needed (see earlier comments) – but it can give me a 19 megapixel image sharp corner to corner with a range of image sizes from square to 35mm, at 18mm and f/11, making it as useful as a 16-200mm lens instead of an 18-200mm.
In March, I needed to write up the Samyang 24mm Tilt-Shift lens, which was only available for review in Nikon mount, and needed a full frame body. The A7R with a low-cost Nikon adaptor did the job perfectly and the magnified focusing function allowed full and successful use of the lens functions. I now have a wide range of lenses and adaptors, and there’s no manual lens I own which the A7R can not use.
The Samyang 24mm Tilt-Shift f/3.5 manual lens has better control over movements (including 30° intervals for independent rotation) than the Canon or Nikon in the same focal length, though it lacks auto iris, EXIF data and focus confirmation. Here it is used with a low-cost manual Nikon adaptor.
Using the 24mm Tilt-Shift – a lesson here in floor/ground and ceiling/roof relationships and camera position. First shot, a typical eye level architectural compromise in which a normal wide angle keeps the verticals straight. The trade-off is that you get a similarly generous view of both the floor and ceiling. Second shot, moving the camera close to ground level. Third shot, applying a full vertical shift; the floor is now seen from an angle giving it much less emphasis, while the vaulted roof is seen from below. For real estate shots, the camera is usually placed close to the ceiling on a tall tripod, and a drop front applied, to show the extent of room interiors better by emphasising their floor area. This is stuff I learned 40 years ago working with 5 x 4.
The A7R stabilisation incompatibilty issue with the Tamron 18-200mm was ‘tested’ at considerable cost in lost shots. During most of the Kerala trip, fortunately including a few chances to get close to wildlife like the anhinger shown above, I used the 18-200mm on the NEX-6 for the slightly higher resolution and faster response. I’m very glad I did this and put the A7R away. No shot shows any sign of stabilisation failure. Finding a dramatic sunset location with rocks and predictable spray from breaking waves, I used the same lens on the A7R, which I had taken to the beach to produce some tests showing full frame coverage.
One of my frame coverage tests of the 18-200mm on the A7R. 175mm, 1/200th at f/9 – conditions which with stabilisation should result in a perfectly sharp result almost every time. Instead, this combination produced a jerked slightly double imaged unsharp shot every single time. Even at 21mm focal length this degradation was visible.
All the images (full frame tests and rock sunset shots) showed the same characteristic stabilisation jerk even at 1/320th, which I had not considered possible as the peak vibration from the A7R shutter occurs 1/250th after the shutter opens. It may not be shutter shock which causes this shake effect, but a firmware incompatibility (in timing signals?) between the A7R body and certain lenses.
Here is my processed image put through the new software Piccure, which I can recommend as the first program to analyse and remove shake effectively – see http://intelligentimagingsolutions.com – and which has significantly improved some of my A7R ‘shaken up’ shots to the point that when reduced to 9 megapixels, they are as sharp as you would have expected from a KM Dimage A2 (ah, the irony… we do make progress, don’t we?). Click the above image for a full size screen shot.
This was my final crop and process from the shot involved, which was an 18.2 megapixel ‘more than APS-C’ crop from the full A7R frame, sharpened using Piccure and reduced to 24MB final image size.
This sunset, and all the similar shots taken with the 18-200mm on the A7R, proved too badly affected by stabilisation malfunction to use at the desired full size.
Again, Sony’s decision to disable OSS with many lenses on the A7R only, and to issue firmware updates to enable this, supports this theory. Whatever the case, I lost all my first night’s sunset shots for anything except web sized use (above – it’s not sharp for printing or library use). We returned two further nights at the right time and tried various combinations. It was a subject not helped by heat haze and blown salt spray (UV filters were fitted, of course, and needed cleaning frequently to avoid the whole picture being softened).
It’s so bad it almost hurts your eyes, but this was the focus point of many shots, and the double image (always in the vertical direction when the A7R was held horizontally) from the 18-200mm Tamron consistently gave a result like this. You might also suspect inaccurate focus and poor lens performance, but plenty of other shots at similar apertures and settings on the NEX-6 were completely OK. Perhaps the only answer with the A7R will be the near-£1,000 70-200mm f/4 G and replacement of the 28-70mm with another £1,000-worth of 24-70mm f/4. All that to get me back to where I was thirty years ago in terms of aperture and focal length range!
Using Piccure had no useful effect on this shot. It created triple outlines of the shake in place of double.
Eventually I got what I wanted but only with the 70mm reach of the 28-70mm OSS lens. The final, third, visit had cloud cover as the sun reached the right position. But, if you want to try this for yourself, visit Light House Beach in Kovalam at around 6.00pm (get a beer and wait) around April 16th-22nd. Like all such sunsets, there are just two times each year where the sun will hit the right position over the horizon.
The 28-70mm really didn’t have the power to give me the sun at the size I wanted, but at least with Photoshop processing this was a more or less acceptable result. For any shot like this, I would far prefer to have a true mirrorless camera – no SLT mirror either – and the A7R should be a perfect choice. Tripod use was not an option because of the crowds (which you can’t see) and combination of incoming tide and wave.
There was one lens which never let me down – the 10-18mm OSS. Whether on the NEX-6, A7R crop or A7R full frame this lens always turned in a perfectly focused and well stabilised result.
At the end of our Keralan tour, we were invited to have lunch and a short tour of a major ayurvedic resort hotel, Isola di Cocco. The tour only took twenty minutes, seeing some of the rooms, and was at mid-day when the light is not ideal. I took a few shots on the A7R including room interiors, and sent small versions to our hosts afterwards. The outcome was a request for commercial use of the image set in their next brochure. These were not exactly what we would do on a commission – for one thing, we’d normally remove towels from round the pool, pick the best time of day, make fine adjustments to room details and even use lighting.
A pool needs to be very clean to handle a shot from three inches above the water surface (at 10mm).
This is what we we used to do in the 1980s producing brochure pictures for travel operators and it was never a casual thing, more a very long and full working day with many appointments and too much driving. These shots were quick snaps, even if professional snaps, and we agreed to use for a charity donation (all Indian businesses seem to support local charities as a matter of routine).
We’d be more than happy to go back and do it properly though!
Back in the 1980s we had nothing to approach the 15mm equivalent angle of the 10mm used on crop frame A7R, even though a few such lenses did exist for 35mm systems. 35mm was like using a 6 megapixel camera, and our shots had to stand full page to double page use. I used a Pentax 6 x 7 with its widest non-fisheye 45mm lens and that was equal to a 24mm, something you can now find at the wide end of many compacts. It had to go on a tripod, as the exposure times with Fujichrome RF 50 film (for shadow detail) with the f/16 or f/22 apertures needed for sharpness in depth were usually around 1/4 to 1 second. The tripod was one you couldn’t easily take by air today, and the camera kit with two bodies and three lenses was heavy and bulky. Then there was a matter of a hundred or so rolls of film to handle the five bracketed exposures for each frame, lead anti-X-ray bags, and a large Metz flash with an extension head… and our 35mm Minolta kit on top of it all. Each room could take an hour or more to photograph.
Raw conversion controls enable the rich teak wood interior to be shown clearly without losing the highlights of the wall and white sheets.
And here I am today, complaining about aspects of the A7R when I can walk into a room like the one above, without a tripod, find my viewpoint, observe the horizon level display while composing carefully, and make an exposure at ISO 1600 with quality equivalent to ISO 100 35mm film. With a lightweight carbon-fibre tripod, this almost Leica-sized camera can now outperform anything we might have expected from 6 x 7 film and at ISO 50 is good enough for wall-sized prints and poster reproduction.
We have some aspects of A7R technique and performance to ‘fix’ and you’ll realise that I do not approach using any new camera uncritically. But there’s nothing else on the market short of medium format which can match what it does.
I do not address, here, the demands of users wanting to switch from conventional heavy-duty SLR type cameras whose gear includes fast long apo telephotos and zooms, who work frequently with sequence bursts, require to track sports action, shoot news, capture wildlife or want to snap their kids and pets (which requires much the same camera performance as covering sports and news… they may move slower but they are much closer!).
My present thinking is that the new 12 megapixel A7S with its 4K motion picture capture and extreme low-light performance may not be what I want, but I’m considering adding an A7 or changing the NEX-6 for an A6000. I’m not quite ready to sell the A900 or the A77. I’ll see how the A7R performs over the summer and update in due course.
The A7 MkII with full-frame stabilisation, announced in November 2014, tends to put my theory about power drain and lenses into doubt, but only because I might assume the 5-axis sensor stabilisation also puts a heavy load on the battery. It does have the different shutter mechanism found on the A7, and of course, it does not have a 36 megapixel sensor to power.
The Sony E-mount (not FE) 10-18mm f/5 OSS lens can be used effectively on full frame for creative work and within limits for technically more demanding shots. Below, an uncropped A7R shot of the concourse at Abu Dhabi Airport, taken at 13mm setting, f/6.3 with my lens profile as provided below. Check the straight lines in the floor tiling, if you doubt that this lens would be of any use for architecture.
However, you don’t get this without a lens profile, and without due care to limit the focal length to a range of 13 to 16mm – not the full 10 to 18mm. Below, you could get this if you try 12mm straight out of camera…
This is a pretty awful case of vignetting and distortion – as you would expect. It’s from an APS-C format wide angle zoom, the 10-18mm f/4 SEL OSS lens for NEX, used on the Alpha 7R full frame mirrorless body. Early in the launch period of this camera, various far more attractive images appeared on-line using subjects like roads, rail lines, beaches and even shop counters where the lines look straight – rather like that drainpipe – because of where they fall in the shot. As you can see, anything with a horizon near the long edge of the framewould have given a very different impression.
However, Adobe offers a free utility which enables you to make lens profiles to correct vignetting and distortion.
I created a lens profile for ACR/LR using full frame and the 10-18mm on the A7R. The vignetting is such that the profile creator really can’t handle it, and overcorrects the extreme corners as a result. I’ve done f/4, f/8, f/16 at 12, 14, 16 and 18mm focal lengths using an A2 chart; for a lens like this, a much greater working distance and an A0 chart would really be desirable. The link below is to a zip file of the Adobe Lens Profiles I produced – for A7 and A7R, with .lcpp files for final use, and .lcp files for different settings of the 10 18mm I found useful.
At 12mm you can probably see the vignetting artefacts in the corners, the magenta corner shift and incomplete correction of the horizon line. You’ll also be quick to spot that the 12mm coverage has been reduced to something much less, lens profiles always reduce the field of view (they can not do otherwise).
The profiler simply can’t handle the degree of sudden fall-off in illumination given by the 10-18mm used on full frame. Manual distortion corrections can actually do a better job. At other focal lengths, the profile I’ve made works well enough, and if the frame is cropped slightly (still exceeding the APS-C area the lens is designed for) it’s possible to get good results and wider angles.
I have sold my Sigma 12-24mm HSM II which was used with the A99, and also sold a Voigltander 15mm f/4.5 I bought to test (zero cost fortunately, as it made a small profit between Gumtree source and eBay destination). The Sigma was not only very difficult to focus using CD, its HSM motor won’t play with Sony CD.
Just for good measure, here is an uncropped A7R 13mm focal length shot of the church of Maila Dumpara in Kerala taken to use dramatic converging verticals – which fail terribly unless the lines are properly corrected, the last thing you want in a strong upward angle is lens distortion. It’s very stiff test of any lens to do this. I have left the vignetting uncorrected. I rather like it. Click either this or the Abu Dhabi photo and you’ll get a larger image, about 1000 x 1500 pixels.
Samples produced for a dPreview forum question
There’s been a lot of discussion on dPreview forums of which lenses work on full frame E-mount, as Sony saw fit to put a Disable APS-C crop option in the menus of the A7 and A7R (almost as if they wanted owners to experiment). They have made other welcome changes of a similar kind which I’ll cover in a full review of the camera – which I can not do yet as I have no FE mount lenses for it, and with the current choice and prices, I can see I may never use FE mount lenses on this camera.
So, to answer some questions on dPreview’s E-mount forum, I posted these images and comments.
Here is a ‘native’ uncorrected shot of a local building taken on the 10-14mm on A7R at 11mm, f/10, ISO 100:
Here is the result of using the profile, doing a crop and some straighten of slight rotated tilt, and pulling the scale down (with the profile applied, the roof apex is clipped off at the top as the lens has so much distortion its 11mm probably becomes more like 15mm when corrected):
I’ve used some clarity and local burn adjustments on the sky to treat the image more or less as I would (except that I wouldn’t actually photograph this building at this time of day, with blinds drawn, etc).
For me, the 10-18mm on A7R with our without the profile correction offers the same options as using assorted lenses on 5 x 4 sheet film. It never mattered whether a 47mm didn’t cover the entire film, you got an image circle and could use whatever part of it you want. At 10mm the image, with the profile used, has strong corner cut-off but the overall circle of usable image greatly exceeds APS-C provided you stop down (f7.1 seems just OK, f/10 is maybe optimum, I’d certainly try f/16 despite fears of detail loss).
The red crop mark is square – my ‘Hasselblad SWC killer’, as the classic SWC had just a 38mm wide angle lens. You needed to get an Arcbody with 35mm Rodenstock to go any wider on 56 x 56mm film (6 x 6). With the A7R and 10-18mm at 10mm, you get the equivalent of a 24mm lens. Not a 24mm fisheye on 6 x 4.5 like the widest ever offered by Mamiya… a 24mm rectilinear on 6 x 6.
The yellow crop mark represents a significantly larger area than APS-C (which is actually just a little under the 24 x 24mm square in width). It is shifted vertically, as if the lens was being used as a shift lens. If only the APS-C area is considered, its approximately 16 x 24mm area can be positioned right to the top of the frame, equalling a 4mm rise, or the equivalent of using a 6mm rise on a full-frame PC lens (most actually go to 11 or 12mm rise). There is only one lens made which can compete with this, and that’s the Canon 17mm f/4 TS. Admittedly this is a superb lens and when stopped down to f/11 and used on the 6D (Canon’s most shift-friendly sensor) will blow this result away for clean rendering of detail toward the frame edges.
And then, you can still use the 10-18mm in APS-C crop mode as a snapshot wide angle with pretty much perfect correction (Adobe’s own Sony profile for APS-C), for videos too.
Although some of my information back in September was off-mark (writes David Kilpatrick), the post which I put up here was definitely right about the new A7 or rumoured ‘full frame NEX’ being based on the RX body design. I gather it was not the Alpha division, or the NEX division, which handed the prototype cameras to photojournalists from Magnum and Panos agencies. It was either Sony management at an even higher level, or the Cyber-shot division. The photographers involved had previously been using the RX1. They were given the pre-production A7 as a development of the RX1. It may even have been produced because Sony got the feedback that an RX with interchangeable lenses would be great.
Richard Kilpatrick attended the London launch event on Wednesday 16th October and has a small gallery of JPEG shots taken with prototype or pre-production bodies and lenses:
Richard also relays these comments (now finalised and properly written, evening of a busy day):
Both cameras are deceptive; you simply don’t expect this image quality out of something that light. It’s not like carrying a Leica, where you’re wielding something that might double as a weapon – the magnesium body and full-frame sensor feel solid yet after carrying my regular full-frame SLR, it’s a genuine shock.
The Zeiss lens on the Alpha 7R I used, the 55mm F1.8, looks to be exceptional. When first looking over the JPEGs, I went straight to the corners – the clarity, the even illumination, just instantly impressive. The kit lens I didn’t spend as much time with, and I tried it on the 24Mp Alpha 7 mostly investigating the AF, but I would be opting for primes anyway on this body. I’m curious to see how it handles Leica M-targeted lenses – there will undoubtedly be a 15mm or similar, but one of my favourite inexpensive lenses on the M9 was the Voigtländer Super Heliar II, which showed dramatic falloff and magenta tinges in one corner on that full-frame CCD. It was possible to correct, it seems Sony’s work on short registration full frame may be extremely successful, or their lenses are very well matched. Either way, it works.
I’m not very familiar with Sony’s user interface, and I found some controls slightly unintuitive – on this pre-production model, I couldn’t change the ISO whilst the file was being written. That’s the sort of thing which if I’ve left it set to Auto, or simply hadn’t been paying attention between uses, I might want to do – noticing an incorrect exposure and wanting to rapidly correct my error and reshoot.
Other areas of the UI impressed. The animations for aperture and so forth as you adjust the wheels are quick, clear and unobtrusive, whilst still providing the feedback that would allow less experienced users to see which direction they’re heading and what options are available.
The main screen is very nice. Sharp, and I’m a big fan of articulated screens that allow the use of a camera in a “waist level finder” format. Felt solid, robust enough to cope with professional abuse.
Card door and battery compartment aren’t combined, which is a bonus on a compact body. It also has a well sculpted grip. Perhaps it’s unfair to make direct comparisons, but let’s say I prefer this sort of body design to the flatter, more ‘retro’ inspired mirrorless options on the market.
Can not mention this enough, it’s tiny. It’s properly tiny. Not tiny like “well, it’s as big as a classic SLR from X manufacturer, but it’s packing a tiny sensor in there” – it’s “35mm film era compact body” tiny. With a proper, serious sensor in it, the design compromises to achieve a digital, high-tech UI in a small form factor feel like a much better trade than if you’re working with small controls and sacrificing sensor area.
Port covers are hard plastic, hinged, a bit annoying (rubber ones will at least bend if you catch them by accident). Again, lack of familiarity with Sony catches me out here, as the accessories I’d often expect to hook into the ports use the hotshoe accessory port. An adaptor for the earlier hotshoe is available and about £25 apparently, I was more concerned that I wouldn’t be able to use a regular wireless trigger and thus finding a conventional – albeit very sophisticated – hotshoe was reassuring. I wonder how many regular professionals share that perception – that there will be a non-standard interface on the Sony body.
Shutter sound is very solid, mechanical. A really nice sound. There is not a fully electronic shutter mode available, so no silent shooting, but it’s discrete enough.
Ergonomics are really good. The wheels are logical, I found my way around it very quickly on the whole, though without the experience David has of Sony’s software I didn’t know where to find specific features right away. It was logical enough for the main features, such as setting file size and type. There’s an optional battery grip, though it’s really not vital for changing orientation – the camera is so light, one handed shooting and quick rotation is easy.
I am not a fan of EVFs, though I’m happy to work with them if that’s what I’ve got, an optical viewfinder will always be my preferred route. That said, the EVF really did impress. It’s very sharp, has an impressive refresh rate and of course, somewhere there’s a lot of data being shifted to generate that 2.4Mp image. Cannot deny the technical accomplishment! The overlaid virtual horizon was useful and unobtrusive, though I wasn’t clear on what focus point I was using due to my lack of familiarity with the interface.
Sensor exposed when lens detached. This is common on mirrorless bodies, but I’d really like the option for the shutter to close when detaching a lens. Pros do not treat their kit the way an enthusiast or amateur will cherish the substantial investment – the job, be it on sandy beaches, muddy fields or pouring with rain at a wedding, must take priority and the cameras and lenses get subjected to abuse.
I want one, in an abstract way. it’s really very nice. To expand on that – I’ve a feeling when I see what the finished firmware and raw files offer, and have had more experience with the Zeiss lenses in particular, the shift to an EVF is a change I’d willingly accept for the size and quality advantages, but it’s also just a lovely bit of design. Really appealing.
Sony want to move to pro market. Sony have pretty much always had good glass and bodies, but this offers something really unique that should appeal to many professionals – not least because of that 36Mp sensor.
NEX brand is no more. All models will be united under the Alpha brand, with A, E and FE mounts (Alpha, E and Fullframe E) – Richard Kilpatrick
That it should use the NEX E-mount (already used for full frame on the VG-900) was never in any real doubt, though other prototypes may have existed using a different approach. Today, worldwide, the A7 (24 megapixels full frame with Phase Detect focusing pixels on the sensor) and the A7r (36 megapixels without PDAF, but with AA filter) were officially announced.
Compare the body here with the RX1 below – and make a special point of looking at the film plane index mark on the left-hand top plate end. You’ll see that the sensor is positioned much further forward in the A7 body, as the FE mount has the same 18mm register as the original E-mount (including the RX-style decorative orange lens throat bezel) and the RX body is thicker than a NEX even before this is added. This enables a flush-mounted double hinged rear LCD screen, but it’s not a fully articulated or reversible screen, which is a pity.
You will also see that the entire body has been extended in length, despite the RX being full frame.
This is necessary to accommodate the mechanical drive for the focal plane shutter, which sits more or less between the lens and chunky right hand grip (the RX has no FP shutter as it uses an interlens design). All other principal aspects of the A7 stem from the RX design but the construction is not the same, with multiple magnesium body components sealed together and a different set of interface covers.
The cameras include WiFi and NFC (NearField) communication to enable cable free transfer of images. It does not have built-in GPS but a GPS module is expected for the Multi Function Accessory shoe. The cameras have 2.3K dot 0.71X 0.5 inch OLED EVFs, essentially the same as the A99 with a similar generous eyepiece size and auto switching.
There also appears to be some extra depth to the body. You could dream that the extra body depth, length and height conceal the required mechanism for in-body stabilisation… but it’s just what is needed for the focal plane shutter.
We had hoped that the 35mm f/2 lens would be replicated, but this was not to be despite some information that the 35mm being used on prototypes was ‘the same’ as the RX1. Instead, there’s a 35mm f/2.8 Zeiss. I will admit to being underwhelmed by that, as it puts the A7/A7r into a category which almost every camera ever made matches (very few cameras can’t achieve a 60° view angle at f/2.8 – it’s what the cheapest compact 35mms used to start with). It is not stabilised.
One zoom lens also announced – a lower cost stabilised(?) Sony G 28-70mm f/3.5-5.6 – also fails to set the heart racing (or the hands racing for the wallet) when you consider its modest aperture and fairly substantial size. Unlike the 35mm, it has a rear ring which is marked for aperture adjustment like the RX1 (silent or clicked at choice). The FE mount, while compatible with existing E-mount lenses and accessories and has the same ten-pin contact array, may have additional protocols to handle the on-lens aperture setting.
The 28-70mm zoom is not a true parfocal, it’s similar to lenses such as Canon’s 18-135mm sold with their EOS 70D which almost negates the value of on-sensor PDAF by having massive focus shift when zoomed.
If you want contrast detect focus to work, you need parfocal zooms. You need to keep the subject as close to being sharply focus when you zoom as you possibly can. This zoom does not have a constant aperture though setting it to f/5.6 or smaller may have that effect, and it has a large varifocal range (closest focus at 28mm is 0.30m, at 70mm, it’s 0.45m).
Looking at this, I feel that the 24-105mm Sony f/3.5-4.5 D I’m using on my A99 has real appeal.
This shot shows a Carl Zeiss 24-70mm f/4 OSS lens, not a kit lens, but an option at a high price. This is a more realistic range. My guess is that this lens will not only be a constant aperture (regardless of setting) but also parfocal so zooming during video will not force a refocusing process.
The A7 models have audio manual level control during video and a conventional 3.5mm jack for mic input, clean HDMI output for professional external recorders, and for stills only (not video which remains 1080 50/60 or 25/24p – there is no 30p option) the camera will play back at 4K resolution for the new Triluminos gamut Sony 4K televisions.
The final lens of those released with the camera is a 55mm f/1.8 – again, a slightly odd choice for an expensive standard angle lens of reasonable speed without being special. Bear in mind all these lenses are weathersealed and built for professional use, with the kind of smooth focusing and aperture control required for video as well as stills. A 70-200mm f/4 is also released, putting a total of five lenses in the showcase for launch despite the absence of a true super-wide.
A brand new LA-EA4 Alpha mount lens adaptor provides phase detection AF via an SLT mirror, and has sufficient clearance internally to prevent image cut off (the LA-EA2 casts a shadow on the sensor as it has a smaller throat). A new 70-200mm SSM G II A-mount lens has been launched today as well as is picked out by Sony as compatible with this adaptor.
For most potential buyers, the preview of many other lens adaptors – for Leica and for Canon, as examples – will not just be an added attraction, it will be a essential function. It would be interesting if the FE-mount allows adaptors with their own aperture ring controlling lenes such as Nikon G, and reporting EXIF correctly to the A7’s CPU. That kind of detail we’ll have to wait to learn about; most early reviewers will have other concerns. Adaptors are vital because this camera is launched in sharp contrast to the original NEX-5 and 3 models, with at the best a semi-wide prime lens and a basic wide angle on its zoom.
The NEX system set off with a 24mm lens equivalent, an 84° angle of view considered to be the most desirable all-purpose wide angle, in the box. The NEX SEL 16mm f/2.8 may have had its critics and its QC problems, but it’s become a much-loved lens and got hundreds of thousands of NEX owners off to a great start needing no other wide angle lens. It also had the 12mm wide and 10.5mm fisheye adaptor options at modest cost, meaning that those who wanted true wide views had no reservations buying into the system.
The A7/r is in sharp contrast to this, without no prime in the launch range shorter than 35mm. Professionals would definitely want to have a fast 24mm (and a faster 35mm!) and a geometrically good 20 or 21mm. The Leica 21mm Super Angulon was almost the standard lens for photojournalists from as long ago as 50 years, reaching a peak of popularity in the 1970s, still considered vital when you’re in a tight situation with crowds. The A7 is an incomplete professional tool until it has a moderate sized, f/3.5 or f/2.8 20-21mm. Vignetting is acceptable as long it’s not accompanied by a colour shift. Vignetting actually helps with the look of the images!
The AA filter
The A7r with its D800 level resolution (but a sensor not related to the D800) has the AA filter removed, as in the RX1r. I have tested the RX1r against the RX1 for the British Journal of Photography and I’ll write here about the whole issue of AA filters and moiré only after the BJP has published my report. I will say that the moiré is not a minor issue, the RX1 standard version is already capable of throwing up moiré as it has a very weak AA filter, and the RX1r is bitingly sharp.
So why does Sony do this? It’s hostile to video though the scaling down from the 6000 pixel sensor to a 1920 pixel HD frame is accompanied by moiré removal. The answer lies in conventional contrast detection autofocus. AA filters reduce fine detail contrast and tend to smooth the luminance peaks and troughs used by contrast detect focusing to decide when the image is most sharp. Removing the AA filter has a small but significant effect on the speed and accuracy of contrast detection focusing, along with an improvement in many irregular textures like distant woodlands, lawn grass and human skin. So if you incorporate image processing able to remove some of the resulting moiré, it makes sense. This is the route being taken by most other makers now to get the best possible live view auto follow-focusing.
The A7r sensor has a sensitivity of 100-25,600 expandable to 50, and to 51,200 with multi-frame noise reduction.
The battery
The RX1, like the RX100, charges via micro USB and uses a very small battery., NP-BX1. This is fine for running a camera without a focal plane shutter, though pushing it for capacity when running the larger RX1 with EVF (you need spares). The A7 models have a large finger grip partly to accommodate a more substantial battery. The tiny NP-BX1 is really a consumer compact camera cell. The NP-FW50 used by the A7 models is the same cell used by NEX and Alpha 55 (etc).
A battery grip VG-C1EM accepts two of these cells for extended shooting. Charging remains in-camera despite the battery size, as with the Alpha 3000, the first camera to charge this battery type via USB. However, there is an external battery charger available.
As this image, released in the early hours of the morning, shows it’s a bridge camera with an 8.8-73.3mm f/2.8 lens which is equal to 24-200mm on a 1″ sensor (2.7X factor, 2:3 format shape). This is the spiritual heir to two cameras – the Konica Minolta A200 and the Sony Cyber-shot DSC-R1 – rolled into one. The A2/A200 was described as having a 28-200mm lens, but because it had a 4:3 format shape, the lens was actually equal to a 24mm if you wanted an 8 x 6″ print shape (the 28mm equivalent assumed you cropped the frame down to 2:3… not many people know that…). And that camera had a 7.2-56mm lens, which tells you that the 2/3 inch sensor is for some reason more like a 3/4 inch sensor relative to the 1″ standard.
The RX10 has a mechanical zoom just like the earlier Minolta/KM and Sony models. As long as the lens lives up to expectations, it’s going to be a great general purpose camera, with its 1/3rd click stopped aperture ring round the lens and its Alpha style mechanical AF mode switch. Why would you really want anything more than this for 90% of your out-and-about photography? It has Nearfield (NFC) connectivity but does not have WiFi, or GPS built-in. It does have the Multi Function Accessory shoe which can add many accessory functions in future.
One surprise is that this camera has a mini XLR balanced powered adaptor kit for microphones – this is the small XLR you may have seen on wireless mic sets, locking and more secure than the minijack which is built-in for regular use. This also has audio level metering and manual gain control (thus beating the Alpha 77, which remains hampered by forced auto gain for audio).
Local noise reduction
All the new Sony models have improved sensors and processors. The A7r has the microlenses moulded directly to the sensor, rather than added in an overlay layer as it normal, and they are gapless. The RX10 has a back-illuminated sensor. All have ‘local noise reduction’ which sets alarm bells ringing. If it’s a function that only affects JPEGs, all very well; if we have adaptive local NR affecting raw files, it will only be acceptable if it can be turned off (at least, to some users).

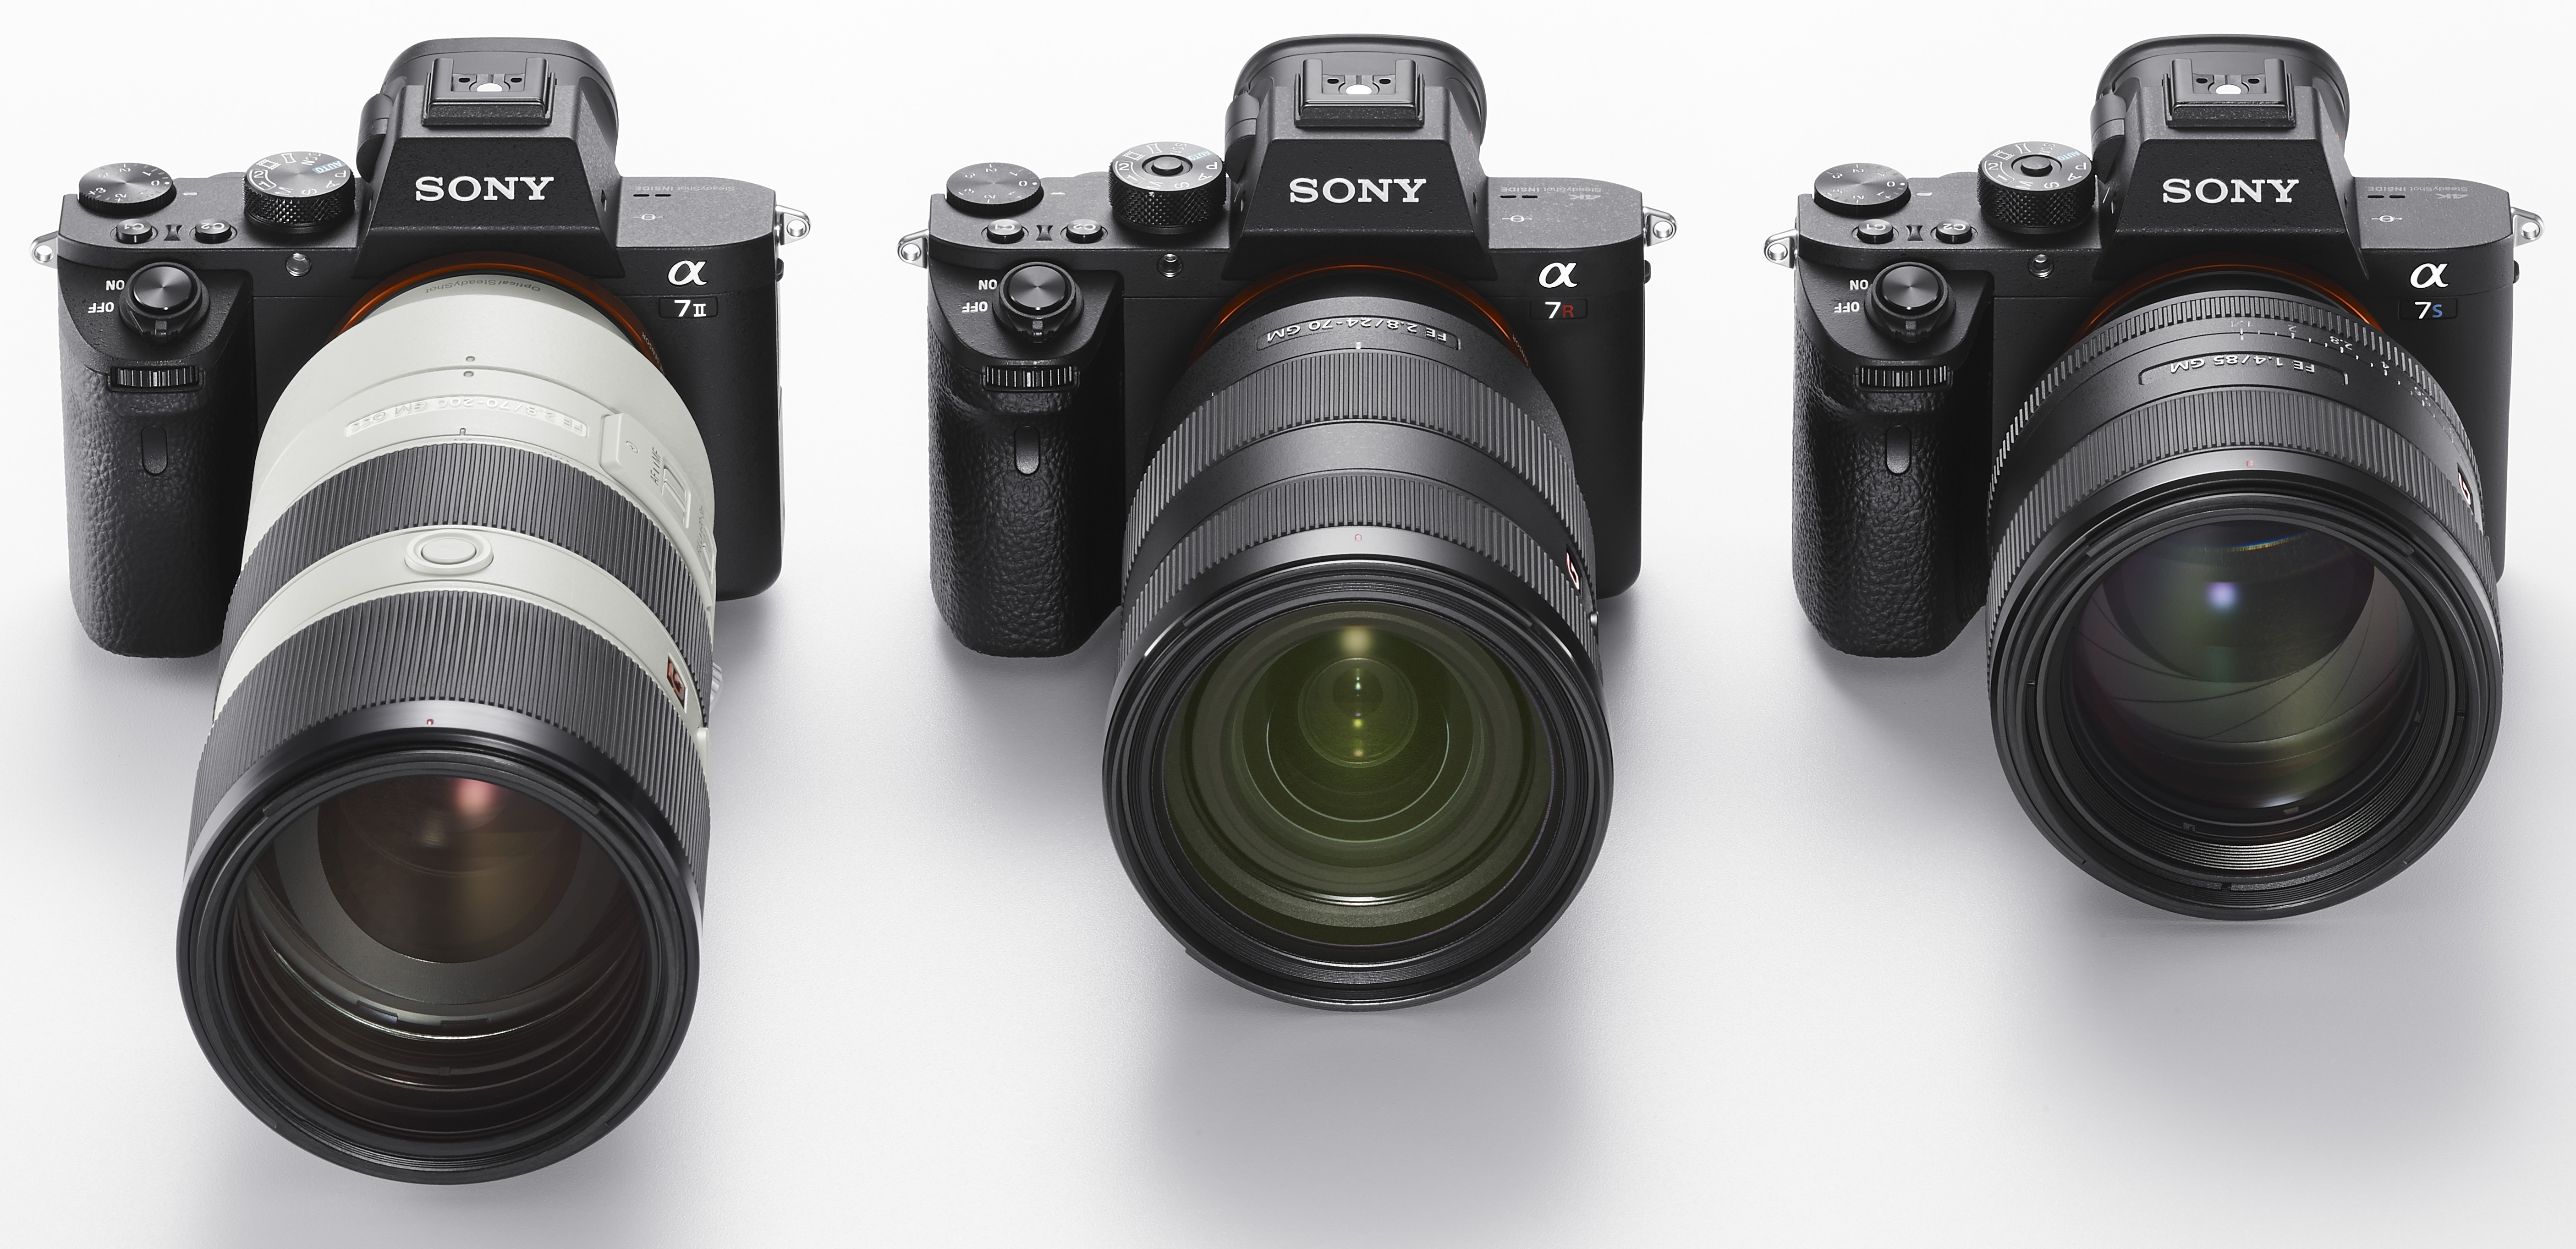


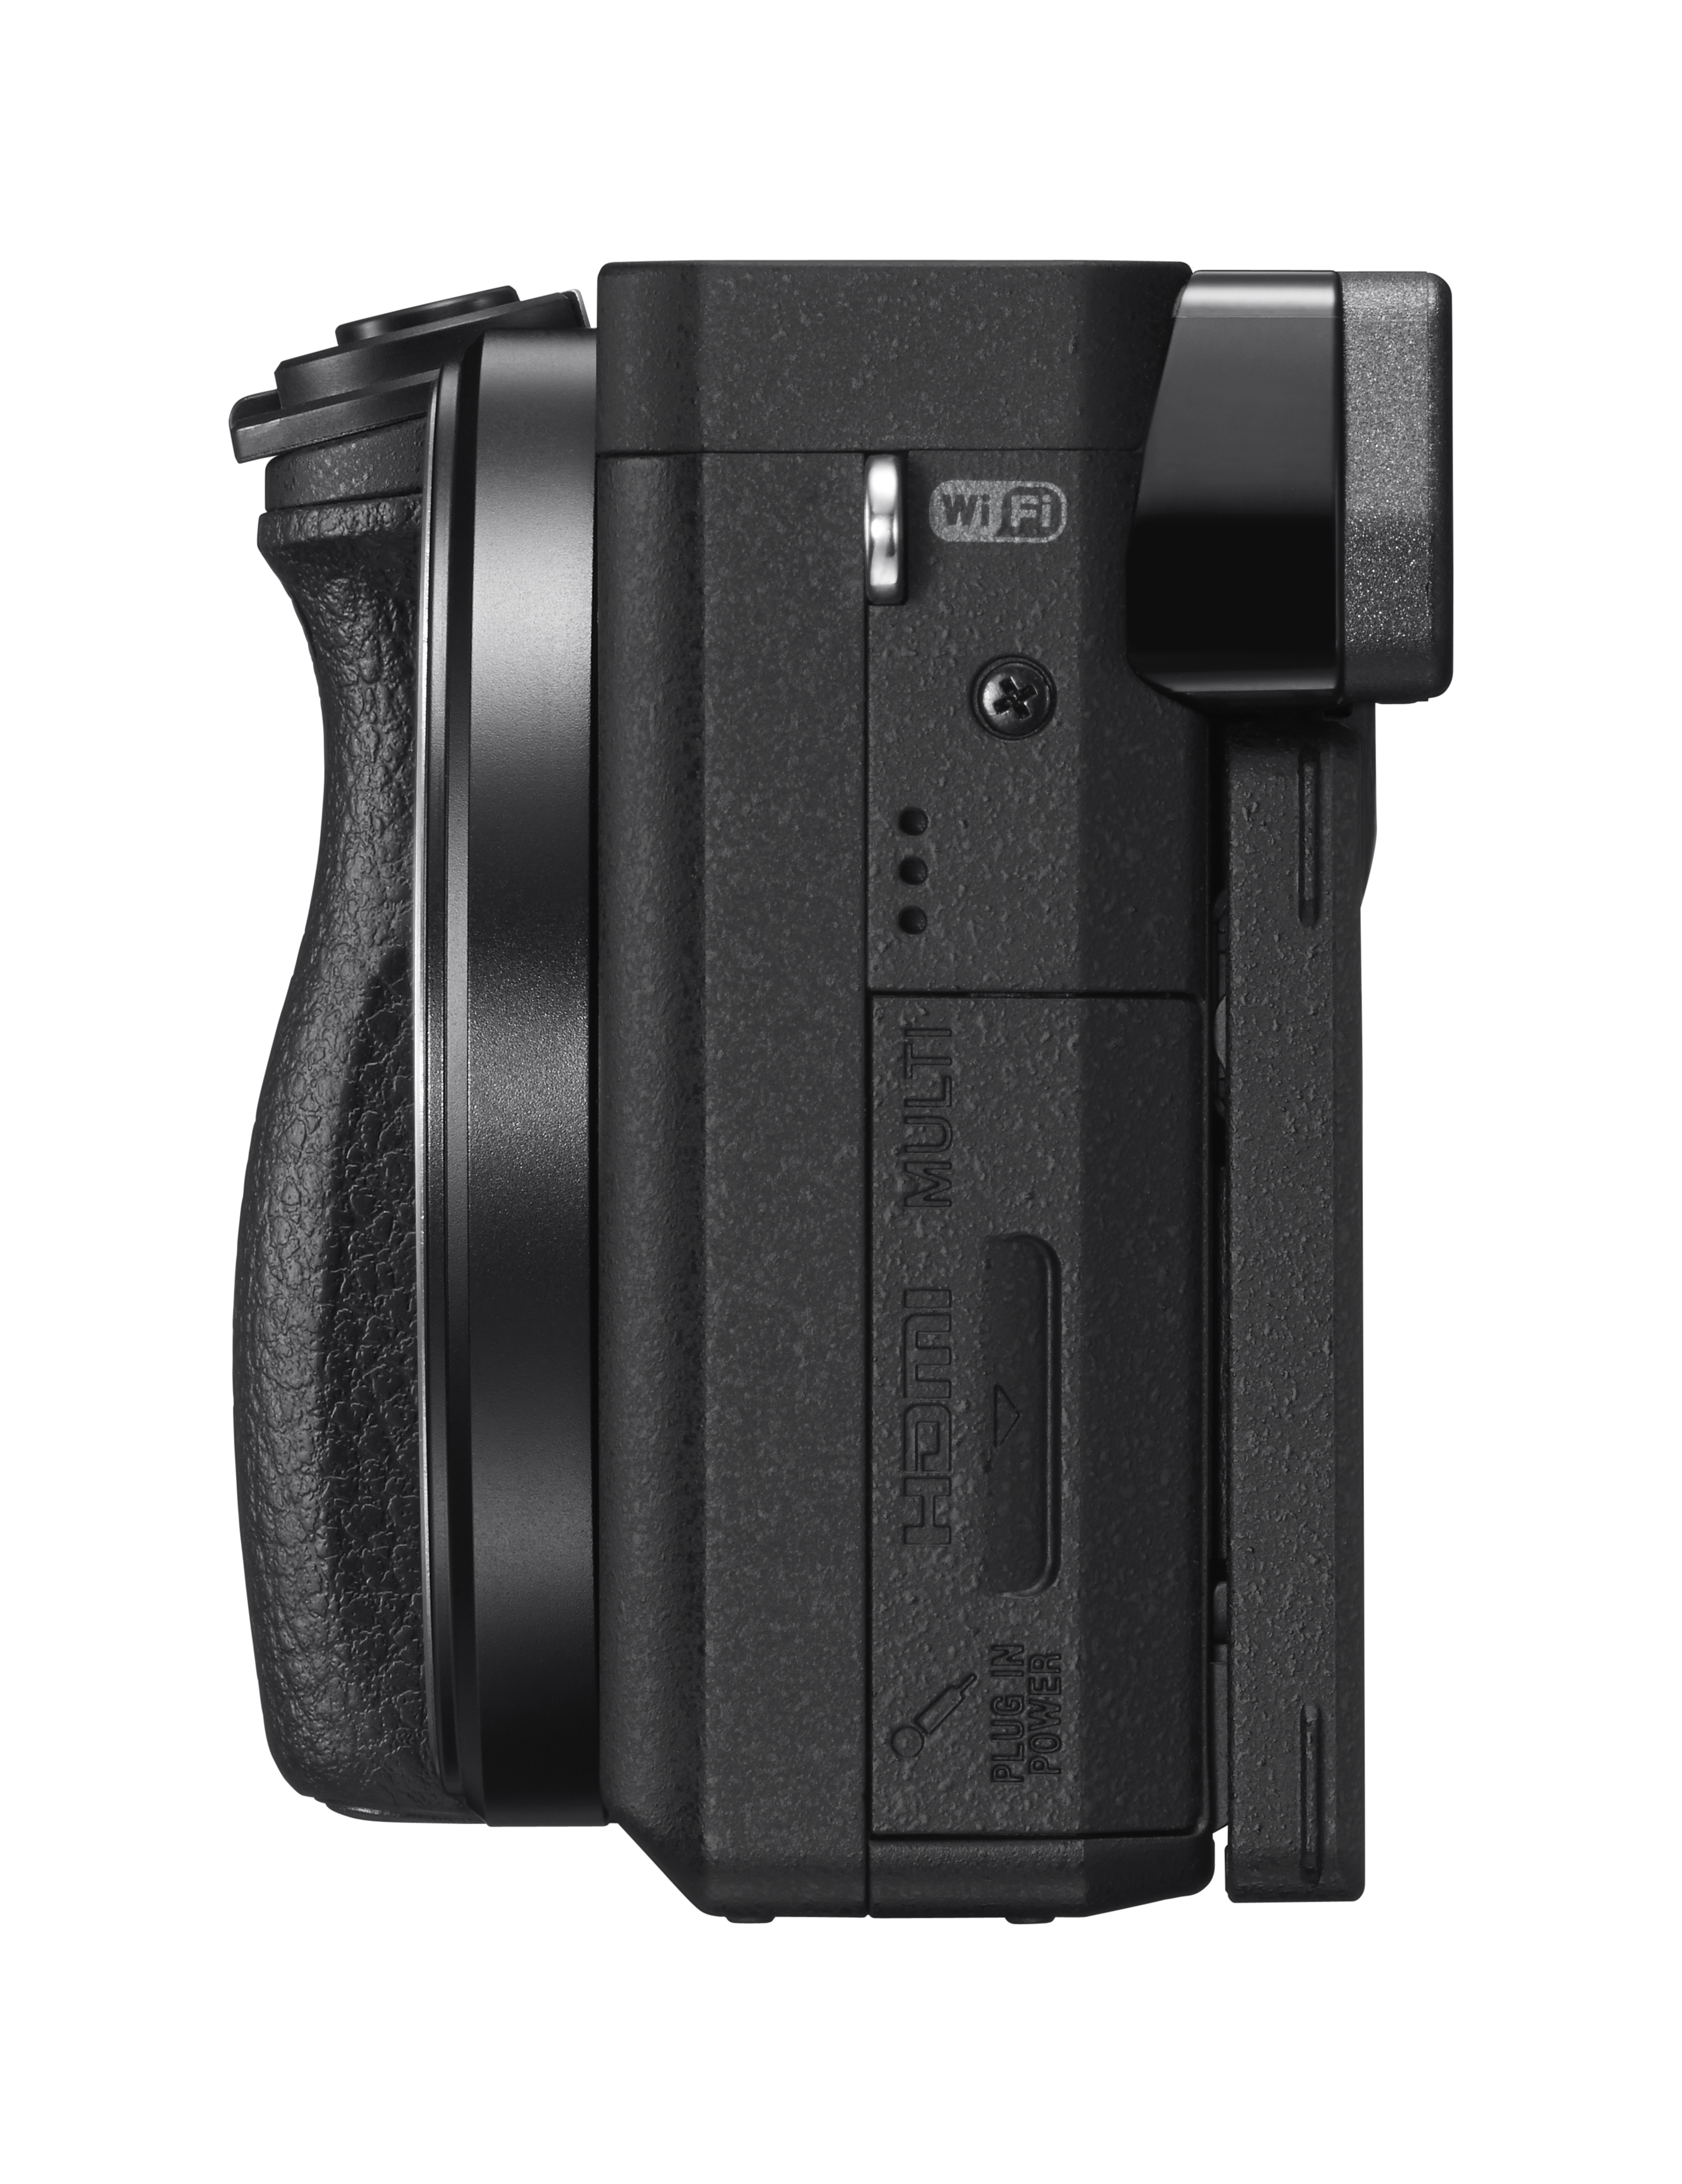 Click to open full size official images!