Lightroom 3 Beta 2 – the high ISO wunderkind
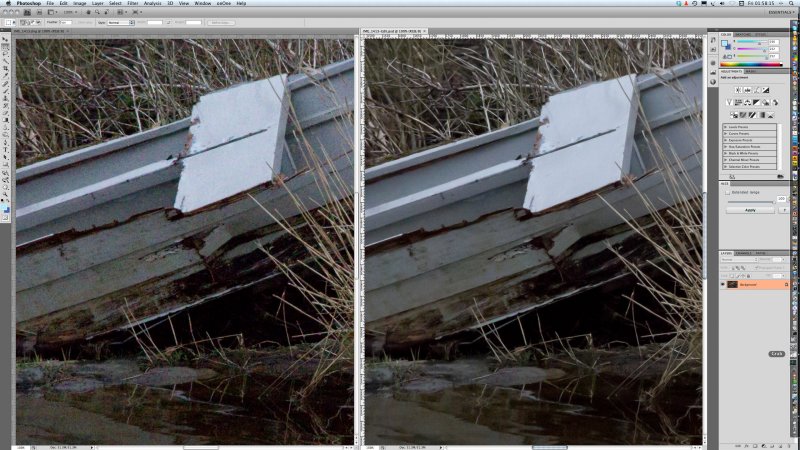
I’m not going to bore you with countless 100% clips. Just open this one file. It is a 100% screen shot of a tiled view of the same raw file from a Canon EOS 550D (aka Rebel T2i), taken at ISO 6400.
On the left, you see what Adobe Camera Raw 5.6 does with this file using no sharpening, 25 Luminance NR, 50 colour NR. On the right, you see what LR 3 Beta 2 does using the same settings (LR noise reduction has some further options – these are not adjusted).
When exporting the LR image to Photoshop, a dialog box appears saying you may need to install Adobe Camera Raw version 5.7! At the time of writing, version 5.7 is not yet available. But LR3 Beta 2 knows it exists… I used LR Rendering for this sample.
Click the image, open the full size screen shot. Or view it at
http://www.pbase.com/davidkilpatrick/image/123036282
The 12,800 shot is by no means bad either. You could compare it with ISO 1600 shots from the first 10 megapixel CCDs.
Trust me, the LR 3 Beta2 result is superior both to the Canon in-camera JPEG and the Canon DPP processed result. Had I the time I’d post examples of every ISO from 100 to 12,800 and you would see something very special – the increase in size of ‘grain’ with each speed step, but nothing more. NOTHING more than a proprotional increase in grain size, just like film used to be.
No oatmeal. No porridge. No hot pixels, no smeary watercolours. No colour blurring and luminance smoothing. Just neat, tight, virginal grain. Hmm. I should not have said that. Even so…
And another things – it works on everything. It works on old files, new files. RAW files from before the Ark got stuck on Ararat. Night shots taken when night shots could only make 7 x 5 inch prints. Nikon, Canon, Sony, old Minolta, Pentax, Olympus – download this beta, and you just discovered great pictures in the stuff you thought was rubbish because you accidentally used ISO 800 when that meant shaking the pepperpot over your soup!
Go download! http://labs.adobe.com/technologies/lightroom3/
Tip: to use Lightroom use a front end, just set Photoshop as your editor, and after adjusting the pic hit Command-E – same as hitting the Open button in Adobe Camera Raw. Go straight to Photoshop, Do Not Pass Go, and do not (yet!) spend £200!
– DK


Thanks for that test, David, I was considering downloading the Beta and was too lazy, assuming nothing much had altered in the processing. I’ve recently done a job that needs the NR that you’ve just demonstrated – great stuff! We shall see the results in the morning.
Generally later cameras have better dynamic range and noise control, so the makers have shifted the exposure to the left (hence the extreme high ISO ratings we now get). They just underexpose more. The latest Canon models with Highlight Tone Protection go even further and definitely underexpose the shot – at risk of more noise. But no more burned out wedding dresses, no more sky colour which turns lurid green just above the bright horizon when you get the best blue up above!
David
Thank you David – extremely authoritative and helpful, as always! I’ll certainly consider a wratten 85 filter (I know I had one years ago).
But, the “with Canon cameras of your vintage” statement is making me wonder if I should keep my money in my pocket while I’m saving up for a new(er) model? Your thoughts on my camera purchasing dilemma are welcome.
Best wishes,
Stephen
Stephen
David – Excellent article. My confusion with NR setting is lightroom is whether or not there are standard (default) settings or is it just a question of moving the sliders until it looks right? I have some colour noise on images taken with the EOS 1Ds II, at 400 ISO, with a polarizing filter, especially in the blue sky. I can remove the noise with your suggested setting – 25 luminance, 50 color but the building looks a bit over-flattened.
Blue sky noise is common to all cameras and can not easily be eliminated. It is a result of the low sensitivity to blue of the sensor, which results in a very noisy red channel (the brightness or gradation of sky blue is mainly down to the red and green channel levels, not the blue channel level). The way to correct this is to overexpose (expose to the right) but it can be a dangerous method with Canon cameras of your vintage, if there is a bright horizon, bright clouds, or sun in the sky – you may get loss of saturation or a colour shift when correcting the exposure in raw. An easier method, which very few photographers understand properly, is to add a Wratten 85 (artificial light film to daylight) conversion filter and set the camera to Tungsten light balance. The warm (brown-orange) filter boosts the red channel level at the taking stage, and evens out the response between the three channels, resulting in less blue sky noise when the raw file is converted (at Tungsten setting of course). The UniBalance method calls for a special filter pack, usually including something like a 40-50 Magenta, to exactly level up the three channels in true sensitivity and headroom and this creates the lowest possible noise. But the 85 filter is a quick, easy off the shelf fix.
Thanks for that test, David, I was considering downloading the Beta and was too lazy, assuming nothing much had altered in the processing. I’ve recently done a job that needs the NR that you’ve just demonstrated – great stuff! We shall see the results in the morning.