Alpha 700 – well up to the job!
ON OCTOBER 10th I left the UK London press launch complete with an Alpha 700 review camera. I’ll be covering the many aspects of the Alpha 700 performance in later reviews, but this camera is so good I wanted to get just something out to you right the next day.
It was not a great day, 3.30pm in October in London with hazy sun at the best. I headed straight for the highly protected Palace of Westminster – aka the Houses of Commons (the Lords are there too…) or Big Ben (which is the bell, the clock is just a clock and the tower is called St Stephen’s Tower). The River Thames provided loads of extra reflected light and some good sunset images later on with a silhouetted Westminster. Believe me or not, despite ten years working in London several times a week, I’ve never before in my life photographed Westminster. I have never had time to take any pictures in London at all, work is work, and getting there is expensive.
This time my flight back to Scotland was not until after 9pm and I had three hours to kill wandering around with a new Alpha 700 and my own 16-80mm, 28mm f/2 and 100mm macro lenses.
First – the A700 is incredible. It feels like.no.other if you have come from a Minolta/KM background. I also had my film Dynax 7 loaded with the brand new Velvia 50 to test. The Dynax 7 feels like a flimsy toy compared to the A700. The A700 magnesium alloy shell and weathersealed finish is rugged, solid, but light. It feels light the same way an insulated breezblock feels light – you know you are still lifting a lump of concrete, it’s just not so hard to lift! The shutter-mirror sound is swift and loses all those unpleasant clack harmonics. The shutter release is hair-trigger light, like a Nikon D80 or D200. The AF can be set to two different speeds of motor, Fast or Slow, and on Fast it beats the average sonic-motor in-lens focus system cleanly. It zips and locks before you can think.
Also the entire menu system, buttons and QuickNav rapidly prove to the best and fastest user control interface I have ever encountered. I found myself making adjustments to settings shot by shot without losing more than a few seconds. My only complaint was that I wanted Auto ISO 100-400, and the A700 only uses Auto ISO in the range 200-1600 (factory preset 200-800) with user set limits. I had to settle for 200-400.
It was immediately apparent that the 16-80mm was locking more accurate focus than with the A100. The large clear viewfinder proved it. But what I want to show you right now is that the raw .ARW file from the A700, processed using Adobe Camera Raw from an ISO 200 file, can be pulled around and messed with and still get a superb zero-noise, really sharp large result. I enlarge my images to 50MB (5120 pixels on the long side) using ACR because this is what my photo libraries require. The A100 does it well. The A700 can match it with added smoothness and superior focus sharpness.
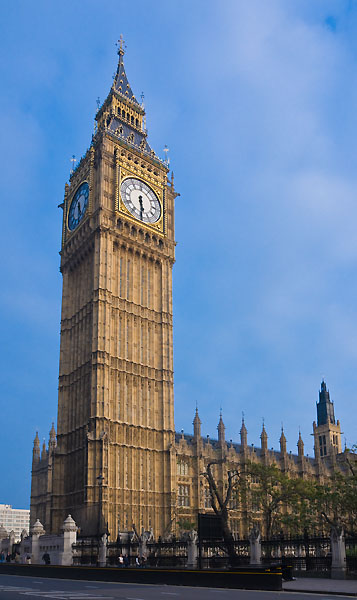
Here is an in-camera JPEG. You can see this was the sort of day where any stock library shooter goes and has a beer. You can’t sell a picture of Westminster taken in such lousy lighting condition with such a poor sky.
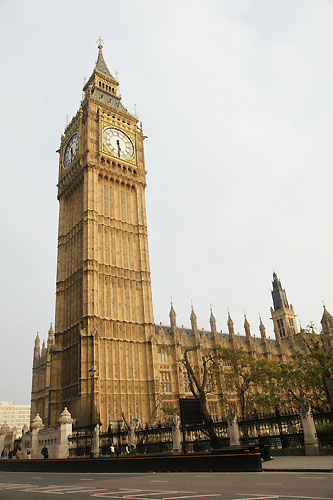
You can’t fault the exposure, you maybe can fault the white balance which was 5850 K as shown in ACR to match this JPEG. The trace of low late afternoon sun – near sunset – was warmer than that. The viewpoint is not stunning, a bit close and no elevation to shoot from, nor time to find one. It’s a tourist snap and dozens of cameraphone folk were snapping beside me, but they didn’t wait patiently for a gap in the traffic, as I did.
Here is what the raw file actually conceals – information you can get at by making adjustments:
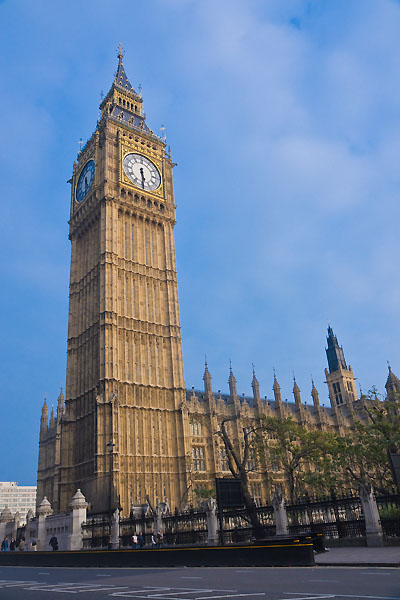
No, this is not a different shot, and I have not dropped in a blue sky or colourised the sky in Photoshop. All this is from the raw camera data using CS3 Bridge/ACR 4.2 controls. You may think it’s a bit over the top, but by picture library standards it is fairly flat and the sky is not blue enough! Buyers like extremes, consumer-cam colours and snappy contrast. Here is what I did:
Colour temperature (WB) set to 4150K. Exposure untouched. Recovery set to 25. Black to 0. Fill Light to 15. Brightness to +46. Contrast to 25. Clarity to 25. Vibrance to +69. Saturation to 0.
Sharpening depends on image size but I normally use around 10-25, Detail set to 25-50. Noise reduction for this shot used 23 Luminance, 50 Chroma.
The real trick, which creates the blue sky in conjunction with the Vibrance setting (and which demands the NR setting to keep that sky clean) is in the HSL Slider controls. Blues were set to +40 saturation and -38 luminance. This is what brings out the sky and clouds and has a minor effect on the shadow side face of the clock; this looks natural enough and I did not feel like dropping in a less processed clock face.
But what about the quality, given all this messing around with what are fairly deep ‘Levels’ in the raw conversion process? Have a look at a 100% per crop:
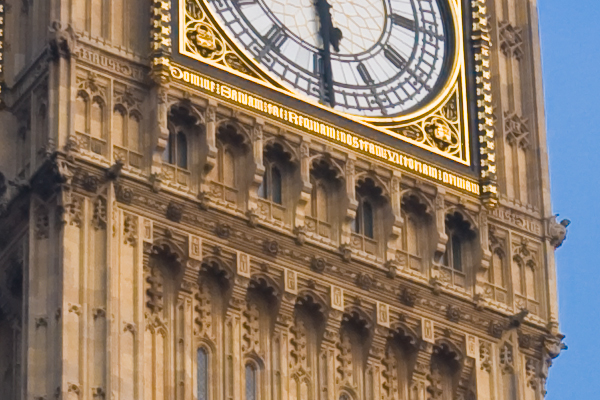
The only artefact which might lead to a picture library rejecting this image is the slight white line where the sky meets the edge of the tower. In practice, this is acceptable and would enhance the apparent sharpness of the picture on a print. This is the 16-80mm lens at 16mm, 1/60th at f/8 handheld with SSS on. For the exposure I used +1 exposure compensation because of the large sky area and dark foreground. In ACR I used -29 Red/Cyan fringe to fix some very slight CA totally. The image above uses ACR sharpening but has no unsharp masking applied for web display. You can see the level of detail capture by the A700 and especially note the subtle different shades of the stone blocks the tower is made of. This sort of colour distinction could easily be lost.
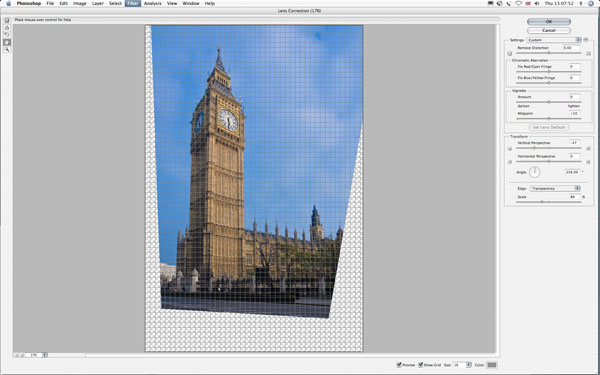
To complete the image, I exported it to 75MB size, the largest option in ACR, and made a new 48.4MB crop with architectural correction. It’s a bit extreme, so my picture library will get both versions to give buyers a choice. Here is the Lens Distortion filter in Photoshop with the adjustments set:
And here is my final cropped image:
The sharpness present in the final result is very close to the uncorrected original. I do not attempt to make all verticals perfectly parallel, that would be serious overcorrection with such a steep viewpoint, and even an experienced view camera user would not attempt 100 per cent plane-parallel correction. It tends to make the image look artificial. It is better to leave just a small amount of ‘natural’ perspective convergence and balance the angle and weight of components in the shot with the horizon line. You need to use your eye to do this, and it can make even an off-centre composition like this appear stable. It does not always mean having the horizon dead straight, or the verticals dead vertical, or even having an equal lean at both sides. You must imagine balancing the composition on your hand – would it fall over?
My walkround with the Alpha 700 actually produced a full 2GB Sony 133X CF memory card and I have many more images to process. Yes, I did shoot at 1600, and 3200 and 6400. I did shoot with NR at different levels. I have installed Sony’s software (I know ACR 4.2 makes a real mess of those high ISO files). I shot after dark and inside trains, tube stations and aircraft. I’m sure to have better examples to study later but it gave me a good feel for the A700’s performance.
So far, my verdict is that any Alpha 100 owner upgrading to the 2-3X priced Alpha 700 is likely to think it’s well worth the outlay. I was worried by early previewed JPEGs and raw files but right now, I can see that the Alpha 700 will have no problem meeting my requirements. Next job, to photograph eight wall frescoes before they are destroyed by renovations. Studio flash, 50mm macro, and 12.24 megapixels to get the best out of them at ISO 100 .ARW before making new A2 prints for the owners of the property. A perfect job for the Alpha 700!
For some more of the Westminster shots using the same basic colour manipulation technique in different ways, see http://forums.dpreview.com/forums/read.asp?forum=1037&message=25181529
– David Kilpatrick
