Sony Alpha 700 Review Part 1: the Interface
SINCE September 2007 I have had for test the Canon EOS 40D, Sony Alpha 700, Nikon D300, Olympus E-3 and Nikon D3 in that order. The reports have been published in the British Journal of Photography, and later on in Master Photo Digital and f2 magazines (some are yet to appear, in February, in these titles). My own system is Sony Alpha but I have to be as objective as possible when field testing all makes. I also have to seek out the unique selling points, the reasons for owning any given model, rather than just compare them on a tick-chart feature basis.
With the Alpha 200 about to appear, I guess it’s time to sum up what I think about the Sony Alpha 700 and how it compares to the competition.
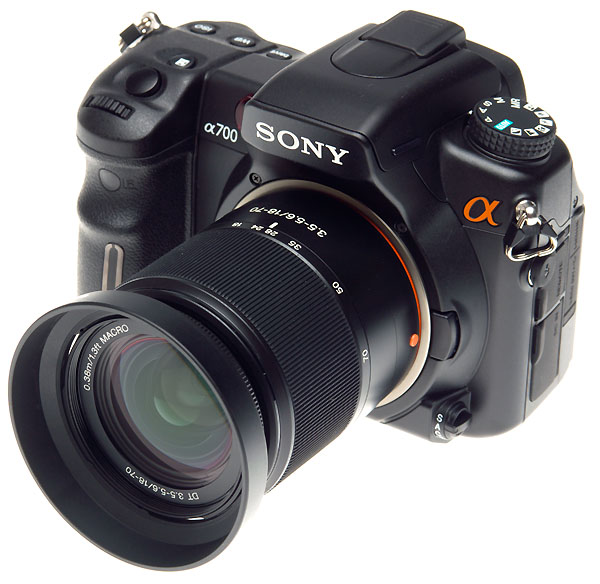
The user experience
In case I am accused of familiarity with one interface and no other, the Alpha 700 user interface is so completely revised it is almost as unfamiliar as a Nikon or Canon for owners of earlier KM and Sony Alpha models. At the heart of it is Quick Navi, which is just a trademark for something others have already offered (notably Nikon and Olympus). The 920,000 pixel 3 inch rear LCD displays all your primary image parameters and shooting settings whenever you have first pressure on the shutter and the camera is away from your face. This behaviour can be modified, but is the default.
With previous models, this is a display only. If you want to adjust anything, you must get into a different menu screen individually for each function, then exit this mode after adjusting (normally by pressing the shutter lightly again). The Quick Navi shortcut uses the settings as displayed on the screen in compendium form. You can still opt (‘Buttons Ops’ menu setting) to have each dedicated-function button (+/-, Drive, WB, ISO) go directly to its enlarged, solo adjustment mode when you press it, and the universal ‘Fn’ button only activate Quick Navi. Alternatively the dedicated buttons can take you straight to their own function, but within Quick Navi instead, allowing subsequent rapid jump to further settings.
If this sounds like so much jargon, here’s how Quick Navi works: the Fn button takes you to whatever you last adjusted. Let’s say ISO is showing (your current ISO) on the rear screen as normal. Press the ISO button, and the small panel which shows the ISO will be highlighted, while the rest of the screen remains showing all the other data. When the panel is highlighted, turning either of the front and rear control wheels will change the setting in that panel. To change other settings, you use the Multi Controller (joypad) to shift the highlighting to other panels. If they are not available for adjustment in the mode you are using, they appear slightly dimmed and the highlighting will skip them to the next up, down, left or right. Again, for any highlit setting, the control wheels provide either two adjustments or a single adjustment.
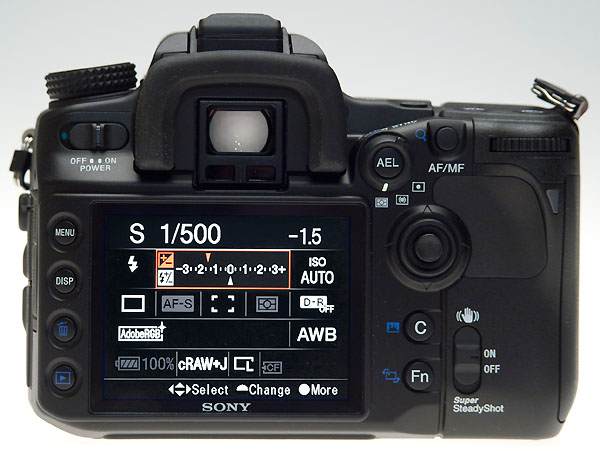
Exposure compensation only appears on Quick Navi if you set ‘Button Ops’ to Quick Navi, otherwise it is a screen on its own, or appears when a Control Wheel is set to use it without the orange highlight outline on its box. The advantage of Quick Navi is that when this any box is highlit like this, you can move instantly to the others using the Multi Controller. In this case, after setting exposure compensation, a single right push of the Controller takes you to ISO – where a new ISO could be selected rapidly, a typical scenario when tackling any scene with difficult exposure. The dimmed options are ones you must set through switches or menus, or for information only.
This single innovation makes the Alpha 700 one of the fastest cameras to adjust in relatively complex and deep ways – changes which, in other cameras, often need multiple button presses, menu navigation and sometimes accessing heirarchical secondary menus and scrolling down them. Though the Alpha 700 does use conventional menus for some set-up functions, it is rarely necessary to go there when shooting. This is in contrast, especially, to Nikon’s professional models (the D40/40X is closer to the Alpha approach). Olympus’s E-3 uses a similar compendium display with adjustment to individual settings, but it requires more fingerwork to reach and adjust any given parameter.
The one poor implementation on the Alpha 700 is the card formatting command. If you rarely use your Menu display, going there will take you back to your last operation as long as set up the camera with ‘Previous’ as the Menu Start preference (tools menu). If this was card formatting or playback, life is not so bad – you get to the Format option fast. If you have been doing other menu-based setup, you will go back to that, and have to navigate through to the Format command. If you have set ‘Top’ as the Menu Start option, you will always go back the Camera menu first screen.
Nikon’s card formatting approach of having a two-button combination press to activate a short delay warning then confirm formatting on a second double-press is elegant and fast. It’s just as hard to do accidentally as Sony’s menu-accessed two stage operation.
Here’s a quick tip if you prefer to have Menu Start set to ‘Top’ – the Menu button is context-sensitive. Press the Playback button first, then the Menu button, and you get straight to the ‘Delete, Format, Protect’ etc menu – this is the ‘Top’ menu for playback. This does not work if you have ‘Previous’ set for your Menu Start prefs.
Using the Olympus E-3, economy of design has dictated that double simultaneous button-presses are needed to access several functions. The required buttons may be both together (hit with two fingers of one hand) or on opposite sides of the top. Either way, camera handling does not always makes for easy two-button targeting. Once pressed, the E-3 remembers what you have done for 8 seconds, during which time you must activate the adjustment (wheel or pad). Adjustments are often controller-specific; hit the wrong wheel, nothing happens. I am not criticising this, because it’s how many DSLRs still work.
But the Alpha 700 is exceptional. You do not have to remember sequences, because the camera has been programmed by someone who understood users.
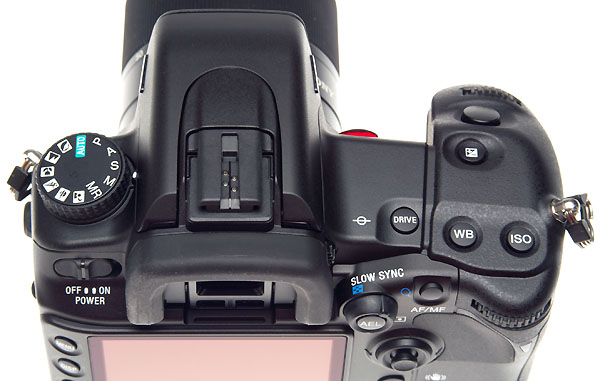
The two control wheels and the Multi Controller have multiple, redundant, automatically duplicated or segregated functions meaning that you hardly ever encounter a ‘wheel which does nothing’. The single function buttons can be set to lead to their own unique full screens, or to Quick Navi. Their position makes them usable by thumb or finger, taking some getting used to, but proving intuitive and well separated spatially. The whole interface is usable with gloves on, and with the eye to the viewfinder. It is rare to press the wrong button by mistake as their placings are so distinct.
Take ISO adjustment for example. If you have programmed the ISO button not to go to Quick Navi, but to its own full size dedicated screen, all three controllers will change the ISO for you. The front wheel will change it in doubling steps – 100, 200, 400, 800, 1600, 3200, 6400. The rear wheel or vertical operation of the Multi Controller will alter it in third-steps (100, 125, 160, 200, 250, etc). Moving the Multi Controller left or right does nothing, but as the ISO listing is clearly a vertical column few users would make this mistake. The screen remains active not for 8 seconds, but until the camera decides sleep mode is needed. There is no need to make adjustments within a short set time or lose the screen.
In White Balance, front and rear control wheels have different functions, but they are again (logically) for full steps and fine tuning. The Multi Controller duplicates the adjustment, vertical for main settings like Cloudy or Flash, horizontally for plus-minus tint tuning. A similar situation exists in Drive adjustment. Wherever a spare controller (front or rear wheel, Multi Controller stick) has no dedicated function in the overall menu choices for that setting, it will duplicate the most logical function.
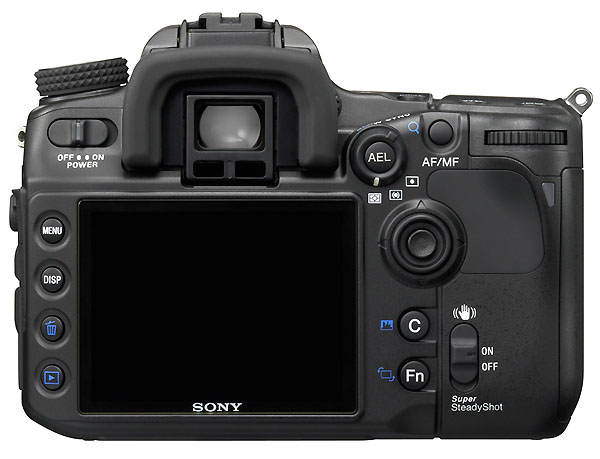
The rear layout showing the Multi Controller, C Custom Button (programmable) and Fn Function Button (Quick Navi access). Alternate uses are marked in blue, and take over when in Playback mode, also marked in blue.
Using Quick Navi, the Multi Controller has the job of navigating round the settings on the screen. Only the control wheels can make adjustments. Again, the same rule applies – the front wheel shifts from AWB to Daylight to Tungsten, the rear wheel fine tunes the tint; the front wheel adjusts ISO in full steps, the rear one in third-step fine increments.
One exception to the logic of the control wheel functions is the Ambient and Flash compensation system. This has (as you can see in the rear screen shot with compensation example) Ambient in the top half and Flash in the bottom. A Menu selection allows you to ‘link’ these (changing Ambient correspondingly adjusts flash, maintaining the difference between ambient and flash compensation, but changing overall exposure) or have them separate (both the plus-minus scales refer to normal exposure). However, no indication is given as to which mode you are in, the rear display is identical for both. So -1 on ambient and -0.5 on flash can mean either that the flash is half a stop more powerful than the ambient, or half a stop less, and you will be unaware unless you know which preference you have set. Moreover, both control wheels change the same value; front and rear will both alter ambient when you press the +/- button, and to alter the lower scale for flash, you must use the Multi Controller to step down to it – then both wheels alter the flash scale.
This is clearly wrong (thanks to Mark van Bergh for pointing out some of the problems this causes). Where flash and ambient are separately controlled, it would be much faster and more intuitive for the front wheel to control ambient, rear wheel flash. There would be some difficulty with viewfinder information here, as flash compensation is not dispayed in the finder, only on the camera and on separate flash units mounted for use. Also, when the two are linked, the front wheel should really move both flash and ambient together so the true exposure relative to normal is shown on both scales; the rear wheel should adjust the flash alone. Again, a possible issue is that you can currently have -3 flash compensation plus -3 ambient, with ‘Ambient+Flash’ as the compensation mode, which means the flash is set to 6 stops under. Since this can not be displayed on the existing scale with both linked, Sony choose to have an ambiguous display.
One trick I have discovered is to set -3 ambient then set +3 flash, when in Ambient+Flash mode. The auto-set 1/60th, normal for flash, then turns to 1/125th or even 1/200th, giving you a normal flash shot exposure but really short ambient one – reducing ghosting from lights or windows indoors.
With the further ability to program the C button (custom) to access any one of a list of functions in full screen mode, navigation and adjustment becomes extremely fast. Settings do not require confirmation. With many cameras, you must first set your change, then press an OK button or the centre of a joypad. The Alpha 700 uses self-confirmed adjustments. If you change the display, you have changed the setting. It does not revert or disappear if you fail to press ‘Enter’, ‘OK’ and so on. First pressure on the shutter release will make the display change to the normal shooting display and your change will be visibly confirmed.
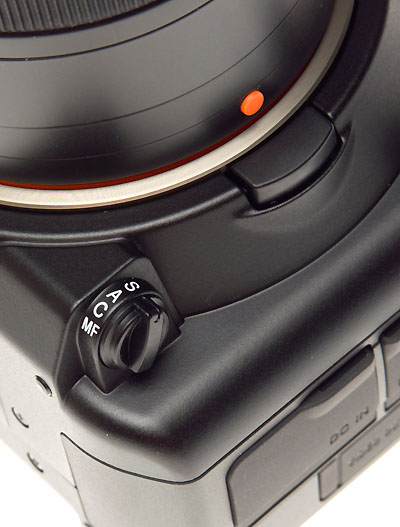
The focus mode switch is placed similarly to the Dynax 7D, and also resembles Nikon’s AF mode switch positioning. The lens release button has been made far more substantial and the mount is extended further round the rear of the lens.
Completing the Alpha 700 user interface are enough hard-wired (looking!) controls to satisfy most users. A real switch controls your Matrix, Centre Weighted and Spot Metering choices; another controls AF-S, AF-A, AF-C and M focus.
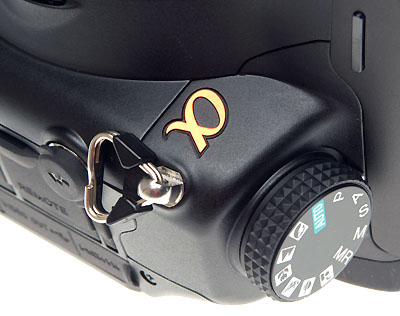
The Alpha 700 has D-ring strap fittings like the Dynax 7D, rather than fixed slots. The main mode dial is simple and solid, placed on the left hand end. Here you can also see the PC sync flash socket cover, which is tethered and not easily lost, and the small raised lug on the built in flash which helps with manual flash raising. There is no auto pop-up flash function.
A large left hand top dial sets P, A, S, M, MR for memory recall of up to three programmable user setups, six Scene modes and a non-destructive Green Auto (file size and quality choices are retained). There are dedicated and function-reprogrammable AF/MF and AE lock buttons, there’s a Depth of Field Preview button (this function is portable to other buttons), an exposure factorial compensation button which you don’t have to use if you set Control Wheel direct compensation, and of course a switch for SSS On/Off.
The key points to the Sony Alpha 700 user experience are speed and intuitive behaviour. You are not left wondering which control to use, which button to press next, or which of the setup menus (little camera, little cogwheel, little spanner, little arrow…) might happen to hide the function you are searching for. Most changes are accomplished by a single shift of a switch, one button press followed by one adjustment, or one button press with swift on-screen Quick Navi to your chosen adjustment, then a single adjust action.
The viewfinder single-line display below the screen allows all the main single-button adjustments to be set with your camera to the eye, including fine tuning. You can, for example, use the rear control wheel to scroll through 3 or 5 frames at 0.3, 0.5 or 0.7 EV continuous bracketing after pressing the Drive mode button and using the front control wheel to reach CB, and this is all visible below the screen using an easily understood alphanumeric shorthand.
On the large display screen, functions which can not be set using Quick Navi are those controlled by physical switches or menus only – AF mode, metering area, and choice of using CompactFlash or MemoryStick card. You can’t set the Custom button to reach these either. There is also a detailed battery life display, which I found disconcerting because it drops steadily showing an exact percentage. Do I really need to know my battery is down to 56%? I feel an urgent need to recharge it when it goes below 70% and that’s not a good policy!
While physical-control only access to metering area and AF mode are acceptable, the only way to get fast spot metering is to assign the AE Lock button to use Spot AE Lock. This avoids needing to use the switch surrounding it just to get Spot metering. The main gripe I have is the card media selection. There is no switch, no Quick Navi item, and you can not assign the Custom button to access switching from CF to MS. The only way to make this change is a tedious trip to the Spanner menu (Tools), second screen, first item. Nor is there any provision for auto overflow switching from one card to another, copying, or splitting RAW and JPEG between cards with simultaneous writing. My Alpha 700 has a 2GB MemoryStick installed and it has not yet seen a single image written to it, it’s so much easier to change a CF card than change media in-camera.
Subtle benefits
What more can I add? How about retention of mode-specific settings. Since this does not happen with all DSLRs, it needs explaining. If you set a specific shutter speed using Shutter Priority (S), say 1/500th, then switch to Program (P) mode or Aperture Priority (A), no matter what happens in these modes you will return to 1/500th when you move back to S (you will also retain this speed when moving to Manual M control). Let’s say you want to have 1/1000th as a short cut for action, and f/16 as a shortcut for depth of field. Just set 1/1000th using S, then move to A, and set f/16. Now move to Program or any of the Scene modes, where both are set automatically. As long as you do not use Ps or Pa program shift – which can not be used in any of the Scene modes – you will always return to your last set shutter speed, or aperture, or both in the case of Manual.
With other cameras, your current Program aperture or shutter setting is often transferred to the Tv or Av (A or S) mode when you switch, meaning that you have actually changed nothing until you make adjustments. This will happen with the Alpha 700 only if you use Program Shift (Pa or Ps) to change the shutter or aperture setting when in P mode. If you do not, you can rapidly access presets. In the 1950s cameras appeared which had two shutter releases, one for landscape and one for sports, so you got a small aperture with one and a fast shutter speed with the other, making instant decisions based on the scene. The Purma Special camera changed its settings depending on which way up you held it, using a square format and a pendulum inside to change from snapshot to action picture! The forerunners of autofocus did something similar with different releases for preset distances. Those days are long past, but might yet inspire digital designers. The Sony Alpha 700 does not let you press the shutter one way for action, the other for depth, but it does provide an exceptionally fast interface to reach whatever settings you want.
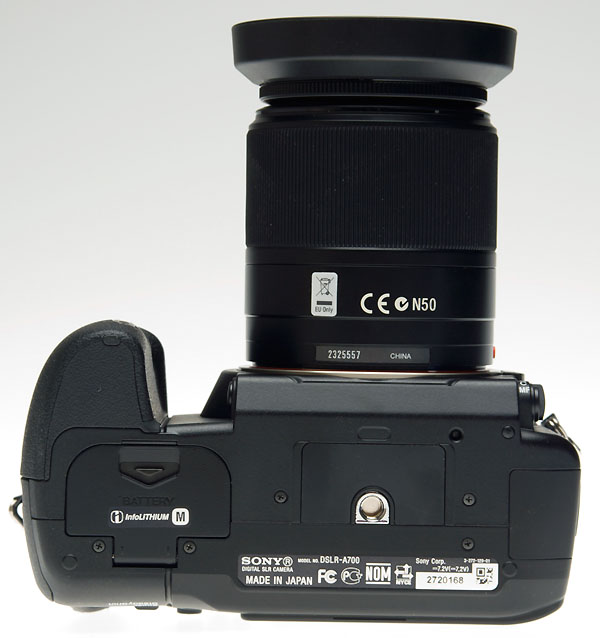
This is a Hong Kong body (the labelling lacks any of the EU regulations, which normally occupy the rectangle round the tripod bush. You can see from this view the size of the handgrip and the space for fingers with the angled mirrorbox escutcheon.
The round it off, the Alpha 700 has a very neatly sized and proportioned body. Though relatively small, it allows a generous gap between the grip (itself a good thickness) and lens mount, and just enough body on the left hand side for a comfortable grip. The forward siting of the control wheel and inner position for the shutter button reduce rotational shake (the further forward the shutter button is, the more you tend to tilt the camera when pressing it) while the angle of the release aims its axis to the rear of the base of the camera. The unusually widely spaced, large function buttons with their rear position are accessible to both fingers and thumb; there is never a requirement for a double button press or a sequence. It’s not a conventional layout but it lends itself to ‘muscle memory’. The card door is firmly closed in a single action and does not need a catch to be released before opening, allowing single-handed use.
Overall, I have found the Alpha 700 to be one of the best DSLRs to use single-handed. Some have made fun of this idea, but I’m shooting in situations where I often need my left hand free. Anyone who walks, climbs, likes to retain their camera bag or wallet in unknown souks, uses a hand-held flash or shades the lens in backlight will appreciate that nearly all adjustments can be made entirely with the right hand without removing the camera from the eye. The one-hand (right hand only, sadly) grip is also firmer than the Alpha 100. I’ve just been editing a few dozen potentially valuable pictures taken single handed with the A100 from camel and horse-carriage (the other hand hanging on to the means of transport). Too few were sharp enough to use. I reckon they would have been that bit better with the A700, and for other reasons too, which will be explored in further installments of this review.
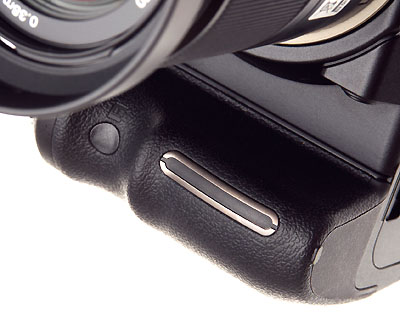
The Hong Kong model has a real, working nickel-plated grip sensor – replaced by a black plastic dummy strip in European models. I don’t guess Sony will be recalling all our expensive European Alpha 700s to base in 2008 to have them fitted free of charge with a new non-nickel strip that actually works. There are a few dummies around the Sony camp, and not all of them are camera components. The British photo press is unaware of having missed anything. They never miss a thing, do they?
My one complaint must be the disabling of the Grip Start function in European cameras. This function disables Eye Start autofocus unless the grip is in your hand, and that alone allows Eye Start to be used (normally, it’s a pain and causes the rear screen to keep flashing on and off and the lens to focus randomly if the camera is switched on and dangling round your neck). Conversely, it also switched on either regular focusing or Eye Start the moment you grab the camera, leading to zero delay. Is this much nickel really worth killing a product for? They will be banning our coinage next! This fast and clever function added to the rest of the swift interface. Removing it, apparently with no chance of simply replacing a part with something acceptable to the allergies of Brussels, removed a part of the Alpha 700’s performance edge.
I will be continuing this review with further installments to look at the specifications and performance of the camera, and the performance of its ‘film’ – the quality of its RAW and JPEG images.
– David Kilpatrick

This one is a real doozy for A-Mount fans! If you are to believe DIWA Labs, the Sony A700 is thumping the Nikon D300 badly when it comes to dynamic range.
This link is to D300-A700 comparison plots of dynamic range, tonal range, signal-to-noise ratio, and color fidelity.
http://www.sonolta.com/diwa-labs-test-nikon-d300-sony-a700
Three cheers for Sony on this one! Well…at lest on DIWA’s paper, and on my screen and on prints the Alpha A700 looks pretty dang terrific! I dunno, but what I do know the A700 is giving me some performance that is almost incredible, even at the highest ISO’s.
-Sonolta
http://www.sonolta.com
Sony Alpha A700 delivers amazing high ISO iimage quality!
See my recent ISO 5000 and ISO 6400 blog entry here:
http://www.sonolta.com/sony-alpha-a700-image-quality
Don’t let any one kid you, the Sony A700 is one *ell of a machine!
-Sonolta
http://www.sonolta.com
Happy New Year to the DK family! I also find the interface of the A700 very well planned and very easy to get comfortable with. Designed for gloved operation and comfortable in the hand, the A700 does not let many people down in this regard.
Since I double fist cameras at my arena sports events I am also looking forward to doing some serious one handed business. I shot one-handed with the A100 at some sporting events last year but already I have found myself shooting one-handed for casual shoots with the A700.
It is a comfortable machine. If you want to take a look at my recent no-flash ISO1000 and ISO1250 shots go ahead and take a look here:
http://www.sonolta.com/sony-photos/v/sony+a700+christmas/
Overall the camera performed well enough indoors with pretty great exposures overall. One slight niggle was the Raw files were sometimes a bit overcooked with NR and NR artifacts. All-in-all I was pleased with the A700 handling and performance.
-Sonolta
http://www.sonolta.com