Want your Alpha to look like an EOS?
DxO OPTICS PRO 4.1 is the latest version of a clever raw file processor which includes lens lookup tables to auto-correct distortion, vignetting and chromatic aberration. It also lets you alter the look of Dynax or Alpha images so they match popular films – or other DSLRs by Canon and Nikon!
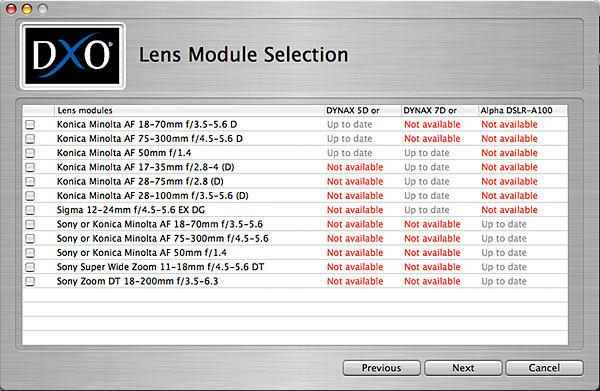
There is no way we can review DxO Optics Pro 4 completely – or even begin to touch on how radically it differs from all other raw converters. The ‘Download’ screenshot shown below gives a clue.

This is the screen after visiting the DxO website and downloading a whole set of DSLR body and lens combinations from the database of available types. A surprisingly good number of Minolta, Sigma and Tamron lenses are included for Alpha system bodies and it looks as if DxO has always had the Minolta system in mind. However, since my first download in January 2007 when I was impressed by the list including the Sony A100 plus 11-18mm and 18-200mm (etc) very shortly after not having them present, I find that nothing new has been added to the database. It was growing with a few lenses every month, and seems to have been static from the Minolta-Sony angle since then. Here’s the latest list, same as it was in January:

I have revisited the site and find no more KM/Sony profiles as of mid-June 2007, but it is worth noting that lens identities seem to be shared (KM/Sony equivalents) and just because there is a red ‘Not Available’ showing doesn’t always mean it will not work. The 7D seems to come off worst.
DxO Labs are specialists in digital image analysis and have devised ways to reverse the unwanted distortions, vignetting and aberrations found in most lenses. This can be done manually using Photoshop Camera Raw aberration and vignetting controls, with later work using the Lens Distortion filter. DxO’s processing is not so haphazard and maps the known characteristics of each lens at many focal length settings and focus distances. A single zoom may need 10MB of reference data, and each different camera requires a separate process to compensate for different softening, chromatic effects, purple fringes and light fall-off.
When you buy Optics Pro 4 (current version 4.2.1) it comes with some camera and lens modules installed. DxO are adding new combinations frequently, and these can be checked for and downloaded. I was pleased to find many lenses I actually use listed for use with Konica Minolta and Sony DSLRs – you’d hardly expect this when Canon and Nikon are really all that matters commercially. I have all the lenses in the list except the Sigma 12-24mm and the kit 75-300mm. You may find some lenses missing, but you should download the nearest equivalent. Optics Pro recognised that a KM branded 11-18mm Æ’4.5-5.6 zoom could use the tables for a Sony branded one, and shots taken with the earlier lens on the A100 were automatically treated using the data for the new version.
Optics Pro also supports the Konica Minolta Dimage A2, but to my great disappointment this and all the other seriously good consumer bridge cameras with raw file formats are cut out from raw development – JPEG only. Not much use that is, when the whole point of owning an A2, or indeed a Kodak P880 and many other such cams, is to shoot raw and get DSLR quality. Amazingly it doesn’t support raw from the Sony Cybershot R-1, probably most desirable 10 megapixel fixed lens zoom camera ever made.
Spare a thought for the frustration of Nikon D100 owners, though. They also get treated to the JPEG only limitation. That is just plain ridiculous. Processing a D100 raw file can hardly be that difficult!
The Optics Pro workflow is not instinctive. It involves opening your source folder to view your files as thumbnails, but double-clicking does nothing. You must select all the shots you want, and import them into a Project. New thumbnails then appear with options to ‘Rank’ using five stars. You can turn any combination of stars on and off, making it possible to define lots of different sets of images. The idea is to give all the similar images – for processing purposes – the same ranking.

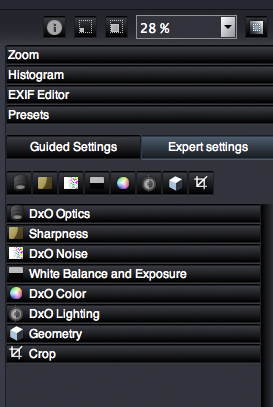
Then, you double click one of these images, and a large Enhance window appears with a superb array of tools (Toolbar menu is shown above). These include the lens correction functions, an auto-manual noise reduction module which can identify the camera’s noise profile, exposure with highlight recovery from raw, and a colour correction tab which includes ‘looks’ for different slide films, neg films and digital camera bodies.
There is also a DxO Lighting function which enhances murky dark midtones and a good unsharp mask with familiar parameters. Optics Pro uses built-in camera colour profiles (not installed in your ICC folder) but can also access any other profiles you have on your machine. I was able to output to ProPhoto RGB by locating this profile in Adobe’s app support directory.

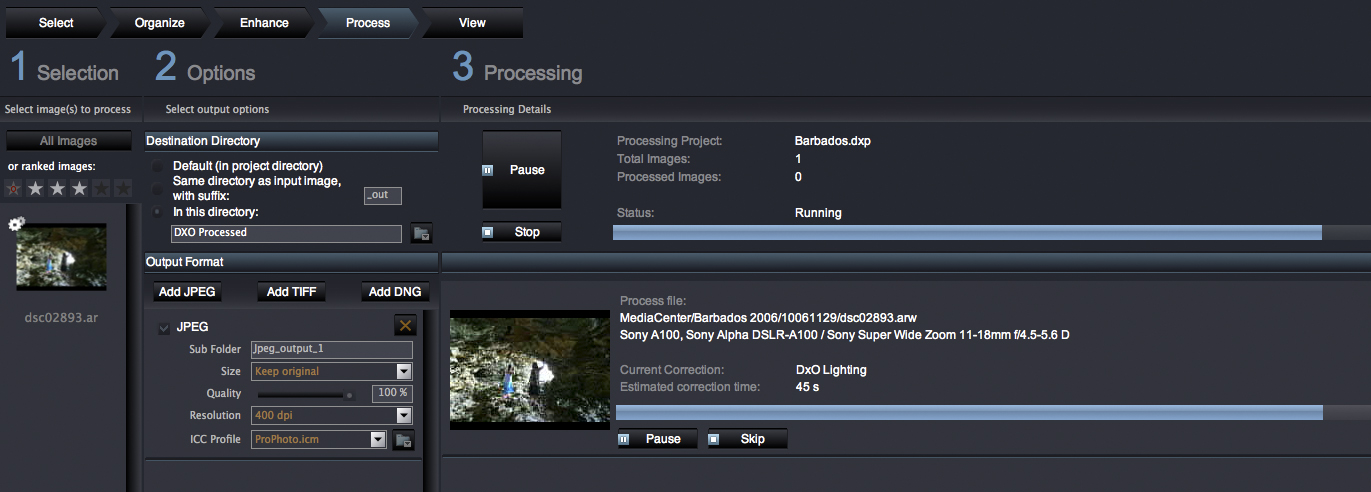
Once you have ranked your images, you adjust one example, then set Optics Pro going batch processing the entire lot, which takes time but can run in the background. Optics Pro includes a Photoshop plug-in which lets you import raw files via its Enhance stage, ideal for single image handling. If you are used to the speed of Adobe Camera Raw, however, you won’t be delighted with the productivity. That can only be achieved using the batch process method. As as of mid-June 2007, the plug-in was not updated to work with Photoshop CS3, and no definite time for development of a compatibility upgrade was given.
The dialog boxes of Optics Pro are far from intuitive; creating and selecting destination folders is a confusing process, the program tending to place its own sub-folder for filetype within any destination directory, and batch filenaming is equally rigid. You are likely to end up with files saved back to your destination folder, which doesn’t help if it is your original camera memory card still in the camera. Some people work like that. I don’t. For scaling the image in size, there are no clear options and I found the only way which worked was to ‘Keep Original’ and set a higher dpi resolution to get an interpolated-up result.
One thing DxO Optics Pro does which ACR can also do is to save to .DNG format as well as regular TIFF and JPEG. This provides a new ‘digital negative’ with extra bit depth, like a raw file, incorporating Optics Pro corrections. That’s a useful archiving function as many photographers are now converting all their various raw formats to .DNG in the hope it will remain readable for all time.
The power of this program lies in its camera and lens database, inbuilt colour profiles, and image analysis with auto-correction. Where much previewing and manual interference might be needed with Adobe Camera Raw left to auto-adjust a batch, Optics Pro can be given the task with confidence. It may be a bit tedious using such a bureaucratic-minded workflow (the program is French!) but if you can persuade your habits and mind to be tidy enough, the tedium can be occupied watching Big Brother while your files are safely processed and saved.
The Camera Looks are amazing. Images shot on the Sony A100 don’t look like those taken on the earlier Konica Minolta models, which are particularly rich in colour. Just telling Optics Pro to process the file with Dynax 5D/7D colours instantly made the weaker 10 megapixel images look like the familiar 6 megapixel ones in tone and saturation. You can also get Film Looks 1.0 and 1.1, which match the output to the gamut of many popular slide and negative films, as scanned.

Dynax 5D DxO Optics Pro ‘normal look’ from a photo by Shirley Kilpatrick

Canon 1Ds MkII Look applied – note the paler sky and lower overall saturation

Nikon D2X look with warmer (yellow bias) hues

Fujichrome Provia 100 look

Fujichrome Astia 100 look (a bit extreme, lads?)

Fujichrome Velvia 50 look – see how the foliage is more varied in colours

Neopan ACROS 100 look – and yes, this is actually very different from a Tri-X look or other monochrome choices
For the working studio, this means that a Nikon D2X shooting alongside a Canon 1Ds MkII (very different colour and contrast) can be batch processed to be similar. Not only that, but you can match to films like Kodak Portra 160NC and VC, or Fujichrome Velvia 50, which are often used for social photography or commercial stock work. Since Optics Pro has profiles for all the main pro DSLRs, this allows flesh tints and tone curve to blend with real film shots in the same shoot.
But why would anyone want to change the colour of a Dynax 7D to match a Canon 1Ds? It’s more likely the 1Ds owner would want to match the colour of the 7D, which is generally agreed to be one of the best DSLRs for colour rendering yet made. A Sony A100 owner might want to do the same! The demise of ‘Minolta colours’ has been a complaint of Sony switchers. Simulating it is not the same as capturing it, but it’s a way of matching your new shots to a familiar vivacity and fidelity of hues.

The original in-camera JPEG for a difficult shot in Barbados, with burned-out highlights, dense shadows, and an altogether too extreme dynamic range for JPEG shooting. You need to shoot raw when confronted with scenes like this. Sony A100, 1/8th at f/4.5, ISO 400, SSS on, hand-held at 11mm.
Don’t underestimate the learning curve with this program, or its capacity to overprocess images if you let it. My sea-cave shot taken in Barbados (the Animal Flower Cave, St Lucy) produced an amazing result for viewing or printing through Optics Pro, especially when compared to the very flat, colourless Adobe Camera Raw conversion below which used ACR’s Auto options. We used Auto settings because Optics Pro also uses auto adjustments, but Optics Pro appears to analyse the image in order to do so:

The Adobe Camera Raw ‘Auto’ result pulling in the highlights and using Brightness to reveal midtone detail.
It was hardly a pure image though, with lots of tonal quantisation and artifical sharpness and local contrast enhancement. What you can’t see without copying the pictures and overlaying them is how the geometry of this 11mm wide-angle shot changed, with the scale of the centre evening out perfectly.

Comparison which changes with cursor over image from in-camera JPEG to Optics Pro result.
The DxO Optics Pro automation changes the image geometry and recovers plenty of colour information – these colours are much closer to the original scene. Highlight recovery is not as successful as ACR despite being set to Maximum. The midtone contrast is so much better than ACR, which makes the shot seem flat and lacking in dimensions. The Optics Pro tone scale is better both on-screen and on the printed page. Examined at 100 per cent, the file is not as pure, and has a processed look with excessive noise reduction and compensating sharpening producing watercolour effects. But it prints superbly.
Printed in our magazine Master Photo>Digital, it looked a thousand per cent better. DxO have given me a problem. Do I need to reprocess thousands of images which have been put through ACR? Would all my pictures have that much more life? Well, despite having the latest DxO Optics Pro version and the Film Looks, the short answer is that I did not switch to using the program. My workflow is too deeply rooted in Photoshop to want to add a further involved stage of carefully planned raw conversion before editing. I also have lenses not included in its database, and with the switch from an 18-200mm Konica Minolta to a new 18-250mm Tamron, one lens which benefited greatly from distortion corrections is now gone and no new module is there for the replacement. And I use my KM Dimage A2!
For many photographers, who shoot in a different way, Optics Pro would make far better sense and offer colours and lens corrections which are impossible to obtain quickly or automatically by any other means.
– David Kilpatrick
DxO Optics Pro 4 is distributed by Alpha Digital Services Ltd in the UK: www.alphadigitalservices.co.uk/dxo
