Sony’s precision aspherics
In interviews about the new micron-accurate aspheric lens element moulding process used to increase the resolution of the latest Sony G Master lenses, a visual has appeared which shows the ‘onion ring’ effect that coarser mould machining causes in lens elements.
Working independently, I’ve been aware of this for years – and I have used a point-source photography technique to study lenses. I’m not an optical engineer or scientist, indeed I don’t even have a degree in anything. I came into photography through Victorian books and teenage years experimenting with lenses, developer formulae, building my own equipment and using observation, corollary and deduction to understand how things work. It’s helped me explain difficult technical stuff to many thousands of readers through books and magazines, without using maths or formulae, and very few diagrams.
In the Cameracraft back in 2013 I published a home-brewed rendering of aspheric moulding visual analysis.
Here’s Sony’s visual showing the difference between traditional aspheric moulding (pressed glass aspheric, as pioneered by Leica and Sigma) and their new refined pressing with better engineering.
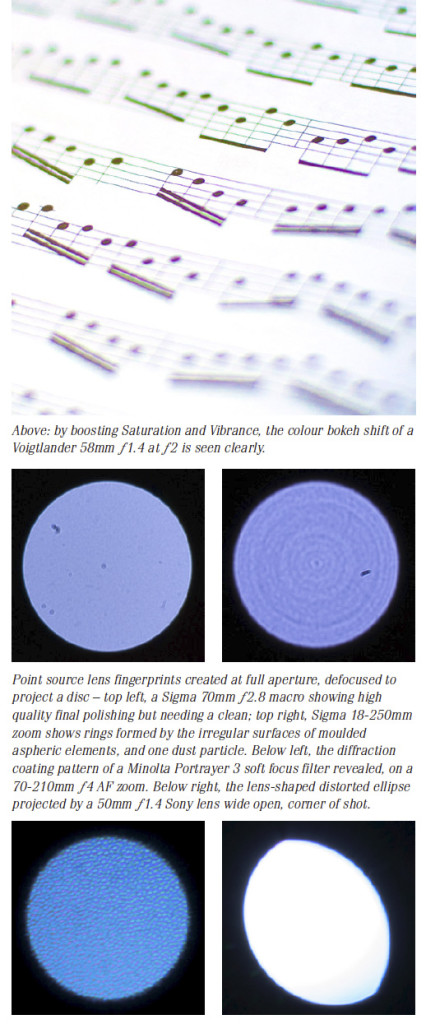
And here is my home-brewed visual from Cameracraft when I explained the bokeh and resolution issues created by pressed elements (and also, some other aspects of bokeh, which I’ll refer to below the image):
This is the clip from a 2013 article in Cameracraft dealing with broader aspects of bokeh, depth of field, aberrations and how images are rendered. You can download the two-page article here. Nine years after we launched Cameracraft the magazine is going strong, it’s a bit thicker and does have the occasional advert unlike our original, but it is still one of the best ‘never knew that before’ reads a photographer can have drop through the letterbox. You can arrange that easily enough here!
Here is the full article as a downloadable PDF.
Sony’s new superlens was not any better than the Sigma 70mm f/2.8 macro which I still use. My reasons for choosing this macro are simple – it is optically excellent and traditionally made without any aspheric or other special elements, and it uses simple focal extension for focusing, not rear or internal group movement. This means it’s a true 70mm lens even when used at 1:1 and gives the maximum lens to subject distance, for its focal length.
However, it’s MUCH better than the Voigtländer 50mm f/1.4 used for the colour bokeh shift example at the top. Sony’s information makes it clear that the new more precise aspheric moulding allows new surface profiles and the elimination of chromatic aberrations which cause this magenta-green foreground to background shift in so many otherwise excellent lenses. I’ve said that to do so, the new lenses must be what would once have been called Apochromatic, though that term has only ever meant that all wavelengths focused to the same plane and at the same scale. Even past Apo lenses can show poor colour bokeh. It’s interesting that Sigma, after years of plugging the APO (capitals not actually needed, folks!) label chose not to label some new lenses this way even through their performance matched or exceeded earlier APO models. Sony seems to be taking the same view – G Master will be sufficient label to imply very high resolution, elimination of bad colour bokeh shifts, and by implication an apochromatic performance on RGB sensors.
So will I be buying these amazingly expensive, large, E-mount dedicated lenses? Probably not. My unscientific observations tell me there are smaller, lighter, far less expensive lenses which will serve me better. Mirrorless digital camera bodies with high quality EVF and high magnification focusing allow me to do things I could never have done over 40 years ago when I took my first position as a Technical Editor (of the UK monthly Photography published by Fountain Press and edited by John Sanders). Geoffrey Crawley, editor of the British Journal of Photography, showed me how to evaluate any lens quickly with the help of a light bulb, a darkened studio, a roll of background paper and a sharp pencil. Back then you had to expose film, now you can just look through the finder. In a photo store, any LED spotlight will do for a quick check. Focus centre, magnified to max, at full aperture. Move to all corners in turn without refocusing, magnify each time. Refocus each corner in turn when magnified, examine change in rendering of point source. Buy the lens which shows symmetrical, balanced results and the best sharpness of the corners when the centre is correctly focused. Do this with a light source at least 3m/10ft away and if you can, even further. Repeat one stop down, two stops down, with zooms repeat at three or four focal lengths across the range. Never do it at close distance (hint: lens test chart results are only good for the distance you photograph the chart from, which is why Imatest, DxO and other labs have test targets the size of a wall and industrial sized space to work in).
And, if you have a single LED bulb or miniature LED torch, you can examine any of your lenses in a darkened room and produce a ‘bump map’ which will reveal its moulding defects, scratches or fungus, blemishes, and population of dust and microfauna.
– David Kilpatrick
For our PDF and App editions, go to Pocketmags where you’ll find Apple iOS, Android and all the usual choices to subscribe or buy individual editions.

And if you really want a trip back in time – there were huge changes between 2012 and 2015. Cameracraft documents the rise of mirrorless, the growth of hipster retro, and the discovery of older manual lenses as it happened. You can read a full set of the 12 issues via this one-off YUDU subscription:


