I’m about to offend myself. I own this lens, and I know how upset owners of brand new lenses get when someone says it’s not perfect. Well, the 16-50mm SSM is far from perfect and if you know how to check out lenses, you’ll agree should you be lucky enough to own one. It’s a compromise. But I love it.

Here’s the problem; this lens has such soft corners and complex distortion at 16mm and f/2.8 that it makes the NEX’s legendarily reviled* 16mm pancake look like a Super Angulon in disguise. It’s got a curved field at 50mm and stopping down does not always bring distant scenes into perfect focus across the frame. It suffers from rampant chromatic aberration which just becomes a dead-sharp fringe on stopping down. *Not by me!

This shot was taken on a preproduction A77 and 16-50mm. I was not supposed ever to show it. But I know there is no fault with the shot, the pre-release gear was just fine. And I really like the minimum focus, at 50mm, at f/2.8!
Yet it also has exceptionally high central sharpness, great colour and contrast, and a lovely quality to its differential focus. That’s the old traditional English-language term for the context in which people over-use the term ‘bokeh’, and deserves to be revived. With f/2.8 to play with across the entire zoom range, you can use differential focus creatively. At medium settings, 24-35mm, the distortion disappears and the sharpness extends corner to corner wide open. You have to set it to 50mm to lose the edge.
More than this, the 16-50mm SSM is a video-tuned lens. Its natural host camera, the Alpha 77, crops the frame considerably when shooting HD video. The soft corners and even most of the distortion don’t get a look in, they are outside the video area. The standard and 3D pan modes of the A77 also crop out the problems. The focus action and silent supersonic motor of the 16-50mm are ideal for A77 video shooting with active AF (if you want it) during takes. The f/2.8 aperture allows the lens to be stopped down to the optimum f/3.5 used for movies and also for high speed (12fps) mode, and have no issues with aperture shifts if the focal length is changed.

The Carl Zeiss 16-80mm, left, is smaller than the Sony 16-50mm SSM.
After testing the lens, I decided to keep my 16-80mm CZ which is now five years old. It’s not just the different quality of image produced by the CZ coatings and design, or the very slighter better close-up ability (you can’t get quite as close but at 80mm the subject scale is a touch bigger on the CZ – the 16-50mm wins at 16mm, where getting two and half inches closer to the subject makes a real difference). The CZ is lighter, takes 62mm filters rather than 72mm, and is considerably smaller with lens hood size adding to the difference. Working in the field, it is a lens which can easily be held in the hand with fingers free to operate the lens-mount release button, hold a rear cap, or even another lens – the usual juggling of two lenses which photographers get used to.

With lens hoods fitted, the overall relative sizes become more obvious. The SSM lens has an attractive metal front ring, a new trademark of higher-end Sony lenses, shared with the 70-400mm G.
The 16-50mm is at the limit of diameter, shape, balance and weight to be safely gripped with another lens in the same hand, even briefly during the process of swapping over. That’s not to say it is cumbersome, just that the 16-80mm is faster and more secure to work with because it’s that little bit smaller and lighter.
Once on the camera, I have to say I like the overall balance created by the 16-50mm. It tends to help the A77 hang lens-down, a position I prefer with the camera under my left arm and the strap over my shoulder. The zoom action is super-smooth and well damped, and also has a lock which operates at 16mm to prevent gravity-fed creep, and keep the action firm in future.

No creepy zooming – thanks to Royal Mail, and their neat Sony-coloured rubber bands which are a perfect fit to go on the CZ 16-80 and make the zoom action super-smooth and stay put!
My CZ is now well used and over-free in action. A rubber band to go over the front end of the zoom ring is the cure! You can get proper broad Alpha-ish orange silicone rubber ones from Lens Band as well as the free orangey-red ones used in the UK to hold our postal deliveries together. My way of using a rubber band is not quite the same as Lens Band’s method, it goes over the flush seam between zoom ring and lens barrel on the 16-80mm and it doesn’t just hold the zoom, it smooths the zoom action.

The zoom lock on the 16-50mm was missed from the 16-80mm… missed by all owners, that is. The 16-50mm has a type of raised moulded marking. Durable? Maybe not. The similar raised ‘P’ on my A77 mode dial is now a ‘D’ having lost its stalk.
The best shots I’ve got from the 16-50mm are as good as the best from the 16-80mm, but I can trust the CZ more in the 35-80mm range. From 35-50mm the SSM becomes increasingly soft and sharpness towards the edges of the frame can be poor. At first I thought this was only at full aperture, but shots at apertures like f/5 and f/7.1 were affected. I compared my own lens with two pre-production Sony samples I had used months earlier; we were told not to release images taken with these. The degree and type of sharpness loss was identical, enough for me to conclude this is a characteristic of the lens and not a coincidental case of rogue lenses.
Major plus points for the 16-50mm include focus accuracy, which is much better than the 16-80mm on most Alpha bodies. The f/2.8 aperture activates higher accuracy sensors, such as the Alpha 700’s central point and the extended range of the 11 cross sensors of the Alpha 77. When used on the Alpha 580 for live view pre-shot AF, or on the NEX models with the original LA-EA1 contrast-detect AF adaptor, both focus speed and accuracy are optimum.

The SSM lens has an AF/MF switch but no on-lens button control. Direct Manual Focus is supported and unlike SAM (conventional in-lens motor) lenses, the supersonic drive is not damaged by moving the focus ring without engaging MF.
Despite the large area of glass, the 16-50mm is no more prone to flare than the 16-80mm. The new Sony coatings used for this lens (water and oil/dirt resistant, very hard, similar to Nikon’s NanoCrystal) do a great job. And, of course, they are part of the final reason I am keeping this objective. It’s weatherproofed to some degree, as is the Alpha 77 body. Reports vary between dowsing with a bucket of water without harm, to reluctant use in slight drizzle. I think I’ll get myself a Sigma EX DG filter for my lens, as these have the same coating now and they are about the best slim-mount UV filters made for optical quality without paying Hoya Pro1 Digital prices.
Also, with the 72mm filter thread, there seems to be less need for a super-slim filter. The CZ lens suffers from very strong mechanical vignetting at both ends of the scale, producing dark corners at 16mm or 80mm alike. At 16mm, depending on the position of the SSS/AS sensor-based stabilisation, a dark corner can be well enough defined to need cloning out or the image cropping. The 16-50mm SSM has no such issues. Not only is optical vignetting well-controlled, the mount does not create any dark corners.

These dark corners are created by adding vignetting and grads in raw processing. The 16-50mm, at 24mm, turns in great shadow to highlight detail without a hint of flare; 1/50th at f/9, ISO 100, hand-held with SSS – mid-January in the Scottish Borders. When I pulled up to shoot this, a car with two camouflage-kitted big Nikon and Canon multi lens ‘serious enthusiast’ shooters pulled in alongside. They were still struggling with tripods, a kissing-gate, a stone wall, lenses and car by the time I’d got the sunray shot (which disappeared in seconds) and left. I just carry my Alpha 77 – but then, I’m not a ‘serious enthusiast’ and my ideal camera would be invisible and with me all the time. I’m a panda – sees shoots and leaves.
Though Sony owners may be reluctant to admit it, the SSS mechanism can decentre the sensor and if the lens coverage is so tight it barely covers the corners of the frame (16-80mm and 16-105mm both guilty) you can get the occasional asymmetric dark corner. I’ve never seen this yet from the 16-50mm. But when I check the 16-80mm against the 16-50mm using the Alpha 900 full frame finder to examine the image circles, if anything the 16-80mm has more apparent clearance round the extremes of APS-C, with a softer gradation. The 16-50mm has a tight exact circle.
I have also checked the way the 16-80mm and 16-50mm focus as you zoom. Though the CZ is not perfectly parfocal. That term describes a zoom which retains exactly the same focus point, as you zoom. Video and TV camera lenses are parfocal, otherwise, the focus might ‘go off’ during a zoom. The CZ is nearly parfocal, just a touch varifocal. That’s the opposite term, and means a zoom which changes the focus as you change focal length. At one time, varifocal lenses were not actually called zooms; they date back to the 1920s, and J H Dallmeyer’s adjustable telephoto lenses. Konica made a famous 35-100mm f/2.8 Varifocal in the 1970s.

Silent focus, silent A77 camera (almost), 16mm and ISO 800 at f/3.2 – with ACR profile correction. Café society, Hawick.
The 16-50mm is either a perfect parfocal zoom, or so close you will never know. It is possible to focus at 16mm, and zoom in to the subject. This can only happen with very accurate focus, and a parfocal zoom. Try it with the 16-80mm CZ and you will see the image go out of focus, not to mention clicks and jumps in brightness changing as the aperture adjusts (that’s because the CZ is a variable maximum aperture lens, f/3.5-4.5). The 16-50mm can zoom during video, in or out, without losing the original focus point and without any brightness change or aperture adjustment.
Now you may understand why I want to keep this lens even though – unlike some enthusiastic new owners – I find that its sharpness across the field is not actually as consistent as the CZ. It is a far better overall match to the Alpha 77 especially for video work. But in January, I chose the CZ in preference for a week abroad, and I would most likely do so again.
The Alpha 77 (and 65) include built-in correction profiles for this lens. They are so effective that when I first saw JPEGs from it, I thought the geometry was perfect. If you intend to use the lens for JPEG and movie shooting, any criticisms can be moderated. The correction profile can not improve sharpness, and it does change the effective focal length slightly so than you don’t get a true 16mm.
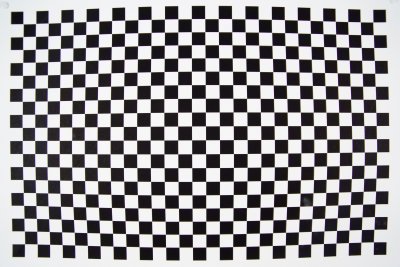
This is a straight-on shot of the Adobe chart used (not this way, shot nine times per full frame) for profile creation and it shows how very bendy the 16mm f/2.8 setting is at this range, the target is A2 size. Click image to see full size.
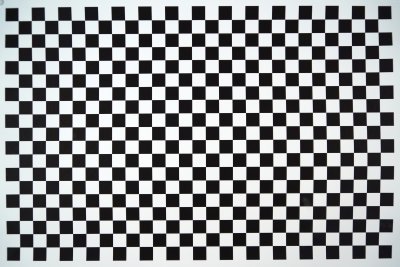
This is the same, but JPEG with the in-camera correction enabled.
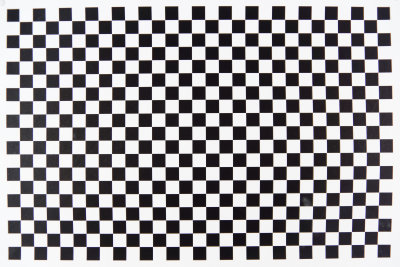
This is the same, with the Adobe Lens Profile I have created and sent to Adobe, applied in raw conversion of the first example. Please note that the Adobe profile applies to shots taken at three times this distance or more – these profiles, like the in-camera profile, are never much good at rigorous correction of geometric targets shot a couple of feet from the lens.
For Adobe Camera Raw, I have made a profile for the lens which covers three apertures (f/2.8, f/5.6, f/11) and three focal length settings (16mm, 24mm, 50mm) between all of which ACR will interpolate correction values. Because the extreme corners of the image go so much out of focus when shooting the target (refocusing ruins the profiling process) I don’t think this profile handles chromatic aberration as well as it could. The profiling program needs a sharp image of the RGB colour channels to work out their relative scale, which is how CA is corrected. Applying 150% CA correction, instead of the default 100%, seems to improve the conversion.

Here is an uncorrected real-life shot on the 16-50 and 16mm, 1/125th at f/9, ISO 200 (click image for full size 24 megapixel view, and note the chromatic aberration at the left end of the shot especially).

This is the same raw file processed using the Adobe Lens Profile I have produced for the lens.
You can dowload from here the 16-50mmA77rawAdobeLensProfile, hopefully it will also become available from Adobe’s user-created download area. Unzip the file to extract the .lcp file, and place this in your Application Support/Adobe/CameraRaw/LensProfiles/1.0/Sony directory. You require Photoshop CS5 to use the profile.
So what is my conclusion? I do not agree with some of the over-the-top reviews including one to be found on the Sony store USA site claiming it’s the best zoom of this range and aperture for any system. It is not, you get more than you pay for (much less than a lens of this specification might cost from others) but not an optical miracle. You get a very well designed optical compromise housed in a particularly good mechanical design. I would compare it favourably with Olympus’s waterproof ‘Top Pro’ range fast lenses for 4/3rds. I think it can claim to match Canon’s 17-55mm f/2.8 and Nikon’s similar lens, I’ve used both and the Sony is rather neater. It’s probably a little better than the Pentax/Tokina 16-50mm f/2.8, which it most resembles but definitely is not related to.
It’s different from the CZ 16-80mm, not better or worse; it has a different mix of good qualities and failings. The obvious competitors are Sigma’s 17-50mm f/2.8 OS and the Tamron 17-50mm f/2.8. The Sigma offers Optical Stabilisation. The Tamron is now an older design, replaced by a new VC stabilised version for other mounts, but still issued without stabilisation at about 60% of the price of their VC versions, for Alpha. It is the lowest-cost option in this range.
The Sony Alpha SSM 16-50mm f/2.8 DT lens is supplied with rear cap, 72mm lens cap, and bayonet petal hood. It does not come with a case or pouch. My lens was purchased ‘white boxed’ – that is, split off from an Alpha 77+16-50mm kit by a dealer and priced accordingly. The lens is only available with the A77, or as a separate item; it is not currently offered as a kit option with the Alpha 65 or other models.
– David Kilpatrick
Check the current price from B&H Photo Video – remember, B&H ship worldwide and for the UK buyers, offer a UK service.
Technical Data (Sony information) amended to remove nonsense
- Lens Type : Standard Zoom
- Focal Length 16-50mm (35mm equivalent 24-75mm)
- Lens Mount Type : Sony A-mount, SSM in-lens supersonic motor focusing, electronic coupling
- Aperture (Max.) : f/2.8
- Aperture (Min.) : f/22
- Filter Diameter : 72mm
- Lens Groups-Elements : 13 groups, 16 elements
- Minimum Focus Distance : 12″ (30cm)
- Distance Encoder : Yes
- Distance Scale: Yes
- Angle of View: 83°-32°
- Non-rotating Filter Thread : Yes
- Aperture : 7 blades (Circular aperture)
- Lens Weight : 20.4 oz (577g)
- Maximum Magnification : 0.2x
- Dimensions (Approx.) : 3-1/4 x 3-1/2” (81 x 88mm)
Compare the 16-80mm Carl Zeiss technical data:
- Lens Type : Standard Zoom
- Focal Length 16-80mm (35mm equivalent 24 – 120mm)
- Lens Mount Type: Sony A-mount, in-body motor focusing via mechanical drive coupling
- Aperture (Max.) : f/3.5 – 4.5
- Aperture (Min.) : f/22 – 29
- Filter Diameter : 62mm
- Lens Groups-Elements : 10 groups, 14 elements
- Minimum Focus Distance : 14.4” (36cm)
- Aspheric Elements : 2 aspheric
- Distance Encoder : Yes
- Distance Scale : Yes
- Angle of View: 83°-20°
- Non-rotating Filter Thread : Yes
- Aperture : 7 blades (Circular aperture)
- Lens Weight : 15.7 oz (445g)
- Magnification : x 0.24
- Dimensions (Approx.) : 2 7/8 x 3 3/8” (72 x 83mm)


